Showing posts with label iron-on transfer. Show all posts

Tuesday, December 31, 2019

Reviews & Previews: Topics and Projects for the New Year

Mushrooms, crewel embroidery by Annake
Crewel embroidery by Annake (in progress)

Now that the art shows and craft shows are over for a while and we have caught up with most family and charitable events, we have time to look toward our plans for next year. While we work the shows, we try to jot down notes about questions we are asked by customers and comments made by people who just stop by the booth to look and chat. We try to show several kinds of artwork and photography when we do art shows and many kinds of needle arts and other handicrafts when we work craft shows. We base a lot of our plans for future articles and activities on our notes and the reflections that they generate.
Original crewel embroidery by Annake
For example, a sweet young lady bought a framed piece of crewel embroidery. She asked me what kind of embroidery it was. She had never heard of crewel.  I explained that it was done on fabric, not canvas, with fine wool yarn rather than embroidery floss — although I do sometimes do surface crewel embellishments on top of finished canvas work.  (There are good acrylic yarns that can be substituted if a person has an allergy to wool or doesn't want to pay the prices for wool). Some of the stitches used for floss embroidery are used for crewel (and most can be), but there are other stitches that are more popular for crewel than for other techniques like counted cross-stitch. We gave her our business card and told her how to use  the search engine on this blog to locate past articles on crewel and on stitch "families".

Heirloom crewel pillowslip from Annake's collection

Tracing a drawing with transfer pencil
Later a lovely white-haired lady complained that it was so hard to find stamped patterns for crewel embroidery. I told her that I make my own patterns, so I had not been aware of how serious the shortage had become. I suggested that she might find some at thrift or charity shops, as people might donate them rather than discard them.

By this time I had concluded that it was high time for me to revisit the way to make iron-on patterns for all kinds of embroidery, and I plan to re-visit crewel embroidery and demonstrate more of the "families" of stitches that are most appropriate for it. So you can look for those articles to appear early in 2020.

Assisi embroidery rose by Annake
Another type of needlework that got quite a bit of attention was Assisi work. This is something that should be fun for counted-cross-stitch fanciers who are looking for something new (although the art is very old). It can also be done in canvas work if you have a nice white or tinted canvas to use for a background. Look for an article on the subject, its origins, how it was initially used,  along with illustrations, directions for a modern version of it,  and a pattern or two early next year.


Star pillow, original design by Annake
Another young lady bought a pillow with a central motif of a starburst. She asked if the design was done in flame stitch. I assured her it was and was privately delighted that she knew the term (a common name for a particular kind of bargello stitchery). She was surprised and pleased that it could be used for working out from a center in different directions. she left with business cards for herself and a friend. I promised her some new articles on bargello with emphasis on linear designs and designs radiating out from a center, like 4-way, 6-way, and 8-way designs. So look for those as well.

I will be continuing the series on Color in the New Year, starting with an article tentatively titled "The Non-Colors: Black, White, Grays and Metallics".   J.D. also has some topics he wants to pursue.

We also pay attention to comments and questions from our readers, as you can see in our seasonal Question and Answer segments. We are very gratified by the questions addressed directly to this blog and try to answer as many as we can, sometimes combining questions from more than one reader. Here are some recent examples

What special project are you currently working on?

I am currently working on a project suggested by the work of Erin Henson, California landscape artist, who has done an entire gallery show in paintings done primarily in the color orange. I couldn't pass up that kind of challenging project! She also does beautiful renditions of scenes in U.S. parks and monuments.  Those are subjects I really like, as you can see in these needlework pictures:

Cascades and Monterey Cyprus, needlepoint landscapes
"Cascades" and "Monterey Cyprus", needlepoint landscapes by Annake

and in this latch-hook rug.

Delicate Arch latch hooked rug by Annake
"Delicate Arch", latch hooked rug by Annake
However, my real love is doing pictures of animals. I am currently working on a mixed media piece involving both a color rendering and collage elements. I'm going to use many shades of orange (remember that brown is considered in the orange family) along with white, black, and grays. I will show a photo of the new project as soon as it is completed (or perhaps in stages of development).

Did the soccer players finally get their heads?

Yes, after having been lost temporarily in the flood of fall and winter projects. the fabric collage looks very like the original sketch, but I will show it at some future time.

Are we going to get more blackwork patterns soon?

In the previous post I promised more Spanish blackwork patterns and more optical illusions, so I'd better get busy designing and stitching!

Wishing you a safe and happy New Year,


 Creative Commons LicenseThis post by Annake's Garden is licensed under a Creative Commons Attribution-NonCommercial-ShareAlike 3.0 Unported License.

Monday, October 2, 2017

Still Life in Needlework, Part III

Still life shapes
In Part II, I promised to show you a technique in which you could do a still life in black and white only. This is one of several related embroidery techniques which spread across parts of Europe after the Renaissance and eventually found their way to the Americas. It is called Spanish blackwork. Its patterns can be used in other styles of single-color embroidery, such as Russian redwork and Scandinavian whitework, as well as a multicolor style like Holbein embroidery. My choice of objects to portray is shown above in a photo that J.D. took at the beginning of the project.

I'm going to take you step-by-step through a still life picture in blackwork. The original 16th century blackwork was done in black silk and gold thread on white linen. I urge beginners in any of these monochromatic stitch techniques to begin with black floss on quarter-inch checked gingham because it is so much like graph paper. It is easy to work out the individual patterns (called diaper patterns) on graph paper and then repeat each individual line with a single stitch.

"Cat Nap," blackwork embroidery on 1/4" checked gingham

If you have done counted cross-stitch, you may want to work on the smaller “baby check” gingham to get more complex-looking patterns. I prefer pastel checks so the blackwork design stands out dramatically. If you are working on “baby check”, you may want to divide your floss and use only three strands instead of six. The stitch used for the patterns is a simple back-stitch.

Hot iron transfer for still life
In order to have a truly black and white (and gray) design, I'm going to work on white monks' cloth, where the squares are indicated by tiny spaces in the weave at each square's corners. I begin with a piece of monks' cloth that I have backed with interfacing and basted around the edges. I find the vertical and horizontal center lines of the fabric and mark them with a running stitch in a color other than black. This is to center my design; the colored stitches are pulled out after the design is worked. I made a hot-iron transfer of my design outline and transferred it to the fabric. (The transfer will reverse the design, so I studied mine carefully from the back against a bright light to make sure it worked well in reverse.) I chose the area to begin and used an embroidery hoop.

You will need a sharp-pointed crewel needle with an eye large enough to accommodate the floss and several skeins of black six-strand embroidery floss. I like to have several needles so I don't have to stop as often to thread my needle. I was working on monks' cloth, which is comparable to “baby check” gingham, I divided the floss to use three strands. Here is a picture of the first completed section, and close-up of the pattern used for it. Each line on the pattern is a single stitch. Stitches begin and end in the same spaces at the corners of squares.

Blackwork embroidery, Step 1: the Vase

Stitch pattern for the Vase
Tip #1: The Vase. When you are stitching a pattern over an object with a complicated shape, begin at the widest part of the object. Start at one side and work the pattern line to the other side. Then stitch the pattern lines in order both to the top and the bottom of the object.

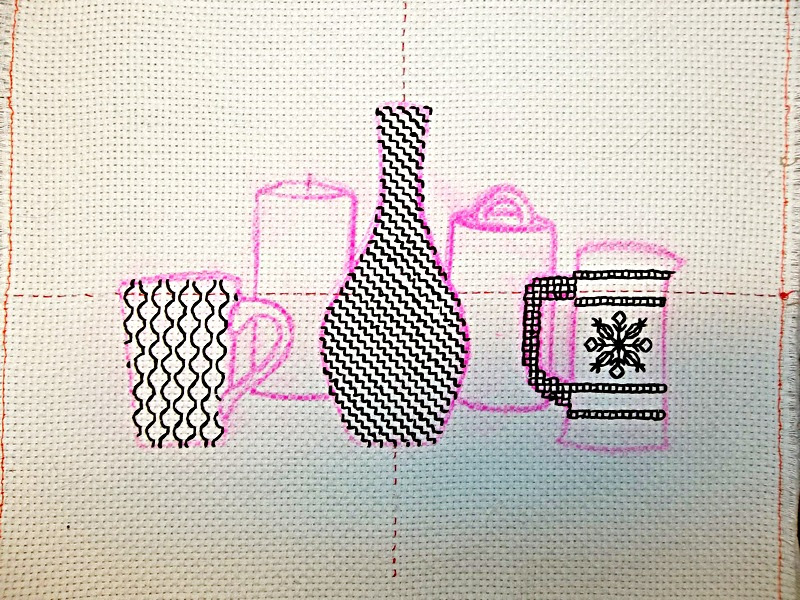
The next series of pictures show each of the other sections as they were completed, accompanied by a close-up of the graph-paper pattern for each. The lighter I wanted the section to be, the simpler the pattern I used; the darker I wanted it to be, the more complex the pattern.

Blackwork embroidery, Step 2: the Pitcher

Stitches for the pitcher


TIP #2: The Pitcher. When you are stitching a radiating pattern like this one, find the exact center of the place you want it to be and mark it lightly with a pencil. Begin there at the center of the design; work outward, one step at a time.


Blackwork embroidery, Step 3: the Cup

Stitch for the Cup
Stitch for the Cup
Tip #3: The Cup. As you reach the border lines of the section, make as much of the pattern stitches in each square as you can without crossing the border-line. When your outline of the shape is completed, there may be small gaps where the pattern doesn't quite reach the outline. Fill these in with tiny stitches.


In this project, I concentrated on shape, pattern, and perspective only. If objects of the same size are placed side by side, the one with the faintest outline will seem the furthest away. If you make the objects overlap, so that the more faintly drawn objects are partly covered, you have started the illusion that they are behind the darker figures and are farther away from the viewer. This is called “recession in space”. This illusion can be considerably increased by combining it with lighter outlines. Because I wanted to draw your attention to this visual device, I used gray floss for the two objects “behind” the front three. You will also notice that their bases appear to be on a higher plane. You can use all these devices in your own still life projects.

Blackwork embroidery, Step 4: the Birch Bark Box

Stitch for the Birch Bark Box
Tip #4: The Birch Bark Box. Instead of back-stitch for this pattern, I used a simple running stitch. The marks on the birch bark appear in clusters on the box, but I didn't think that would show up sufficiently so I used the stitches for the entire pattern. I left an empty space for the line indicating the bottom of the box lid.


Blackwork embroidery, Step 5: the Candle
Stitch for the Candle


Tip #5: The Candle. Here the back-stitch is used vertically. Be sure that your stitches are as straight as possible. To make the wick more visible, I stitched it in black instead of gray.


Finally, I covered the outlines with solid lines of stitching. I wanted a bold, modern feeling to the picture, along with many contrasts, so I used the full six strands of floss for the outlines. I chose chain stitch, but I could have used back-stitch, outline stitch, stem stitch or any of several other stitches. I outlined the gray objects with the same number of strands of floss that I had used for the black ones. You might prefer a more delicate treatment. J. D. has shown here how it would look outlined in three strands of floss in a back-stitch or outline stitch. I then removed the colored centering stitches. A quick hand-washing in the sink with dish-washing liquid removes the remnants of the iron-on pattern. Follow this by a rinse and pressing with an iron set on 'cotton', and it's done.

How the still life might look with narrow outline stitching

To make your own blackwork still life, start with a simple outline pattern. Follow the directions for preparing the material. Use the patterns I used, see additional patterns on the posts for October 6, 2013, October 18, 2013, February 21, 2014, and January 15, 2017 or make up your own.

Now, you are ready to transfer those outlined areas of your design to your fabric. You can place your outline on a light-box or tape it to a sunny window-pane and trace it directly on your fabric., or you may want to use a hot-iron transfer. For directions to make one, go to the post for October 6, 2013. For more on monks' cloth, see see the post for April 30, 2014.

Go make something black, white, and beautiful!


Finished Blackwork Embroidery Still Life

Updated October 10, 2017, to replace all the illustrations Google Photo somehow lost :-p


 Creative Commons LicenseThis post by Annake's Garden is licensed under a Creative Commons Attribution-NonCommercial-ShareAlike 3.0 Unported License.

Sunday, November 20, 2016

Stylish Seasonal Sweatshirts


Decorated jacket from sweatshirt
Here in the high country it is possible to wear sweatshirts for at least part of three of the four seasons. The garments are sturdy, economical, machine washable and colorfast. I buy them whenever I find them on sale. Be aware that they are on sale for a reason. Check carefully for flaws before you buy. Another thing that you should be aware of is that the sizes are not always accurate. I have five now that are all marked “Large” and no two are the same size! Hold them up at arm's length to get a better idea of their real size. Decorated sweatshirts are durable. To illustrate that fact, here is a shirt I decorated and have worn regularly for the past ten years. It has been laundered scores of times.

apple applique sweatshirt

print fabric panelYou can buy ready-printed panels for applique, although these are more often intended for use as pillows, table linens, etc. These are usually sold as a separate unit, rather than by the yard. Many of them need to be trimmed down in size the be used as appliques for sweatshirts. You can make your own panels from calico prints or the kind of illustrated fabric usually classified as “Country” (i. e., rural or pastoral scenes, farm animals, people in old-fashioned costumes, etc.); that's what I did with the apple design above.


sweatshirt with raglan sleeves
Look carefully at the sleeves of your chosen sweatshirt before you choose a panel or make a pattern. Most sweatshirts have set-in sleeves that curve slightly toward the center of the shirt above a straight up-and-down side seam. But other shirts have raglan sleeves. These sleeves slant upward at an angle, joining the shoulder seam much closer to the collar. This narrows the area available for applique. You may find that a circular. diamond-shaped, or free-form design will fit a raglan-sleeved shirt better than a square or rectangular one.


I mark what part of the fabric I need for the applique with tailors' chalk and then add a 3/8 to ½-inch (1 to 1.5 cm.) border all around that will be turned under, leaving a smooth edge. After turning it under, I press the piece, making sure the edge is flat and straight. Then I am ready to pin the applique in place on the sweatshirt (using lots of pins). I baste the piece in place, remove the pins, and sew the applique to the shirt either by hand or by machine. If I like, I then edge the applique with rick-rack, braid, or cotton lace.

Green sweatshirt with large applique
Green sweatshirt with large applique. Note the lack of raglan seams.

Red sweatshirt with round appliques

Even small pieces of patterned fabric can be used effectively. Here is a finished shirt with a seasonal theme. I decorated it with three circular pieces cut from the same fabric and arranged in a triangular pattern. Each circle was then edged with gold trim. Small motifs like this can be arranged horizontally, vertically, diagonally, or in squares, diamonds, circles, etc. Try pinning the pieces in several different arrangements and choose the one you like best.


Embroidered sweatshirts are a little more complicated, especially if you are decorating a dark-colored shirt. If you are working on a light-colored shirt, you can use a commercial iron-on transfer (following the directions on the envelope) or make your own hot-iron transfer (see the post for May 12, 2016). For dark-colored shirts, I usually draw my design on thin tissue paper and pin it to the inside of the shirt front. Then I back-stitch along the pattern lines with white thread, floss, or yarn. This gives me an easy-to-follow outline on the right side of the shirt. I remove the tissue paper and discard it. The white stitches can be removed from the finished embroidery later if you like; I just work over them to hide them.

Steps in sweatshirt embroidery
Steps in sweatshirt embroidery, as described above

Today, however, I have something even better to work with! These are patterns I drew with transfer pencil on non-woven interfacing. They have already been used to transfer the flower designs onto a pair of pillow tops. I then filed the patterns for future reference. Now I can pin them to the insides of shirts and stitch along the lines with white thread, floss, or yarn. I simply leave the interfacing in place to further strengthen the embroidery.

used iron-on transfers
Recycled iron-on transfers of lily and pansy

All of the items I have shown here have been for adults, but the same techniques work well on sweatshirts for children. Animals, cartoons, sports logos, superheroes, and many other topics are appropriate. If there are no children in your life, clothing like this is always in demand at women's shelters and emergency services. You and your friends could take on a project like that and have a lot of fun getting together to make the shirts.

I regret that I have written fewer posts lately. J.D. and I have been as busy as long-tailed cats in a room full of rocking chairs, dealing with craft shows and sales. We have another three weeks or so of that and then I will be able to get back to my regular writing schedule. Until then...

Stitch away!



Finished embroidered sweatshirt with detail


 Creative Commons LicenseThis post by Annake's Garden is licensed under a Creative Commons Attribution-NonCommercial-ShareAlike 3.0 Unported License.

Sunday, January 31, 2016

Interlaced Hearts: Chain-Stitching Around Curves

Embroidered Vest Pocket
You have now practiced several different kinds of chain-stitch, along with a number of ways of modifying those stitches. There will be more varieties of chain-stitch in the future, which I recommend you continue to practice along straight lines of pulled thread until you have mastered them. It is time now, however, to use what you have already learned and to practice it in an actual design.

Embroidered Vest Back
One of the most popular characteristics of chain-stitch is its flexibility. This makes it ideal for embroidering curved shapes and loops like the ones embroidered in silk on this decorative vest. Look, for example, at the detail in these pictures. Now it is time for you to take a pencil or a permanent marker and draw a variety of curves and loops on your practice fabric. Place the fabric in an embroidery hoop or a frame and embroider the curves and loops with the stitches you have already learned. This will tell you which ones follow curves best, as well as showing you which ones you most enjoy using.


Bird in Beauvais Embroidery
Plain chain is also very useful for filling blank spaces and the insides of closed shapes. This kind of solid chain stitch is sometimes called Beauvais embroidery. The bird on this purse is an example of that. Draw a closed curved figure circle, oval, heart, etc. on your practice fabric. It should be at least a couple of inches (4 to 5 centimeters) across. Embroider around the outline in plain chain, turning your work as you go. But don't join the last stitch to the first. Instead, keep stitching just inside the finished chain stitches, getting as close to them as you can. Continue in this way until the entire shape is filled solid with stitches. Carry your yarn to the back of your work and secure it under finished stitches. It is possible to start in the center of a shape and work outward, but I find this more difficult to do. Remember to keep turning your hoop or frame as you work.

Iron-on Transfer
Iron-on Transfer
In the May 12, 2015 post, I promised to make a design based on one of the free-hand painted patterns on my Costa Rican cart. I have done a simplified outline design which you can download and copy. You will find it at the end of this post. I then made a hot-iron transfer of the design and ironed it onto light gold Aida cloth. (There are other ways to transfer a design, but this is one I use regularly.) For more information on making your own hot-iron transfer, see the post for October 6, 2013. The transfer is pictured here.


Interlaced Hearts, Step 1
I made a completed crewel picture, emphasizing the heart shapes in the design. You will see stages of the work, in progress. For the first stage, I outlined the heart shapes in various chain-stitches, using a variety of reds ranging from a dark maroon to a bright pink. I also filled in small empty sections with Beauvais embroidery, using the same reds.

Interlaced Hearts, Step 2
In the second stage, I worked various sections in other colors, using more chain-stitches. I employed a number of techniques, such as back-stitching, lacing, double-stitching, etc. Once this was done, I washed the piece carefully in lukewarm water and a gentle liquid detergent to remove all traces of the transfer pencil. I hung the fabric to dry and later pressed it on the back with a warm iron and replaced it in the embroidery hoop. (Pull yours taut in the hoop to keep the fabric from wrinkling. This will make it easier to block when it is finished.)


In the last stage, I added details and embellishments with a fine white yarn. I like to do white embroidery last on a project. This means that the work is not handled as much and that there are fewer chances of the white yarn or thread getting dirty or discolored. Finally, the design went to J.D. to be blocked, backed, and framed. Here is a picture of the finished project.
Interlaced Hearts Embroidery, Finished and Framed

Embroidery Pattern
Click to Download Embroidery Pattern


And here is the pattern to embroider in your choice of fabric, yarns or flosses, and most of all your favorite stitches. I added a few details to my finished embroidery that are not on your pattern. I would expect you to do this also to your project to make it a one-of-a-kind piece that is uniquely your own.

Happy hearts to you,


 Creative Commons LicenseThis post by Annake's Garden is licensed under a Creative Commons Attribution-NonCommercial-ShareAlike 3.0 Unported License.

Contact Us

Name

Email *

Message *

Blog Archive