Showing posts with label animal puppets. Show all posts

Sunday, July 31, 2016

For the Wee Folk

some of Annake's puppets
Some of Annake's many puppet designs
If you have followed this blog for some time, you have read about my puppets occasionally. I started making them for my own children, made more for the children of family and friends, and used many as teaching aids throughout the years.

Earlier this year (February 29, 2016), I showed a puppet made into a simple stuffed toy. I call these toys ‘loveys’ because they remind me of simple, even crude, toys called that which I saw as a child when living in the southern United States. Here are some other examples:

loveys
'Loveys", made from Annake's puppets

Lately I have begun combining the ‘loveys’ with another of my favorite pastimes, making afghans in this case, baby afghans. I've never cared much for the “Pink is for girls, blue is for boys” idea. Babies don't see pastels very well. The first color that babies really focus on is usually bright red. Toy manufacturers know this and make good use of the fact. I used bright colors for my children and incorporate them in most of my afghans.

big red barn afghan and lovey
"Big Red Barn" afghan/lovey set

I mean for the afghans to be used long after they are needed to wrap a tiny baby. I envision toddlers using them as nap blankets and play mats, cuddling in them while being read to or told stories, even using them as “security blankets”. Therefore, I try to incorporate features that inspire “teachable moments” for parents and care-givers. “Cottontail's Garden”' for example, could help children learn colors, associate the colors with favorite vegetables and fruits, and learn the names of those edibles. That should make trips to the grocery store more fun. (J. D. says it makes him hungry just to look at that afghan.) The association of the garden pattern with the rabbit ‘lovey’ leads naturally to reading storybooks like Beatrix Potter’s Peter Rabbit series.

cottontails garden afghan and lovey
"Cottontail's Garden" afghan and lovey set

Later this spring (May 12, 2016), I used a puppet to show how simple designs like those in coloring books could be adapted to create various kinds of needlework items for children and decorations for their rooms. The first thing I did was to convert my lion puppet pattern into a down-loadable outline drawing, similar to a coloring book picture, suitable for several kinds of needlework projects.

Puppet and new design outline

I used a copy of the outline pattern to cut out pieces of felt. Then I stitched the felt pieces together and appliqued them to a background. At this point, the picture would be suitable to be framed or to be made into a small wall hanging. There were, however, several other options. Eventually the picture was used to decorate a tote bag a nice place for a coloring book and crayons perhaps?

lion applique tote bag
Lion applique on tote bag
Needlework pictures, wall hangings and other decorations are ideal for a child's room because they are not likely to cause any injuries to the children. I never put glass in a picture designed for a child's room, and I use narrow, light-weight frames. I learned this lesson the hard way. One day when my oldest child was about 14 months old and already walking and climbing out of his crib I found he had climbed onto the bench of my spinet piano. From there he had climbed onto the closed keyboard and then onto the top of the piano. He was trying to lift a framed painting that was bigger than he was off the wall. The painting had glass in it and a very heavy frame. There were dangers of several sorts of disasters. I think I got my first gray hair that day! We moved all the pictures closer to the ceiling and secured them to the walls with adhesive. Then I began making things for the nursery that weren't hazardous to young would-be mountain climbers, like this blackwork cat embroidery which, even framed, weighs just a few ounces.

cat nap framed blackwork
"Cat Nap",  framed blackwork embroidery
I'm still embroidering animals in blackwork, redwork, whitework, and Holbein embroidery (which is essentially blackwork stitches done in many colors). I decided to do the lion design in Holbein embroidery on checked gingham. Once again, I used the simple outline design, this time to make a hot-iron transfer that I ironed onto the gingham. You will notice that the pattern is reversed when you use the iron-on technique. You can see more animal designs these destined to become a child's quilt on the blog post for October 18, 2013. Go to our Archive or the search engine on this blog to find them, along with a pattern you can download.

lion Holbein embroidery
Lion pattern done in Holbein embroidery
The last little lion is done in latch-hook, a soft medium that children like to touch. I traced the outline directly onto the latch-hook canvas with a permanent marker. I had to adjust the position of the tail a little to make it look right. This little fellow became a small wall hanging. As you can see, the three projects are similar, but different.

lion latch hooked
Lion pattern as a latch hooked wall hanging
I hope you will try one or more of these projects, whether with the downloaded designs or ones of your own making. If you don't have children or grand-children of your own, please make something for a child in need of kindness. There are far too many of them out there.

Thank you,


we love you this much wall hanging
"We Love You THIS Much", latch hooked wall hanging from our Etsy shop


 Creative Commons LicenseThis post by Annake's Garden is licensed under a Creative Commons Attribution-NonCommercial-ShareAlike 3.0 Unported License.

Monday, February 29, 2016

Celebrating Our Third Anniversary

blog visitor's map
It is wonderful to see so much more color on our blog visitor's map this year. J.D. and I want to send a special thanks to those of you who visit our site regularly or occasionally. We also want to welcome visitors from the new nations we heard from this past year. They are (in alphabetical order): Armenia, Bahamas, British Virgin Islands, Dominican Republic, Finland, Honduras, Kazakhstan, Kenya, Morocco, Oman, Pakistan, and Suriname.

snowdrops
Snowdrops in bloom
Most of the heavy snow that we've been accumulating since early December has melted or is melting, although there are lighter snows in the weather forecast. I have no illusions that winter has finished with us. We usually get at least one heavy snow the last week in March, the first week in April, or both. Nevertheless, the retreating snow is revealing treasures — like this cluster of beautiful white snowdrops. Iris and poppy plants are appearing in all of the flower gardens. Strawberry plants are thriving. In one of our vegetable beds, a row of cress has been growing under the snow. I find myself humming my favorite Frank Sinatra song, “It Happens Every Spring”.

big red geranium
"Big Red"
More sunshine and longer days have led to more hours of work in the greenhouse. It is time to start flats of seedlings and hanging baskets of foliage plants and flowers. I'll be taking cuttings from plants like this geranium (which appears to have delusions of grandeur). It was nearly as tall as I am when we brought it into the greenhouse in the autumn. Now it is pushing up on the inside of the greenhouse ceiling! I've seen geraniums like this in sunny California, but not in the cold Colorado mountains. When it began its rapid growth last season, it produced balls of bright red flowers that were six inches (15.5 cm.) or more in diameter, and continued to do that all summer long.

Now that we have doubled our participation in farmers' and artisans' markets, you will be hearing more about plants and seeing pictures of them from time to time. That doesn't mean I'm going to neglect the handicrafts, however. For example, I have still been experimenting with my own crochet patterns. Here's an afghan, “Autumn Colors”, that I did recently ....
....and another one, “Winterwood”, that I did for this season. I have continued to do latch-hook and needlepoint projects and have several crewel embroideries in progress. I'm also embarking on new designs for the cross-stitch, blackwork, redwork, Assisi and Holbein types of embroidery.

Crocheted afghan, "Winterwood"

Currently I'm working on a large series of puppets for another Etsy artisan, a baker-confectioner, to include in her Easter baskets. Some of these chickens, ducks, and rabbits are new designs. I'll be adding them to the farm animal puppets on our shop site. New designs are developed frequently. Here are a few new ones. I'm also working on a series of puppets of endangered animals for Earth Day. I believe that puppets are a good way to encourage children to learn about and care about animals.
Most of the puppets can be easily made into soft toys. I stuff the entire body and make a seam at the bottom to close it. When I was a little girl living in the South, little children were given rag dolls or animals. These were often stuffed with raw cotton from the cotton gin at the end of the road. The older folks called them “loveys”, and that is what I call the ones I make today. Here's a picture of a rabbit “lovey”.

I've been re-reading all of the posts for this past year. While doing this, I discovered that I had mentioned several projects and techniques that I didn't follow up with articles and examples. I'll be concentrating on those in the upcoming posts for March and April. They include reverse applique, an introduction to Swedish weaving, and lettering as a technique for needlework design (as well as words as needlework motifs). I apologize for any concern that my delays may have caused. I will do my best to discuss everything that I overlooked last year. I will also have some summer and autumn patterns that you can download, so that you can get an early start on projects for those seasons.

Swedish Weaving Sample

I hope you will enjoy this, our fourth year, along with us.


 Creative Commons LicenseThis post by Annake's Garden is licensed under a Creative Commons Attribution-NonCommercial-ShareAlike 3.0 Unported License.

Tuesday, February 24, 2015

Projects Past and Future: Our 2nd Anniversary Post

World map
On February 12, 2015, we began our third year of this blog. We had an interesting and rewarding second year and we hope this year will be even better. The most delightful result, from my point of view, is knowing that the postings have been viewed all the way around the world, reaching every continent except Antarctica. Here, in alphabetical order, are your (our visitors') homelands:

Albania • Argentina • Australia • Austria • Barbados • Belgium • Bolivia • Brazil • Bulgaria • Cambodia • Canada • Chile • Colombia • Costa Rica • Croatia • Cyprus • Czech Republic • Denmark • Dominica • France • Germany • Greece • Guam • Hong Kong • Hungary • Iceland • India • Indonesia • Ireland • Israel • Italy • Jamaica • Japan • Jersey • Jordan • Kuwait • Latvia • Lithuania • Luxembourg • Macedonia (FYROM) • Malaysia • Malta • Mexico • Moldova • Namibia • Netherlands • New Zealand • Nicaragua • Norway • Peru • Philippines • Poland • Portugal • Puerto Rico • Qatar • Romania • Russia • Saudi Arabia • Singapore • Slovakia • South Africa • South Korea • Spain • Sri Lanka • Sweden • Switzerland • Taiwan • Tanzania • Turkey • Ukraine • United Arab Emirates • United Kingdom • United States • Uruguay • Venezuela • Vietnam • Zimbabwe

penguin puppets
 Boy and Girl Penguin Puppets
And for all those penguins in Antarctica that we haven't heard from yet, here's a greeting from two of our friendly puppets.


Welcome, everyone, to Annake's Garden. My warmest wishes go out to all of you.


In our previous anniversary posting we showed pictures of some finished projects that were shown in progress or which were not shown at all in that year's posts. This year, again, we showed a number of needlework items in progress or finished but not yet framed. Here are a couple of them once they were mounted and framed.

color onion domes and purple iris projects
"Colorful Onion Domes" Holbein embroidery and "Purple Iris" needlepoint
At the bottom of the 1st anniversary post we showed three photos of new projects for this past year. I must apologize that we did not get to cover Swedish huck weaving during the year. I realized that there were a number of techniques that should be covered first to lay the groundwork for that project. We have begun that process by introducing needleweaving, as well as some surface weaving in the folk embroidery topics. We will continue to follow those paths. I promise that we will arrive at Swedish huck weaving this year. Thank you for your patience.

I have continued to design and make crocheted afghans. This one is a favorite of mine. I call it “Mariachi Music” because that was the kind of music that I heard in my mind the entire time that I was working on it.

crocheted afghan Mariachi Music
Crocheted afghan,  "Mariachi Music"
We continue to try to improve these posts, using more pictures and close-up photography of stitches. (In case you haven't tried it: if you click on a stitch sampler, you will get an enlarged picture.) I am very visually-oriented and learn stitches better by seeing the real thing especially in color than by following the diagrams in needlework books. I hope you find these examples helpful and that you will experiment with stitches and patterns of your own devising.

We provided more patterns for viewers to download last year than we did during our first year. We hope to provide both a greater number and a greater variety this year.

I will continue to revisit needlepoint, especially bargello, with more four-way designs, optical illusions, and perhaps I may get brave enough to attempt an eight-way design. (No promises.) I will also talk about some non-needlework projects involving painting, dyeing, and lettering. As always, I will try to present projects that are simple to do, that require a minimum of equipment, and that are economical. I also plan to discuss sources for design ideas and ways to adapt designs from one kind of needlework or craft to another. At the bottom of this post you will see three photos related to this coming year's projects. We hope you will visit this site often and enjoy the activities we present here.

Until next month,


upcoming projects collage
Pictures from upcoming posts; any guesses?


 Creative Commons License 
This post by Annake's Garden is licensed under a Creative Commons Attribution-NonCommercial-ShareAlike 3.0 Unported License.

Tuesday, April 1, 2014

Those Popular Puppets

I'm delighted by the positive response my puppets have generated! I am asked lots of questions about them at shows, so I want to answer some of those before I offer a puppet pattern for you to download.

Backs of Raccoon, Cow, and Squirrel Puppets (showing tails)

I'm asked why I show tails and other features on the backs of my puppets. When I used to work with puppets to teach children about animals, I liked to have the puppets be as active as possible: hiding their faces shyly against my shoulder, climbing up my arm, scampering across my lap, wrestling with each other, and so forth. During these actions, a puppet is seen from all angles. I wanted them to be interesting --- and authentic --- from the back as well as the front. I wanted to show the animals' most distinguishing features so that the children would recognize them wherever they encountered them; in pictures, storybooks, television programs, movies, parks or zoos. That's why I also add hands, paws, hooves, or wings to the puppet arms.

Teddy Bear, Cat, and Rabbit Puppets
Teddy Bear, Cat, and Rabbit Puppets - notice the different eyes

Why don't I use the commercial plastic movable eyes, rather than making eyes with layers of felt? The answer is that I don't want to produce choking hazards. Children in the age group who like to play with puppets are not likely to chew on them. They may, however, have little brothers and sisters who would. Small children will put anything in their mouths! One of mine tried to swallow a handful of small change when his grandmother's attention wandered for a moment. Another reason is that I like to think my puppets' felt eyes are more individual and expressive than those plastic ones.

Puppy Puppet front and back pieces showing stitching
Puppy Puppet front (outside) and back (inside) pieces showing stitching

One interesting question was,”How do you get their heads to be so firm?” I stuff them, of course, preferably with fiberfill. But the real “secret” involves what I do to the “wrong”(reverse) sides of the heads before I put the fronts and backs together. First I sew the two halves of the heads to the respective parts of their bodies. Then I turn them over so that I can work on the insides of the heads. I sew the neck --- which extends well up into what will be the head cavity --- to the inside of the face, using very small overcast stitches that catch just the surface of the felt and do not show through to the other side. (This takes a little practice, so you may want to try it on felt scraps before you attempt it.) I do the same thing to the back of the head and also stitch down any other loose edges. For example, the top of the lamb's gray head is sewn to the back of the scalloped white “wool”. The extra stitching gives the head more strength and solidity, so that it does not sag or wrinkle. Remember when stuffing the heads to leave enough room for the puppeteer's fingers.

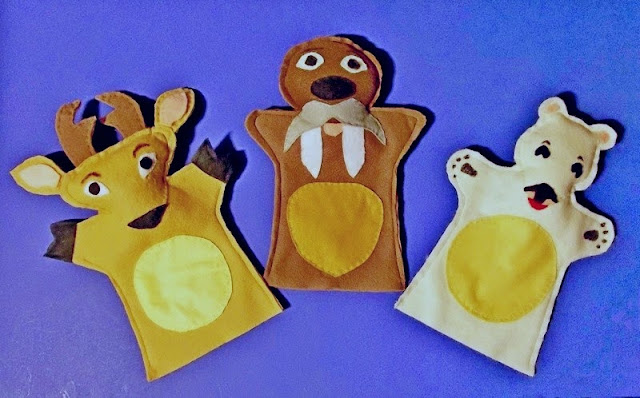
Reindeer, Walrus, and Polar Bear Puppets
Could you tell a story using these Reindeer, Walrus, and Polar Bear Puppets?

My favorite question came from a mother holding a beautiful baby girl about six months old. “It will be a long time before she is old enough to play with the puppets,” she said. “Is there some way she could enjoy them now?” I gave her several suggestions. Since the child will obviously be in a crib for some time yet, the most obvious thing would be to suspend the puppets from strings and hang them above her crib where she can see them easily. Another easy solution would be to pad a small bulletin board and cover it with felt, flannel, or fleece to hang near the child's crib or playpen. Small pieces of Velcro sewn or glued on the backs of the puppets will allow them to stick to the board. But they can also be detached and moved around the board to help the mother act out stories, rhymes, or songs. If longevity isn't an issue, the arms and bodies of the puppets can be stuffed with fiberfill, cotton, or fabric scraps and the bottoms sewn shut to make huggable soft toys. A little weight added inside the bottoms and they could even stand up by themselves. These were ideas that sprang immediately to mind. I'm sure you could all think of others.

Little Pink Pig Puppet with folded ears
Those of you who have been reading my blog posts for a while probably already know about the little pink pig puppet that started me designing and making puppets (April 17, 2013). I'm giving all of you a pattern (with instructions) that you can download to make your own little pink pig. (Click here to download.) The picture shows an alternate appearance for the pig. Just gently curl his ears forward and attach the tips to his face with a few tiny pink stitches. If you are doing a set of the Three Little Pigs, you might make one with upright ears, one with curled ears, and the third with one of each kind of ear.

Downloadable Pig Puppet Pattern
Pig Puppet Pattern (Click to download)
I'd like to express a caution about size. My hands are small. Most children of an age to enjoy playing with hand puppets can wear puppets patterned to my hand size, especially with a little stuffing in the ends of the puppet arms. If you are going to be the puppeteer yourself, check your hand size against the puppet body pattern before you cut out the pieces. If the pattern is too small for you, cut out the body pattern from a folded piece of plain paper. Cut it apart along the fold. Place the two halves on a plain sheet of paper and move them apart until they are big enough to fit you (including a quarter-inch seam allowance on each side). Tape the half-patterns to the paper and draw a straight line across the neck edge and the bottom edge. Cut out the new pattern piece and you are ready to pin it to felt. Check to see if the head still fits the body. If not, enlarge the head in the same way. To make the pieces smaller you can trim them off along the outsides or cut them as described above and overlap the two halves until they are the right size. You will probably have to shorten them at the bottom, as well.

Whether you have small children or grandchildren or not, why not make a little pig for some little person to love?

Annake


Creative Commons License This post by Annake's Garden is licensed under a Creative Commons Attribution-NonCommercial-ShareAlike 3.0 Unported License.

Wednesday, February 12, 2014

Same Song, Second Verse - Our Anniversary Post

Annake blogging
Annake, at work on this blog
 Some time in late January 2013, about a month after our Etsy shop went online, J.D. announced, “You're going to become a blogger.”

“What's a blogger?” I asked innocently.

“Someone who writes a regular blog and posts it online,” J.D. replied.

Beginning to feel a prickle of apprehension, I asked, “What's a blog?” At that time I had never even read a blog. J.D. explained the basics. “How am I supposed to do that?” I cried. (You should know that J.D. is rather fond of throwing me into the deep end of things and expecting me to “swim”.)

“Easy,” he said. “Just think of something you're interested in and write a short article, like the ones you've been writing for your students and for other teachers all these years. I'll illustrate the articles with photographs if you give me something to work with.”

Although uneasy about the whole process, I did “swim”. On February 12, 2013, we posted the first of 24 Cuttings from Annake's Garden. I have enjoyed writing the blog and making the projects to illustrate the articles more than I could ever have imagined. (J.D. is probably not as thrilled, especially when I trot down to his workshop with an armful of projects and tell him, “Take lots of photos so we can pick the best ones.” Or when I ask, “Can you have this ready to post by tomorrow midnight?” Too bad. He started it, after all.)

spring thaw needlepoint wall hanging
"Spring Thaw"  needlepoint wall hanging
In reviewing the year's articles, I found that I had shown a lot of works-in-progress and talked about others that weren't shown. I decided that a good way to mark this first anniversary (and prove to you readers that I do finish what I start eventually), would be to show some of those projects in their completed state. For example, the second article (February 28, 2013) featured a long wall hanging on quickpoint canvas. The inspiration for this was a small (about 1 ½ inch by 3 ½ inches) picture that I cut out of a magazine ages ago. I started by taping several pieces of graph paper together and trimming them to the same relative proportions as the picture. I cut the canvas so that it had as many squares of mesh as the paper had quarter-inch squares. Then I sketched the features from the picture that I most wanted to show on graph paper in colored markers. I chose acrylic yarns which closely matched the marker colors and began at the bottom of the canvas, making one stitch for each square of the graph. The piece was rather unwieldy, so I devised a way to secure the canvas on a rolling cart so I could work on one section of canvas at a time, rolling up the completed canvas to keep it clean. That device, more than the hanging itself, was what I wanted to feature in the article. Here's a picture of the finished work, backed by felt and hung from a dowel. I call it Spring Thaw.

Most of my subjects are taken from Nature: animals, plants, landscapes, seascapes and skyscapes. But when I prepared to do an article about latch-hook (June 16, 2013), I wanted to do something different. Discovering that there were more packs of greens and pinks in my stock of rug yarn than there were of any other colors, I decided to use them in a geometric design. The chosen design creates a kind of optical illusion. Out came the graph paper again, to make a diagram of several repeats of the motif so that they flowed diagonally across the paper as they would in the rug itself. The resulting graph served as my pattern when I began making knots on the canvas. Above is a picture of the finished rug, entitled "Diamonds in Pink and Green".

new puppets lion raccoon owl
Some new puppets: Lion, Raccoon, and Owl
 Thanks to a LittlePink Pig (April 17, 2013) told the story of how I got involved in designing and making felt hand puppets for children. When people come up to me at shows to say they enjoy the blog, that's one item that's frequently mentioned. The puppets are such fun for me at Christmas. At the last show of the year, a grandmother gasped with delight when she saw the raccoon puppet. Her grandchild had asked for some kind of raccoon toy for Christmas. The whole family had been searching for nearly three weeks for any kind of raccoon, without results, and had nearly given up hope. How satisfying it was to be able to fulfill that little girl's wish. I also got a good laugh from another grandmother who described to me the ways she and her husband had played with the puppets they bought before they wrapped them for their grandsons. I thought you might like to see some of the puppets I've designed and made lately. So here are Raccoon, Owl, and Lion.

raspberry ripple crocheted afghan
Raspberry Ripple crocheted afghan, in our Etsy store
On June 2nd, we showed a ripple afghan that I had just started. The topic of the article was to promote using leftover materials to make useful items, rather than discarding them or leaving them to accumulate in storage. As carefully as I could, I divided each color of yarn in half before I began crocheting. When I reached the midpoint of the afghan, I reversed the order of the colors. I used up most of the yarn, except for short lengths. In one case, I had less than a foot of the color left when I completed the afghan. You can see the finished project in the photo on the right.

You have probably noticed that we have changed the background of the blog. Expect to see several new pictures from the garden as backgrounds at different times throughout the year. Coming soon, there will be additional changes to the mechanics of the blog to make it easier to navigate. And, of course, lots of new projects. For a glimpse of “coming attractions”, we've placed pictures of some future projects across the bottom of this page. From left to right, they are: a blackwork picture on monk's cloth, a 4-way bargello on a background of tent stitch, and a sample of Swedish weaving on huck. The items shown in the article are either already on our Etsy shop site, or will be there in the near future.

Thanks for stopping by,

Annake

coming attractions collage
Coming Attractions!

 Creative Commons LicenseThis post by Annake's Garden is licensed under a Creative Commons Attribution-NonCommercial-ShareAlike 3.0 Unported License.

Sunday, December 15, 2013

A Perky 'Possum Puppet

Little Pink Pig Puppet
Annake with the Little Pink Pig Puppet
'Tis the season ... for craft shows and Christmas bazaars. We have been doing our share of them. The hand puppets are always a popular item. I've been pleased with the number of people who have come up to me to say they enjoyed the story behind the little pink pig. If you have read that blog, (April 17, 2013), you know how I got into making puppets in the first place. I'd always done realistic art work, so making the caricatures that were necessary for a child's puppets was hard for me at first. I wanted to put in too much detail. My class members, who were making most of the puppets, soon convinced me that this was both unnecessary and undesirable!

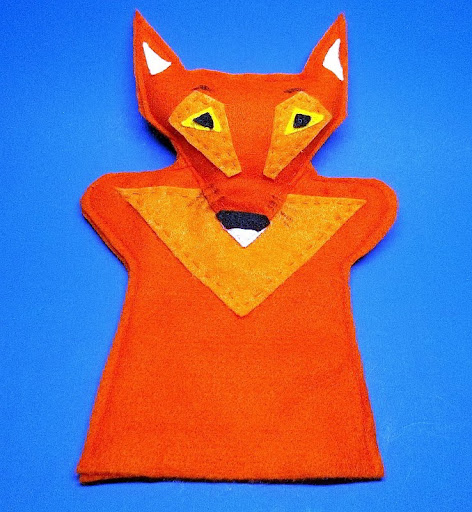
Fox Puppet, Front View
Red Fox Puppet, Front View
The more I worked with the designs, however, the more I enjoyed the cartooning process. Now I design and make puppets for my own enjoyment as much as for that of the children who will eventually receive them. I especially enjoy making animal puppets and giving them “personalities” of their own. They're one of the few items I make more than once. Even then, no two versions of an animal turn out to be exactly alike. For some time I've wanted to make a perky 'possum puppet. (Say that out loud five times quickly!) Let me share the process with you.

Fox Puppet, Back View
Fox Puppet, Back View, showing tail
The most important part of a hand puppet's design is the face. The bodies are pretty standard for animals with paws or hooves, but need to be modified for ones with wings or flippers. I try to make the backs of the puppets interesting, paying particular attention to their tails. The first thing I do is cut out two stock bodies, a front and a back., from the appropriate color of felt --- gray, in this case. The back of the 'possum's body is medium gray and the front is light gray. These pieces have a “wrong” and a “right” side since I adjust the patterns for the fact that a hand's thumb and little finger are joined to the hand at slightly different levels. I have small hands, so a puppet that fits me will work for most children, although it is sometimes necessary to pad the tips of the puppet's “arms” with cotton or fiberfill for very small hands.

Possum Face Sketch
Possum Face Sketch
I make a cartoon sketch of the animal's head, using colored pencils that approximate the colors of felt that I plan to use. Once I have the basic features and have captured the expression that I want, I trace the outline of the head, cut it out, and place it over the front of the body. Sometimes the sketch is too large or too small and has to be adjusted for size. Or I may have to make some small changes so that the left and right sides match. When I'm satisfied with the head shape, I make a new pattern out of a heavier, more durable paper and cut one out of felt. I place one on the front of the body to decide how far it should overlap the “neck” of the puppet, pinning the head in place. I make a second paper pattern for the back of the head, leaving off the “chin” or “muzzle” and rounding off the back of the head where it will overlap the neck in a gentle curve. I cut out the felt for the back of the head and turn it and the back of the body over.

Possum Body and Head Pieces
I match the front and back, wrong sides together, adjusting until they fit exactly. The back is now ready to be sewn together. I mark the position of the head on the front of the body with a couple of small pins. Then I remove the head so that I can put on all the facial features. Some of these are sewn on in layers, while others are drawn with permanent markers.

I wanted my puppet to be a mother opossum with some babies. When I was in college, someone brought our biology class a female opossum that had been hit by a car. There was nothing we could do to save her life, but six of the babies in her pouch were alive and apparently unharmed. Working in shifts around the clock, we fed them with doll's bottles and carried them in our pockets to keep them warm. They gripped our fingers with their tough little tails and dangled underneath our hands. Eventually they were weaned onto solid food and we were able to release them into the wild.

Possum Puppet Pouch Detail
A mother opossum's pouch is a slit that runs along her belly from front to back, with babies tucked in on both sides. If I were making a stuffed animal, I would make it that way, put in a zipper, and stuff it with babies. This wouldn't work for my 'possum puppet, however. So I made a side-to-side pouch like that of a mother kangaroo (another marsupial). When making puppets, I sometimes have to take liberties with Nature.

Possum Puppet Tail Detail
I try to avoid having loose parts on my puppets that a small child might pull off and swallow. That's why I don't use buttons, beads, ball fringe, sequins, etc. Therefore, I chose to applique the “babies” to the mother's body rather than having them loose in her pocket. On the back, I added a long tail for the mother and appliqued a single baby hanging from it. Up to this point, all sewing was done by hand. The two halves of the puppet were sewn together by machine and the head was stuffed lightly with fiberfill.

Opossums are not particularly intelligent, or even attractive, but they are survivors. They have been around much longer than we have, spreading from their original home in South America throughout the United States and well into Canada by now. As scavengers, they are a part of Nature's clean-up crew. I hope this new puppet will help children learn to respect them as much as they do the more “cuddly” creatures. They all have their parts to play in the great scheme of things.

Season's Greetings,

Annake

Finished Possum Puppet
Finished Possum Puppet, Front and Back Views


 Creative Commons LicenseThis post by Annake's Garden is licensed under a Creative Commons Attribution-NonCommercial-ShareAlike 3.0 Unported License.

Contact Us

Name

Email *

Message *

Blog Archive