Sunday, December 16, 2018

It Works Both Ways

Colorado Cougar needlepoint
"Colorado Cougar", framed needlepoint
I'm frequently asked about the process I follow in creating my original designs. Actually, there is no single process. Sometimes I have a clear picture in my mind when I begin. (Sometimes the finished project actually looks like that mental picture!)  Sometimes a sketch generates a piece of needlework. Sometimes a piece of needlework generates a detailed drawing or painting.  J.D., who is looking over my shoulder as I write, says: "Well, that ought to confuse everyone. Why don't you show them what you are talking about? I'll download the pictures." Since he keeps photographic records of much of my work in progress, that is what we are going to try to do in this post.

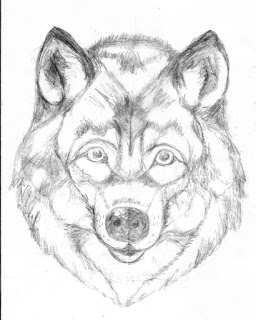
Last Earth Day I told him that I wanted to do a series of works featuring endangered or threatened species, beginning with those in the western United States. I had done two Close Encounters pieces by that time — a black-footed ferret with the endangered Colorado blue butterfly and the grizzly bear with the bee on her nose. I had taken a somewhat whimsical approach to those. Now I wanted to do some more serious  "portraits", more like the black-maned lion that I did in honor of a rare lion and his son, both killed by trophy hunters. I began with a sketch of a wolf. This is not a particular wolf, but rather a composite of several wolves. I noticed in my research that wolves often seem to be smiling or laughing, and that's what the one I was working on wanted to do. (Many artists, if they are honest, will tell you that their work often seems to have a mind of its own; I've found it wise to let mine express themselves.) The result was "Alpha Wolf"'.

original sketch for wolf needlepoint
Original sketch for wolf needlepoint
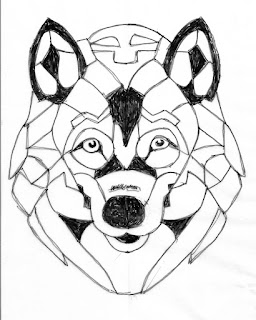
I began with the sketch you see here. I had already decided to do the "portrait" in French longstitch on a background of tent stitch, so I made a secondary sketch with areas of the longstitch blocked out. I then traced that simpler sketch onto my canvas, keeping the more detailed one for reference.


Blocking diagram for wolf needlepoint
As I stitched the design, the subject continued to express his personality. I always do the eyes of a subject last. Whether I'm doing people or animals, I don't feel that i really know them until we are eye-to-eye. I decided he must be the leader of the pack, proud of his authority and the fact that he would be the father of all the future wolf pups — and happily unaware that he was only alpha male because the alpha female had chosen him.  Here he is.

Alpha Wolf needlepoint
"Alpha Wolf", framed needlepoint

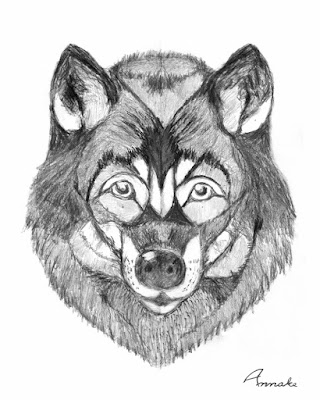
Print of enhanced wolf sketch
As you are probably aware if you read these posts regularly, we have done a number of art and craft shows the past few months. Each one is different. Sometimes J.D. and I spend most of the time discussing his photographs and my needlework with visitors. At other times there are quiet periods when nothing much seems to be happening. Then J.D.  usually goes off with his camera, taking pictures of anything that interests him. I’ve learned to take a sketchbook along. If the lighting permits, which it does not always do, I work on a sketch or two.  At one show I was paging through my sketchbook and came across the early wolf sketch. I had several shades of drawing pencils and charcoal pencils with me, so I decided to do a detailed finished picture from the sketch, knowing J.D. had already photographed the original sketch for future reference. This time my subject had a more serious expression, as you can see in the print which J.D. has made from my sketchbook page.

I had innocently opened a Pandora's box.  J.D. wanted to go through my old sketchbooks and look for other sketches that would be suitable for prints as they were, or with considerable extra work on my part. We showed a few of the prints at a recent event. They were favorably received and the wolf print sold, so I think I have my winter's work already laid out for me. I am getting rid of a lot of paper, which is a good thing, but nothing goes into the wastebasket until J.D. says it goes!

Of the wildlife "portraits" I have completed in the new series of needlepoints, my favorite is the cougar at the top of this post.  I have a great friend of my age group (yes, there are still some of us around and working!) who was doing a painting of a Florida panther — also a cougar — at the same time that I was stitching my Colorado cougar. Neither of us was aware of the other’s project. Hers was done from a clipping she had kept for many years about a female panther which was protected for many years in Florida and became quite a celebrity. I told my friend that hers was a "glamour girl", while mine was a hard-working single mother with mouths to feed.

Detail of cougar's eyes
The cat with Mona Lisa eyes

J. D. discovered when he photographed the finished needlepoint that the cougar's eyes seemed to follow him wherever he went. I had not noticed the effect because I was working so close to her on the canvas. I recalled walking the long gallery in the Louvre, where the Mona Lisa hangs at the center, in both directions and seeing the picture's eyes always following me. So we refer to my cougar as having Mona Lisa eyes. That fascinates viewers, especially children, when we show her.  They walk back and forth to see that it is really true.

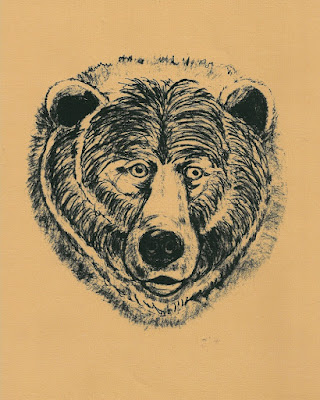
After the shows ended, I returned to sketches I made of grizzlies' heads when I was working on "What Kind of Sunflower Are You?" I've made a detailed rendering of a grizzly as a companion piece for the wolf and others. J.D. wants me to let you know that he will have a number of the prints for sale in our Etsy shop (see the sidebar on this post)  early in 2019 for those of you who are interested.

Drawing of grizzly
Print of grizzly bear drawing (Artist's proof)

Let's do what we can to preserve our native wildlife wherever we are.


The Tiger Vanishes original drawing
"The Tiger Vanishes", original pencil/pen & ink drawing

 Creative Commons LicenseThis post by Annake's Garden is licensed under a Creative Commons Attribution-NonCommercial-ShareAlike 3.0 Unported License.
Wednesday, December 5, 2018

Wrapping Up the Season: Late Fall Q &A, 2018

small tree with lights
Before I begin with recent questions, I want to pass along two items of interest from a benefit show and sale for a local animal shelter that we took part in a few days ago.

A charming couple purchased several of my puppets for their children. They said they planned to fill the bodies and arms of the puppets with "stocking stuffers" like candy, money, miniature toys and games, etc., and sew them shut with an easy-to-pull thread. Then the children would each have a puppet to play with after they had enjoyed their small treats. What a great idea! I learn so much from the people I meet! The same idea would work for birthday parties or sleep-overs. Here J.D. is showing the puppet of a girl elf with some stocking stuffers.

elf puppet filled with goodies
Elf puppet filled with goodies

dog and cat puppets
Two of our puppet pets
The other thing I want to point out refers to our dog and cat puppets, like the Siamese cat and Yorkshire terrier seen here. You will notice that each of our dogs and cats is wearing a "collar" and a "tag".  This is to remind children that their pets should be licensed and wear identification tags for their protection.

Now to our questions.

I like the 4-way bargellos a lot. I understand how the pattern "grows" from the center out. I can follow your examples, but I don't know how to start a new design from the center outward. Can you give me some examples to get me started?

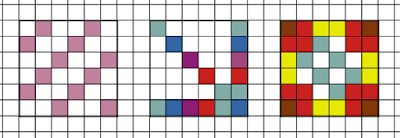
Certainly. I'll be glad to. And I can show you a "short-cut'" that you can use to generate new designs when you run out of inspiration. All you need is quarter-inch graph paper and something to color the squares. I'll show you that trick first. Take a piece of graph paper and mark off several frames around squares that are 6 graph squares wide and 6 graph squares high. Start with the square in the lower right-hand corner. Color it. With the same color or a second color, fill in a random pattern of graph squares in the next row outward. Repeat with a 3rd color in the next rows of graph squares. Continue as long as you like, with as many colors as you like. Repeat colors if you like. Make several of these designs on your sheet until you find one you like more than the others.

three 6 x 6 designs on graph paper
Three 6 x 6 designs on graph paper

First design rotated and repeated four times
Now take a clean sheet of graph paper and mark its center both horizontally and vertically. Repeat your desired pattern on top of the horizontal line, starting just to the left of the vertical line. Now repeat your pattern in reverse to the right of the vertical line. Turn the paper upside-down. Repeat what you just did below the horizontal line above the horizontal line now. Now you have a 4-way starting pattern.  Each colored square represents a stitch in your bargello pattern. Empty squares can be worked in white, black, beige, etc. Work the four parts of your design in the center of your canvas, then decide how you want to "grow" your finished pattern. Here is what the first of our small patterns looks like done in this way. This one is done in a single color with a white background.

Second design rotated and repeated four times
Second design
Here is the second "starter square"done in the same way.  the more colors that you use, the more complex the design that you create. This one is done in two shades of two colors, plus a white background. Substitute your own choice of colors. Once you have gotten that far, you need to decide if you will continue that design all the way out to the edges or put in new directions of your own making, You may want to practice on graph paper before you start a large project.

Third design rotated and repeated four times
Third design
And here is the third "starter square", expanded. Here you have strong diagonals balancing the vertical and horizontal lines. You might choose one over the other to change your design as you work outward from the center. This one also uses four colors, but the contrasts are stronger and the white background is greatly reduced. It is a good all-over design.


But remember these important rules:
  1. Each square represents 4* vertical stitches, each over 4 threads.
  2. No canvas is left bare; stitches share the squares of mesh.
  3. There will be places where there will not be room for an entire square. In that case,work as much of the square as you can.

When you did the 6-way bargello you showed two optical illusions that you and J.D. saw. I liked them and copied them on plastic canvas, but now I don't know how to proceed. You didn't show any shading on the pieces, but it seems to me that shading is what makes the optical illusions work. Can you show those patterns with the correct shading, please?

You are correct that shading enhances optical illusions.  However, there is more than one way to shade a particular illusion, depending on where you decide the light source is.  We will be glad to show you how we would shade the two illusions.  Just be aware that there is more than one "correct" way to do them.

annake's and j.d.'s illusions with shading
Annake's (left) and J.D.'s (right) illusions with shading

You can use black, white, and grays for your shading or you can use various tones and shades of a single color. If you use different colors, you may achieve an interesting design, but lose much or all of the illusion. I suggest you work the designs out on paper before you select the yarns. Think carefully also about your background and whether or not you are going to outline the sections with back-stitch or some other embroidery stitch.  Good luck.  It should be an interesting project.

You haven't mentioned latch-hook lately. Are you still doing it?

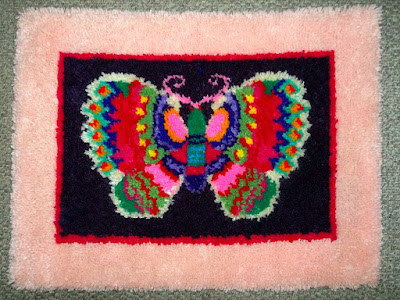
Yes, although it has been curtailed somewhat because of the increase in frequency of shows that we have done this year and the remodeling we have been doing to give me more studio space for drawing and painting.  Here is a rug that I finished at the beginning of summer. When I was doing research for the posts on creating landscapes in needlework, I came across a photograph of a Ming Dynasty scroll that had a beautiful butterfly on it. I wanted to do a rug with a similar butterfly, but in "hot" modern colors.  This is the result.

Latch Hooked Rug "21st Century Ming Butterfly"
Latch Hooked Rug, "21st Century Ming Butterfly"

Have a happy holiday season for all the holidays we celebrate around the world.


*This post has been updated on December 15, 2018 to correct an error in content. Our thanks to the reader who brought this to our attention.

 Creative Commons LicenseThis post by Annake's Garden is licensed under a Creative Commons Attribution-NonCommercial-ShareAlike 3.0 Unported License.
Thursday, November 22, 2018

A Call for Holiday Help

Spruce tree in snow
'Tis the season...
I was planning to post a Q & A, with some of the questions I’ve gotten during the many shows we’ve done this fall, when the following arrived. This call for help came in a rather long letter that I have shortened considerably here. Since it seems to me to have broad application, not just to the questioner, but to readers in general, I'm going to address it today because it is time-sensitive.

"Annake, please help! I was married last spring, to a gentleman who had been a widower for some time, with a grown son and daughter. I met them at the wedding and they were very cordial. They are bringing their families here for Christmas. Each family has a daughter, one 10 years old and one 12. They will be here from several days before Christmas until New Year's Day, and I am not sure how to keep the girls occupied and entertained for so long:  I have never had children or ever worked with them! My husband has decreed this as "family time" and asked everyone to limit time spent watching TV or using electronic devices. The adults are eager to visit friends in the area while they are here. We are going to take them to see "The Nutcracker", and we have planned some activities for the girls, like sledding and caroling, but those will depend on the weather. Your blog has all kinds of interesting activities, but I don't have any idea which ones are appropriate or even possible for girls this age. Please give me some ideas! Please answer in a blog post but don't use my name; just sign me "Nervous Nellie"!

Well, Nellie, I was a first-and-only wife and mother, but I do understand your concerns. I had two sisters-in-law, and a family get-together included up to seven boys ranging from toddler to late teenager, and two girls about the same distance apart in age as your guests.

Assorted Christmas cards
First, some general suggestions. You don't mention harvesting, shopping for, or decorating the tree as activities for the girls, so I am assuming you plan to have a tree decorated before they arrive. Is there a small evergreen somewhere on your property which could be "their" tree to decorate and to cherish every time they come to visit? Or would the budget stretch to purchase a small live tree which could be planted after Christmas? If a live tree isn't possible, a small, undecorated artificial tree for each girl might be a possibility.  Let them decorate as they desire.

Crocheted Cookie Cutter Tree

Second, enlist their help with the festivities. Ask them to decorate placemats and/or place cards for all the members of the family for Christmas and New Year's breakfasts. You will need colored construction paper, a box of mixed greeting cards, white glue or rubber cement, scissors (they are old enough for sharp tips — don't insult them with kindergarten scissors), and a roll of clear contact paper to cover both sides of the finished work.

Invite them to help you make and decorate cookies, cupcakes, gelatin desserts or puddings. Don't expect perfection and do expect some mess, but include clean-up in the activities.

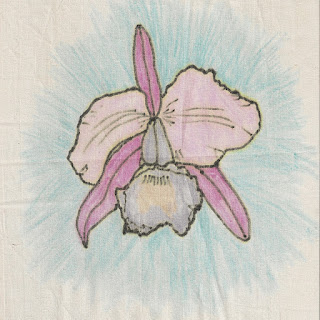
Crayon batik of an orchid
Here is a new activity they might enjoy. You will need two men's cotton handkerchiefs for each girl. Please wash and press them beforehand to remove any sizing. You will need a large box of good-quality wax crayons — not the ‘washable’ kind, which will come out. You will also need paper towels, an ironing board and iron, a sewing machine or needles and white thread, and a small bag of polyester pillow stuffing. They may want to outline parts of their pictures with permanent marker, so be sure to protect the work surface from ink that might come through the fabric. Let the girls decorate both handkerchiefs with the crayons. They should press hard and go over darker areas several times. Cover the ironing board with several layers of paper towels. Cover the tops of the pictures with paper towels. Set the iron on "Cotton" and iron over the paper towels, pressing firmly and replacing the towels as needed until the wax of the crayons is completely removed. Place the handkerchiefs with the picture sides together and sew them together by hand or machine, leaving a big enough opening for the girls to stuff their pillows with the polyester. Turn the pillows right-side-out, stuff, and sew the opening closed.

Work table with crayons

For the rest of these, you may have to bend the rule about Internet use a little:

Butterfly "Window Wonder"
Revisit my "Window Wonders" article (April 29, 2015) or type in window wonders on our Search Engine in the sidebar of this post. These sun-catchers are still popular, but have developed over time. Now we make graduated hangings of three pictures at a time, usually a #4, a #5, and a #6 hoop, held together with small lengths of aluminum chain, available at many hardware or craft stores. (Ask the men of the family to cut and fasten the chain lengths if you need to do so. There's no reason they should not take part in their daughters' activities!)  If chain is not available, sew or tie the hoops onto a strip of wide, flat ribbon. The rest of the directions from the original article still apply.

Another appropriate activity would be the paper designs some of my students made to look like the wonderful patterns made by Hawaiian quilt makers. The student designs shown on that blog post (January 1, 2018) were made by girls and boys in the 5th grade who were studying the state of Hawaii at the time. That is in the age range of your girls. All you would need is colored paper, scissors, and glue.

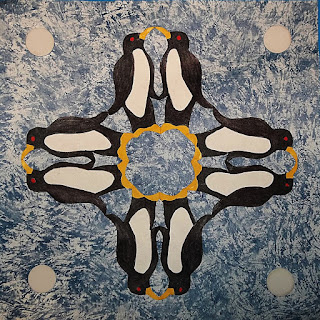
Four-way penguin design
You may want to look at that post and the one on four-way designs from Hawaiian quilts from March 21, 2017 before suggesting the activity.  Let the girls study the examples on the post before they begin their own designs. The paper to be cut out should be folded into four equal parts. If they draw their design on one square, starting at the center point and extending it to both sides of the square at one point, it should hold together when it is cut out and the paper is unfolded. You can turn the paper over so that the drawing does not show. A couple of "practice pieces” may be necessary.

Finally, I suggest that you and the girls type in the word puppets on our Search Engine. The girls might enjoy the story of the Little Pink Pig. It may even inspire them to do a project of their own when they get home: there is a downloadable pattern for the pig puppet. In addition, there are several other articles which show various puppets from both front and back to give the girls ideas for designs of their own. After seeing the performance of the Nutcracker, they may want to make a puppet for one of their favorite characters from that story. Here are a couple of puppets that I don't believe that we have shown before:

seasonal puppets
Some seasonal puppets

Relax, and enjoy! And, Nellie, keep thinking about those seven boys who are NOT coming for the holidays! Let me know how it works out.


 Creative Commons LicenseThis post by Annake's Garden is licensed under a Creative Commons Attribution-NonCommercial-ShareAlike 3.0 Unported License.
Friday, October 26, 2018

Out to Sea, In to Shore, and Along the Shore: Seascapes in Needlework, Part 2

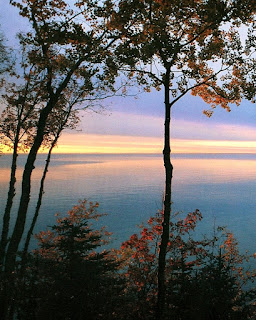
Shoreline sunset
Lake shoreline or ocean coastline?
Before we begin our new topic, I would like to address two questions that I am frequently asked. The first is "Can I take what I'm learning about seascapes and use it for lakes?"

In most cases, the answer is a resounding "Yes!" This is particularly true if you have access to a large lake. I can assure you that Lake Michigan during a storm is as awesome as the ocean!  You will not get the same wave forms and breakers that you would see on a seacoast, nor the large tidal differences. Sunrises, sunsets, fog and storms over lakes can be quite dramatic, however. and can be treated in the same way as those at sea.  A solitary fisherman can provide as dramatic a silhouette as strollers on a beach.  Boats of all kinds, docked or in motion, are always interesting. Lakes are also a good place for wildlife sightings, particularly of migratory birds. We had moose reintroduced to our area a few years ago and I'm hoping for a good sighting soon. By all means apply the principles you learn to lakes as well as the ocean. This photograph could be either a lake scene or an ocean one.

Annake tracing petterns on canvas
The second question, phrased in many ways, refers to the amount of planning I recommend before actually starting an art needlework project. Unlike painters, fiber artists (needlepointers, rug makers, quilters, weavers, embroiderers) cannot "paint over" areas of our work. Removing stitches is tedious and time-consuming and always runs the risk of damage to the underlying canvas or fabric. It is wise to work out as many details as possible before putting in that first stitch. (My favorite paint medium is watercolor, which is not as easy to modify or correct as some others, so I learned early to plan before I began.)  This is just a practical reason for pre-planning.

But there are many more advantages to planning.  Planning forces you to think about what you want to do.  You must really look at the scene, animal, flower, or other subject you want to depict in needlework. Then you have many individual decisions that you need to make. What is the function of the piece — rug, picture, decorated clothing, table linens, etc.? How large will it be when it is finished?  Will it need matting, framing, backing, edging? What is the style — realistic, stylized, cartoonish, geometric, abstract? Will you need to transfer the design to your canvas or fabric? Are you following a chart, or just working "free hand"? What is the color scheme? What materials will you need and how much of each one? What tools will you need? Do you have what you need on hand or must you buy some things? Make a shopping list. Once you have resolved all these questions, you will be able to begin your work with confidence and enthusiasm because you know your planning has been thorough.

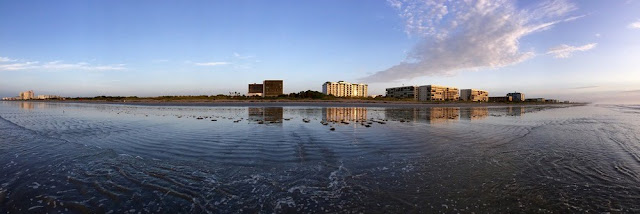
Now back to seascapes!  Seascapes can be planned in three main ways. The first of these is to look outward from the land to the sea. This is what we concentrated on in the first part of this series. The second is to look at the shore from the sea. We used one of J.J.'s photographs as a basis for demonstrating "gesture" in art. Let's remove the directional lines and look at the picture underneath.

Shoreline #2, cropped
Florida shoreline, photo by J.J.
The city almost appears to float on the calm waters! Look at the clarity of the reflections of the buildings. Here is the scene as part of a larger panorama.

Shoreline #2, full panorama
Panorama of shoreline, as originally shot
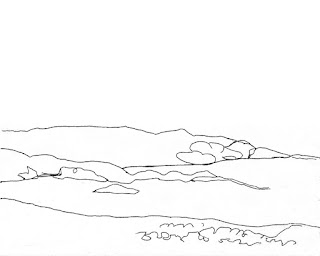
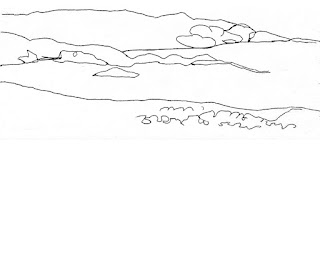
Whenever your scene includes a large portion of land, not just rocks that the sea is breaking over, you have a number of decisions to make. I am going to give you two simple sketches of a cove to illustrate this point. The sketches are identical except for one thing — the position of the sketch on the background.  Please feel free to copy both sketches and develop them as you choose. I've made them very simple so that you can do that.

Simple sketch, cove at bottom
In this sketch the cove is dominated by the sky, which occupies the top half of the background.  Is the sky sunny or cloudy? Are the clouds fair-weather clouds or storm clouds? Is it sunrise, midday, or sunset? Is there anything besides clouds in the sky — a flock of migrating birds, perhaps, or colorful hot-air balloons? Is the cove just barren rocks? Is there a lighthouse on the point? Are there buildings? Are there boats anchored in the cove? Is the sky reflected in the water? You will need a balance between light and dark features. If the sky is light, how are you going to balance it by making the cove darker — or the other way around? What are you going to do with the small strip of foreground that is at the bottom of the sketch, closest to the viewer? Make your choices and indicate them with colored pencil, crayon,  marker or pastel. Features will be small, so you need not put in a great deal of detail unless you want to do so.

Never underestimate the value of so-called "neutral' colors like beiges, tans, and the whole array of grays. Wet things — earth, sand, rocks, ropes, fishing nets — dry and lighten in color as they do so. Mixing strands of neutral floss or yarn into the "wet" colors or gradually lightening areas with closely related neutrals make such transitions look more natural and believable.  An exposed rock, for example, may be considerably paler at the top, where it has dried, than it is at the bottom, where it is still wet.

Simple sketch, cove at top
This time the sky is much less visible and plays very little part in the composition. The cove itself takes "center stage". But now that little strip of foreground that you could almost ignore in the first sketch takes up nearly half of the visual space in this one. Is the cove now the site of a village or a simple ridge of rock that the sea, surging in from the right, will break over?  Is there a solitary fisherman standing hip-deep in the water/ A fishing net caught on the rocks? Is the foreground a part of the same rock formation, also battered by the sea? Is it a high elevation looking down on the scene below? Is beach grass growing on it? Are gulls coming in for a landing? Is it a stretch of sheltered beach where someone has built a sand castle? How are you going to balance the lights and darks this time?

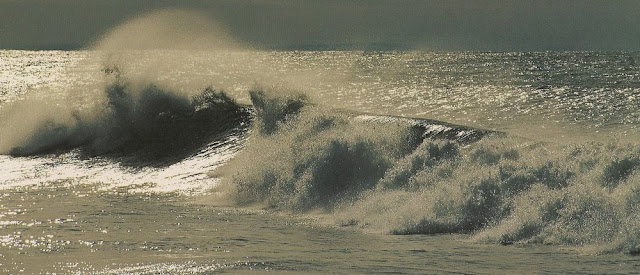
breaking surf
Monochrome picture of breaking surf

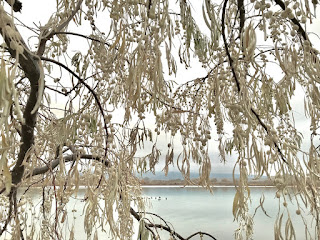
Shoreline through white leaves
A complex lakeshore photo by J.J
For those of you working on lake scenes instead of seashores, you can easily modify the cove sketches. You may want to visualize trees along the point above the cove  — hardwood trees in autumn foliage, perhaps, or darker evergreens.  What else might you include? Canoes instead of fishing boats? A bear teaching her cubs to fish? The tents of campers? Snow falling softly? Ducks, geese, swans or other migratory birds in the water?

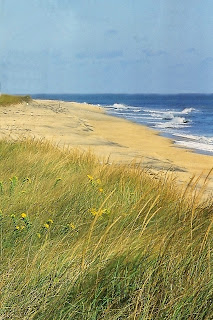
beach with seagrass
Grass blades, plant foliage, tree leaves, even evergreen needles eventually surrender their colors as the seasons of their lives come to an end. Showing their natural colors replaced with darker or more muted tones gives them a liveliness and reality in a composition that they would not otherwise possess. Take beach grasses for example. Even when the grasses die at the end of summer, their complex root systems serve to hold both the dead plants and the sand itself in place against the influences of wind, rain, and snow. If you are adding grassy dunes to your seaside composition, ask yourself if the green in the grass comes from new plants taking hold among the old ones or from hold-outs losing ground to the coming winter. The answer can set the tone for the whole composition — and determine the color scheme as well. Which brings us to the third way of composing a seascape — looking along the beach or seaside itself, while sea and sky act as  "accessories" to complete the picture. This scene of beach grass and sand is a good example of what I mean.

Earlier I mentioned balancing dark and light in a composition. This doesn't mean that you should divide your design down or across its middle and make one half dark and the other half light. It does mean that if, for example, you have a light sky above dark water, you should have at least a small amount of dark tones in the light area (perhaps patches of deep blue sky between white clouds), and lighter tints in the dark area (perhaps white foam on the water or light-colored sand on the beach). It also means that if you have a large dark or light area or object at the center of your composition, you should have a smaller area of similar lightness or darkness close to one edge of the composition. Think about a see-saw. How does a large adult balance a small child on a see-saw? By moving closer to the center, while the child remains at the other end of the board. Try to make a composition that has some alternating light and dark areas. You may find that this is the most satisfying solution to the light/dark balance problem.

"Cascades," mixed needle arts
"Cascades," a mixed needle arts picture demonstrating many of the points above
I have given you a lot of ideas to consider. I'm sure you can think of many more.  Experiment. Play with your choices. When you have considered the alternatives and when you have a combination that pleases you, begin the planning process. Then get busy and make that composition!

And start thinking of yourself as a fiber artist in the making!


 Creative Commons LicenseThis post by Annake's Garden is licensed under a Creative Commons Attribution-NonCommercial-ShareAlike 3.0 Unported License.
Sunday, September 30, 2018

Cross Stitch, Creatures, & Craft Shows - Early Autumn Q & A, 2018

autumn thunder mountain
Autumn comes to Thunder Mountain
You haven't mentioned cross-stitch lately.  Are you still doing new designs?

Yes, indeed. In fact J.D. and I did a small showing quite recently that featured some of his close-up photographs of flowers from our garden and some of my embroidered pillows with flower designs. I used different techniques for the pillows, but some were done in cross-stitch, with some parts done in double cross-stitch (also called star stitch, and St. George-and-St. Andrew stitch), where I worked what is essentially a plus sign (+) on top of the conventional X. I love the appearance of colorful stitching on checked gingham and used that for these pillows. Here you can see the Iris, the Poppy, and the Sunflower. [Sorry, the Iris pillow sold before we got a photo - J.D.]

Cross stitched pillows


I also did some miniature needlepoint pictures of flowers.  These were framed 3 inch X 5 inch pictures (7.5 cm X 13 cm) done in conventional tent stitch with some back-stitching. No sunflowers this time, but an iris and a poppy were included.

Needlepoint flower "minis"
Finally, here are a couple of J.D.'s photographs from the exhibit.

Flower photos by J.D.

What's on your screensaver? (Asked by a teenager at a recent show.)

Is this a trick question being asked by the younger set of old-timers like me to determine if we are "cool" enough to spend a few minutes with? Yes, I recognize that "cool" is an obsolete — even archaic — term of approval,  and that the current one is probably something I wouldn't even recognize.  (I am glad that "sick" has apparently fallen out of favor!)

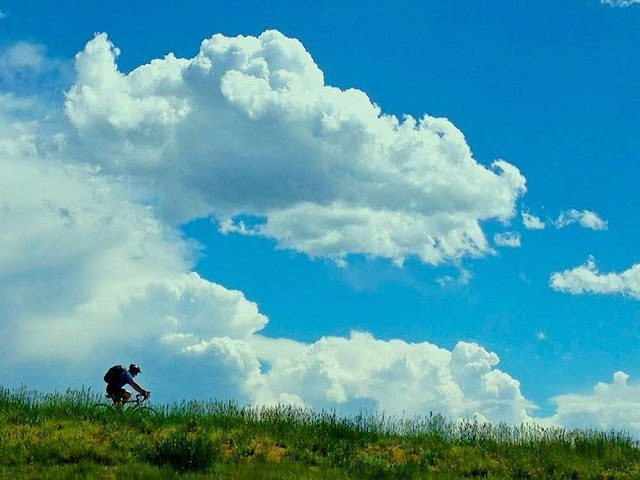
Anyway, I do have a story about my current screensaver. It is one of J. J.’s photographs. She loves to take pictures of the sky and clouds. (Look for some of her photos in the post on "Skyscapes in Needlepoint" later this year.)  She saw a large cloud formation that looked to her like a dragon breathing fire and little puffs of smoke. She hurried to capture the image before it could change. When she down-loaded the picture, she was startled to find that she had also captured at the very bottom of the photograph the silhouette of a bicyclist riding along the top of a ridge. We decided to entitle the picture "Racing The Cloud Dragon".

Racing the Cloud Dragon, photo by jljardine
"Racing the Cloud Dragon," photo by J.J.
We framed a print of the picture and offer copies of it in our print catalog, so I was able to show the young man the original. He smiled and thanked me and walked away — not seeming to feel that he had wasted his time.

Like J.J., I have always treasured the pictures seen in clouds and the patterns I see everywhere. When I was a young teenager I used to slip outside on clear summer nights after my parents had gone to sleep. I would climb to the top of our winter wood pile and sit for hours watching the stars. I would pick out the constellations that I recognized, but then form imaginary new constellations from the visible stars and watch them move across the sky. I hope that teenager sometimes looks up from whatever screen he is watching to look at clouds and stars, too.

Are you going to start writing three blog posts a month again, instead of just two?  You said you would when your busy season was over.

I will do that as soon as I can, and I will apologize in advance because it is going to be later than I had planned. This has been by far our busiest year since we started Annake's Garden! The Farmers' Markets stop at the end of September because of the short high-country growing season. (And I wish I could have sent every one of you some of our sweet seedless grapes, which were especially good this year.) But we still have art and craft events scheduled into early December and I have many new projects to complete for those.

I have started a series of needlework "portraits" of our Rocky Mountain wildlife that I am eager to share with you in a few months.  I'm working on more abstract,  geometric,  mosaic and optical illusion designs.  Part II of "Seascapes in Needlework" is in rough draft and will be followed by "Skyscapes" and "Cityscapes". I'm gathering materials for a couple of do-it-yourself projects that I hope you will enjoy.  But I do have to sleep sometimes, so my writing has to be worked into what I laughingly call my "spare time". I'll keep writing, you keep reading, and I hope we will all be happy with the results.

Bighorn needlepoint
Bighorn needlepoint, ready to frame
Happy Autumn (or Spring, as the case may be*),


*For our Southern Hemisphere readers, of course.

 Creative Commons LicenseThis post by Annake's Garden is licensed under a Creative Commons Attribution-NonCommercial-ShareAlike 3.0 Unported License.

Contact Us

Name

Email *

Message *

Blog Archive