Showing posts with label bargello. Show all posts

Tuesday, March 10, 2020

Into the Borderlands: Decorative Borders to Stitch

Colorful needlepoint border design

Borders are attractive by themselves, but that is not their only potential use. They can be used to construct frames, or they can be repeated multiple times to make an all-over design. One of the things that interests me so much about borders is that reversing them sometimes surprises me. For example, I planned to use the design above for the top of a wall hanging and then turn the pattern upside-down to complete the bottom edge.  When I reversed the design, however, I discovered that not only would it serve the purpose I intended for it, but it was also an interesting design in its own right, with an entirely different "feel" than its mirror image. Either one can easily stand alone. You will see the reversed design at the end of this post.

You may not feel ready to take on such a large project right away, so let's start with something simple and see how it can be changed a step or two at a time to work in a number of needlework techniques.  We will start with this simple cross-stitch pattern, which can be repeated over and over to make a border that is as long as you wish.
Simple cross-stitch butterfly, repeated for a border

Obviously, the same pattern can be done in counted cross-stitch on fabrics like checked gingham, monks' cloth, Aida, etc., or as blackwork.  The only modification I would  make is to switch from black to another color of floss.
Same cross-stitch butterfly border in red

Colorful butterfly on plastic canvas
I liked this one so much that I decided to make the body of the butterfly slimmer and enlarge the top and bottom wings. I also liked the empty squares on the original design, thinking that they could be left open or filled with a stitch like a French Knot or a bullion knot.   I finally decided to fill them with spots of other colors. The result for me was this multicolored butterfly. This version of the pattern was done in upright Gobelin on canvas with backstitching for the outline and antennae and French knots for the eyes. It could just as easily have been done in counted cross-stitch or needlepoint.

Simplified butterfly design in needle weaving
Once I started to think about canvas, I had to experiment with it some more. I modified the butterfly a bit, making it somewhat smaller for more repeats, and added vertical columns of stitches between the butterflies. This was done with acrylic yarn on # 7 plastic canvas  in a technique called needle-weaving, which consists of in-and-out horizontal stitches worked either left-to-right or right-to-left — or both alternately. I did not put in antennae on this motif. The colors were limited to red and blue.

Simplified butterfly design in gobelin stitch
Butterfly design, modified again, in Gobelin stitch
I had been looking for a motif to use on the hatband of a red hat for a dear friend who belongs to the Red Hat Society. With minor changes, I thought a modified version of the design above would do nicely. I put in simple antennae. I chose a dark purple for the bodies, a lighter purple for the lower wings, and a dark lavender for the upper wings. The design was eventually made on a stiff canvas with the butterflies done in upright Gobelin stitch and the white background done in tent stitch. You can see for yourself how many different techniques the little butterfly design has suited — and perhaps add a few more ideas of your own to the list.

Simple blackwork border design
I'm careful to keep patterns of my border designs  (in both black-and-white and color), not only for reference, but also because I often can change them into all-over
Simple blackwork border design, stacked
designs by simply stacking them with very little space between them or by joining them together.  For example, this simple border design becomes an interesting all-over pattern.

Flower motif repeated vertically, horizontally, & fancy corner
Flower motif repeated vertically, horizontally, & a fancy corner
Or I may need to design a corner block or modify a horizontal design to a vertical one, so that the motif can be used as a square or rectangular frame for something.


Here are a few new designs shown as blackwork. They can easily be done in colors.  If you play with them to make borders, frames,  or all-over designs, modify them in any way you like.
Three new blackwork borders

Some of you may be ready for a more challenging project.  For example, you may want to use a border design for many more repeats to produce an all-over design. Here is one I have done for a pillow top, tentatively entitled "Persian Pillow".  I made a single, repeatable design with the initial row and repeated it 15 times, each row in a different color.  Then I repeated the whole block until I had covered the pillow, filling in the corners at the top with stitches in the appropriate colors in reverse order. Here is the original block:
"Persian Pillow" stitch block

"Persian Pillow" pillow top

And the pillow top.

Now, here are some things YOU can do:
  • Make up a simple border design on graph paper and try it out as blackwork or counted cross-stitch.
  • Choose one of the simple blackwork line patterns that we have given you and do it in color.
  • Choose a single line pattern and "stack" it four or five times to make an all-over pattern.
  • Take a horizontal pattern and use it as a vertical one to make a corner deign, modifying it as needed.
  • Use a simple line design to make a pattern for a small embroidered frame.

Border design from top of post, flipped

See, YOU can be a designer, too!!


 Creative Commons LicenseThis post by Annake's Garden is licensed under a Creative Commons Attribution-NonCommercial-ShareAlike 3.0 Unported License.

Friday, October 18, 2019

‘Growing’ Geometric Designs

scan of new geometric design
First draft of a new geometric design, future project
You readers have been so responsive and enthusiastic about the new 8-way design that we published last month. Thank you so much for your interest and supportive remarks. A number of you have asked for more information on expanding patterns. That is a subject that I have touched on several times over the years we have been doing these posts, but I am always happy to return to it. This article is going to focus more on design, rather than on specific projects. In our January 1st post of this year, we showed how to rotate a simple one-and-a-half inch pattern on quarter-inch graph paper to make a symmetrical three-inch design which could be repeated over and over again to make it as large as you wished — up to the size of a patchwork quilt top, for instance. Each of the little squares in the design could represent a single stitch on canvas or even-weave fabric, a much larger square of fabric, or even a floor tile. Let's revisit one of those designs. Instead of taking one of the little squares as the basis of our design, this time let's consider the entire three-inch square as a single, repeatable part of our design.

Center design for the 8-way needlepoint
Central square from the 8-way needlepoint

Alphabet chart for the design
If you are going to follow along with me directly, you will need quarter-inch graph paper, a sharp pencil, an eraser (preferably a kneadable one, to get into the small squares), a straight-edged ruler or triangle, and a selection of colored pencils that can be erased. You can use pens or crayons, but they will not correct easily and can make the process frustrating. Or you can use an alphabet letter for each color written in plain pencil and fill the colors in later.


Central square in light blue, turquoise, and deep violet
The first thing I did was to center the design on my graph paper so I could work around it in all directions. The next thing I did was to change the color scheme of the design, leaving out the white, which is not a color. (You may want to use black, white, or gray in your design.) I chose to make this design in analogous colors (colors next to each other on the color wheel) because I wanted to make some points about color combinations. Analogous colors reflect wavelengths of colored light that are closely related.  Since these colors are closely related, we are pretty well assured of a pleasant design. I chose blue-green, blue, and blue-violet for my color combination, but you need not use those colors if you want to try others. For a trio of warm, bright colors, you might choose red-orange/orange/yellow-orange (the exact opposite of the three I chose), for example.  For more about color combinations, see our "Pigments and Palettes" article. A word of caution about colors. What I see on my screen in the office is not necessarily what J.D. sees on his screen in the workshop or what you will see on your device. And if you are printing something out, there are even more possible differences. That is why I identify the color range that I am using each time.

Central square in royal blue, medium violet, and aqua
Notice that I have used one light color, one medium color, and one dark color (a tint, a tone, and a shade) in each design. I do this to make it easier to place each color when I begin ‘growing’ the design. Each color is in the same set of squares on all three versions of the design; only the intensity of the colors changes. As you can see, which color is emphasized most does alter the design — a fact you will need to consider not only when growing your design, but also before choosing the yarns, fabrics, paints or other materials for your final project. Changing the positions of the colors as well as the intensity will give you even more varied results. I ‘grew’ all three of the blue-green/blue/blue-violet designs. You can see illustrations of the set at the end of this article.

Central square in aquamarine, medium blue, and lilac
Now that you have chosen both your color combination and your plan of light/medium/dark placement, you are ready to 'grow' the design. The simplest way to grow this design is to treat it the same way we did the little 6×6 square to get the 12×12 one we have now. If you want to proceed in this fashion, you may want to cut out your chosen 12×12 square and place it at the lower right-hand corner of a new sheet of graph paper. You can copy the pattern from your screen or print it as many times as you need it. You can then reproduce it immediately to the left, directly above right, and diagonally to the left of your original design. From there you can expand the design in any direction you desire.

Here is an outline pattern of the design to download.

Downloadable geometric design
Click here to download

Detail of mosaic from Ur, circa 2500 BCE (public domain photo)
Detail of mosaic from Ur, circa 2500 BCE
This design technique is called tiling. It is an ancient art process used primarily for creating inlays and mosaics. It was used in Mediterranean civilizations long before those of the Greeks and Romans. The earliest known mosaics were made in Mesopotamia before 2,000 BC (BCE)  Just last month there was news of a remarkable mosaic discovered in the ancient city of Hippo.

J.D. preferred the sample design with the light blue/turquoise/dark violet combination, so I tiled it first. Once I had a completely correct 4-part design, I reproduced it in colored pen for J.D. to photograph. I went through the same process with the other two samples. Somewhere in the midst of all this, he slipped up behind me and snapped this picture of my worktable, with the designs in progress. (He says he wanted to show you how much work I do before I publish anything for my readers. I think he just wanted to show what a mess my worktable usually is!)

Annake at work designing
Annake at work, designing


Expanded center square, stage 1
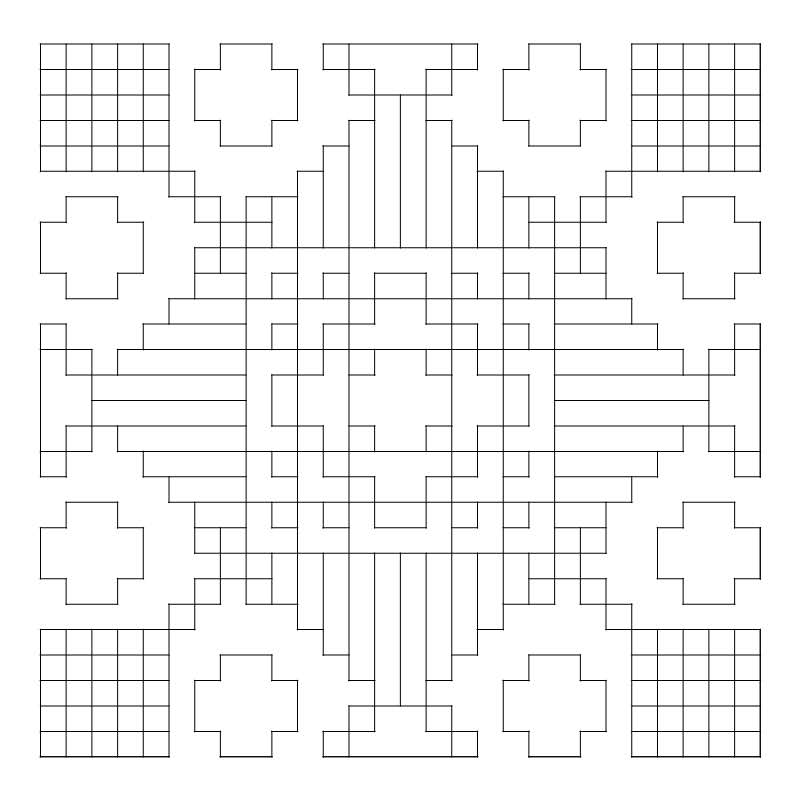
Now I turned my attention to the original black-line design to see how it would work as a 4-way or 8-way bargello design. Once again I placed the 12×12 pattern with the empty squares in the center of my graph paper and began to expand the design. I did this in plain pencil so I could erase any lines I didn't like. I worked strictly with lines and shapes at this point. (Although I planned to use some of the analogous colors in my final design, I intended to incorporate a variety of warm-color contrasts to the design, and I didn't want to be influenced by colors at this stage.) Since the top, bottom, and sides of the design were flat, I decided to begin there. I extended the lines that formed the sides of the squares outward in a stepped pyramid pattern of varying lengths. Once satisfied with one side of the design, I repeated it on the other three sides.

Outline of completed design
Then I turned my attention to the corners. Instead of closing the corner to make it the center of a design like those already completed, I opened it out with a stem-like addition and spread the arrowhead-like ends.  I returned to the north/east/south/west areas of the design and repeated and capped the pyramids with a small motif that I had used around the original center..Then I looked for ways to connect the corner designs to the expanded side designs. I decided not to connect them completely, but to leave areas where the background color could fill in around the shapes. The small center shape of the design was used in a detached fashion and repeated around the entire pattern in places where groupings seemed too empty.

Once the pattern was complete,  I went about filling in the colors.  I used many of the blue-green, blue, and blue-violet colors again that I had used in the trio of original designs — but sparingly. The feeling of the new design was rather heraldic for me, so I decided to incorporate reds and golds liberally in the final version. You can see the result at the top of this post. I left the background white so that the color details would be clear. I have saved an electronic copy of the design, however, and am planning to 'flood' the background with other colors later in order to compare the results. I also have some ideas for varying the central design. I haven't decided yet on what form of needlework I will make with this design. The design will probably change somewhat as I translate it for the medium in which it will finally appear. I'm already considering using a metallic thread, floss, or yarn in some areas — an antique gold or perhaps a copper tone. I will show the more interesting of these experiments in future posts.

I hope you have found this demonstration and discussion useful, and that it has encouraged you to experiment with designs of your own.  If you would like us to feature your design or designs on this blog, you can e-mail them to us at annakes_garden@yahoo.com .

As always, have fun!

tiled versions of analogous color design squares
Tiled versions of the analogous color design squares above

 Creative Commons LicenseThis post by Annake's Garden is licensed under a Creative Commons Attribution-NonCommercial-ShareAlike 3.0 Unported License.

Tuesday, February 12, 2019

A Little Eye Candy: Our 6th Anniversary Issue*

Hard Winter, photo by J.J.
"Hard Winter", photo by J.J.
Greetings, readers old and new. We are currently winding up our 6th year of this blog, and gearing up for Year Number 7. J.D. has a lot to show you and tell you, so I will turn this post over to him. I’ll be back to introduce some of the topics you can expect to see in the coming months.

Hello, all;  J.D.,  Annake’s Garden Gnome here.
 
First, a special welcome to last year’s new visitors from Andorra, Bangladesh, Cote d’Ivoire, El Salvador, the Republic of Georgia, and Mozambique. We have now had visitors from at least 121 of the 197 countries recognized by the UN.  I say at least, because Google Analytics classifies a growing segment of our visitors as ‘Not Set’,  so any of you who has never seen your country mentioned — blame Google!
 
Last year’s most popular new posts were the five parts of our series on ‘Landscapes in the Needle Arts’, followed by the post ‘Back to Blackwork’, and (surprisingly) our periodic Question & Answer posts. I don’t know whether we are doing a better job of promoting those posts, or more of our readers have figured out that they are full of juicy bits of new information;  we’re just glad to see them getting more attention. And, since many of you first come to this blog searching for material in our archived past posts, I’ll note that cumulative visits since we launched are still highest for tutorials on various bargello topics, blackwork embroidery, Holbein and Assisi embroidery, and cross-stitch; but last year, Swedish weaving and the posts on optical illusions started to catch up.

Lion art print
Now available for download in our Etsy shop
And now, a major addition to our Etsy shop: by the time you read this, the first downloadable prints of some of Annake’s work will be available for you to buy, for a very reasonable price. We’ve shown a few of these in recent past posts — remember the wolf and bear prints? These and many more will be in our Etsy store. Initially, what will be available is going to be limited in size and scope; but, as we figure more of this process out, you can expect to see many more subjects, colors, and sizes that you can download immediately and print at home, or take to a print shop to have your own high quality example of Annake’s work. This includes our international readers — no hassles with expensive shipping, customs forms, or currency exchanges:  just download from the Internet!

So — why this, now? Doesn’t Annake mostly do needle artwork? Where is all this coming from?

Well, the prints are being offered as a result of a number of converging headaches, needs, and trends, which I will tell you all about in a much longer post later this spring. For now, a quick example:

Black-maned lion needlepoint


Remember this black-maned lion needlepoint (we showed it, still unframed, in this post)? Annake came across her original sketch while digging through files looking for something else. (We do a LOT of that!) 

Damaged original working sketch for lion needlepoint
Damaged original working sketch


You can see that it was in pretty rough shape, so I said, “Let me scan it into the computer; I can clean it up, and then you’ll have it when you need it, and we can print it out in any size you want.” So I did — the result is below.


Edited scan of lion sketch
Annake said, “Hmmmm… print me a copy, I’ll put in some shading to indicate what I had in mind for stitching, then you can scan that in for future reference.” So she did — and by the time I had scanned and cleaned it up, it looked pretty darned good. We decided to sign it, put it into a high-quality print file, and — you can see the result above at the beginning of this section.  And, you can now download and print your own.

Look for lots more prints to come over the next several months… as well as printable downloads of some of my photos, and some of J.J.’s — all in our revamped Etsy shop.

Back to you, Annake...


Here are some of the topics you can look for this year:
  • Our next issue will feature a new reverse applique with step-by-step photographs and a pattern to download.
  • Then watch for Seascapes IV and V and at least one issue on skyscapes.
  • I’m going to revisit Folk Embroidery and feature several new “families” of stitches.
  • There will be a new series on color, starting this spring. I think you will get some new ideas from it that will be fun.
  • Expect features on collage and scratchboard plus more optical illusions.
  • There will be new bargello patterns for 4-way and all-over designs, plus new “diaper” patterns for Spanish blackwork, Russian redwork, and Scandinavian whitework.
  • I’ve been looking at landscapes again from a new perspective that I want to share with you.
collage of photos from future posts
Photos from some future posts...

Don’t forget out Question and Answer issues where I try to answer your questions and provide additional information.

I’m really looking forward to starting the next year of blog posts with you.

Take care of yourselves. Stay safe, come back often.


* If you're wondering about the title of this post, candy is a traditional 6th anniversary gift.

 Creative Commons LicenseThis post by Annake's Garden is licensed under a Creative Commons Attribution-NonCommercial-ShareAlike 3.0 Unported License.

Sunday, January 27, 2019

On the Other Hand...Our Mid-winter Q & A

Daisy pattern pillow
Daisy pattern pillow, based on our icon
We began this blog in late February, 2013. Since then it has grown a lot. Some of you, bless your hearts, have been with us from the beginning. While it is possible to work your way backward to that beginning, it would take a very determined person to do so. Most of you have joined us in later years, found one or more topics that interest you, and used the search engine to find posts on those topics. Sometimes someone asks a question about topics from long ago. I'm going to try to answer a couple of them today. Those of you who already know all this, feel free to use the search engine to just browse or check back for our next topic in a week or so.

"I want to do a pillow like the one you did with the daisies all over it, but I get confused by the chart you gave for it.. Can you give me one with the graph paper squares instead? I don't have any trouble with those. Also, I want to use different colors of daisies. What is the best way to arrange them?”
Graphed pattern for daisy needlepoint stitches
Here is the pattern in squares. Each square represents 2 stitches side-by-side, each stitch over 2 threads on #10 canvas. If you are working on #14 canvas, you may want to adjust the squares to 3 stitches over 3 threads for each square. I hope you find it much easier to follow this chart. I prefer to start in the center of the canvas and work outward. For arrangement of colors, there are many ways; here are four suggestions. Make the center row in your main color and do the rows above and below it in the other colors, (above) ending with the outer rows in the main color. Do the same thing but put the colors in diagonal lines, with the main color in the center and at the corners. Put the main color in the center square and make concentric squares of different colors around it, repeating the center color at least once, preferably in the outer square. Or you can scatter the colors randomly, even if you use a different color for every flower. It is an excellent way to use up odds and ends of yarn. I'm sure other patterns will occur to you as you lay out your colors.

"My needlepoint is starting to feel heavy and awkward. Is it all right if I turn it around and work from the other end when I get to the middle?”

That depends.  I doubt that it is going to feel any lighter, but it might seem less awkward. If you are working with continental stitch on a printed or hand-painted canvas, and both the canvas and the design are even, you can safely turn the canvas 180 degrees. If there are patterned stitches in the design, don't turn it. If you are working from a chart, I advise you not to turn it. If you are working on a symmetrical geometric design such as a 4-way, 6-way, or 8-way, definitely don't turn it.  If you do turn it, be sure you reverse it the entire 180 degrees. If you turn it 90 degrees or some in-between amount, the stitches will not join properly at the center.

Home-made device for rolling needlepoint canvas
I suggest you try this instead. After completing two or more inches of the design, use masking or packaging tape to secure the top edge to something cylindrical: a mailing tube or the center of a roll of paper towels or gift wrap.  Use small metal clips to hold the canvas in place and readjust them as you make each new turn. I think you will find this helpful and the finished piece will require less blocking.

"I would really like to do needlepoint, but I am left-handed and all the directions and charts seem to be made for right-handed people. I have seen advice to sit across from someone who is doing needlepoint and make a mirror image of what they are doing, but I don't know anyone. I got some plastic canvas like what you advise us to learn with, but that is as far as I've gotten. I don't want to put a lot of time or money into a project and then find out I'm not able to do it. Can you help me?"

I will certainly try. I expect you will be able to do it. I understand your hesitation, though. My mother was strongly left-handed and I am right-handed. She did embroidery and some conventional needlepoint, but she got frustrated trying to teach me and stopped trying. I had to teach myself. I agree that you should not invest much money to begin with, but I hope you are willing to invest time.  If you find you enjoy needlepoint, it will become a lifelong pastime and pleasure.

complex-looking Gobelin stitch pattern
A complex-looking Gobelin stitch pattern
You will need at least two contrasting colors of knitting-weight yarn and tapestry needles with eyes large enough to thread the yarn through.  Later I will teach you a simple way to do continental stitch, with which you can stitch canvases with patterns printed on them or ones from black-and-white charts. There are other tent stitches, but continental is the only one you really need. Right now I want you to practice some patterns with upright stitches. You don't need to be concerned with the slant of the stitches, as you do with tent stitches. These patterns often look much more difficult than they are.

Each stitch in the patterns below comes up through a square of mesh, passes over 4 bars of canvas (which represent the threads in needlepoint canvas), and goes down in the hole directly below where it came up. The bottom of each stitch in the first row shares a square of canvas with the top of the stitch in the second row. No canvas is left bare. We count threads, not holes.  Leave a couple of inches of yarn dangling below the first stitch. When you reach the end of the row, push your needle under the finished stitches on the back of your work for an inch or two and cut the yarn. Thread the dangling yarn into a second needle and secure it under stitches on the back. Get into the habit of doing this each time. Bad things can happen when ends of yarn are not secured.
Sample 1
Sample 1
The first pattern is a simple 2-color checkerboard with 4-stitch clusters. Begin at either the left or the right side, whichever is more comfortable.
Sample 2
Sample 2
This scalloped design is a little more difficult because the stitches follow a curve. Count carefully. Once the first line is done, it is easy to follow.
Sample 3
Sample 3
Working from top to bottom, the next row, in the second color, will begin in the bottom of the first stitch of the first color. Continue with the pattern until you feel that you have mastered it. To complete your sample swatch, turn your canvas around and work as much of the pattern in reverse as you can until the rows are even.

These simple patterns can be done in as many colors as you like and can be used to make things as small as a bookmark or key ring or as large as a piano bench cover. The stitch you have been using is called upright Gobelin and is used in a technique called Bargello. If you liked doing the samples, here is a link to a lesson in beginning bargello: [Link].

Directions for doing the Continental stitch
Here is an easy way to learn continental stitch. Your stitches should look like those in the diagram above. Begin in the upper right-hand corner of your canvas. Your first stitch goes from lower left to upper right. Work the entire first row. There are two ways to proceed.. One is to turn your canvas at the end of each row and keep stitching as you did before. This diagram shows you the way to do this by numbering the stitches. This may be the easiest way for you. Or you can just remember that working from left to right, stitches go from lower left to upper right; working from right to left,  your stitches go from upper right to lower left. Incidentally, the smallest design on the post for January 1, 2019 is worked almost entirely left-handed except for two parallel green lines that were worked right-handed.

I hope these steps help all three of you. Good luck. Have fun.


 Creative Commons LicenseThis post by Annake's Garden is licensed under a Creative Commons Attribution-NonCommercial-ShareAlike 3.0 Unported License.

Tuesday, January 1, 2019

Adjustments, Additions, and Adaptations

All-over pattern worked from a "corner" design
A phone call from a friend alerted me to an error in the December 5th post. She called to say she had accidentally reversed the numbers in the sample she was doing of the multicolored 4-way bargello pattern. Instead of making her stitch squares 3 stitches over 4 threads, she had made 4 stitches over 3 threads and wondered if she should take the completed stitches out and start over. This puzzled me because when making stitch squares, I recommend 4 stitches over 4 threads. I suggested that she do another sample with those numbers and keep the original one to see how they differed. She agreed. Then I went back to the blog post to see what went wrong.

What happened was that sometime before posting J.D. had told me the post was too long and something needed to be cut from it. I took out a section about using this design as an all-over design, along with a completed sample. Somehow the stitch directions given for this change got detached and the stitch count I had recommended for that exercise got attached to a place it did not belong. My apologies if this has confused anyone. J.D. doesn't do needlework, so he wouldn't have caught the error. I should have caught it, but didn't.  The error has now been corrected in the initial post.

I was trying to make two points with that segment of text. First, that, since this was an all-over pattern, it was not necessary to start in the middle of the canvas. I started the piece pictured at the top of this page at the upper right-hand corner of the design and expanded it both horizontally and vertically as far as my canvas segment allowed. Second, the pattern can be worked to fit rectangular projects. They do not have to be square, as the 4-way ones do need to be.  I suggested that viewers might want to do a sample using the 3 stitches over 4 threads formula that I used for this sample, which elongates the squares into rectangles vertically. (That's where the text error occurred.) The pattern stitch my friend was using elongated the squares to rectangles horizontally. Here is an example of what that would look like done on the same canvas as mine and beginning in the same corner of the design. The result is definitely rectangular — and large. It is probably not a good design for a 4-way, unless you are using much smaller squares of canvas. It would probably work on #14 needlepoint canvas.

Pattern resulting from error in directions
Pattern done as tent stitch
Same pattern done as tent stitch, 1 stitch per square
The samples I usually show on these posts are done on #7 plastic canvas. I recommend this for practice and to make pattern samples that are meant to be filed for future reference. But before we leave this pattern, I would like to show you one more variation. This is the pattern square done in conventional tent stitch, with one stitch for each square of the pattern. It is also done on #7 canvas, so you can imagine how small it would be on a canvas with more squares to the inch!  These patterns are very versatile. If you do latch-hook, for example, you can use a pattern like this one by putting in a knot for each square of the pattern. This would work as both a four-way pattern, perhaps for a pillow, and an all-over one for a mat or rug. Beading and mosaics could also be done with such a pattern.

When working a multicolor pattern like this, I recommend using a separate needle for each color. This cuts down on the time spent in threading needles and decreases yarn waste. Secure each color often on the back of your canvas. Do not carry long strands of yarn across the back of your canvas while moving from one colored segment to the next.

The designs made from the small corner squares have proven to be popular. For that reason, I am giving you some more of them to work with. In each case, the original square that was rotated is shown in its proper position and is emphasized by a black outline. The two-color pattern is suitable for an all-over design, but perhaps is not as good for a 4-way design.

3 patterns based on different corner patterns

New 8 way bargello design
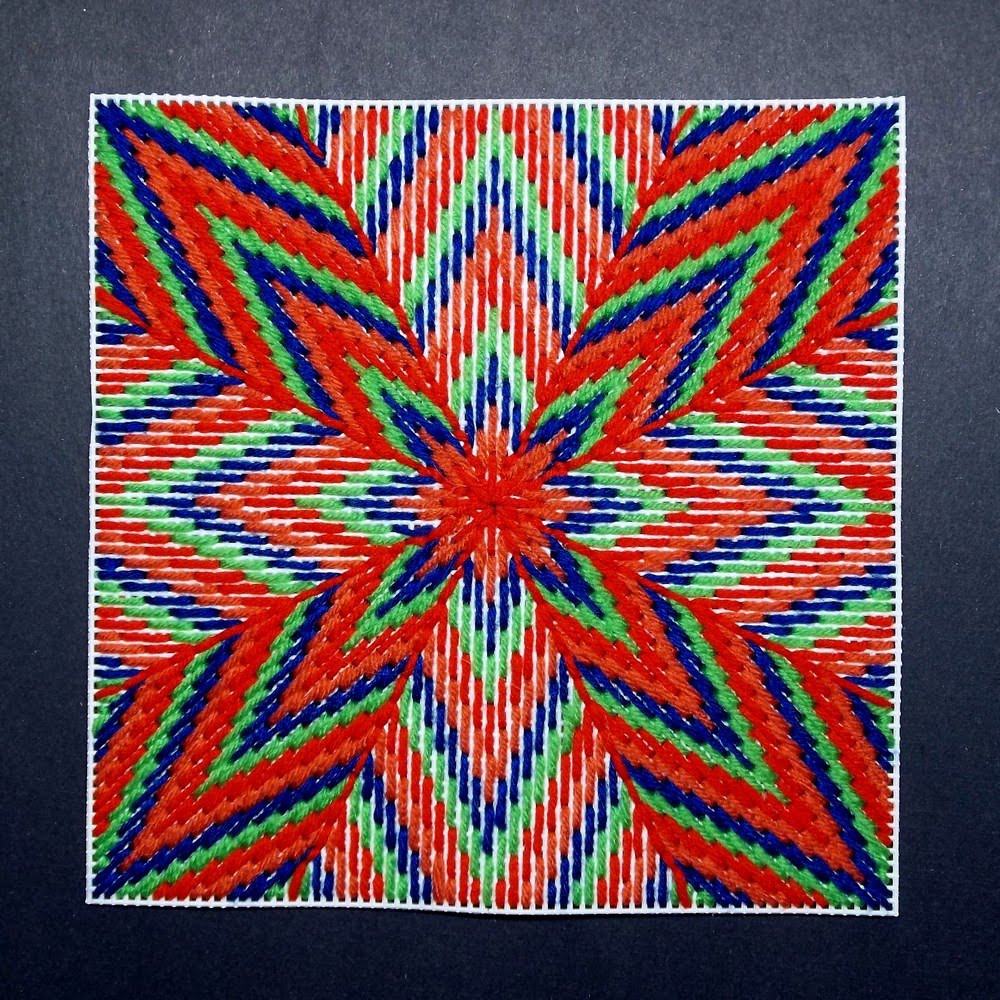
We have a new 8-way bargello to show you. Because some stitches are horizontal or vertical, while others are slanted on the canvas, some segments of the eight do not reflect the light in the same way that others do. This gives a feeling of movement to the composition. I don't know how well this will show up in a photograph, but I hope you can see the effect. I also hope you enjoy the new design.

We have used plain backgrounds behind bargello patterns a great deal. Only once, when we emphasized the use of a bargello pattern behind the capital A in the original Annake's Garden's logo, have we discussed the use of bargello as a background for other kinds of stitchery. Here is a picture of a screaming eagle that we use to decorate our table when we are doing an event on or near a patriotic holiday. The background is made up of strips of bargello patterns in red, white, and blue combinations. Doing slanted designs like this requires some planning. I recommend drawing a few diagonal lines lightly in pencil on your background canvas to guide your stitches. I worked the eagle first in conventional tent stitch,  then ran the last stitches of each pattern under the edges of the eagle's feathers.
                                    
Screaming eagle with bargello stitch background
I urge you to try making some of your own new designs. All you will need is some graph paper and colored pencils, pens, or crayons. Often what looks like a very simple pattern on a 6-part square turns out to be unusual and beautiful when fully rotated.  Then you will want to see it done in yarn. Keep your small samples in a container of some kind (any thing from a shoebox to an expandable portfolio), so that you can return to them whenever you like. Also, when you have a pattern you really like, try it in several different color combinations.

Have fun - and a wonderful new year!


 Creative Commons LicenseThis post by Annake's Garden is licensed under a Creative Commons Attribution-NonCommercial-ShareAlike 3.0 Unported License.

Contact Us

Name

Email *

Message *

Blog Archive