Monday, February 29, 2016

Celebrating Our Third Anniversary

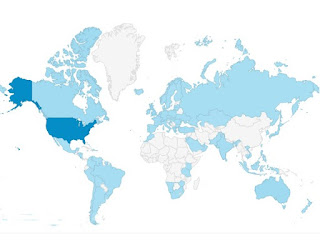
blog visitor's map
It is wonderful to see so much more color on our blog visitor's map this year. J.D. and I want to send a special thanks to those of you who visit our site regularly or occasionally. We also want to welcome visitors from the new nations we heard from this past year. They are (in alphabetical order): Armenia, Bahamas, British Virgin Islands, Dominican Republic, Finland, Honduras, Kazakhstan, Kenya, Morocco, Oman, Pakistan, and Suriname.

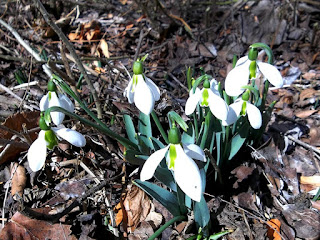
snowdrops
Snowdrops in bloom
Most of the heavy snow that we've been accumulating since early December has melted or is melting, although there are lighter snows in the weather forecast. I have no illusions that winter has finished with us. We usually get at least one heavy snow the last week in March, the first week in April, or both. Nevertheless, the retreating snow is revealing treasures — like this cluster of beautiful white snowdrops. Iris and poppy plants are appearing in all of the flower gardens. Strawberry plants are thriving. In one of our vegetable beds, a row of cress has been growing under the snow. I find myself humming my favorite Frank Sinatra song, “It Happens Every Spring”.

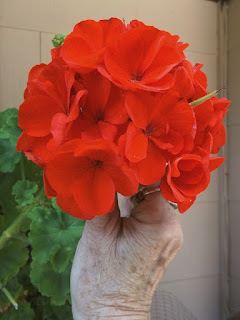
big red geranium
"Big Red"
More sunshine and longer days have led to more hours of work in the greenhouse. It is time to start flats of seedlings and hanging baskets of foliage plants and flowers. I'll be taking cuttings from plants like this geranium (which appears to have delusions of grandeur). It was nearly as tall as I am when we brought it into the greenhouse in the autumn. Now it is pushing up on the inside of the greenhouse ceiling! I've seen geraniums like this in sunny California, but not in the cold Colorado mountains. When it began its rapid growth last season, it produced balls of bright red flowers that were six inches (15.5 cm.) or more in diameter, and continued to do that all summer long.

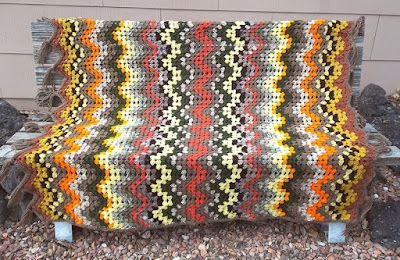
Now that we have doubled our participation in farmers' and artisans' markets, you will be hearing more about plants and seeing pictures of them from time to time. That doesn't mean I'm going to neglect the handicrafts, however. For example, I have still been experimenting with my own crochet patterns. Here's an afghan, “Autumn Colors”, that I did recently ....
....and another one, “Winterwood”, that I did for this season. I have continued to do latch-hook and needlepoint projects and have several crewel embroideries in progress. I'm also embarking on new designs for the cross-stitch, blackwork, redwork, Assisi and Holbein types of embroidery.

Crocheted afghan, "Winterwood"

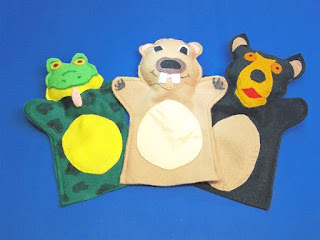
Currently I'm working on a large series of puppets for another Etsy artisan, a baker-confectioner, to include in her Easter baskets. Some of these chickens, ducks, and rabbits are new designs. I'll be adding them to the farm animal puppets on our shop site. New designs are developed frequently. Here are a few new ones. I'm also working on a series of puppets of endangered animals for Earth Day. I believe that puppets are a good way to encourage children to learn about and care about animals.
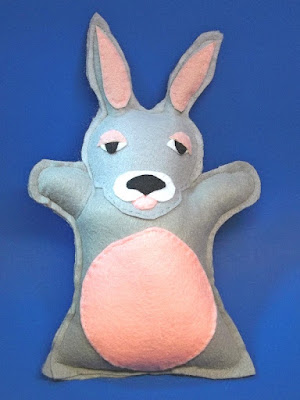
Most of the puppets can be easily made into soft toys. I stuff the entire body and make a seam at the bottom to close it. When I was a little girl living in the South, little children were given rag dolls or animals. These were often stuffed with raw cotton from the cotton gin at the end of the road. The older folks called them “loveys”, and that is what I call the ones I make today. Here's a picture of a rabbit “lovey”.

I've been re-reading all of the posts for this past year. While doing this, I discovered that I had mentioned several projects and techniques that I didn't follow up with articles and examples. I'll be concentrating on those in the upcoming posts for March and April. They include reverse applique, an introduction to Swedish weaving, and lettering as a technique for needlework design (as well as words as needlework motifs). I apologize for any concern that my delays may have caused. I will do my best to discuss everything that I overlooked last year. I will also have some summer and autumn patterns that you can download, so that you can get an early start on projects for those seasons.

Swedish Weaving Sample

I hope you will enjoy this, our fourth year, along with us.


 Creative Commons LicenseThis post by Annake's Garden is licensed under a Creative Commons Attribution-NonCommercial-ShareAlike 3.0 Unported License.

Saturday, February 20, 2016

Winter Questions and Answers, 2016


Your embroidered plain chain stitch looks a lot like crocheted chain stitch. Is there a way to use crocheted chain stitch as embroidery?

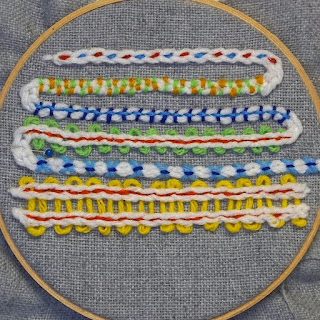
Yes, there is. It looks good on things like sweatshirts, heavy sweaters, caps and mittens, too. Because it can only lie on the surface of the fabric, however, you will need to couch it down with embroidery stitches in the same yarn or a contrasting one. If you use contrasting yarns, you can create borders that are attractive in both color and texture. Some embroidery techniques are shown on top of crocheted chain in the samples below. The first group is done in a single color. These are: back-stitched chain, couching between the “links” in the chain, alternating couching worked from the centers outward at right angles, whipped chain and plain chain on top of the crocheted chain (like “double chain” in crewel).

crocheted chain sample 1


crocheted chain sample 2
Click picture for larger view
 The second group are done in two colors and some can easily be done in more. These are: crocheted chain with double running stitch (red and blue); alternating couching of the crocheted chain in two colors (yellow and green); crocheted chain couched, with back-stitch over it (purple and blue); crochet chain back-stitched in red and then threaded in green; cross-stitch between “links” of the crocheted chain, with running stitch over the crosses (blue and purple); and two parallel rows of crocheted chain, back-stitched in red and interlaced in gold. Work all of the stitches in one color before going on to the next color. I find it works well to stitch one color left-to-right and the other color right-to-left. The green threaded and gold threaded stitches may be couched down. I would do this on a garment or any article that will get a lot of wear. Use tiny stitches in one strand of the yarn or floss, or use a matching sewing thread.

I suggest you place practice fabric in your hoop and make a chain a yard or meter long in order to practice each stitch pattern across the full width of your hoop. Leave a long “tail” when you begin your chain. Later you can thread this end into a crewel needle, take it to the back of your fabric and secure it. Cut your crochet yarn far enough beyond the last link in your chain that you can thread that end into a crewel needle, take it the back of your fabric and secure it. Pin the chain to the fabric every inch (2 ½ centimeters) or so. Don't stretch the crocheted chain out of shape. Don't pull couching stitches so tight that they disappear in the chain. You can use lighter or heavier weights of yarn for the embroidery if you wish. Or you can use crochet cotton, embroidery floss, or other materials.


What is the difference between the optical illusion block you showed last month and a 4-way bargello?
That's a very good question! The major difference is that the optical illusion (and the quilt block it is based on) are figured out in advance and the areas are drawn on the canvas before the stitching is begun. You may or may not put in the horizontal and vertical center lines and the diagonals depending on the pattern. Ordinarily you would begin at the center and work your way out to the edges. The design will be basically the same whatever canvas and yarn you use. Back-stitching is often an important feature of the design. For me, the challenge is in drawing the design precisely in order to get the effect I want.
The 4-way design is not unchanging like the optical designs; it changes and evolves as you stitch. It is best to begin all such designs by drawing in the vertical and horizontal center lines and the diagonals. A 4-way usually begins with a pattern line, rather than a shape to fill in. (There are exceptions; see Hearts Afire”, December 22, 2014 post, which does depend on a definite shape, for example.) A four-way usually begins several (sometimes many) rows of canvas from the center. Instead of being worked outward from the center, it is worked both outward and inward from the pattern line. The design changes rapidly often in surprising ways. Back-stitching is not regularly used. I get the most pleasure from starting with a pattern line which surprises me as it unfolds.

There are similarities between the two techniques, however. Both need to be centered on the finished canvas. Both tend to be square when finished. Both use the upright Gobelin stitch. Both may benefit from being turned ninety degrees as you work on the various parts of the design. Both depend on a careful selection of shades of color for their best visual effects. Neither leaves empty squares of canvas in the design; stitches share canvas squares. Both are fun to do and satisfying to complete.

I really like the optical illusions from quilt blocks. They look like fun. But they're square, and I hardly ever see square frames. Are you going to do any that fit rectangular frames?

King's cross pattern
I've just adapted the “King's Cross” design for a rectangular frame. The sketch will work with any three-color combination as long as the white sections are in the lightest color, the pencil-shaded sections are a darker shade of the same or a similar color, and the inked-in triangles are in a very dark color. You will notice that the pairs of triangles are not quite the same. Also, the shapes that were parallelograms in the original pattern are now polygons. These are large areas, so use a heavier yarn than usual or double your regular yarn to cover the canvas completely. Once again, I recommend doing the triangles in basket-weave, starting at the center points and working outward this time. Any irregularities where two colors of yarn join, or at the edges, may be covered by back-stitching if you choose.


king's cross diagram
Click on diagram for larger view
I did this pattern for a 5-inch X 7-inch frame (13 X 18 centimeters), but I can show you how to adapt it for any rectangular frame. Turn the frame upside-down on your canvas and draw around the opening with a pencil. Remove the frame. (If necessary, use a ruler or straight-edge to square the corners and make the sides straight.) Leave extra canvas around the rectangle so that you can tape the edges. Find the center of the rectangle and mark it with a dot (O on the diagram), continuing to use a pencil. Find the centers of the top and bottom the short sides and mark them with dots (A). Find the centers of the long sides and mark them (B). Mark the four corners (C). Mark the centers of the lines between the A's and the center O (D). Mark the centers between the B's and the O (E). Mark the centers between the C's and the A's (F) and the centers between the C's and the B's (G). Now connect the dots as follows:

  • A-O-A
  • B-O-B
  • Both C-O-C's
  • Both E's on the top and bottom with the nearest D
  • Both G's on the sides with the nearest E
  • You may then erase the A-D and the B-E lines if you wish to do so.

Now you are ready to begin stitching.

If you like squares and rectangles, just wait until we get to hexagons!


 Creative Commons LicenseThis post by Annake's Garden is licensed under a Creative Commons Attribution-NonCommercial-ShareAlike 3.0 Unported License.

Wednesday, February 10, 2016

More Optical Illusion Needlepoint from Quilt Blocks

diamond dust quilt
Judy's latest quilt, available in our Etsy shop
I've mentioned before (November 16, 2015) that some “op art” began as quilt patterns. Quilted layers hold heat and played a large part in keeping people warm before central heating became widely used. Quilts were also helpful for using up small scraps of fabric left over from other kinds of sewing. Early ones were probably of the “crazy quilt” variety, with little attention given to the shapes of the quilt pieces. Soon, however, quilters began arranging geometric shapes the same squares, triangles diamonds, rectangles, parallelograms and hexagons that we will be using to make interesting and attractive quilt blocks. Quilt-making and hand-quilting became a social activity, where women came together to share fabric scraps, patterns, ideas and, of course, gossip.

This time we are going to adapt a quilt pattern to make an entire “op art” needlepoint. I started with a pattern called “Ring Around the Star”. (Be aware that many quilt patterns have multiple names.) I don't know the origin of the pattern, but I suspect it is 18th Century American. However, I think it is derived from a much older English pattern called (among other things) “King's Cross”. The “King's Cross” pattern is shown in the sketch at the very left below, and the center part of the “Ring” pattern is just to its right. The other two sketches are ones I made to decide which shading best gave the effect I wanted. I decided the one on the far right.

quilt block design collage


op art needlepoint stage 1
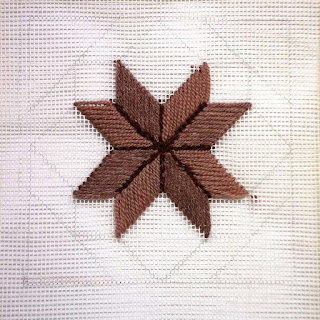
I prepared my canvas, drawing the lines lightly with a pencil. I used #10 mono canvas. (For more on preparing a canvas, see the post for May 11, 2014.) I worked the sections with tapestry wool, but you can use other yarns. The yarn is in two shades of the same brown, one noticeably darker than the other. I used upright Gobelin stitch on the first stage, covering the pencil lines on both sides of each parallelogram and leaving no open squares of canvas. I put in the darker shade first. To keep all of my stitches upright, I turned the canvas ninety degrees for each new parallelogram. Then I put in the lighter shade in the same way. I usually save back-stitching for the very end of a project, but did it here to emphasize the shapes of the finished sections.

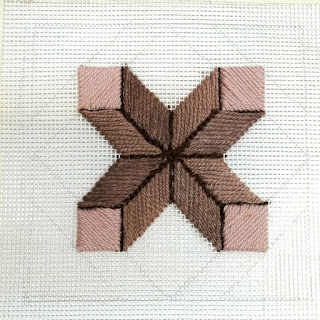
For the second stage, I concentrated on the squares formed by the V-shapes at the end of each pair of parallelograms. I did these in Graduated Diagonal Stitch. The enlarged photo shows one square done in this way. I began in one upper corner of the square with a stitch over a single thread of canvas. The next stitch was over 2 threads. I continued in the pattern: 3, 4, 5, 6, 7, 8, 9, 10. and 11 threads for the squares on the needlepoint canvas. With the 11th stitch I made the diagonal line between the bottom corner on the side I started from and the upper corner on the opposite side. I then began decreasing the number of threads crossed with each stitch: 10, 9, 8, 7, 6, 5, 4, 3, 2 and 1. The square was complete.

op art needlepoint stage 2
I turned my canvas ninety degrees and began the second corner. When all four squares were completed, I back-stitched the edges where the squares touched the ends of the parallelograms. I did not stitch the edges bordered by bare canvas. As you can see, the illusion of structures emerging from the canvas has been achieved. But there is yet more illusion to come.


I turned my attention to the large diamonds between the “structures”. These diamonds will make the second illusion. They were too large to do effectively with the Graduated Diagonal Stitch, so I first divided each square into four equal parts by connecting their corners with their centers, using very light pencil lines. The stitch pattern in red on the upper left is the Diamond Eye Stitch. Begin at any of the corners. Stitch over threads (or bars) in this pattern: 1, 2, 3, 4, 3, 2, 1. Give the canvas a quarter turn and do the same stitches again. The stitches should end in the same squares of canvas as those in the first triangle. Turn the canvas and repeat until the square is completed. I liked the stitch, but decided to do it diagonally in order to cover the canvas better. This is shown in the blue sample at the upper right. Working diagonally, the pattern becomes: 1, 1, 2, 2, 3, 3, 2, 2, 1, 1. Each stitch is doubled, increasing until you reach the diagonal, then decreasing in order. You will notice that the ends of the stitches are uneven. This will be covered on the project piece by back-stitching when the next section is completed. A simpler way to do the diagonal stitch is shown in the green sample at the bottom. Start in the center of the diamond and stitch over 1 thread. Increase each stitch by one thread until you reach the edge of the diamond. Turn your canvas a quarter turn and continue. The disadvantages to this stitch are that the outer stitches become very long and that the stitches do not cover the canvas as well.

I completed the four diamonds and back-stitched the horizontal and vertical center lines in the same color. I back-stitched the lines between the diamonds and the ends of the parallelograms with the same brown yarn that I used previously for back-stitching. If you now concentrate on the large diamonds rather than the small squares, you see shorter but much larger blocks emerging from the canvas. The second illusion is complete. Your eyes can move back and forth between the two, but you don't see both simultaneously.

Any illusion stands out best against a very dark background. I usually use black for this purpose, but I thought it was too harsh for the nice brown and beige combinations in the design. Instead, I used the darkest brown I could find. (Very dark purple, maroon, forest green, or navy blue also make good backgrounds.) I worked the “ring” of 8 parallelograms around the double illusion in upright Gobelin stitch, making the inside end of each stitch go into the same square of canvas as the outside ends of the stitches that make up the diamonds. I back-stitched these joinings with the original brown yarn. I left the outside edges of the parallelograms unstitched.

basket weave stitch sample
Basket Stitch sample
The multicolor sample shows you how to do the tent stitch known as basket-weave. Begin in the upper right-hand corner with a single slanting stitch, shown here in red. The next color shows the next row of stitches. Each row fits in between the stitches of the previous row. Even numbered rows, like the second one shown here in orange, are worked from left to right. Odd-numbered rows, like the third one shown here in dark blue, are worked from right to left. This is the favorite stitch of most devoted needlepointers.

I worked the outer triangles of the design in basket-weave, turning the canvas a quarter turn each time so that the triangles are all worked inward from their corners. Stitches which cannot be completed outside the “ring” are worked by finishing the stitch just under the outer stitch of the “ring”. I back-stitched the lines between the basket-weave sections and the “ring” with the darkest brown yarn. J.D. later found an attractive frame for the piece, but it was a little large, so I continued stitching the background until I achieved a good fit. The framed project is shown below.

Plan some illusions of your own,


 Creative Commons LicenseThis post by Annake's Garden is licensed under a Creative Commons Attribution-NonCommercial-ShareAlike 3.0 Unported License.

Contact Us

Name

Email *

Message *

Blog Archive