Thursday, August 31, 2017

Late Summer Questions and Answers

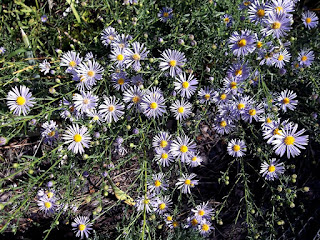
wild asters
Wild asters in bloom
I know you have been busy with the Still Life posts, but what else have you worked on lately?

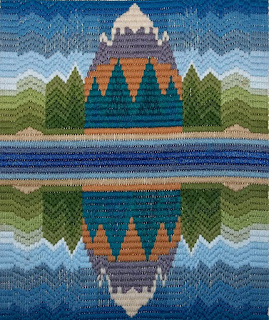
I've been finishing some projects that were put aside while I worked on others. One of these was a mirror-image piece done in upright Gobelin stitch on needlepoint canvas. Here's a picture of it shown horizontally. The pattern is mirrored both from side to side and from top to bottom. Seen in this way, it is pure geometric pattern in design.
mirror image needlepoint horizontal
Needlepoint, horizontal view
mirror image needlepoint vertical
Needlepoint, vertical orientation
But look what happens when it is shown vertically. Now it is a stylized representation of the fields and forests, mesas and mountains of western Colorado. I don't usually do a design that leans this far toward the abstract, but this one was fun.


I'm thinking of framing it with two hangers on the back of the frame, one on a long side and one on a short side. Then it could be displayed either way and changed back and forth as desired. What do you think?


You showed a picture of a basket of strawberries at the top of Part II of the Still Life series (August 21, 2017), but you didn't tell us anything about it. Are you going to tell us about it?

Certainly. Here it is again:

still life of a basket of strawberries
Needlepoint still life of a basket of strawberries
There are a great many things to consider in doing a still life painting or its equivalent in needlework. Here is a cheerful little needlepoint of a small basket of strawberries on a blue-and-white checked tablecloth. It is done in a poster-like style with little indication of depth and no highlights or shadows. The emphasis, instead, is on line, shape, color, and texture. Still, there is a good deal of pattern involved. Something like this is a good exercise for a beginner taking up still life needlework. This is the sort of design that can be found in a child's coloring book, for example, for anyone not yet ready to make an original design. The design is done in acrylic yarn on #10 needlepoint canvas. The checked tablecloth is a simple bargello pattern done in upright Gobelin stitch.

sample of stitch for checked tablecloth
Sample of stitch for checked tablecloth
The body of the basket is a simple needle-weaving pattern that is shifted every other row. The yarn is brought up from the back of the canvas. Working from left to right, the stitch pattern is over 6 threads, under 2 threads, over 6, under 2, across. The return stitches from right to left are under 6 threads, over 2, under 6, over 2. The sample has been done in two colors to make this easier to see. The stitch pattern is continued until a block of 6 rows is completed. The next block of 6 rows begins shifted 4 threads to the right of the first one. The third block is just like the first one and the fourth is like the second one. Incomplete blocks can be filled in once the pattern is established. Each stitch begins and ends in the same squares as the adjacent ones. No canvas threads are left uncovered.

sample of stitch for basket
Sample of stitch for basket

The strawberries are done in Parisian stitch to indicate their surface texture. The sample is done in two colors for clarity. For more on Parisian stitch and related stitches, see the post for April 10, 2014.

sample of stitch for strawberries
Sample of stitch for strawberries
The ribbon-striped wallpaper is done in continental stitch, but the rows are done vertically rather than horizontally. To do this, do downward vertical stitches in the standard continental manner (lower right to upper left) and upward stitches in the return method (upper right to lower left).
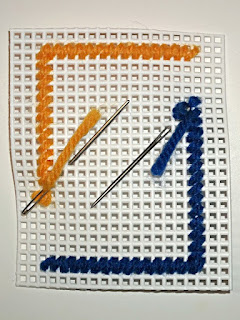
Sample of stitch technique for wallpaper
Stitch technique for wallpaper stripes
Although this is a simple pattern, it still contains some information. The strawberries indicate that it is probably late spring or summer. The lighting indicates daytime. The checked tablecloth indicates that the room is a kitchen or dining room. The bow on the basket handle suggests that the strawberries are a gift. We don't know whether the gift has been delivered to someone in the household or whether it is a gift being prepared for someone else. Either way, it is a pleasant picture. (I like to think the basket is a gift for a friend.)

Are you still doing new crochet projects?

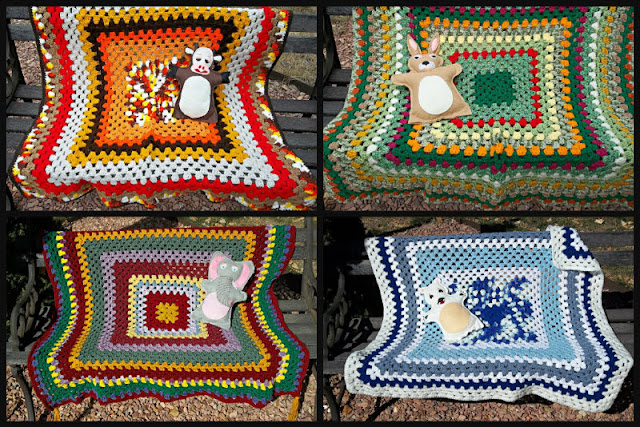
Yes, I am still doing crochet projects. A while ago I started a new line of baby afghans and “loveys”. Loveys are soft stuffed toys based on my puppet designs. I will admit that I have never been fond of the “Pink is for girls; blue is for boys” school of thought. For one thing, babies do not readily see pastels for quite some time. The first color that most of them notice is bright red. Toy-makers have known this for centuries and painted their toys accordingly.

baby afghans with lovies

I try to make bright-colored afghans that will appeal to toddlers (and also allow parents and caregivers to teach the children colors and words), and toys that can be used along with storybooks, made-up stories, and even songs. For example, here is “Cottontail's Garden” and its “lovey” (at the left side of the photograph).

Detail of "Cottontail's Garden" afghan and lovey
The rows of different colors can be associated with the vegetables and fruits the child eats or sees in visits to the grocery store. The lovey could be a good companion to the child when books like the Peter Rabbit series are read or songs like “Here Comes Peter Cottontail” are sung. (Incidentally, J.D. says he feels hungry every time he looks at this afghan.)


This question is for J.D. You mentioned a hot drink made from dandelion roots. (July 16, 2017) I sure have plenty of dandelions. What can you tell me about the hot drink?”

(The gnome grumbles...) Okay, for reasons too complicated to go into here, I once had to come up with a hot drink made from ingredients easily available in northern Europe a thousand years ago. After some experimentation, I settled on:

4 parts roasted malt barley
1 part roasted dandelion root
1 part roasted chicory root

Grind together to the size and consistency that matches whatever apparatus you use to make coffee - or tea - and brew. No caffeine kick, but it tastes pretty good on a cold morning.
J.D.

Enjoy the rest of the summer!


 Creative Commons LicenseThis post by Annake's Garden is licensed under a Creative Commons Attribution-NonCommercial-ShareAlike 3.0 Unported License.

Monday, August 21, 2017

Still Life in Needlework, Part II

needlepoint of a basket of strawberries
A simple needlepoint still life
First of all, let me say that I was delighted by the positive response to the first post in this series. I hope you will continue to be as enthusiastic about those that follow. Let's begin where we left off last time.

After the fall of the Roman Empire, still life painting lost its popularity until about the 16th Century in Europe. The genre was probably most popular in Spain and Holland. The main art centers in Spain were Italian-influenced Seville and Madrid, site of the royal court. In Spain, the credit for renewed interest in still life usually goes to Juan Sanchez Cotan, who painted very realistic fruits and vegetables hung from strings against a jet-black background. Like many painters who followed him, he painted so realistically that people reached out to touch the objects in his paintings, believing that they were real a style we now call trompe l'oeil, meaning “fool the eye”. The greatest artist of the period, Velasquez, painted tables of delicious-looking food. Even Goya and El Greco did studies in still life. Most followed the use of the black or very dark backgrounds, which can be dramatic.

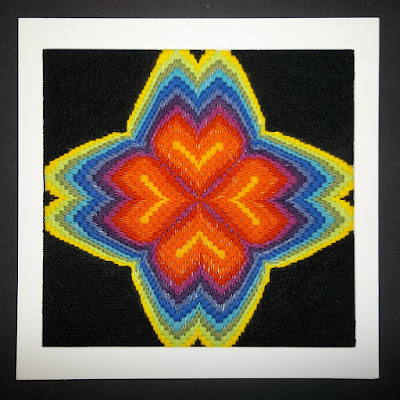
If you are working on any kind of needlepoint or tapestry canvas, black backgrounds are easy to make. You simply do all the design of your picture, no matter what the subject, and then fill in the background with a simple tent stitch in black that doesn't draw the eye away from your central design. You can see the effect in the geometric bargello design below. Working on dark or black cloth is more difficult a problem we will take up later.

Four-way bargello, "Hearts Afire"
Four-way bargello, "Hearts Afire," with black tent stitch background
Today I am going to take you step-by-step through a simple still life composition. The background is #7 plastic canvas. I chose this because the work will show up well in photographs. Also, the materials are inexpensive something to consider until you are sure that you want to make one of these projects. The yarns are acrylic leftovers from some of my knitting and crochet projects. (If you do the design on needlepoint canvas, monk's cloth, or Aida, the detail will be finer, the stitches smaller, and the curves more rounded. You will need to use finer yarns or flosses.) The needle is a blunt tapestry needle with an eye large enough to accommodate the largest yarn. I used continental (tent) stitch throughout because it is the simplest stitch that we will use for these activities.
 
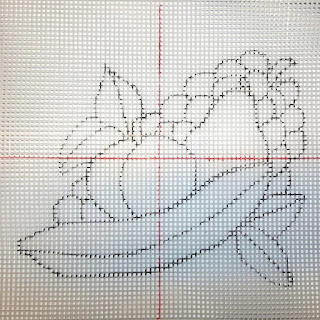
prepared canvas for fruit needlepoint still life
Prepared canvas for needlepoint still life
 I found the center point of the canvas and drew the vertical and horizontal center lines through it lightly in permanent marker (red lines). I marked those same centering lines on my design sketch. Finally, I traced my pattern onto the canvas with a permanent marker and removed any excess ink with a tissue. Now I am ready to begin stitching.


step 1 for fruit needlepoint still life
Step 1


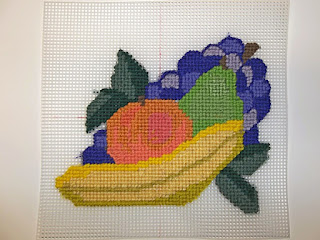
STEP 1: I outlined the shapes of each of the fruits with one or more rows of stitches in the defining colors. Features that did not require much modeling like stems and leaves were filled in completely.


step 2 for fruit needlepoint still life
Step 2


STEP 2: The shapes were filled in completely with continental stitch. Additional colors were used where they were needed.


(I'm sorry that I can't show you my “live models”. I should have had J.D. photograph them. I get hungry when I work, so as soon as I completed one of the kinds of fruit, I ate the fruit. By the time I finished Step 2, I was left with a few leaves and a tangle of grape stems! Not a very interesting picture!

But J.D. has become very interested in the still life project. He has been collecting interesting objects and photographing them from different angles, in different lighting conditions, etc. We will share some of those with you in a future post. Here's a sample of his work:

Photo still life, "No Rhinestones"

step 3 for fruit needlepoint still life
Step 3
STEP 3: The tablecloth that the fruits are arranged on is worked and a shadow of the banana is suggested with straight horizontal lines. Shadows of colored objects always contain a hint of the object's complementary color. The yellow banana's complementary color is violet, so a violet-toned yarn was used for its shadow. The leaves also cast shadows, but they are much thinner than the solid banana and move with the slightest breeze, so their shadows are less well-defined. They are indicated here where the blue stitches are over-stitched with one strand of dark red (green's complement) yarn. Knowing and applying these simple facts will make your embroidered compositions more lively and realistic. The other complementary colors are: red/green, red-orange/blue-green, orange/blue, yellow-orange/blue-violet, yellow-green/red-violet.

finished fruit needlepoint still life
Finished needlepoint still life


STEP 4: The remainder of the background is completed. I visualized an old plaster or stucco wall behind the arrangement. To get that effect, I chose a color of yarn that was halfway between a dark ecru and an antique gold.


This simple pattern is very versatile. With very small changes in the lines of the original design, you can make extensive changes in the finished picture. Here are some examples to consider:


  • Remove the center curve and change the peach to an apple;
  • Do a red apple with green grapes or do a green apple with red grapes;
  • Make the pear yellow, red, or light brown;
  • Add more leaves or omit the ones that are there;
  • Change the banana to an ear of corn or a crookneck squash, the peach to a tomato, the pear to an avocado or an eggplant;
  • Replace the grapes with a head of cauliflower, leafy green lettuce, or blue kale;
  • Use a variegated yarn for the tablecloth, make it striped, or give it more texture with a patterned stitch like Hungarian or Parisian;
  • Use a light color for the tablecloth, but work the upper background in solid black like the Spanish artists did.

I'm sure you can think of other variations.

Not all still lifes are made in color. Think of all the black-and-white media for making pictures: pencil, charcoal, gray-toned pastels, pen and ink, block prints, etc. Here is J.D.'s photograph as a pencil drawing (left) or a mixed charcoal and pastel rendering (right).

BW photo variants of photo still life
Black and white variations of "No Rhinestones"
When we return with Part III of this series, I will introduce you to a design on fabric with floss that is done in a black-and-white technique called Spanish blackwork. If you are not familiar with blackwork, I recommend that you read some of my early posts that described the technique particularly those of October 6, 2013 and January 27, 2014. Use our search engine to find these posts.

Play with the pattern and combinations to find ones that you like. As always, have fun!


 Creative Commons LicenseThis post by Annake's Garden is licensed under a Creative Commons Attribution-NonCommercial-ShareAlike 3.0 Unported License.

Contact Us

Name

Email *

Message *

Blog Archive