Monday, May 25, 2020

Easier on The Eyes: Needlework for Older Needlecrafters

Quickpoint picture by Annake of ferret and butterfly
Original quickpoint by Annake
Are you one of those people who once enjoyed needlework, but now find their eyes and hands do not respond as well as they once did? I belong to that group myself. Please don't give up an activity that you love. Find less physically demanding ways to work. I believe needlepointers and cross-stitchers together form the largest group of people doing stitchery today, so I will start with those pursuits.

Quickpoint is a form of needlework that I recommend to senior needlecrafters who are accustomed to doing counted cross-stitch or needlepoint. It is easy to do and the results are achieved quickly. Almost any kind of design can be adapted to the technique. Quickpoint is large and the canvas mesh is easy to see. The needles are large and have eyes that are easy to thread. The yarns are thick and cover the canvas quickly. Projects can be any size that is easy for you to hold. This wall hanging, "Are You Endangered, Too?", is done in quickpoint. The “point” part of quickpoint implies that it is only done in needlepoint. This is misleading. Although it is done on a canvas background, quickpoint is also lovely done in counted cross-stitch. The picture here is done in a combination of cross-stitch and tent stitch.

3.75 and 5 rug canvas
#3.75 (left) and #5 (right) rug canvas
Traditional quickpoint canvas has 4.5 stitches to the inch. I do not have a source for this canvas at the moment, so I cannot show it to you. I can, however, show you a larger-mesh and a smaller-mesh canvas, both of which work well for quickpoint. The canvas with the larger squares is #3.75 conventional latch-hook rug canvas. It can be worked in uncut rug yarn or one of many thick craft or novelty yarns. The canvas with the smaller mesh is also a rug canvas, but one which requires a special hook. It is #5 canvas. You can use two strands of knitting worsted yarn or several strands of crewel or tapestry yarn on this canvas. For the best results, do not double the yarn; instead, cut two or more separate strands the same length and thread all of them through the eye of the needle at the same time. Some of these materials can be hard to find. Good places to look for them are thrift stores, charity shops, and yard or garage sales. I know those are not available right now, but they will return.

“Let's Do Lunch”, quickpoint by Annake
Another of the "Close Encounter" series is “Let's Do Lunch”. It also has some star stitches in the more heavily textured areas. A star stitch is made by stitching a + (like a plus sign) over a completed cross-stitch. A conventional cross-stitch occupies four squares of mesh. A star stitch (which has many other names, including Double Cross and St. George and St. Andrew) occupies nine squares of mesh as you can see in the sample. As with cross-stitch, it does not matter which part of the ‘plus’ stitch you do first as long as you are consistent and do the stitch the same way every time.

Star stitch sample
Star stitch sample

If you are doing a framed picture or a wall hanging that you want to stay rigid and not sag, you need to work on jute canvas. To do a pillow or other soft object, you will need cotton canvas or a nylon mesh. Again, you may have to do some searching to find the appropriate materials.

Detail of cross-stitch butterfly wing
Here is another example of combined quickpoint. The butterfly was done in cross-stitch. The outlining is done in back-stitching with a single strand of crewel yarn, as are the “floating” lines that represent veins in the wings. The background is done in tent stitch. This is easier to see in the enlargement.


Butterfly, cross-stitch on canvas
Here is the completed butterfly framed under glass.  I had planned to go in with a single strand of yarn to cover the little white flecks left by stitches, but it seemed to me that they added some sparkle to the wing, like the butterflies' natural iridescence, so I left them there.

When I am planning a complicated piece with many different shades of color, I often make a detailed graph of the planned design before I begin stitching. On the “Close Encounter" pictures, I charted some features and simply outlined the rest. I did not chart the butterfly, just outlined it.

Bear and bee quickpoint by Annake
Original quickpoint by Annake
This quickpoint picture shows a bear in a field of sunflowers with a background of mountains and blue Colorado sky. The last step for the bear's head was to complete her features. The eyes, nose, and mouth were first done in tent stitch. Then some of the stitches were gone over in embroidery floss to give shine to the features. I tried to give the bear a startled expression. Tiny stitches show the reflections in her eyes. I exaggerated the size of the nose just a little because that is where the ‘close encounter’ will occur. I call these pictures “Close Encounters” because each shows a mammal encountering a very different kind of animal (in this case, a bee).

Waste canvas
Waste canvas
In order to add the bee to the picture I had to make smaller stitches than the quickpoint canvas would allow. I used a special canvas, called waste canvas. Its threads can easily be removed after the needlepoint (or cross-stitch) is complete. It can be used on fabric as well as on canvas or completed stitches. Let me show you how it is done, starting with a picture of the waste canvas, which can be worked as either mono canvas or penelope canvas. Since I planned to do the bee in tent stitch, I chose the mono option.

Closeup of bear and bee
I had to work out the bee design on graph paper. There are hundreds of species of wild bees in our western mountains. Some of them have bodies as large as as the last joint on my thumb! (This design does not represent any particular wild species.) Since I expected the thickness of the stitches on the bear's nose to present some problems, I first tried the pattern on waste canvas over a piece of heavy felt. I first cut a piece of waste canvas larger all around than the design to be stitched. If the design is very large, it is then pinned or basted to the background. I prefer basting because it is more secure. This one was so small that it didn't need to be basted. Then the stitches were put in just as they would be on regular mono needlepoint canvas. I didn't pull the stitches quite as tight as I would do ordinarily. The next picture shows the finished design with some of both the horizontal and vertical threads pulled out. A pair of small tweezers is useful for this. The last picture shows the design on the felt with all waste canvas removed.

Bee, waste canvas test sequence


Quickpoint can be used for geometric or stylized designs as well. Here is a pillow that I stitched in a pattern meant to represent evergreen trees and a canvas designed to represent our autumn aspens.

Quickpoint pillowtops


Cross-stitch rose on check gingham
When I start a class on counted cross-stitch, Spanish blackwork, or similar techniques, I start with a project on quarter-inch checked gingham because it closely resembles graph paper. This makes it easy for students to follow simple graphs and encourages them to try their own graphs. Graphs are very versatile. It is possible to do the same design in a multitude of sizes, from a covered button to a king-sized quilt. The same chart can be used for many different techniques: afghan stitch, beading, mosaic, latch-hook, piecework, etc. A chart like the one you can download today works for a whole rainbow of color schemes. Charts are easy to file for future reference and, laminated, long-lasting. Another advantage of the quarter-inch checked gingham is that it is easier on both the eyes and the hands than most canvases, Aida cloth, etc.

Let's say you want to do a rose in cross-stitch or needlepoint. Prepare your background, choosing the color carefully so it does not overpower the rose. Fabric should be backed with inter-facing. Canvas, except for plastic, should be taped on the edges. Find the center of your material. Run a row of basting stitches through the center, both vertically and horizontally, using a bold color that does not appear in your version of the rose. Now select the colors of your rose.  This pattern will work for most colors. You will need a range of 7 shades of your main color, plus two greens. Shades of the main color are represented by numbers on the chart, with 1 being the palest one and 7 the darkest one. Capital G represents the darker green and small g the lighter green. Lay your 7 materials out in front of you in light-to-dark order. Tag them with the numbers if you like. (I'll admit I'm greedy when it comes to needles; I used a separate needle for each shade.)

Downloadable rose chart
To download, click here
Here is the pattern for you to download. The pattern is a forgiving one. If you place an occasional stitch in the wrong square, it should not spoil your rose. Small differences are to be expected in handmade items. If you run out of a color, continue with the closest match you can find. The vertical and horizontal center rows on the chart are marked. Start stitching at the center and work outward. When the rose is complete, pull out the basting threads.

Patterned stitches such as Spanish blackwork, Russian redwork, Scandinavian whitework, Holbein embroidery and Assisi embroidery also work well on quarter-inch gingham. Be sure the gingham pattern is woven into the cloth, not printed on it. Choose your background color carefully so that it does not overwhelm your design. Here is a simple blackwork butterfly on quarter-inch gingham.

Blackwork butterfly on check gingham

"Heritage Rose", latch hooked rug
Years after I made the rose design, I enlarged and modified it for the center of a latch-hook rug.  Latch-hook is another technique that is easy on the eyes. I once taught the technique to a lady who was legally blind but could still distinguish colors. Latch-hook uses packs of pre-cut rug yarn. what is used in kits works well enough on on #5 canvas, but you may need to use 2 strands of some colors on #3.75 canvas to make good coverage. Commercial rug yarn packets work well on either mesh.

Upright gobelin stitch sample
Another technique that works well on canvas is one of long straight stitches of varying lengths (commonly called French longstitch). You can see these well in the portrait of the bighorn ram below. You can see the stitches used horizontally as well as vertically. There are even a few used diagonally. I did the background in tent stitch, but it could have easily been done in rows of straight up-and-down stitches. Don't leave any blank canvas; the bottom of one stitch shares a square of mesh with the top of the stitch in the next row.

"Bighorn", original needlepoint by Annake
I deliberately ended with the bighorn ram's 'portrait' because it was finished about this time last year. I have done a number of projects since and there are several in various stages of development. I have been doing needlework now for more than seven decades, so I know what I am talking about. I have made many changes and adaptations as I have aged, in order to keep doing the work I love so much; so I hope you will believe me when I say, "And you can do it, too!"

With love,


 Creative Commons LicenseThis post by Annake's Garden is licensed under a Creative Commons Attribution-NonCommercial-ShareAlike 3.0 Unported License.

Thursday, May 14, 2020

Trees in Art and Design

Bare trees against stormy sky
"Incoming Storm," photo by J.J.
Many trees change form drastically as they mature and age, sculpted by wind and weather.  A dwarfed, twisted tree at timberline can give real drama to a mountain scene. Some trees define the seasons. Last autumn we were in the high country, photographing the glorious colors of aspens and scrub oaks against the darker evergreens.

I like to study deciduous trees in the winter when their basic skeletal structure is most evident. Then I revisit the trees in the other seasons, sketching or photographing them to understand how that skeleton supports the masses of their leaves. Fruit trees are especially interesting because they have a flowering stage — often before any leaves have formed — and provide attractive backgrounds when the fruit is ripe. If I understand the way a tree is growing, I can anticipate where the masses of foliage are going to be once they develop.

Fruit tree in bloom
Ornamental fruit tree in bloom
Trees are, of course, vital to many landscape compositions in graphic arts and needle arts, but they can compliment many other types of composition. For example, they can contribute in many ways to photography: to enhance an outdoor wedding or family picnic, as backgrounds for pictures of animals that use them for food and shelter, to soften the lines of street scenes or individual buildings, etc. One way to change a potential landscape or a picture with houses, for example, is to move the surrounding trees into different positions.


Click here to Download
Here is a quick watercolor study of a palm tree that I made many years ago in Panama. Imagine that you can "borrow" my palm tree. What do you see beneath it? An abandoned beach ball? A picnic lunch? A sunbather stretched out on a blanket? An animal digging in the sand for turtle eggs? See how a single tree can stimulate your imagination? Download the tree. Make a sketch of what you would include or look for a photograph that you could adapt.

Here are some things to consider when looking at trees. Study the patterns created by the direction of the light. If the sun shines directly on the tree from the front, which parts of the tree are darkest and lightest? What sorts of patterns are created around the tree? Where do the shadows fall? How do these things change when the trees are lit by light coming from behind them? (Sometimes it helps to half-close your eyes to really distinguish the masses of dark and light.)  If you are sketching the tree, put in the masses of middle value first. Then concentrate on the lighter and darker masses. Trees do not grow out of the ground like fence posts. Include the roots and the spread of the tree toward the roots in your study (sketch) of the tree. If you are doing a picture that includes a group of trees, remember that distance tends to add gray to more distant objects and try to make the farthest trees less distinct than those in the foreground.

Landscaping tree book
I have, as a prized possession, a book written in 1983 specifically for landscape architects and nurserymen. It shows detailed drawings of trees and shrubs commonly used for those purposes. The pictures are all drawn to the same scale, so that you can make combined groupings and be sure that they would look natural together (in a park or garden, for example). It is also possible to enlarge a tree — or even part of a tree — to show how it would look beside or behind a building. You can also enlarge foreground trees and reduce background ones to show realistic perspective. Remember that distance not only makes trees look smaller. It also makes them look paler.

Transparency of an  evergreen
One of Annake's transparencies
Finally, the trees can be copied on clear overlays,  and be superimposed one on another. Although my book is probably long out of print, comparable photographs or drawings can be found in library books or online. Look for such topics as Forestry, Trees of <insert your country, region, continent, or the World>, Landscaping, or Ornamental Trees.

Here is a simple way to determine whether a tree might enhance your picture. When you have your photograph or sketch well organized, place a clear plastic overlay of the tree shape you are considering on top of it. This doesn’t have to be a detailed picture of the tree, just its general shape and growth pattern. You would be surprised, for example, how many shapes different kinds of evergreens can take. I have built up a collection of such overlays that I keep in a file folder. Because they are transparent, I can move them into any position I want on top of my sketch, reverse them, show only a portion of the tree, etc. Move a tree that blocks the view of a building to behind the building. You will still have its shape as a point of interest in the composition, but it will no longer overshadow the building or hide interesting architectural features. Even a single branch can have a big impact as you can see in this  needlepoint picture.

Cascades needlepoint by Annake
"Cascades," needlepoint by Annake

sketch of bare trunk and llmbs
Trunk and limbs
Let's go step-by-step through a tree sketch. I am going to use a simple #2 pencil because it is the one you are most likely to have available. I recommend you do this exercise in late spring or summer, when trees are usually in their best condition. It is neither necessary nor desirable to draw, paint, or embroider the majority of tree branches.  Get the larger ones and enough of smaller ones to show the directions in which the tree is growing. I like to think of the limbs as gesturing in these directions.  After all, when you portray a tree you are making an image of a living, growing creature, constantly adapting to its environment. Its growth is dictated by the amount of sunlight it gets and the directions and angles of that light. It responds to the winds and the amount and kind of moisture it gets — rain, fog, snow, etc.  Its form may be changed at various stages of its life by the presence of obstacles like large rocks, fences, buildings and other trees.  Try to see these influences in the living tree and indicate them in your sketch. And don't forget to show some roots in your sketch to connect the tree with the ground. When I am satisfied with my sketch, I move on to the next step.

sketch of trunk and llmbs with foliage blocked in
Foliage blocked in
Just as it is not necessary to show all the tree limbs, it is not necessary to show all the foliage. If you look at a single tree, you will see the foliage is arranged in large clusters with parts of the trunk and limbs showing through between them. Look at the clusters. Which ones seem to be pointing — or gesturing — toward you? Which ones are pointing away from you, out to the sides, or up at the sky?  Treat them like separate pieces in a jig-saw puzzle. Sketch the general shapes of the most important ones. You don't need all of the clusters to make the tree look real. Make some little irregularities in the outlines of the shapes for realism. Indicate the larger limbs and parts of the trunk that show between the masses of leaves and where they may be seen in "holes" in the foliage. Carefully erase any of the trunk or limbs that you don't want to have showing in the finished design. (Pencil erasers tend to smudge, so it is a good idea to have a piece of sandpaper to remove the surface of the eraser as it starts to darken. A kneadable eraser is a good thing to have.)

tree sketch in greyscale
Values
Now it is time to consider the values of the masses of foliage. Value refers to the relative lightness or darkness of objects or areas. (We are not going to consider color at this stage.)  Which cluster is the lightest and brightest in the tree? Leave it nearly as white as your drawing paper. Check to see if there are any areas that are almost as bright.  Fill them in as lightly as possible with your pencil. Now find the darkest cluster. Consider it carefully. Is it darker than the tree trunk and limbs? About the same? Lighter? Fill it in very solidly, pressing hard with the tip and side of your pencil point. Go over it as many times as you need to give it the value you want.  Continue working alternately with the next lightest and next darkest clusters until all of them have a value. Check the whole composition against the real tree for accuracy. Do you need to further darken any limbs or parts of the tree's trunk?

If you have easy access to the tree, this may be a good place to stop sketching and leave color decisions to another day. Put your sketch away and don't overwork it. If you can get a couple of photographs of the tree, that is an excellent idea. It might rain tomorrow.

Summer colors or autumn?


Evergreens photo by J.D.
Evergreens
So far we have only discussed broad-leaved trees. Evergreens present different problems and possibilities.  Because so many conifers have a generalized triangular shape, many people never try to learn the differences between the species and assign them cookie-cutter appearances. We have a number of different species close by. I love to look at them just before sunrise.  They do start out as very simple silhouettes, but, as the light begins to filter through them, you see that they grow in very different ways. Some of them reach for the sky with tiers of V-shaped branches. Others are less dense and produce their branches at much wider angles with their trunks. Still others have branches that curve or angle downward, sometimes touching the ground.  And there are ground-hugging evergreens which don't take a tree form at all.  They are all worth study and are particularly beautiful in winter.

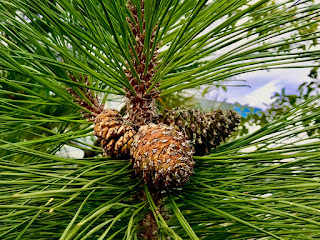
Pine cones, photo by J.J.
Trees that lose their leaves in autumn are known as broad-leafed trees. Evergreens have needles or scales instead of leaves. They lose these gradually all year long. You can usually find a pile of them underneath the tree.  A number of evergreen trees bear cones and are classified as conifers. A photograph or sketch simply featuring cones and needles can be very decorative.  If you are not familiar with the evergreen trees in your locality,  consult a tree guide book or have a talk with someone from a local nursery.

I often use trees to design needlework projects. Some of them are highly stylized like the evergreens and aspens in the two end photos, while others are more naturalistic like the design in the center.

Needleworks with trees

Simple tree silhouettes, particularly of evergreens, make nice border designs for illustrations, needlework borders or all-over patterns, photo mats, etc.

Chart for cross-stitched border
Chart for cross-stitched border of evergreen silhouettes

It is often useful to study how artists have represented trees in their works. For a long time trees were simply backdrops and not done with particular attention to detail. It wasn't until about the middle of the 19th Century that, particularly in France, they became viewed as subjects worthy of painting for their own sake. Jean Baptiste Camille Corot led the field in this respect. He strongly influenced the Impressionist painters. They, in turn, influenced whole schools of contemporary and Post-Impressionist artists. Pointillist painter Paul Signac also did beautiful trees. Look at paintings by your favorite painters to see how they handled the subject of trees.

If you missed our recent Arbor Day post, follow this link. For more information about trees, check our Extras section for "Teachable Moments" activities and a Self-Teaching Unit for teens.  And, if you can, plant a tree!

Now, as our favorite tree-house builder loves to say: "To the trees!"


 Creative Commons LicenseThis post by Annake's Garden is licensed under a Creative Commons Attribution-NonCommercial-ShareAlike 3.0 Unported License.

Contact Us

Name

Email *

Message *

Blog Archive