Showing posts with label tutorials. Show all posts

Saturday, October 10, 2020

Fun With Felt

Felt butterfly picture by Annake
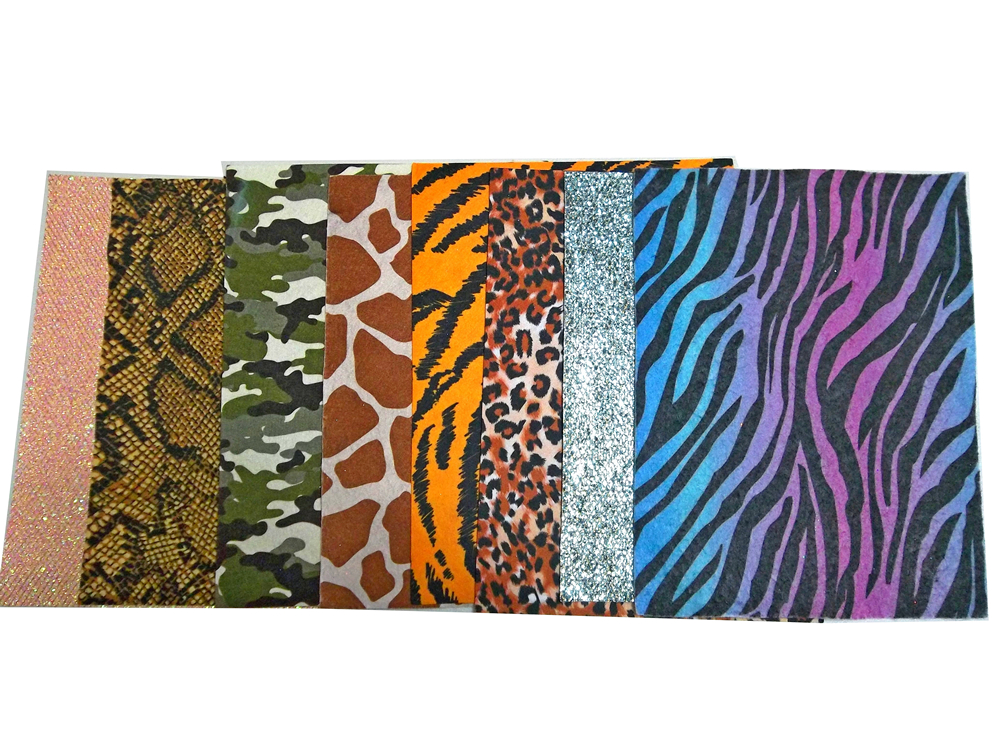
Felt is a versatile fabric with many uses. Because it does not need to be hemmed, it takes less time and work to make something from it. It comes in a wide variety of colors and a number of patterns like zebra or tiger skin,  "psychedelic" colors, and small repeated motifs.  Most of the felt pictures you will see today are done with fabric glue, but there is no reason you cannot stitch them down by hand or machine if you prefer. They will probably be more durable done that way, but if you are going to frame the design. sewing is probably not necessary.

Fancy felt assortment


Projects like this, whether backed, framed or hung with a fancy hanger, are good to fill narrow or awkward wall spaces, like beside or above a door, above or below a window, down the wall beside a staircase, or beside a set of shelves.

Simple pattern idea, adaptable to felt

They are great for children's rooms, unframed or framed without glass, because they are unbreakable. I make my own patterns, but you may not feel comfortable doing that. However, pictures for small children should be simple. Too much detail is confusing and makes it harder for them to identify and name things. There are patterns available online. Some of them are free; others have a fee. But you can use children's coloring books or trace pictures from children's picture books. Here is a design I adapted from one of my puppets.

 
Shopping bag with felt applique
 
Tools and materials
You will need;
     a felt rectangle for each color of your design
     fabric glue
     sharp scissors for the felt*
     another pair of scissors for paper patterns
       a pencil or marker
     paper for the pattern parts

* Please don't use your fabric scissors for anything but fabric. You would be amazed how much paper will blunt a blade edge. We have a gentleman who sharpens scissors here in our little town, but that sort of help can be hard to find and you can end up spending quite a bit for another good pair of scissors or shears.

Because shopping is so difficult this year, I am not going to recommend any brand names for materials. The felt pieces can usually be found at the big chains like Walmart or Target, fabric stores, or craft shops. Read the directions on the fabric glue carefully and follow the directions closely. If you are using a spray glue, which I don't recommend, try to use it outdoors or in a large space like a garage and wear a mask while dealing with it. Elmer's white glue will work for a piece that is meant to be temporary, but it is messier and may seep through.

Simple Iris pattern

When you are making a pattern for a felt picture, keep it as simple as possible. Once your sketch is finished, make a clean copy of it. Use paper about the weight of computer paper. I like to go around the outlines of the pattern pieces with a colored marker. That makes a thicker line than a pencil or a pen, so that I can more easily cut right down the center of the marker line. I find this gives me a better fit with adjacent pieces which share a common borderline.


Saved pattern pieces
Choose your background color. As each piece of the picture is cut out, remove that part of the pattern. write the name of that particular piece (for example "long leaf, upper right") and store the pattern piece in a business-sized envelope for future reference. Label the front of the envelope with an appropriate title and file it in a shoebox or similar container.

Finished felt iris picture
Arrange the pattern pieces on the background exactly where you want them to be in the finished composition. Carefully lift the pieces one at a time and apply the fabric glue as directed on the container. Carefully put each section in place and let the pieces dry completely. If you decide you need to press the piece, use a pressing cloth over the felt and a moderate temperature for the iron.


Easy hanger method
The finished composition can then be backed, framed without glass, framed under glass, or whatever you wish. If you want it to be a small wall hanging, stitch or glue a folded piece of another color of felt at the top of the picture so that it becomes a tube that will hold the hanger. Slide the rod of the hanger through the tube, close and fasten it.


Are you taking the advice I have seen and heard for having a candy "treasure hunt" around your house or apartment for your children, instead of the traditional "Trick or Treat" activity this year?  Here is an idea for something a little special for the dinner table before the treasure hunt. Make a special Halloween placemat for each child and cover it with clear plastic wrap or slip it into a clear plastic bag to prevent food spills. Then the child can have it for a keepsake, room decoration, or whatever they choose. I think everything we can do to make this very different celebration special for the children is worthwhile. (We are talking about felt today, but of course you can do this activity with colored papers; however, the mats will not last long and won't make very good keepsakes.) If you want another activity, make a draw-string bag for the collection of the candy. The child can use the bag for other purposes after the holiday.
 
You can do quite a bit with a simple design like this. For example, you can make any kind of jack-o'-lantern design on the pumpkin that you like — friendly or scary or silly.  You don't have to have a black cat coming out of the pumpkin. It could be a bat, a ghost, an owl, a pirate — anything you want.

Finished leopard "portrait"
For "portraits" of animals or storybook characters, just the head is necessary. I enlarge the heads of my puppets for such pictures. We have published several articles about puppets with color photographs and the occasional pattern. You can find those by using the "Search My Blog" feature at the side of this article. Just type in the word "puppet".  Incidentally, all the dog and cat puppets I do are outfitted with a collar and tag to remind people to do that for their pets. There is also an article about teaching with puppets in our EXTRAS section, listed at the top of this article.

An easy way to display a picture is to "frame" it with a wooden or plastic embroidery hoop. Plastic hoops come in a variety of colors. A wooden hoop can be left as it is, varnished, or painted. Choose a hoop that will display the amount of background that you want. Place the felt picture over the bottom part of the hoop. Adjust the upper part of the hoop so that the tension screw is directly above the center of the picture. Push the top part of the hoop gently down over the felt. Tighten the screw a little at a time, pulling the felt taut as you do so. When the picture is completely flat, turn it over and trim away the extra felt. The small space left under the screw is usually large enough for you to slip the screw over a "headless" nail for hanging.

Stuffed toy from puppet pattern


I stuff the heads of my puppets with fiberfill (you can use cotton), leaving just enough room for one or two fingers of the puppeteer. You can make a soft doll by stuffing the whole body and sewing the bottom edge securely closed.


Puppet used as treat bag
Or you can prepare it as a working puppet but fill the body with cellophane-wrapped hard candies, miniature candy bars, small trinkets, etc. Sew the bottom shut with easy to remove stitches so the child can pull them out to open the seam. Then he or she can enjoy the treats in the gift bag and still have the puppet to play with.


Felt scraps
Save your felt scraps in a bag or a large mailing envelope for use in future projects.  For, as my Grandma used to say:

"Use it up,
Wear it out,
Make it do,
Or do without."

I hope you have gotten some ideas from this article. I put the emphasis on fun because that is something we all need to get us through these challenging times.

Stay safe. Be well. Our best wishes go to all of you.


 Creative Commons LicenseThis post by Annake's Garden is licensed under a Creative Commons Attribution-NonCommercial-ShareAlike 3.0 Unported License.

Saturday, September 5, 2020

Using Annake's Garden's "Extras"

J. D. and I originally started our "Extras" section (see tab in the menu above) to encourage older people to learn how to keep doing art and crafts even though their eyes and hands, like mine, have lost some clarity and dexterity, and also to encourage newcomers to try new techniques. Then came the pandemic. We found ourselves adding suggestions for dealing with small children, guiding the "’tweens" to learn things at their own pace and look for more, and devising self-teaching units for teens who like to learn on their own or with a group they choose as co-learners. Some of you have already taken advantage of what we have posted and we intend to keep adding to the "Extras" and organizing them to make them readily available.

We realize that there are many of you who will find yourself staying home and supervising children of all ages over the coming weeks and months. This will be new territory for many of you, especially dads, grandpas, and older brothers who may be taking courses of their own. Using our most recent previous post, we are using this current post to demonstrate teaching a topic at many levels, starting with small children. Please bear with us and follow through the age-level examples. You cannot teach a three-year-old the way you coached that after-school soccer team.

If you read our Extras, you probably have noticed that I often suggest teaching children of various ages with simple themes and equipment.  We just did a post about butterflies and moths. That set me to thinking about various things that could be taught to children at various levels of development, starting with teaching very young children with the aid of paper butterflies. The butterflies use simple materials and are easy to make. I have included some outline patterns at the end of this section to get you started. You can begin with very young children and progress to teach more complex ideas as the children grow older. At the end of this discussion I will make some suggestions for older children and also suggest how teens can turn the subject into a self-teaching unit for science, creative writing, etc.


TEACHING WITH PAPER BUTTERFLIES

Prepare yourself:

Make a note of the facts you know about butterflies and do a search for additional information. Children will ask questions — lots and lots of questions. Treat them seriously because they are serious to the children. If you don't know the answer, tell them so and promise to find out. Keep your promise. Breaking promises to children is destructive to your relationship with them. Don't worry that they will think you don't know everything about everything. They will come to that conclusion on their own. And a few years from now, they will conclude that you don't know anything about anything that they are passionate about.

Prepare your materials:

You will need:
    a pencil
    paper (Colored construction paper, gift wrap, colorful magazine  pictures)
    scissors (sharp-pointed for you, put away afterward; blunt-pointed for them)
    tape, paste, or glue
    popsicle or ice cream bar sticks
    patterns for several butterflies
Nice to have:
    a pipe cleaner for each butterfly (cut them in half if you like)
    glitter (Yes, gentlemen, you need to master glitter as well)
    a hole-punch to make holes in the wings or make "dots" to glue on
    clear plastic if you want clear or partially-clear wings

Don't worry. You will need this stuff again and again. Have a place to store it and make participating in clean-up a part of each lesson.

 What to do
:

Click here to download
Cut out two butterfly shapes the same size. For older children, make sure the two shapes are from different papers so that you can demonstrate how the wings look different when the butterflies are flying and when they are at rest.

To make antennae, use two small pieces of paper or bend a pipe cleaner in half. curl the ends of the pipe cleaner so there are no sharp ends.

Decorate the butterfly wings.

If you want wings that are partially clear, cut "windows" in the same place on both sets of wings. Glue clear plastic on the backs of the butterflies.
Cut off any plastic that shows past the edges of the butterflies.

Glue the butterfly bodies to the popsicle stick. You may want to do this one at a time and let them dry completely before you attach the other side. If you are using antennae, glue them to the back of the top butterfly before you attach it to the popsicle stick.

When a butterfly is dry, wave the stick through the air to make sure everything is firmly attached.

Teaching with your butterflies:

Start with simple ideas. Butterflies are very small animals. We should not touch them because we could hurt them. If one comes and sits on us, we should be very quiet and not move until the butterfly flies away. Butterflies fly by flapping their wings.  (Put your hands up, thumbs together and demonstrate flapping. Have the children try to copy you.) When the butterfly needs to rest or sleep, it sits on a plant and holds its wings together. (Hands up, palms together, children copy.) With your paper butterflies, show that the butterflies fronts and backs are different. Let each child choose a butterfly and name it. Let the children "fly" their butterflies around the room for a few minutes, then bring them to be put away. Go through the routine of flapping the next session. Ask the children questions to see if they remember what they learned before. Then teach a couple of new concepts.  It is nice to have a story as follow-up.

If your local library is currently open, find out what children's picture books and storybooks about butterflies and caterpillars are available or can be ordered for you. If you have more than two children, who can sit on either side of you while you read, have them sit in a semicircle in front of you. Show them the cover of the book and then tell them the title. After you read each page, turn it so that all the children can see it and give them time to look. Children will have favorites and want to hear them over and over. Don't show how bored you may be, and don't ‘cheat’ by leaving out parts. They will know! And if you do it again, you will lose a little bit of their trust.

There are literally thousands of pictures of butterflies and short videos about them on line. If it is winter or you are in an area where the children are not likely to see butterflies, these are a good alternative.

You can teach any simple idea with some version of this technique. Don't try to teach too many new things in one day and remember that repetition is the way small children learn. Praise progress; correct gently. Correct quietly, but firmly if the child is doing something dangerous or destructive. You are now officially on your own.  Good luck. There is always the next time to do better.
  
The "’Tweens" —  Grades 4 Through 8

Starting at about 4th grade, children will, if encouraged, begin to find out things on their own. Competition plays a part in this. Timed quizzes and JEOPARDY-type games become popular, especially if grades are not involved. Continuing with our butterfly theme, here are some suggestions for further study, both in and out of class. The work can be individual or group-oriented. The complexity of the questions and the language for the suggested topics can be adjusted to the age level.

1. Butterflies are insects. In the next 5 minutes, write down a list of as many insects as you can think of. (Students make their lists. Teacher writes them on a poster or chalkboard.) Were there any that weren't insects? Cross them off. Ask the students to choose 3 insects from the list and find out 3 unusual or startling facts about them by (give a time limit.) Some students will go much further than the assignment. Share all information.

2. Over millions of years, many flowering plants have formed a partnership with butterflies and other animals. A butterfly visits a flower. It unrolls its long proboscis, a tube-like mouth-part, to drink a sweet, sugary fluid called nectar from the flower. This does not hurt the flower. The flower made the nectar for just this purpose. Often there are lines or spots on the flower to show the butterfly how to find the nectar. While the butterfly moves around, it picks up pollen which sticks to its body. When it flies to another flower, some of the pollen rubs off. This helps the flower.

Research to find the answers to these questions:
    What is pollen and why does the flower need it moved to another flower?
    What kind of light can the butterfly see that we cannot?
    How do flowers make sure that the butterfly picks up some pollen?
    What other animals pollinate flowers? Name one that is not an insect.
    What is cross-pollination and why is it important?

3. Butterflies and moths go through 4 different stages in their lives. They are egg, caterpillar (also called larva), pupa and adult. The process is called metamorphosis, which means "changing shape process". A 4-stage process of change is called complete metamorphosis. Fewer than 4 stages are sometimes called incomplete metamorphosis. For example, a frog goes through 3 stages: egg, tadpole, frog. The caterpillar hatches out of the egg, eats as much as it can, grows so much that it has to shed its skin several times (a process called molting). Then it hangs its body, usually by the tail, on a twig or branch and appears to go to sleep. Its body hardens as a stiff covering forms over it. A moth usually spins a tough silk covering, called a cocoon, for itself and often does this underground. But in either case the body changes completely, so that, when it comes out of the little shell or cocoon it leaves behind, it is a butterfly or a moth. Read about butterfly or moth metamorphosis and draw a picture of the 4 stages.

4. You may want to know why animals and plants have those strange looking scientific names. Think of it this way: the common name "butterfly" is not the same in many other languages — 300 of them to be exact!  Here are just a few of those names for butterfly and their countries: sommerfugl (Denmark), papillion (France), psyche (Greece), chouchou (Japan), farfalla (Italy), lubalaba (West Africa), mariposa (Spain), parpar (Israel). Imagine trying to translate the name of the Tiger Swallowtail butterfly into 300 different languages!  When an animal or plant has one scientific name, scientists from every one of those countries will recognize it and be able to write or talk to scientists in other countries about it. Just for fun, why don't you write a new name for "butterfly" and share it with the class?

5. Teach students the form for writing a haiku. Have them cut a butterfly shape from paper and write or print their haiku on it. Then have them incorporate their butterfly into a poster, paper sculpture, mobile or other art form.  Make a display of all the projects.

6. More ideas:

    Silk thread is made by silkworm moth caterpillars. This is a huge industry. Some older students may want to research it. CAUTION: They may not like what they find.

    The Painted Lady butterfly is found on all the continents except South America and Antarctica. Some students may like the Painted Lady Migration Project. Potential for map studies and figuring large distances.

     Moths have been around for about 200 million years. What do fossils tell us about the Earth at that time? Butterflies appeared about 50 million years ago. What might have been happening to make them become active in daylight?

     Many butterflies and moths are endangered by climate change, deforestation, loss of habitat and loss of food plants. Some may have already become extinct. What can we do to help protect them?

How Teens Can Do a Self-Teaching Unit That They Won't get In School

Teens:  self-teaching units are completely directed by you. There is nothing to be turned in and there are no grades. The units provide information on a subject and suggest activities, but you are in control of which ones you find interesting and challenging. You work at your own speed and select what is most interesting to you. You may work alone or contact friends or fellow students who might like to join you in the study, in person or online. The results of your research can be converted into essays, term papers, speeches, 3-dimensional constructions or other projects if those interest you and further your traditional education.

Currently there are two complete units in our Extras — a botany unit on the history of trees, and one on being an archaeologist. I'm going to "walk you through" a zoology unit suggested by our previous post. There is also a series of our posts on Color, combining several sciences and visual art. Below are the first four in the series, which you can find in our Archives. The fifth installment, which concerns the appearance and development of eyes over millions of years and the impact of color on living organisms today, is slated for late September.

August 14, 2019: Spectral Light And Structural Light; All About Color, Part I
September 24, 2019: Pigments And Palettes; All About Color, Part II
February 10, 2020: The Non-Colors And Metallics; All About Color, Part III
June 28, 2020: The "Escenses" of Color; All about Color, Part VI

In order to make our previous post the basis of a self-teaching unit, first read the directions for the 'Tweens above, and write down investigations that you could carry much further, making note of any scientific terms for follow-up. Then go to the bottom of this page and select "Older Posts". The first one will be our article: "Butterflies, Moths, and Words: Entomology & Etymology". Read it and consider how you would proceed if you chose to study that subject. We will continue to add more units on sciences and the arts as time permits, so check back occasionally. J.D. and I wish you the very best of luck in your studies.


 Creative Commons LicenseThis post by Annake's Garden is licensed under a Creative Commons Attribution-NonCommercial-ShareAlike 3.0 Unported License.

Tuesday, August 18, 2020

Butterflies, Moths, And Words: Entomology & Etymology

Embroidered moth by Annake

We considered just posting this to our Extras section; but, since there is still a little summer left to chase butterflies outdoors, we decided to post it here. Enjoy! — J.D.

About 600 million years ago, plants and animals which had lived successfully in the ocean began to venture onto the pieces of land that had risen above the waves. Some of them were able to adjust to life in small pools and later in lagoons that were a mixture of saltwater and fresh water. Some of the most successful of these animals belonged to the group we now call arthropods (arthro=joint, pod=leg or foot). Arthropods have jointed legs. They don't have warm blood, bones, fins, feathers, or fur. They do have hard coverings called exoskeletons (exo=outer, skeleton=body framework) outside their bodies. Those are the things we can count on. Everything else about them is a case of usually-but-there-may-be-exceptions. Today close to 75 per cent of all the species (a special group) of animals on Earth are arthropods. You didn't think we ran the planet, did you?

Lobsters, border design by Annake
Some of those many arthropods...

Blue butterfly (Public domain photo)
The largest group or phylum (rank) Arthropoda is the class (division) Insecta. Okay, we all know some insects. The largest group or order (arrangement) of insects is Coleoptera (coleo=sheath, ptera=wing), the beetles. The second largest order is Lepidoptera (lepido=scale, ptera=wing), the moths and butterflies. That is a good description because they do have wings covered by tiny scales made from flattened hairs.  The names "butterfly" and "moth" are Old English names for the insects, written about since 700 AD. and later by English authors like Chaucer and Shakespeare. And no, "butterfly" is NOT "flutterby" twisted around. There are at least 160,000 species of moths and 20,000 to possibly as many as 45,000 species of butterflies.

Hummingbird moth, photo by J.J.
When and how did the Lepidoptera separate from the other arthropods? That is a hard question to answer because these creatures are so delicate that they are seldom preserved as fossils. Most of their fossils are of wing scales that left an impression in a material that later fossilized. We can compare them to modern moths and butterflies, but we cannot recreate the original animals. The exceptions are when butterflies or moths were preserved in amber. Amber is fossilized tree sap. When it was fresh, the sap often flowed over insects and other small animals and hardened, preserving them just as they were in life. We do know that the moths came first. There were at least three families of primitive (first or earliest) moths which have been traced to nearly 200 million years ago. If there were three families already at that time, there must have been a common ancestor even earlier which has not yet been found. Butterflies, on the other hand, came along later, 40 to 50 million years ago.

What is the difference between a butterfly and a moth? All butterflies are really moths, but they behave differently. Even then there are exceptions to the 'rules'. Most, but not all, moths are active at night. Most butterflies are active in the daytime. Some of each fly at dusk or dawn. Most moths are relatively small and dull-colored, but we will show you some that are big, boldly colored, and beautiful. Many butterflies are brightly colored and some are large. Moths tend to rest with their wings flat, while most butterflies hold their wings upright and pressed together when they are at rest. Most moths are darker colored on top and lighter underneath, while many butterflies are just the opposite. Both use devices like eye-shaped spots to startle or scare away enemies. Look at the 'eyes' on this Io moth.
Io moth (Public domain photo)
Io moth

Butterfly laying eggs (Public domain photo)
Butterfly laying eggs (circled in red)
All butterflies and moths hatch from eggs laid by the females of their particular species. A female may lay eggs even if she has not mated, but they will not contain caterpillars (old North French word meaning "hairy like a cat"), also called larvae (an immature form of the species which does not resemble the adult). The eggs come in different sizes and in many shapes, including round, oval, teardrop-shaped and drum-shaped. They also come in many colors and surface textures. A female may lay only a few eggs, usually one-at-a-time on the underside of a leaf, or she may lay hundreds. The average number is from 150 to 200. Some females lay their eggs on a specific plant because that is all her babies will eat once they hatch. Others prefer a wide range of plants. The female will die soon after she has laid all her eggs.

Somehow a small generalized form, or several forms together, gave rise to the Lepidoptera. How they did it is not yet understood. The most likely idea goes like this:
    1. In order to get a caterpillar, start with a worm something like an earthworm, but give it strong jaws with small sharp teeth and simple eyes that can tell light from dark. A caterpillar chews with jaws that work from side to side, not bottom to top like ours. Watching one chew is really strange!   
    2.  Divide the worm's body into segments (sections) and stick a leg on each side of every segment. Now you have something like a millipede (milli=1000, pede=leg or foot), which is also an arthropod, except that millipedes have 2 pairs of legs on each segment. They don't have a thousand legs; the record is 750.
Millipede (public domain photo)
Millipede

    3. Maybe that wasn't such a good idea. Let's try this: Make the first 3 pairs of legs the only walking legs and strengthen the segments below them to be flexible and able to wave around in different directions until the legs can find a foothold. Give some of the remaining legs the ability to clasp a surface and keep the animal from falling off a stem or leaf.
    4. Give your caterpillar a color and pattern that helps it hide or a bold, colorful one that advertises "You will be sorry if you eat me!" Many caterpillars are poisonous, having absorbed poisons from the plants they eat, while others just taste nasty.  A bird or frog might eat one, but it wouldn't make that mistake again!

Monarch butterfly caterpillar (public domain photo)
Monarch butterfly caterpillar
When the caterpillar is ready to leave the egg, it chews a hole in the egg's shell and pulls itself out. Many caterpillars then turn around and eat the rest of the eggshell, probably getting needed minerals or enzymes (proteins that speed up a chemical reaction) from it. The caterpillar has a head with jaws and simple eyes. It has six walking legs close behind the head.  It has tiny holes called spiracles ("breathing holes"), on the sides of its segmented body. Toward the rear end of its body it has leg-like structures called pro-legs (pro=before, earlier), which it uses to grip the surface of a leaf. It may be colored to match its leaf, have a textured pattern that hides it, or have a bright-colored pattern that sends a warning. It may look like dirt, a dead leaf, or bird droppings. At least one looks like a snake!

Pupa (public domain photo)
Pupa
The caterpillar's only desire is to eat, eat, eat. It grows fast. While its skin does stretch, there soon comes a time when it must be shed. This is called molting (molt=throw off). The next skin has already formed under the first one. Sometimes, when the outer skin has pulled away, it becomes so transparent that it is possible to see the new one through it. It is soft and damp and can be stretched greatly before it hardens. Not only is the caterpillar now much larger, but its color and pattern may be unlike the previous one. Most caterpillars molt five times over a period of a couple of months. They then stop eating and prepare to move on to the next stage of their lives, the pupa (a name given the structure by the scientist and classifier Linnaeus)  or chrysalis ("golden", from the color of many of them).

The caterpillar finds a secure location in which to make the change. It spins silk threads to fasten itself in place. A butterfly caterpillar usually hangs by its tail, although it may hold itself upright with a band of silk. Over time they have discarded or lost much of the covering that moths use. Moths are more likely to spin tough, papery-looking silk cocoons (French for "sheaths") which may be hidden by dead leaves or the ground itself. The pupa no longer looks like a caterpillar, but does not reveal what its adult form will be.

Luna moth (public domain photo)
Luna moth
Scientists can cut open the coverings of the pupa to see what happens on each day. This kills each pupa, but gives them a look at the "what" of each day's process, and even suggestions about some of the "why" a process is going on, but there are still mysteries concerning the "how". Suppose you were designing a process that would turn a pupa into a butterfly or moth. Here are some of the changes you might make.

Moth antennae (Public domain photo)
Moth antennae
    1. Fuse the first few segments next to the eyes and mouth to make a head. Give it more complicated compound eyes with excellent vision even into colors and wavelengths of light that we cannot see, including polarized light.    
    2 Get rid of the jaws and teeth and substitute a flexible mouth-part that can be rolled into a tube for sucking nectar or other juices from a plant and can be rolled up neatly below the head when it isn't in use. Stick on a pair of sense organs known as antennae (old sailor's term for a "sail yard", the long structure that supports a sail) or "feelers" at the top of the head. The term "feeler" is misleading. These organs carry the animal's sense of smell. Only the males have the super-large feathery antennae seen here. They're sniffing for females.
Emerging butterfly (public domain photo)
Emerging butterfly
    3. Fuse the next three segments and put a pair of jointed legs on each one. These are the same legs the caterpillar had, just rebuilt. If a leg is damaged in the caterpillar stage, the butterfly or moth will be lame when it emerges as an adult.
    4. Expand and harden the next section to make a thorax (chest). Make this part of the body anchor the 3 pairs of jointed legs and the powerful muscles that move the wings. There are 4 wings. The pair of wings up by the head are called the forewings. The pair farther down are the hindwings. Poke some holes for the spiracles so that air can move in and out.
    5. Stretch the last part of the body to make the abdomen (belly). This should have about 10 segments and contain a long tubular heart, muscles for breathing, the digestive system, the reproductive organs, and an ovipositor (ovi=egg, positor=placer) for the female. This is a tube through which she can lay her eggs. That should do the job!

Butterflu antennae (public domain photo)
Butterfly antennae
The change from the pupa to the adult is a process called metamorphosis (transformation}. The adult breaks out headfirst. Most butterflies have thready antennae with little knobs on the ends. Moths have heavier antennae, usually without knobs, and larger scales on their wings. They usually have thicker bodies with coverings of hairs or what looks like fur — probably to keep them warm at night.  You should discover fairly soon whether the adult is a butterfly or a moth.

One difference which isn't visible is that many moths have hearing organs (not "ears") on or inside their bodies. Moths and bats have been having an "arms race" for millions of years. The bats develop better ways to find the moths and the moths develop better ways to confuse the bats. Some moths actually make clicking noises that interfere with bats' 'radar'. But moths had some of these organs before there were any bats. Scientists have found that some male moths make sounds to attract the females.

Cecropia moth (public domain photo)
Cecropia moth

When I was a teenager, I used to collect cocoons every autumn. My room was the coldest place in the house, so I pinned the cocoons to the curtains in the north window. In the spring I was rewarded with the appearance of big silk moths like this one. They never failed to hatch. Most were females. The males just dry off and fly away. The females linger, giving off a musky perfume that many people don't like, but I enjoyed. They wait patiently until the males, lured by their scent from as much as a mile away, come calling. The ladies each chose their favorite and flew off to mate and start the life cycle all over again.

Polyphemus moth (public domain photo)
Polyphemus moth

Moths have had many millions of years to adapt to all kinds of conditions and can be found all over the world except in the polar regions. They are not a problem in themselves, but some of their caterpillars have become serious pests because they eat clothing, food crops, and other things that we value. On the other hand, they produce silk and pollinate a number of plants. They pick up pollen while they are feeding on one flower; some of it rubs of inside the next flower. Even butterflies, although they are great pollinators, can have harmful caterpillars. A good example is the white cabbage butterfly.

Monarch butterflies (public domain photo)
 Migrating Monarch butterflies
Many butterflies have a relatively small range, usually tied to their choice of a food plant. Others, like the Monarch, migrate seasonally and return to "home base" for the winter. But one little butterfly has already established itself on all the continents but South America and Antarctica. (They are established in Central America and tend to stay in the mountains in hot countries, so we may find them there in South America soon.) Its name is the Painted Lady. It has divided into a number of species over time and distance, but none exceed the 2-21/2-inch size range, All have the same color combination and similar patterns. We have 2 species: the American Painted Lady and a slightly larger species that was probably its ancestor, which visits from Mexico every year. Their range has expanded northward until it is now well north of the Canadian border. The butterflies have been collected by the thousands over the centuries and preserved in collections, but look at any one of them and you will recognize a Painted Lady.  Scientists now believe that this species may be the first to solve the problem of flying long distances and set out from Africa thousands of years ago in its quest to conquer the world.

Painted Lady butterfly (public domain photo)
Painted Lady butterfly

I could never bring myself to kill butterflies and moths, stick pins through their dead bodies, and store them in a box. I learned so much more from them alive. I'm glad that I didn't kill them. Because of global warming, plastics, deforestation, spraying with insecticides, etc., many species may already be extinct and thousands of others are threatened. They need our help now.

The study of insects is called entomology. The study of word origins and meaning is called etymology. I hope you have enjoyed the examples I included.

Now I have a personal message. Humanity is a single species. No segment of it is superior or inferior to any other. Humans, in all their infinite variety, should be accepted and appreciated.



 Creative Commons LicenseThis post by Annake's Garden is licensed under a Creative Commons Attribution-NonCommercial-ShareAlike 3.0 Unported License.

Wednesday, August 5, 2020

New Geometric Patterns

Three small geometric patterns, graphed

A couple of years ago we began drawing some small, simple geometric patterns which could easily be repeated to make larger, more complex designs.  These were designs that could be adapted for many different crafts — not just needlecrafts.  Designs could be repeated a number of times just as they were in the picture, or they could be reversed, rotated, even taken apart and put together in new configurations.

First geometric pattern
Let's look at the three patterns at the top of the page. Here is the first one, a very simple design in a single color on white. In the larger version, the original pattern has been rotated to make a design of squares. This one can be continued outward as far as you want to go.

First geometric pattern, rotated
Now let's consider the pattern at the other end of the line. You may remember this one.  Later we showed you how to change the design from a square pattern to a rectangular one by elongating the internal squares either vertically or horizontally.

Third geometric pattern, rotated


Third pattern, vertical & horizontal  versions
Vertical & horizontal  versions
I was trying to make two points. First, that, since this was an all-over pattern, it was not necessary to start in the middle of the canvas. I started the piece on the left at the upper right-hand corner of the design and expanded it both horizontally and vertically as far as my canvas segment allowed. Second, the pattern can be worked to fit rectangular projects. They do not have to be square, as the 4-way bargello designs do need to be.  I suggested that viewers might want to do a sample using the 3-stitches-over-4-threads formula that I used for this sample, which elongates the squares into rectangles vertically. The third sample elongated the squares to rectangles horizontally. The result is definitely rectangular — and large. It is probably not a good design for a 4-way bargello unless you are using much smaller squares of canvas. It would probably work on # 14 needlepoint canvas, however.

Second pattern repeated, variation 1
The middle pattern can be repeated just as it is, of course, but I want to play with it a while. How you approach this pattern depends on whether you want to place the emphasis on the heavier "North/East/South/West" part of the square pattern or the more delicate diagonal components. I will start with the heavier aspects. Here is the result. You can change this from a square pattern to a horizontal one by simply adding another repeat of two of the smaller squares to any side of the original.

I returned to the design, this time concentrating on the slender lines that formed the diamond shapes inside the frames.

Second pattern repeated, variation 2

These designs made from the small corner squares have proven to be popular. For that reason, I am giving you some more of them to work with. In each case, the original square that was rotated is shown in its proper position and is emphasized by a black outline.
Three more corner patterns

Suppose you are ready to enlarge a design but are not sure how to proceed.

First corner pattern, expanded
Take a clean sheet of graph paper and mark its center both horizontally and vertically. Repeat your desired pattern (diagram above) on top of the horizontal line, starting just to the left of the vertical line. Now repeat your pattern in reverse to the right of the vertical line. Turn the paper upside-down. Repeat what you just did below the horizontal line above the horizontal line now. Now you have a 4-way starting pattern.  Each colored square represents a stitch or a square of stitches in your pattern. Empty squares can be worked in white, black, beige, etc. Work the four parts of your design in the center of your canvas, then decide how you want to "grow" your finished pattern.

Second corner pattern, expanded
The samples I usually show on these posts are done on #7 plastic canvas. I recommend this for practice and to make pattern samples that are meant to be filed in a box for future reference. If you are working in tent stitch, this is the pattern square, with one stitch for each square of the pattern. It is also done on #7 canvas. These patterns are very versatile. If you do latch-hook, for example, you can use a pattern like this one by putting in a knot for each square of the pattern. This would work as both a four-way pattern, perhaps for a pillow, and an all-over one for a mat or rug. Beading and mosaics could also be done with such a pattern.

When working a multicolored pattern like this, I recommend using a separate needle for each color. This cuts down on the time spent in threading needles and decreases yarn waste. Secure each color often on the back of your canvas. Do not carry long strands of yarn across the back of your canvas while moving from one colored segment to the next.

Third corner pattern, expanded

This two-color pattern is suitable for an all-over design, but perhaps is not as good for a 4-way design.

A word of caution about colors. What I see on my screen in the office is not necessarily what J.D. sees on his screen in the workshop or what you will see on your device. And if you are printing something out, there are even more possible differences. Use your own color choices on any of these designs.

Before we leave the 12-square designs above, here are the three designs as I have expanded them to 16-square designs.

Three 16 square designs

The first one is done in the same way I changed the smaller squares to 12-squares. I took more liberties with the second one, repeating some parts of the design and modifying others. Bear in mind that none of my designs are the only way to "grow" the designs. You need to find your own ways to do that to make designs that please you. I have taken even more liberties with the third design, repeating none of either the dark or light elements exactly as I expanded the design, while keeping the "feel' of the design.

Letter chart
Letter chart
There is another way to record graphed designs, and this one can be done in any color combination that you desire.  Instead of filling in colors on a design sample that you like, put in alphabet letters for each of the colors that you used.  You can then experiment with different color combinations and record alphabetically the ones you want to keep. This diagram will show you what I mean.

Each of the little squares in the design could represent a single stitch on canvas or even-weave fabric, a square of upright gobelin, a much larger square of fabric, or even a floor tile. Let's revisit one of those designs. Instead of taking one of the little squares as the basis of our design, this time let's consider the entire three-inch square as a single, repeatable part of our design. I chose to make this design in analogous colors (colors next to each other on the color wheel) because I wanted to make some points about color combinations. Analogous colors reflect wavelengths of colored light that are closely related Since these colors are closely related, we are pretty well assured of a pleasant design. I chose blue-green, blue, and blue-violet for my color combination, but you need not use those colors if you want to try others. For a trio of warm. bright colors, you might choose red-orange/ orange/ yellow-orange (the exact opposite of the three I chose), for example.

Analogous color 12 square designs

Notice that I have used one light color, one medium color, and one dark color (a tint, a tone, and a shade) in each design. I do this to make it easier to place each color when I begin "growing" the design. Each color is in the same set of squares on all three versions of the design; only the intensity of the colors changes. As you can see, which color is emphasized most does alter the design — a fact you will need to consider not only when "growing" your design, but also before choosing the yarns, fabrics, paints or other materials for your final project. Changing the positions of the colors as well as the intensity will give you even more varied results. I "grew" all three of the blue-green/blue/blue-violet designs. Here are the expanded designs.

Analogous color designs, tiled


Annake at work
Annake at work
Somewhere in the midst of all this, J.D. slipped up behind me and snapped this picture of my worktable, with the designs in progress. (He says he wanted to show you how much work I do before I publish anything for my readers. I think he just wanted to show what a mess my worktable usually is!)

This design technique is called tiling. It is an ancient art form used originally for creating inlays and mosaics. It was used in Mediterranean civilizations long before those of the Greeks and Romans. The earliest known mosaics were made in Mesopotamia before 2,000 BC (BCE)  Just recently there was news of a remarkable mosaic discovered in the ancient city of Hippo.

Of course, I do a lot of preliminary work on the computer to save time.  One place where this comes in handy is in choosing the background color for a geometric center design.  What J.D. does is put up the center design on screen and then "flood" the background of the design with a variety of colors to see how they compare. J.D. did this electronically.  Here are the ones we liked best.

Same geometric pattern with 3 different background colors

We often show pieces of finished work without showing the design patterns.   Here are three that are suitable for tiling in one or more of the ways we have discussed in this article.

New tiking patterms


So far we have worked with patterns based on small squares or rectangles because they are so easy to duplicate on standard graph paper. When we return to this topic in the future, we will discuss other base shapes like triangles and hexagons.

Have fun with your design experiments.


 Creative Commons LicenseThis post by Annake's Garden is licensed under a Creative Commons Attribution-NonCommercial-ShareAlike 3.0 Unported License.

Contact Us

Name

Email *

Message *

Blog Archive
