Thursday, November 21, 2013

Crocheted Trees -- They Aren't Just for Christmas

Colorado Avalanche fan with her tree
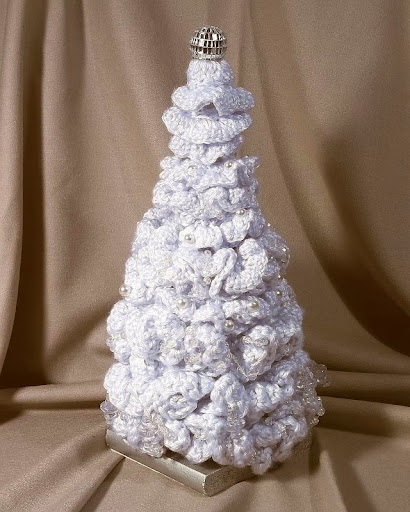
There are some craft items I never tire of making, even after several decades of making them. One of these is the tabletop tree. It all began many years ago with two patterns in a McCall's magazine. One pattern was for a little Christmas tree to be made with cotton crochet thread. It was to be crocheted in the round, then partially flattened to be made into a lapel ornament. The second pattern was for a Christmas wreath lapel pin. Considering my preference for yarn over thread, I couldn't help wondering what would happen if I substituted knitting worsted for the thread and the larger aluminum hooks for the smaller steel ones. I couldn't wait to find out, so I collected green yarn and crochet hooks in sizes G through K. I began to experiment and soon had a neat little layered tree shape about 10 inches tall and a wreath between 10 and 12 inches in diameter.

Crocheted Feliz Navidad tree
Crocheted tree for a "Feliz Navidad"
The original tree and wreath were supposed to be starched to make them hold their shape and then be laced onto pin backs from a craft store. That obviously would not work for my yarn creations.
 
My husband volunteered to make a “tree trunk” from a block of wood and a dowel and to bend a wire coat hanger into a circle as a frame for the wreath. He made these items and painted the tree trunk brown. I laced the wreath onto the wire circle and decorated it with small ornaments and a bow. I glued felt to the bottom of the tree base so it couldn't scratch furniture and arranged the crocheted layers an the trunk, decorating them with miniature ornaments. We were both pleased with the results and immediately set to work to produce a tree and a wreath to add to each of his sisters' Christmas boxes.

Crocheted Valentine's Day tree
"Heartwood", a Valentine's Day-themed tree
My best friend was teaching second grade in another state. When she received her Christmas tree, she called me to ask if I could make trees for other holidays that she could display in her classroom. I began collecting tiny items with holiday themes. Eventually I made her trees for Valentine's Day, St. Patrick's Day, Memorial Day, Back-to-School Night, Halloween, and Thanks-giving. I began to make themed trees for relatives, friends, and co-workers. Our children, niece, and nephews graduated from high school and went off to college, military service, marriage and jobs away from home. Each of them needed a “starter” tree for their new beginnings. I made more than a hundred trees in this way and am proud to say no two were ever alike. Trees for the men were always fun. I trimmed them with everything from fishing lures to tiny model cars to dice and poker chips.

Broncos tree
One of several trees made for Broncos fans
Along the way I acquired a son-in-law who is a devoted Denver Broncos' fan and a grand-daughter who is equally loyal to the Colorado Avalanche. Of course they had to have trees in their team colors to decorate with memorabilia. I'm a die-hard Bronco fan myself, so it is a little bit embarrassing to admit that my favorite among the team trees I have made was one that I made recently as a special order for an Oakland Raiders' fan. I did it in black, white, shades of gray and metallic silver and it looked elegant. I'd like to do a Seattle Seahawks' tree because I love their colors.


Undecorated tree with an alternative shape
Over time the trees grew larger and more complex. I came up with ways to alter the technique to give me several different tree shapes. I began to get requests for special trees: a baby's first Christmas tree, trees for limited spaces like dorm rooms and suites for assisted living, even a tree to fasten to the dashboard of an RV! A teenager wanted a special tree for her parents' silver anniversary. I made a pair of extra-large, extra-tall trees for a friend who makes fused-glass jewelry. She wanted them to display her handmade earrings at shows. She requested a white tree for displaying predominantly “cool” colors like blues, greens, and purples, and a deep blue tree for “hot” colors like red, orange, and gold. They are easy and safe to transport and it only takes a moment to remove or replace a pair of earrings. She uses them for shows year around, not just during fall and winter holidays.
 
Wedding shower tree
Moonlight on Snow, appropriate for a bridal shower
Small trees like these make nice centerpieces for wedding and baby showers and can then be given to the guest of honor. They are nice for hospital visits, especially for men, who may not care for bouquets of flowers, and for visits to shut-ins. They make thoughtful house-warming and hostess gifts and “bon voyage” gifts for friends or neighbors who are moving away. Other “tree” occasions include: birthday, confirmation, quinceanera, engagement party, silver anniversary, golden anniversary, Mother's Day, Father's Day, graduation, Cinco de Mayo, Fourth of July, and any time a person receives a special honor.

Patriotic crocheted tree
The Patriot, available in our Etsy shop
Speaking of honor, do you know a returning serviceman or servicewoman whom you might thank with a patriotic tree in red, white, and blue? The little trees make nice door prizes. I've even made one to raffle off for a Sons of Norway fundraiser.


I hope you've enjoyed this little stroll through my “forest”. Best wishes,

Annake


Creative Commons License


   This post by Annake's Garden is licensed under a Creative Commons Attribution-NonCommercial-ShareAlike 3.0 Unported License.

Sunday, November 3, 2013

Gobelin Droit and French Longstitch Needlepoint

fir and feathers needlepoint detail
Gobelin stitch (trees), Hungarian stitch (sky), tent stitch (eagle)
Needlepoint (canvas work, Florentine embroidery, tapestry work) became an important industry in the 1500's. A rising middle class was growing rapidly and demanding amenities formerly reserved for royalty and the rich. They wanted wall hangings, bed draperies, and upholstery that looked like hand-woven tapestry, but at a fraction of the cost of those tapestries. The manufacture of needlepoint canvas and the development of a few straight filling stitches made simulated tapestries possible.

Gobelin Droit --- also called upright Gobelin, straight Gobelin, flat Gobelin and a host of other names --- is one of the oldest of those stitches. It belongs to a “family” of stitches that includes brick stitch, Hungarian stitch, Hungarian ground, Parisian stitch, Florentine stitch and Byzantine stitch. It is a straight stitch that may be used vertically or horizontally over a number of canvas threads, but which does not cross canvas intersections in the way that tent stitch does. It is a basic stitch in bargello (see “Bravo Bargello!”) and is extremely important in the development of curving and compound patterns. This is a topic we will return to in a future blog.

bighorn framed needlepoint
Framed needlepoint of a bighorn in French longstitch
Although Gobelin Droit is customarily used in repeating, shaded, geometric patterns, it works just as well in naturalistic designs. It is especially effective when used “freehand” over a varying number of canvas threads. This is how I have used it in my French longstitch compositions. The straight stitches lie parallel to each other, fitting closely side-by-side, very much like satin stitches in traditional embroidery. No canvas should show between the parallel stitches. If it does, you need to use more strands of floss or yarn or use a thicker variety altogether. It is a good idea to work a small swatch of your design on a waste piece of canvas to make sure that your materials cover the canvas entirely. No canvas should show between the rows of stitches, either. If it does, this can be disguised by back-stitching with a strand or two of the same color of floss or yarn. On the other hand, if you want to emphasize the textural effect of the rows of stitches, you can do so by back-stitching with a contrasting color or with metallic thread (see the close-up of “Cascades” on the needlepoint challenge blog post). Stitches may vary in length, but -- unless you are using a very fine canvas with many threads to the inch -- probably should not cross more than eight threads at one time. If the stitches are too long, it is very easy to snag them. This is less crucial if you are making a framed picture, which will not be subjected to a lot of wear and tear, than if you are making a pillow or covering a footstool.

bighorn needlepoint pattern
Downloadable pattern for bighorn needlepoint
To make a French longstitch project, start with a simple design which has some large areas to be filled in. If you are taking our needlepoint challenge, you may already have such a design. Or you may want to download my bighorn design. Trace your design on the canvas with a permanent marker and blot or rub off any extra ink. Tape the edges of the canvas with masking tape to keep the threads from raveling. This also keeps your yarns and flosses from being roughened by contact with the edges of the canvas. Since canvas is harder on threads than other fabrics, it is a good idea to shorten the 18-inch strands we have been using to 16 or even 15 inches in length. Use waste knots to get started and secure the ends of strands under existing stitches on the back of the canvas. It isn't necessary to invest in needlepoint canvas and tapestry yarn to try out this technique. I suggest that beginners start with the most economical materials available to them. If you find out you love the technique and want to keep on doing it, then you can start collecting more expensive materials and tools. Gobelin works well even on plastic canvas with whatever yarn you have. If you knit or crochet -- or know someone who does -- you have access to a wealth of leftover yarns. And you can use them to make a project worth framing, even with such inexpensive materials. You need not tape the edges of plastic canvas so long as the edges are smooth.

Framed needlepoint of a pronghorn in French longstitch
Always begin any stitchery with clean, dry hands. Remove any traces of hand cream or lotion and keep food and drink away from your work area. Assemble all your materials, threading several needles if you have them. I start my stitches at the bottom, pulling the strand all the way through to the front of the canvas, then ending the stitch by pushing the point of the needle down at a canvas space directly above where the stitch began. I then begin the following stitch right next to the first one. This makes stitches which cover both sides of the canvas. Yes, this does use more yarn, but it makes a nicely padded fabric which will last for a long time. Each stitch should just fill the space between the entry and exit points. Stitches should be plump. Do not pull your stitches too tight; this will distort your canvas. If you feel resistance to your stitch, you are trying to pull it too tight. The stitches on each subsequent row should end in the same squares of canvas where the previous stitches began.

Lion needlepoint
Unframed needlepoint of a lion, available in our Etsy shop
Most books will tell you to work your stitches from right to left if you are right-handed and from left to right if you are left-handed., turning your canvas 180 degrees at the end of each row. This is necessary for some stitches, but not ordinarily for these straight ones. I usually work boustrophedon (Greek for “as the ox plows”), meaning I work right to left on one row and left to right on the return row. Try all three ways and use the one that is most comfortable and looks best to you. If you are using Gobelin Droit both vertically and horizontally in the same piece (see the legs on the pronghorn antelope and the bighorn sheep), you may need to insert some tiny stitches where the two meet to keep the canvas from showing through. It can also be very effective to use a tent stitch background for a longstitch picture, as I have done on the lion's head, running the closest tent stitches slightly underneath the edges of the Gobelin stitches. When you are not working on your canvas, roll it up --- don't fold it --- and place it in a plastic bag or zippered case to keep it clean and lint-free.

When you have a pattern you like, file it and keep it. You never know when you might use it again in a totally different way. Happy creating,

Annake

 Creative Commons LicenseThis post by Annake's Garden is licensed under a Creative Commons Attribution-NonCommercial-ShareAlike 3.0 Unported License.

Contact Us

Name

Email *

Message *

Blog Archive