| Simple beach scene by J.J. |
If you live in a land-locked area far from the sea, as we do, you may
feel little inclination to try doing a seascape. However, no
landscape is as changeable as the sea and few are as expressive of
mood and emotion. I became familiar with both the Atlantic and
Pacific Oceans when we lived in Panama, where the two are just a few
miles apart. J.J. travels to Florida frequently and takes many
photographs as she walks along its beaches. J.D. is addicted to
fishing programs on television and is currently following one on
deep-sea sport fishing. I check the National Weather Service on my
computer at least daily, where I frequently find film clips of marine
action which I can watch over and over until I am familiar with a
particular aspect of the ocean in motion.
![Northeaster by Winslow Homer 1895 [Public domain], via Wikimedia Commons Northeaster by Winslow Homer 1895 [Public domain], via Wikimedia Commons](https://4.bp.blogspot.com/-blYkVMH5rgM/W4BjtHt0QUI/AAAAAAAAOSE/CUvlfJdM7jksFcX-WQ5is9sdU6a53hAHwCKgBGAs/s320/1024px-Northeaster_by_Winslow_Homer_1895.jpg) |
| "Northeaster" by Winslow Homer, 1895 |
You also have access to such information. Your first resource is your
memory. If you have ever been on the ocean or at seaside, what do you
remember about it? How did you feel about the experience? Jot down
notes about your reactions. They don’t need to be complete
sentences — just words
and phrases. Do you have pictures from that time, or might a relative
have some? Moving pictures from television or electronic devices are
your second resource. Check the National Geographic Channel for
programs about the Earth. Other sources are travel films, series
devoted to animals, and the aforementioned fishing shows. Finally,
there are still pictures, whether modern photographs or paintings by
masters like Winslow Homer.
![Apollo 17 Image Of Earth From Space By NASA [Public domain], via Wikimedia Commons Apollo 17 Image Of Earth From Space By NASA [Public domain], via Wikimedia Commons](https://4.bp.blogspot.com/-lsBLqXYYtZQ/W4BkuLxludI/AAAAAAAAOSw/qyXm3zVNH5oKzWzjWpcL8i79kVeGJ6CzgCKgBGAs/s320/Apollo_17_Image_Of_Earth_From_Space.jpeg) |
| Apollo 17 Image Of Earth From Space |
The oceans are vast. I recently heard an astronaut describe how much of
an orbit is over water. Even large continents like South America and
Africa, he said, take little time to observe and then you are over
water again. The oceans contribute greatly to the fact that Earth
becomes the “Blue Planet” (sometimes referred to as the “Big
Blue Marble”) when viewed from space. The oceans are also deep, so
deep that it is hard to imagine descending to the bottom of one. They
are subject to enormous physical forces — the gravitational forces of the planet and its moon, the planet’s
spin, the movement of the tectonic plates, tides, currents, tsunamis,
storms, seasonal temperature changes. Therefore, they are constantly
changing.
The time of day you choose is important. Sunsets and sunrises at low tide
are especially interesting because the water reflects the colors of
the sky. There will be little blue in the water unless it is
reflected blue from the sky. This may be darkened to a degree by the
marine blue of the water, but the overall effect will be that of the
sky colors. The white of surf and spray also picks up color from the
sky. The sun itself creates a prominent path in the water. It colors
low clouds and reflects on the undersides of higher ones. Seaside
buildings may show color in their planes and shadows, although they
do not reflect with the same intensity as the surface of the water.
The shadows below the crests of waves appear very dark and there is
more violet in the blues. However, the shadows become paler and
grayer the further they are from the shore and the waves themselves
appear smaller. Wavelets striking the land may appear as distinct
bands across the surface where the water is shallow.
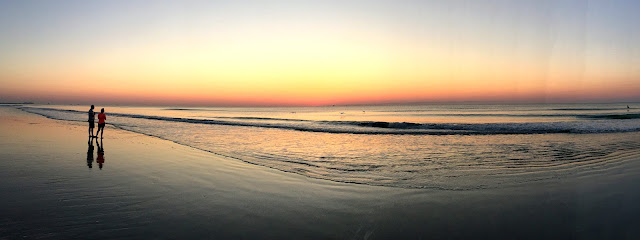
There are four lines of directional movement, often referred to as
gestures, in a composition. These are horizontal, vertical,
diagonal, and curvilinear. While it is desirable to get all four into
the design, an eloquent picture can be made with fewer than that
number. The panoramic photograph below shows three of the four plainly.
The sea’s horizons are almost always strong horizontals, as they
are here. This is counterbalanced by the vertical lines provided by
the two figures and their shadows. Curvilinear lines of direction
come from the gentle wave forms. It would be possible to add a
diagonal line with a cloud or by a sailboat on the water, but I don’t
believe it would improve the composition, which so beautifully shows
the powerful influence of the ocean and the solitary presence of two
people who appear to have the world to themselves.
Let me show you what I mean by directional “gestures’. First is what
you see in the panorama above. There is the horizontal line for the
horizon. Below that are the curved lines of the waves against the
beach. Off to the left are two short vertical lines for the two
people, which are doubled in length by their shadows. The various
lines need not be of the same length or number to give unity and
balance o a composition. Diagonal lines are found both in nature, as
in the branching of trees, and in man-made forms like a sailboat, the
roof of a building, a construction crane, etc.
| Photo by J.J. |
Sunrises usually have gentler colors — pink, apricot, aqua, pale blues. The water reflects less of these
colors. Before the sun clears the horizon, structures both far and
near may appear only as black silhouettes. This can make a striking
picture if the objects that are silhouetted have varied and
interesting shapes. The rising sun (small circle at the far right of
the photograph) appears largely white, lacking the vivid yellows of
the setting sun, and makes a white path of reflection on the water.
Colors, diluted by this white glow, gradually appear along the sides
and on the tops of the shadowed forms as they emerge out of the
darkness. Distant forms may remain backlit longer than nearer ones
facing the sun. The sunrise colors fade faster than sunset colors and
the overhead sky turns a distinct blue before they entirely
disappear. There are a number of diagonals in this picture.
![Winslow Homer - On a Lee Shore [Public domain], via Wikimedia Commons Winslow Homer - On a Lee Shore [Public domain], via Wikimedia Commons](https://4.bp.blogspot.com/-e5sjQaf6wZU/W4BsW2kJfUI/AAAAAAAAOTs/LhEBooY4ziMzh27-gp81oOK4pbmNa91ewCKgBGAs/s320/800px-Winslow_Homer_-_On_a_Lee_Shore.jpg) |
| Winslow Homer - "On a Lee Shore" |
| "Safe Harbor", Nordic stitch needlepoint |
A seascape need not be a complicated project. This one is a color
version of the logo of a Scandinavian company that attracted me many
years ago and meant enough for me to save it. Although the sail has a
more modern shape, the hull reminded me of the shallow-draft Viking
coastal vessels like the ones both my husband’s and my Frisian
ancestors sailed in, centuries ago. I made this color version for
him, with the ship at safe harbor in a fjord as the sun is going
down.
The stitch, called Nordic stitch, is a very simple one. It is made up of
blocks of four horizontal or vertical stitches, each over four
threads, so that they are of uniform size. This is useful for
creating simple designs like these silhouettes and can easily be
combined with other canvas stitches, such as upright gobelin or tent
stitches. Since the individual blocks of stitches are square, Nordic
stitch patterns can easily be converted to counted cross-stitch
patterns. Or the squares could be larger squares cut from fabric and
pieced together to form a patchwork panel, or tiles glued to a wood
or Masonite background.
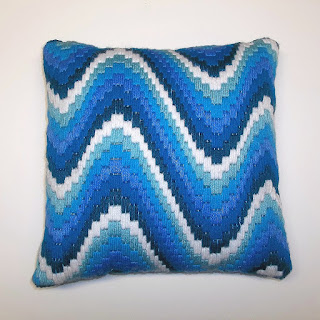 |
| Blue wave bargello pillow top |
In Landscapes, Part IV, we promised you another of my “Bargello Plus”
pictures, which featured bargello patterns plus realistic elements
done in tent stitch. This particular one began with a pattern that
represented rolling ocean waves. This was a traditional bargello
pattern that I lengthened and extended to make larger “waves”. I
used the design to make the pillow top seen here.
I left a space above the waves to represent the sky, where I
embroidered a seagull in tent stitch. Then I left a space between two
of the big waves for a fish, also worked in tent stitch. The
composition was entitled “Seafood Surprise”. I will leave it up
to you to decide which creature gets the greater surprise.
Now it is time for you to design a simple seascape of your own,
Photo credits: Winslow Homer's "Northeaster" and "On a Lee Shore", and the Apollo 17 image of Earth are in the Public Domain, via Wikimedia Commons. All other photos are copyright Annake's Garden.
 This post by Annake's Garden is licensed under a Creative Commons Attribution-NonCommercial-ShareAlike 3.0 Unported License.
