Showing posts with label design challenge. Show all posts

Wednesday, March 27, 2019

All the World's a Stage: Another Look at Landscapes

Stinking Desert Sunset, photo by Annake
Near sunset in western Colorado (35mm SLR photo)
Jim Richardson,  National Geographic photographer, urges photographers to think of landscape photographs they are about to shoot as if they were settings for plays.* That set me to thinking of broader applications for that principle:  I wanted to apply it to pictures we already have.


Do you have photographs or sketches of landscapes that are accurate, but that just aren't ‘special’? Too good to throw away, not good enough to frame?  Perhaps you have a collection of picture postcards from past trips stored in a box somewhere. I certainly have all of those. I got out a few while I thought about what to say in this post.

I took the picture above late in the day, looking westward.  The color is accurate, I did not use a colored filter. I have always liked the picture, but had never decided what to do with it. It seemed a good place to start the current experiment.  Because I wanted to try several scenarios with my picture, I made a couple of copies before I moved to the next step.  J.D. took one for his own use. We decided to each do the project, but separately, choosing our own themes. J.D. will chime in with comments on his own results as we go along.

Camel photo by J.J.
Camel, photo by J.J.
Much of western Colorado, where our picture was taken, is semi-desert. It is not a sand desert, but dry grassland with some rocky areas. The picture certainly said desert to me. I determined it would be the backdrop for a desert scenario. And what more appropriate desert animal than a camel?

“But a camel in western Colorado?”, you scoff. Well, truth is often stranger than fiction. In 1855, Jefferson Davis (remember him from the Civil War?) was the Secretary of the U.S. War Department. He spent $10,000 to import camels to carry supplies and mail between remote western military posts. The endeavor worked well but was broken up by the Civil War, when most of the animals were auctioned off, killed, or escaped.  At least one became the source of a legend,  said to be 30 feet tall, to eat grizzly bears, and to vanish when in plain view. (Look up “camels in the Western U.S.”, and also look for a Smithsonian article on the Legend of the Red Ghost — great reading!)  I decided to do a detailed color drawing on watercolor paper to depict the Legend of the Red Ghost. One story was that the camel carried a macabre burden — a skeleton wrapped in canvas, strapped and roped to the camel's back.

Red camel with skeleton drawing by Annake

The image was drawn in colored pencil, graphite and charcoal. I sprayed it with fixative (hair spray will do, but practice first to get distances and amounts of spray correct; it is better to do this outside on a warm, calm day). I cut the figure out carefully with small, very sharp scissors and put it in place on the photograph. I used sketches, but you might prefer to use other photographs.

Legend of the Red Ghost paste-up by Annake

J.D.:  Over the winter holidays, I began to learn to use a much more powerful image editing program in order to meet the increasing technical demands of the work at Annake’s Garden; so, when Annake proposed this exercise, I decided it was a good time to see how far I’d learned to push the boundaries of what I could do with digital images. First I turned the picture upside down and backwards – and got an image that looked a lot like the sea at a sandy beach, about as far from a desert scene as you can get. Being an ornery and contrary sort of creature, I figured I would see how many element of this image I could turn into their opposites.

Moonlight on Dunes, digital graphic by J.D.
"Moonlight on Dunes," digital graphic by J.D.
Without getting into the specifics of how I used the software, this is what I did: turned sky into water and sand, mostly by stretching the image horizontally and squashing it vertically; turned the ground into night sky by pasting in a strip of the same almost-black color, then sprinkling in some fake stars; turned the sun into a reflection of the moon by laying a mostly transparent image from a different source over it, then adding a little glare effect at the right edge to suggest an out-of-frame moon rising. Everything else was just fine tuning the intensity of the colors, contrast, and sharpness to give the impression of a photograph taken at night.

This all may sound like mysterious high-tech digital wizardry, but there is nothing here that can’t also be done in an analog photographer’s darkroom (although it might take considerably more time and expense!)

ANNAKE: Now suppose you had a copy of the photograph we worked on. What would you do with it? Ask yourself some questions:
  • Do I need to turn the photo upside down? Change a horizontal picture to a vertical one or the reverse? Crop the photo (cut off parts of it)? Cover up or take out something? Change my perspective (point of view)?
  • What kind of story would I like this landscape to tell? Adventure? Romance? History? Mystery? Fantasy? Science fiction (remember J.D.'s "Early Morning Frost...” on Mars)? Horror? Comedy? Tragedy? Natural history?
Once you have decided what kind of story you want to tell, ask yourself if the picture you are considering can help you tell that kind of story. If the answer is "Yes", then ask yourself how the picture can help.
  • Does it suggest a particular place? A particular period of time?
  • What sort of people might live here or have lived here in the past?
  • Is it the habitat of a particular animal? Alive or extinct? Real or mythical?
  • What interesting objects might have come to rest here? Is it an extraterrestrial place? In the sky? Under the ground?

Cliff face public domain photo
Cliff face (rock wall**)
Each decision will clarify your story in your mind. You will begin to ‘flesh out’ your narrative. Then decide what scenery, props, and cast members you need to introduce into the photo to make your story come to life. You might have a picture of a steep rock wall.  Are you going to show a family of mountain goats descending the wall? Climbers free-climbing or ascending on ropes? A hang-glider swooping away from it? A helicopter hovering in front of it? Choose your characters and props carefully.


Now, how are you going to get your props and characters onstage?

  • Are you going to cut parts out of other photographs and glue them to your background?
  • Are you going to stand the background up and place cutouts or small model figures in front of it? Make a diorama out of it?
  • Are you going to glue or paint your characters and/or props on a clear plastic overlay?
Dry branches, 35mm photo by Annake
Another 35mm photo by Annake
This photograph is also one of mine and was done with no color filters.  Not desert this time, but certainly dry grassland and open woodland. There's no mystery involved this time. It is a simple natural history scene that could easily have happened.  J. D. asked for a big raptor alighting on the pile of branches, and that is exactly what I gave him.

Desert hawk drawing by Annake

The hawk was done in the same way as the camel and applied to the photograph. It is a kind of hawk known to make its nest of sticks. The picture was cropped to take out "clutter".

Desert hawk paste-up by Annake

J.D.:  Since Annake used my best idea for this photo, I struggled to come up with anything else interesting. In the end, I just squashed the perspective enough so that I could create sufficient foreground to put in some stock creepy elements. The skull and spider are cut-&-paste from public domain photos available online, and the burrow with glowing red eyes under the pile of sticks is pretty much the same set of effects I used for the night sky in the beach scene above. I don’t really have a story for this image, but if it inspires one for you drop us a line and let us know.

Landscape wiith skull digital image by J.D.
J.D.'s silly/spooky landscape

ANNAKE: This post is the result of my musings. It is not just for those of us who paint landscapes, photograph them, or portray them in needle arts.  It is for those who have photos, slides, or sketches they have always meant to organize and "do something" with, for those who collect picture postcards, and for those who just like to make something new out of something old that might otherwise be discarded. (If I missed anyone, it probably applies to you, too.) Have fun! 


*From a lecture for The Great Courses Masters of Photography, copyright 2014 The Teaching Company

**So, Annake tells me she needs a picture of a rock wall; I downloaded this nice public domain photo. Then I find out she meant a cliff face...


 Creative Commons LicenseThis post by Annake's Garden is licensed under a Creative Commons Attribution-NonCommercial-ShareAlike 3.0 Unported License.

Sunday, August 26, 2018

Seascapes in Needlework, Part I

Simple beach scene by J.J.
If you live in a land-locked area far from the sea, as we do, you may feel little inclination to try doing a seascape. However, no landscape is as changeable as the sea and few are as expressive of mood and emotion. I became familiar with both the Atlantic and Pacific Oceans when we lived in Panama, where the two are just a few miles apart. J.J. travels to Florida frequently and takes many photographs as she walks along its beaches. J.D. is addicted to fishing programs on television and is currently following one on deep-sea sport fishing. I check the National Weather Service on my computer at least daily, where I frequently find film clips of marine action which I can watch over and over until I am familiar with a particular aspect of the ocean in motion.

Northeaster by Winslow Homer 1895 [Public domain], via Wikimedia Commons
"Northeaster" by Winslow Homer, 1895
You also have access to such information. Your first resource is your memory. If you have ever been on the ocean or at seaside, what do you remember about it? How did you feel about the experience? Jot down notes about your reactions. They don’t need to be complete sentences just words and phrases. Do you have pictures from that time, or might a relative have some? Moving pictures from television or electronic devices are your second resource. Check the National Geographic Channel for programs about the Earth. Other sources are travel films, series devoted to animals, and the aforementioned fishing shows. Finally, there are still pictures, whether modern photographs or paintings by masters like Winslow Homer.

Apollo 17 Image Of Earth From Space By NASA [Public domain], via Wikimedia Commons
Apollo 17 Image Of Earth From Space
The oceans are vast. I recently heard an astronaut describe how much of an orbit is over water. Even large continents like South America and Africa, he said, take little time to observe and then you are over water again. The oceans contribute greatly to the fact that Earth becomes the “Blue Planet” (sometimes referred to as the “Big Blue Marble”) when viewed from space. The oceans are also deep, so deep that it is hard to imagine descending to the bottom of one. They are subject to enormous physical forces the gravitational forces of the planet and its moon, the planet’s spin, the movement of the tectonic plates, tides, currents, tsunamis, storms, seasonal temperature changes. Therefore, they are constantly changing.

Beach sunset by J.J.
The time of day you choose is important. Sunsets and sunrises at low tide are especially interesting because the water reflects the colors of the sky. There will be little blue in the water unless it is reflected blue from the sky. This may be darkened to a degree by the marine blue of the water, but the overall effect will be that of the sky colors. The white of surf and spray also picks up color from the sky. The sun itself creates a prominent path in the water. It colors low clouds and reflects on the undersides of higher ones. Seaside buildings may show color in their planes and shadows, although they do not reflect with the same intensity as the surface of the water. The shadows below the crests of waves appear very dark and there is more violet in the blues. However, the shadows become paler and grayer the further they are from the shore and the waves themselves appear smaller. Wavelets striking the land may appear as distinct bands across the surface where the water is shallow.

directional gesture diagram
Arrows show the four different 'gestures'
There are four lines of directional movement, often referred to as gestures, in a composition. These are horizontal, vertical, diagonal, and curvilinear. While it is desirable to get all four into the design, an eloquent picture can be made with fewer than that number. The panoramic photograph below shows three of the four plainly. The sea’s horizons are almost always strong horizontals, as they are here. This is counterbalanced by the vertical lines provided by the two figures and their shadows. Curvilinear lines of direction come from the gentle wave forms. It would be possible to add a diagonal line with a cloud or by a sailboat on the water, but I don’t believe it would improve the composition, which so beautifully shows the powerful influence of the ocean and the solitary presence of two people who appear to have the world to themselves.

Two Against the Tide by J.J.
"Two Against the Tide" by J.J.


Let me show you what I mean by directional “gestures’. First is what you see in the panorama above. There is the horizontal line for the horizon. Below that are the curved lines of the waves against the beach. Off to the left are two short vertical lines for the two people, which are doubled in length by their shadows. The various lines need not be of the same length or number to give unity and balance o a composition. Diagonal lines are found both in nature, as in the branching of trees, and in man-made forms like a sailboat, the roof of a building, a construction crane, etc.

Silohuettes at sunrise by J.J.
Photo by J.J.
Sunrises usually have gentler colors pink, apricot, aqua, pale blues. The water reflects less of these colors. Before the sun clears the horizon, structures both far and near may appear only as black silhouettes. This can make a striking picture if the objects that are silhouetted have varied and interesting shapes. The rising sun (small circle at the far right of the photograph) appears largely white, lacking the vivid yellows of the setting sun, and makes a white path of reflection on the water. Colors, diluted by this white glow, gradually appear along the sides and on the tops of the shadowed forms as they emerge out of the darkness. Distant forms may remain backlit longer than nearer ones facing the sun. The sunrise colors fade faster than sunset colors and the overhead sky turns a distinct blue before they entirely disappear. There are a number of diagonals in this picture.

Winslow Homer - On a Lee Shore [Public domain], via Wikimedia Commons
Winslow Homer - "On a Lee Shore"
The open ocean is a deep blue-green. As it approaches land and grows shallower, it becomes duller and other colors are incorporated: the yellow-green of seaweed, browns and grays from underwater rocks and sand, the stark white of wave crests and the off-white of spray where surging water strikes as it meets the shore. Many painted seascapes that I have seen make the sea look almost uniformly dark blue. That is inaccurate and makes the picture less interesting. You can add color to your seascape by blending yellow, green, and brown strands of yarn or floss with the blue and turquoise ones you use for the sea. Try several browns because they create different effects. If you choose to do a sunlit scene. add occasional small stitches of pastel colors to spray, where bursting bubbles make tiny rainbow twinkles.

"Safe Harbor", Nordic stitch needlepoint
A seascape need not be a complicated project. This one is a color version of the logo of a Scandinavian company that attracted me many years ago and meant enough for me to save it. Although the sail has a more modern shape, the hull reminded me of the shallow-draft Viking coastal vessels like the ones both my husband’s and my Frisian ancestors sailed in, centuries ago. I made this color version for him, with the ship at safe harbor in a fjord as the sun is going down.


Sample of Nordic stitch in vertical and horizontal directions
Sample of Nordic stitch in both directions
The stitch, called Nordic stitch, is a very simple one. It is made up of blocks of four horizontal or vertical stitches, each over four threads, so that they are of uniform size. This is useful for creating simple designs like these silhouettes and can easily be combined with other canvas stitches, such as upright gobelin or tent stitches. Since the individual blocks of stitches are square, Nordic stitch patterns can easily be converted to counted cross-stitch patterns. Or the squares could be larger squares cut from fabric and pieced together to form a patchwork panel, or tiles glued to a wood or Masonite background.

Blue wave bargello pillow top
In Landscapes, Part IV, we promised you another of my “Bargello Plus” pictures, which featured bargello patterns plus realistic elements done in tent stitch. This particular one began with a pattern that represented rolling ocean waves. This was a traditional bargello pattern that I lengthened and extended to make larger “waves”. I used the design to make the pillow top seen here.

I left a space above the waves to represent the sky, where I embroidered a seagull in tent stitch. Then I left a space between two of the big waves for a fish, also worked in tent stitch. The composition was entitled “Seafood Surprise”. I will leave it up to you to decide which creature gets the greater surprise.


"Seafood Surprise", Bargello Plus picture

Now it is time for you to design a simple seascape of your own,


Photo credits: Winslow Homer's "Northeaster" and "On a Lee Shore", and the Apollo 17 image of Earth are in the Public Domain, via Wikimedia Commons. All other photos are copyright Annake's Garden.

 Creative Commons LicenseThis post by Annake's Garden is licensed under a Creative Commons Attribution-NonCommercial-ShareAlike 3.0 Unported License.

Sunday, April 8, 2018

Landscapes in Needlework, Part II

Cattails, photo by J.J.
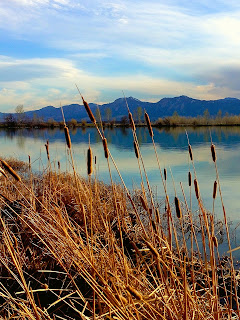
"Cattails", photo by J.J.
The next two needlework landscapes are the result of a class I taught for adults at a Park and Recreation center some years ago. It was an intermediate class for people who had completed an introductory class in needlepoint, some other tapestry work, and basic crewel embroidery. They had acquired some skills, but were still turning to kits and published patterns for most of their needlework projects. I decided it was time for each of them to do a piece of original work. I challenged them to draw a simple landscape and bring it with them to class the following week. It could be any shape except rectangular. I wanted them to “think outside” that particular box. They could do a real landscape or an imaginary one, but this first class session was to be devoted to making a series of choices that would make up their plan for the project a plan they would then be expected to follow throughout the project. The chart below summarizes the list of choices that were decided upon. It worked somewhat like a Chinese restaurant menu: one from Column A, one from Column B, and so on.

ShapeLocationSeasonTime of Day
square evergreen forestspringdaybreak
circleEastern woodlandsummermorning
ovalprairie grasslandautumnafternoon
hexagonmountainswintersunset
desertnight
seashore

I handed out pre-cut templates and they traced their choices of shapes on plain paper. Those who had chosen ovals (ellipses) decided whether to use them horizontally or vertically. Once they had written their other choices on a planning page, we moved on to locations and what might be seen there. A couple of the students had grown up on prairie farms. They mentioned barns, haystacks, silos and windmills. That got the discussion started. Then we talked about how colors change with the seasons, times of day, and weather, and how light differs in forests, the desert, at ocean-side, etc. They had suggestions which I wrote on a chalkboard. They were still unsure about the assignment, but gaining some enthusiasm. The rest of the class was devoted to preparing canvas and making a list of materials.
Monterey Cypress needlepoint landscape
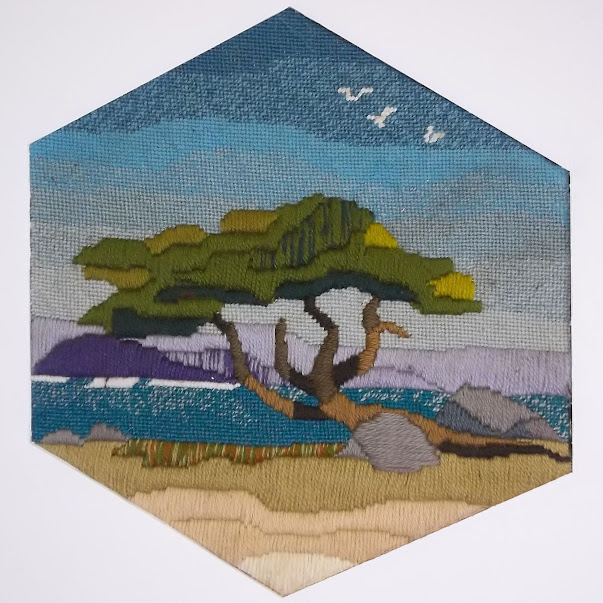
"Monterey Cypress",  needlepoint landscape
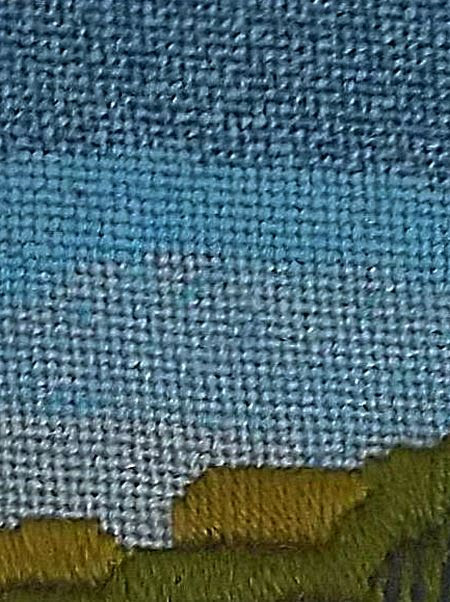
Since I never ask students to do any project that I don’t do along with them, I made my own plan from the “menu” and promised to have my design for the next meeting. I chose hexagon, seashore, summer, afternoon, clear weather. The result was “Monterey Cypress”. This is one of those landscapes mentioned in the previous chapter which try to capture the “essence” of an area without portraying a specific scene. It is a mixture of memory and sensations. There are scenes like this along the Monterey Peninsula, but neither the tree nor the headland in the distance represent a particular one. As I expected my students to do, I used examples of techniques learned in the previous class, as well as new ones. I also wanted the picture to have a 3-dimensional quality. I began at the top of the sky with conventional tent stitch, but used blended yarns to gradually lighten the sky from the zenith to the horizon. Tent stitches are very flat, which made the other elements of the composition stand out from the surface.
Monterey Cypress sky detail
Sky detail showing variegated & blended yarns
At our second meeting, I showed my class my hexagonal outline and the simple shapes that I had included in my design. They had drawn their landscapes inside the shapes made with templates. We discussed the idea that “less is more”. Most of them needed to simplify their pictures by tracing only the broad outlines of the most important features. I didn’t want them concentrating on small details at this stage. They then used the templates to draw their outlines and simplified landscapes on prepared canvases. I had completed a large section of the sky on my picture and gave them a lesson on blending yarns. They liked the effect and used that technique on their own skies.
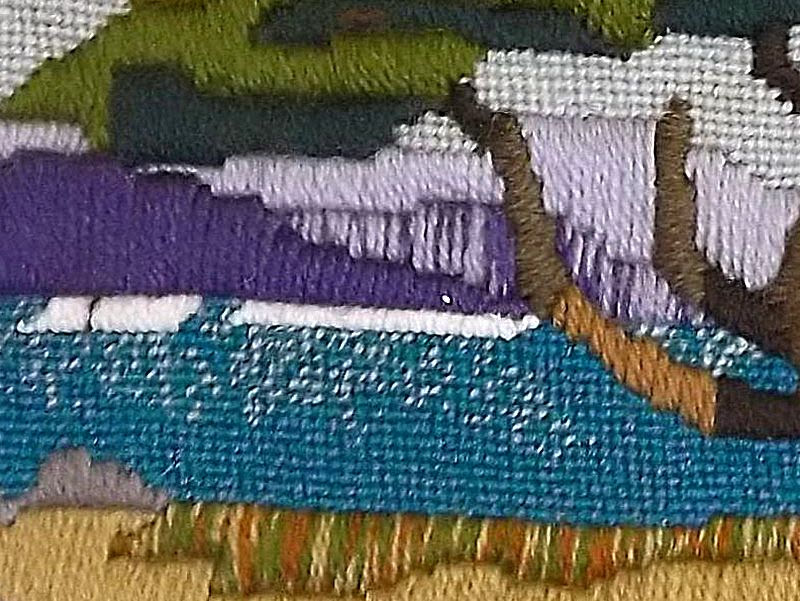
Detail showing blended yarns
You blend yarn by threading two or more different shades into your needle at the same time. Begin with three shades in the same color range a dark shade (D), a medium shade (M), and a light shade (L). Look at the sampler. Each division contains three strands of yarn used together. From left to right, you have the following color designations: DDD, DDM, DMM, MMM, MML MLL, LLL and DML. As you stitch, the strands of yarn will turn so that the same strand is not always on top. This is what creates the intermediate shades. You can see some of that effect on the cliffs of the headland in the distance. You will probably need to use several such combinations to create a “needle painting”.

blended yarns sampler
Blended yarns sampler

Blending embroidery floss works in a similar manner. With floss, however, you are working with 6 strands, rather than 3. Floss does not separate as easily as yarn does. I usually separate floss into three 2-ply strands, rather than six 1-ply strands. As I did with the yarn, I use a dark, a medium, and a light shade of the same color. You can use more closely related shades of the same color for even more subtle effects if you like. Variegated floss will give you a different effect.
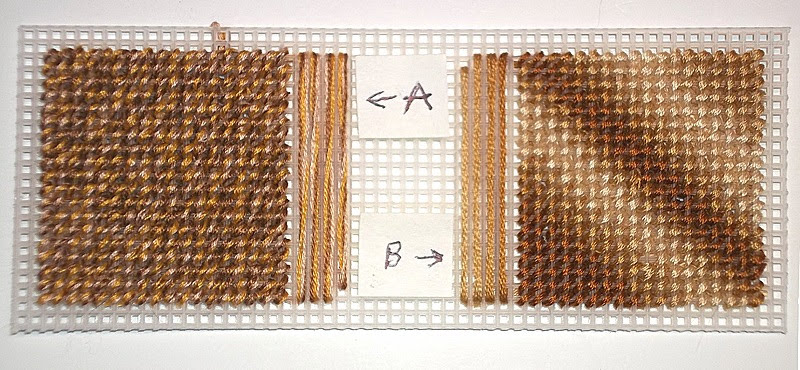
Blended and Variegated Floss Sample
Blended (A) and Variegated (B) Floss Sample


Detail of cypress foliage
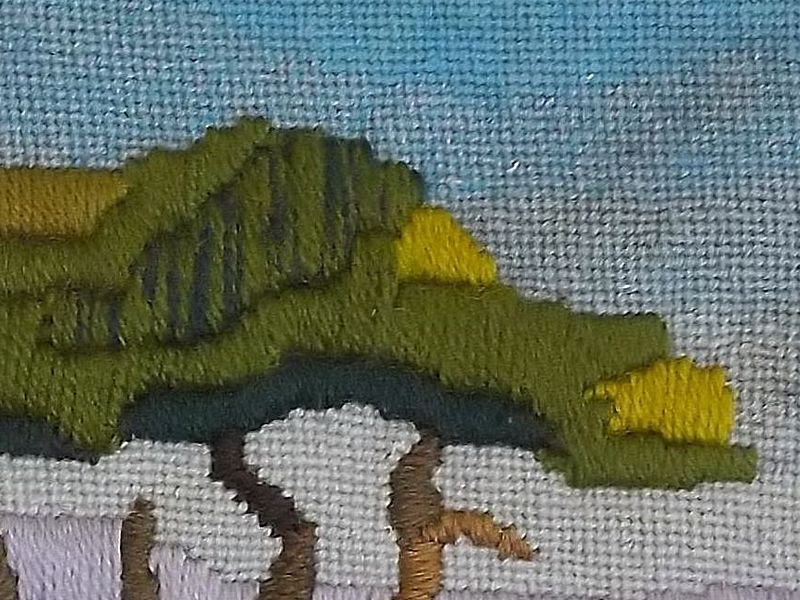
Detail of cypress foliage, showing raised stitching
By the following week the students were eager to start on the middle grounds of their pictures. l I had completed the cypress tree, using a lot of upright Gobelin stitch, a stitch which goes back to the Renaissance, where it was used to produce embroidered goods which looked like woven tapestries, but were far less expensive. These were in great demand from the rising middle class, who wanted goods that were similar to those that had only been available to royalty and the rich up to that time. Gobelin can be used either vertically, as I used it in the sections of the tree’s foliage, or horizontally, as I used it on the narrower limbs and tree trunk. I had used two strands of yarn for the foliage rather than a single strand, which made the foliage stand out from the background.

We had a short practice session with the stitches and they began picking out parts of their pictures where the technique was effective. Class sessions were often interrupted by such questions as “How do I get this wall to look like brick?” or “What stitch will make this tree trunk look and feel rough?” Each time I taught a new stitch, the class stopped what it was doing and learned that stitch. They did samples of each stitch on strips of plastic canvas, labeled them, and stored them in binders, folders. or envelopes, or stapled them to index cards for future reference.
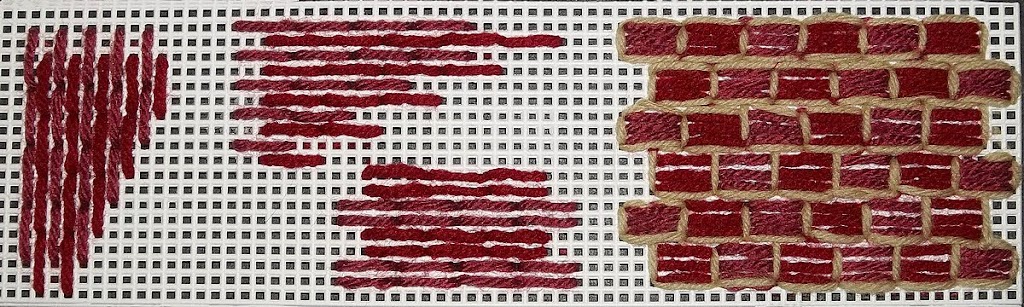
Brick stitch sampler


Brick stitch can be used either vertically or horizontally over 2 or 4 threads of canvas. Despite its name, it is more commonly used vertically than horizontally (upper left). Two colors are used. The stitches of the second color begin and end at the midpoints of the stitches of the first color. I have used stitches over 4 threads throughout. The next stitches (top middle) are done horizontally. To make them more brick-like, you will need to use at least two rows of stitches, if not more (bottom middle). When I did the piece on the right, I did three things: I used three rows of stitches for the bricks; I alternated the colors as well as the rows; and I outlined the brick shapes with a thinner tan yarn to represent mortar. In the top three rows, I used two layers of “mortar” between the rows. This makes the bricks look smaller, more irregular and worn older, in fact. On the bottom three rows, I used a single layer of “mortar” between the rows. They look newer and less worn, but the coverage is not as good. This should not be a problem on needlepoint canvas, where the mesh is finer and the threads are thinner. Think about the age of the wall you are trying to portray. The older it is, the more worn and faded the bricks should look and the darker the mortar should be.
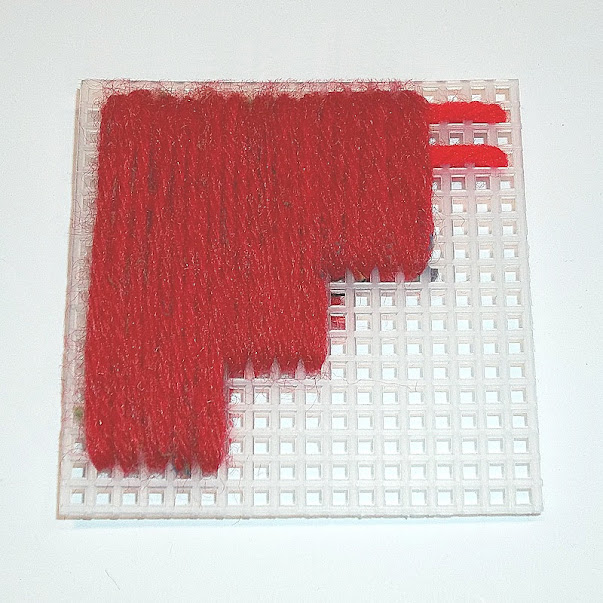
Padded stitch sample
I used Gobelin stitches again in the foreground of my picture, but this time I padded the stitches for objects like the large boulder. Before I put in the double-strand stitches vertically, I laid in long stitches of a heavier yarn horizontally across the area to be stitched. This gave the areas extra dimension. You must be careful, however, to get the vertical stitches even, untwisted, and very close together so that none of the padding shows through. This takes a little practice.
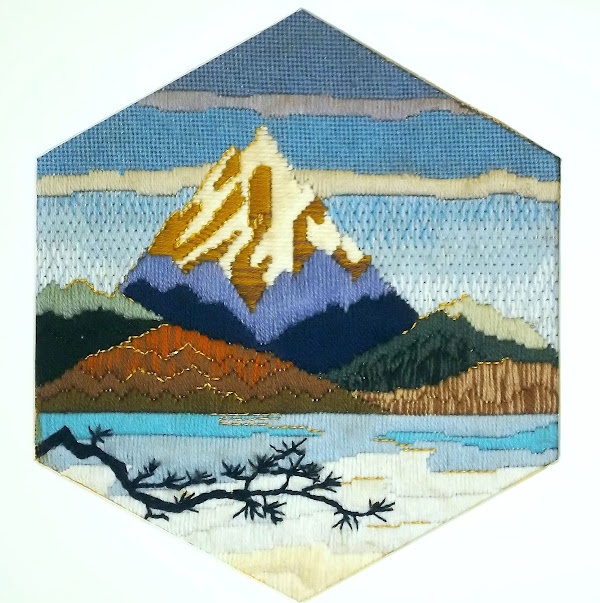

Cascades needlepoint landscape
"Cascades",  needlepoint landscape
By the middle of the class schedule, I had finished Monterey Cypress”, given it a hexagonal picture mat, and framed it. I then started on a second example, keeping the hexagonal shape, but choosing a mountain scene on an early spring morning while the lake in the foreground still had a lot of ice on it. This is “Cascades. Although it captures the “feel” of the area and shows my fondness for it, the scene is completely imaginary. Despite this, I have heard many viewers of it exclaim, “Oh, I’ve been there!” or “I just love that place!”.

As the students finished the mid-grounds of their landscapes and moved on to the foregrounds, they had to decide what the focal point of their picture would be, so they would know whether to really emphasize the foregrounds or make them simple and understated. One of the lessons I gave at that time concerned the use of back-stitching for three different purposes. These are:

     a) back-stitching around an area with a single strand of the same color to help define it,
      b) back-stitching around an area with a contrasting color to draw attention to it, and
      c) back-stitching with metallic yarn or floss to indicate reflections or add sparkle.

You can see all three uses of back-stitching in this sample.
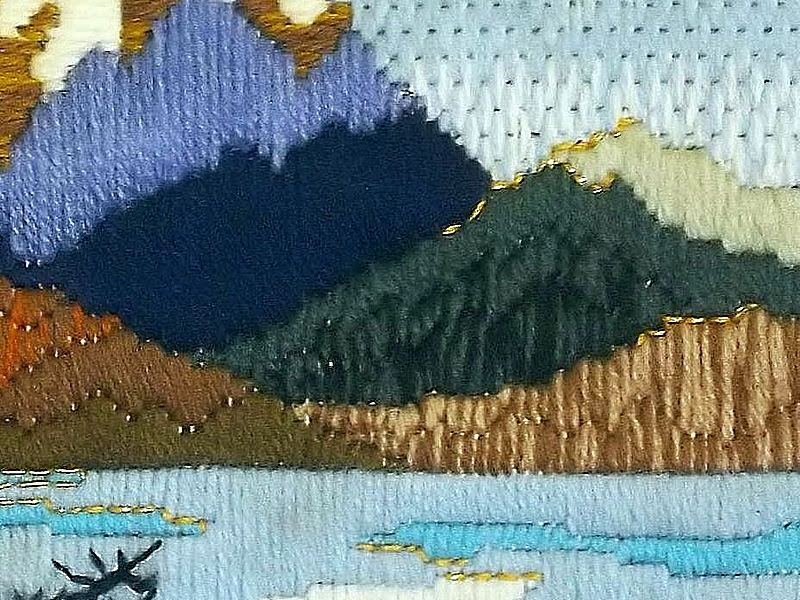
Detail showing backstitching
"Cascades" detail showing backstitching
I had embroidered three white gulls on the surface of the sky in “Monterey Cypress” without calling any particular attention to them. The gulls had, however, suggested a “finishing touch” to the pictures. At the end of the next-to-last session, I gave the students a final assignment. They were told to think of some small detail that they wanted to do in crewel embroidery on the surface of their finished needlework. It could be in color or a black silhouette. They were to bring a copy of this detail, in the size they planned to use, a crewel needle, and yarn or floss to the final class. Their landscapes were to be finished, except for this detail, and be ready to be shown to the class for critique.

On the last day, I gave each student a piece of tissue salvaged from an old dress pattern and some straight pins. They traced their details on the tissue and pinned it in place. They embroidered the details through both the tissue and the canvas. I brought out the framed “Cascades” to show them how I had done the branches in the foreground. They used familiar crewel stitches like outline, stem, chain and satin to do the embroidery. Then they tore away the tissue and used tweezers to remove any remaining remnants. They removed the pins and brushed the surface of the needlework with a soft brush.
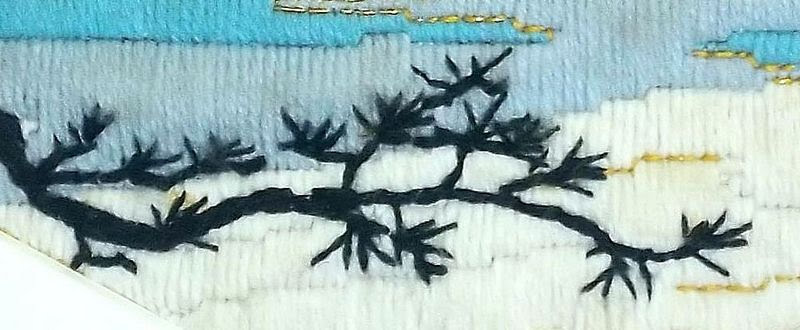
Detail of tree branch from Cascades
Detail of tree branch from "Cascades"
Each student then presented his or her completed landscape, told what had inspired it, and answered questions from other students about decisions they had made. Each of them went home proud of their accomplishments. They each had created an original, hand-crafted, one-of-a-kind work of needle art.

Now it is your turn. Return to the chart at the beginning of this chapter. Make your choice from each category. (Add other choices even more categories if you like.) Prepare your canvas. Make your simple sketch and trace it onto your canvas. You may want to color your sketch and keep it nearby. Choose your yarns and/or flosses with care. Work from background to foreground with your favorite stitches and stitch patterns. When you are sure your composition is complete, add that one detail to the surface of your work.

If there are features of your design that you really want to include, but feel you cannot draw, try to trace the outlines from a photograph. I have a caution about that, however. If you are tracing from a photograph, trace only the basic outlines or outstanding features. Don’t put in unnecessary details. J.J., whose photographs you will see often throughout these chapters, says that she finds it useful to half-close her eyes (squint) and mark only the features she sees that way. If you put in too much detail, you may make something that is difficult for other people to identify as strange as that may seem. You can always refer to the photograph and add more detail later if you think it is necessary. A good source of photographs is wall calendars, many of which are on sale now.
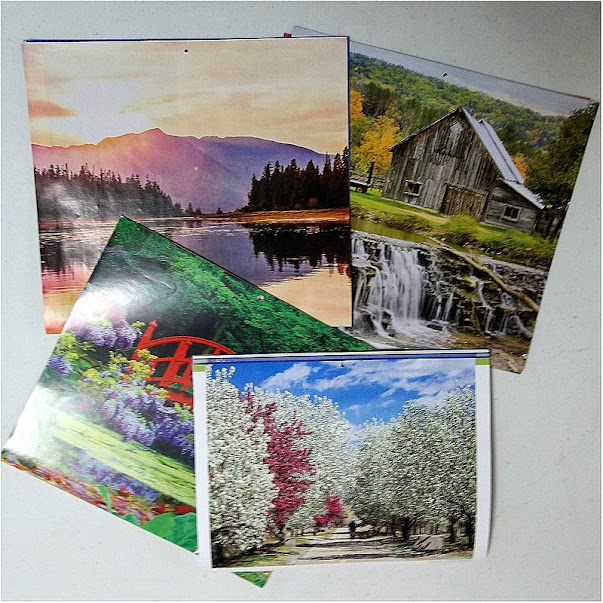
Calendars
Calendars are a good source of inspiration for landscapes
I hope you will be as happy with your landscape as my students were with theirs. You may want to frame your work or make it into a wall hanging, pillow top, etc. Display it with pride!



Some material in this post was presented in a different form in a blog post in September, 2013

 Creative Commons LicenseThis post by Annake's Garden is licensed under a Creative Commons Attribution-NonCommercial-ShareAlike 3.0 Unported License.

Thursday, September 12, 2013

Landscape Design Challenge for Needlepoint

Original needlepoint landscape "Saguaro Sunrise"
"Sunrise with Saguaro," available in our Etsy shop
I get really frustrated when people tell me, “I couldn't do an original design. I can't draw. I can't ever think of anything to do.” I want to say,”You're still breathing, aren't you?” As long as you're alive and able to see and move, you can have an original idea and you can certainly make an original design.

Some years ago I taught a needlepoint class at a Parks and Recreation facility. The students knew the tent stitch, which they'd used primarily to fill in the background around a completed design. I told them that they would create and stitch an original landscape during this class, including a bit of crewel surface embroidery. I assured them that no two pictures would be alike and that they would all be beautiful. They stared at me with varying degrees of shock and dismay. You would have thought I'd told them they were going to have to eat live grasshoppers! I heard a whole chorus of “I can't!”  I said,”You can.”

This is how we proceeded: I gave them a series of choices. When I write them out, they look a little like a Chinese restaurant menu. Choose one from Column A, one from Column B, etc.

ShapeLocationSeasonTime of Day
square evergreen forestspringdaybreak
circleEastern woodlandsummermorning
ovalprairie grasslandautumnafternoon
hexagonmountainswintersunset
desertnight
seashore

I didn't give them a choice of “Rectangle” because I wanted them to get away from conventional ideas.

Once they had chosen their shapes, I gave each one a template of her shape to draw onto her canvas. The people who had chosen ovals had to decide whether to use them horizontally or vertically.
 
"Cascades," original needlepoint landscape by Annake
Then we moved on to locations and what might be seen there. A couple had grown up on prairie farms and mentioned barns, silos, and windmills. That got the discussion started. I wrote their ideas on a chalkboard. I intended, as always, to do a picture right along with them. I chose a hexagon as my shape and mountains as my location. Everyone had a favorite season; I chose autumn. We discussed the color ranges associated with each one. (My chalkboard was filling fast.) Then we discussed how light, shadow, and color changed with the time of day. Soon their choices were complete, although no one chose to do a night scene. As I'd hoped, no two people had identical choices.

Detail of "Sunrise with Saguaros"
Detail from 'Saguaros,' showing shaded Persian yarns
Each one left that day with her choices, notes on many ideas, and a color scheme of yarns to buy and bring to our next class. I also suggested they bring along photos of anything they thought they might like to include in their compositions. The next week I had to convince them that “Less is more”. Most of them needed to leave out more details than they wanted to put into their pictures. I showed them how a few simple lines could suggest hills, a lake, a shoreline or mountain range. They got their sketches down to a bare minimum and traced them onto their canvases with permanent marker. I did a lesson on blending colors by splitting Persian yarn and combining three different shades, upright Gobelin stitch (the most versatile of all canvas stitches), Hungarian stitch and Hungarian ground.

Detail from "Cascades"
Detail from "Cascades," showing various stitches
Their “needle-paintings” developed rapidly and they began looking for stitches that fulfilled specific needs. “How do I make this wall look like bricks?” “What stitch will make this tree trunk look and feel rough?” As I taught the stitches, everyone in the class made a sample of each stitch on spare canvas. Even if they didn't use a particular stitch in their composition, they had it for future reference. In the meantime, I completed my mountain scene and one of a spot on the California coast.

"Monterey Cypress," original needlepoint landscape by Annake
"Monterey Cypress," original needlepoint landscape
The week before our final session I had them bring in a small drawing of something they might see in the sky (birds flying, a kite, a hot-air balloon) or in the foreground of their landscape. Tree limbs (bare, leafy, flowering, evergreen) were popular choices. They traced their choices on tissue from an old dress pattern, pinned them to their landscapes, and embroidered through the tissue. Once they carefully peeled the tissue away, their projects were complete. They thought they couldn't do it. But they could. And they did. No two were alike. And all of them were beautiful.

Detail from "Monterey Cypress"
Detail  showing vertical Gobelin and tent stitches
Now I have a challenge for all of you needlepointers who have only worked with kits, printed canvases, charts or canvases hand-painted by other people, and who think you can't do an original design. Go back to the “menu” and make your choices. With the seasons changing, you have lots to choose from. Observe for yourself the colors and light at sunrise, morning, afternoon and sunset. With a few simple lines, suggest a place. If there are elements you want in your design that you cannot draw, trace them from a photograph. Use any canvas and yarn. Use tent stitch alone or in combination with other stitches. Follow the directions for putting your landscape together. Share it with us (use our “Contact Us” page) and we can include it in a future blog.

Happy designing! Surprise yourself!

Annake

Branch detail from "Cascades"
Detail from "Cascades," showing tree branch in crewel embroidery


 Creative Commons LicenseThis post by Annake's Garden is licensed under a Creative Commons Attribution-NonCommercial-ShareAlike 3.0 Unported License.

Contact Us

Name

Email *

Message *

Blog Archive