Showing posts with label backstitching. Show all posts

Saturday, January 11, 2020

Back to the Crewel World: Yarn Embroidery Revisited

Magnolias embroidery
Heirloom crewel embroidery (Annake's collection)
(Last month I promised to revisit the subject of crewel embroidery. This is a topic that we posted on in 2015 and 2016. To prevent too much duplication of information and techniques, I will give you links to those posts from time to time.)

An article in one of our regional newspapers cited the return of interest in embroidery. As someone who never lost interest, I found this very encouraging. It said some new embroideries were less about decoration than in past decades, and they tended more toward slogans and expressions of personal choice and opinion. There's certainly nothing wrong with that. Tee shirts and sweatshirts have been doing that for ages. Some designs were described as whimsical or comical. (If you want to sell your needlework,  you must be careful not to use a design based on copyrighted characters like Disney cartoons or syndicated comic strips.) A lot of work was called “very individualistic”. I always encourage readers to use the techniques you've learned to create something uniquely your own. Even when I provide a pattern, I try to describe how you can vary it greatly in color, stitches, background material, etc. You can even use the same pattern to create an entirely different form of needle art, or use it in a different medium entirely. These are points I intend to strongly emphasize in upcoming posts.

rose drawing and needlepoint chart
Drawing, turned into a needlepoint chart, works for crewel as well

The word crewel refers to the type of yarn, a loosely twisted 2-ply (2-strand) wool yarn. Traditionally, crewel embroidery is done with a 2-ply wool yarn on a medium-grade to fine-grade linen.

Detail from the Bayeux Tapestry
One of the oldest (and largest) pieces of crewel embroidery still in existence is the Bayeux Tapestry, depicting William the Conqueror's victory over England in 1066 AD. (Although called a tapestry, it is really a huge embroidery rather than a woven tapestry.) You might have seen recent news stories about this famous work. (Look here and here.) The piece, believed to have been made by needleworkers in Normandy and completed about 1100 AD, is 231 feet long (!) and 20 inches high. Besides land and sea battles, it shows many details about the costumes, artifacts, techniques and customs of the era.

Crewel pillow cover
Like Spanish blackwork, crewel embroidery became popular in England during the reign of Queen Elizabeth I.  She loved roses and native wildflowers, so those motifs were widely used, along with leaves and vines like those in this much more recent (20th century) pillow cover.  One of the major functions of this type of embroidery was to provide warmth: the embroidery added weight and thickness to bed curtains, canopies, draperies and wall coverings made of linen or wool. The work was usually done by a number of needleworkers supervised by an experienced embroiderer who may also have designed the motifs. Lovely examples of this work are exhibited at the Victoria and Albert Museum in London.

Jacobean style embroidered bag
Modern bag embroidered in the Jacobean style
Crewel embroidery reached the peak of its popularity during the reign of Queen Elizabeth I 's successor, King James I, who liked to do the embroidery himself. (Crewel was never considered ‘un-manly’ in much of the world.) The work of this period was also called Jacobean Embroidery. This 20th-Century European handbag is done in the Jacobean style.  The designs were heavily influenced by Chinese and other Oriental fabrics, porcelains, and lacquer-work beginning to be imported into England at that time. The Jacobean influence can still be discerned in modern crewel embroidery.  Dragons and other mythical creatures were also popular in the 17th Century.

Early colonists brought crewel patterns and techniques to the New World, where they became quite popular. Some of the stitches commonly used were running stitch, double running stitch, back-stitch and cross-stitch. These basic stitches were further embellished by such techniques as whipping, lacing, and interlacing.  If more experienced embroiderers will bear with me for a few paragraphs, I will demonstrate these stitches for beginners.

A running stitch (also called a basting stitch) is one that covers the same number of threads each time, leaving a blank space of the same number of threads between the stitches.

A double running stitch starts at the end of the running stitch line, often with a second color, and fills in the spaces between the running stitches.

The next row shows a running stitch (dark blue) whipped (overcast) with a second color.  That second color stays on top of the fabric except at the two ends.

The next row shows a double running stitch in two colors that is then whipped with a third color.

This next stitch is the laced running stitch.  It begins with a running stitch (dark blue). The second color (rose) stays on the surface of the fabric except at the ends. It is pulled into a little arc under each running stitch and forms a longer, shallower, downward arch between stitches. This gives it a scalloped appearance. If I were doing this on linens or a garment that needed to be washed, I would use thread from the background fabric to couch the arches to the fabric. That is, I would hold the loops down with tiny upright stitches at the centers of the loops.

The laced double running stitch starts with a double running stitch in two colors. Lace it with a third color. Because the arches are caught at the joining of two stitches rather than crossing an empty space between stitches, the top and bottom arches are the same size and the scalloped effect is gone. This is another stitch pattern that benefits from couching.

For the next pattern row, do the double running row in a single color. Keeping the second color on the surface except at the two ends, loop it around the places where the running stitches join. This is the Pekinese stitch, which usually doesn't require couching.

If you know how to back-stitch, you can whip, lace, and do Pekinese stitches on rows of back-stitching as well, adding to your ‘vocabulary’ of stitches. Practice these stitches until you feel comfortable with them. You can use them for curved lines as well as straight ones, but you need to keep the stitches the same size as you do that.

As I noted earlier in this post, traditional crewel embroidery is done with a 2-ply wool yarn on a medium-grade to fine-grade linen. Some show judges will not let you call a piece "crewel embroidery" unless it is done this way. That was fine, I suppose, in the 17th Century when the technique was at its peak, but it is the 21st Century, and time to broaden our horizons!  Personally, I like to do this technique on wool or a good wool-like synthetic with anything from 1 to 5 plies of yarn (both wool and acrylic), using all kinds of flosses, metallic threads, etc., for special effects.  I like crewel yarn and 3-ply Persian yarn that I separate as needed. Separating the plies also allows me to blend them by combining different colored plies together in my needle.
blended yarn sampler
A blended yarn sampler

Unfortunately, these yarns have become more expensive and harder to find.  Also, some people are allergic to wool or simply can't afford it. Feel free to experiment with the cheaper, more readily available alternatives. You may find some acrylic and other synthetic yarns easier to embroider with than others.  Practice with them so that you can make good choices before you begin a project.

Crewel needles that are sold as such are usually designed to handle 1-ply or 2-ply yarn.  If you want to work or experiment with more plies, you will need needles that have large enough eyes to accommodate the extra yarn. Try to get an assortment of needles with different lengths and sizes of eyes. The needles should have sharp points that slip between the threads of the background fabric. If the needle point punches a hole in the fabric, it is too large and heavy.

iris shirt stitching
Surface stitching anchored by the outline
I also like to keep a variety of blunt-pointed tapestry needles on hand. Once I have outlined the edges of a design part, I often fill the center with stitches that lie flat on the fabric but do not penetrate it. They are held in place by running them underneath the outline stitches.  While the yarn should not be loose enough to move out of its place on the surface of the fabric, it must not be pulled tight enough to pull the outline out of shape. This requires a little practice on a small piece of the fabric to get it just right. The blunt tapestry needle will slip under the outline stitches without splitting them.


You will need some sort of support for your work, otherwise it will eventually pull out of shape. If you are a beginner and doing small projects, start with a set of a 6-inch, 8-inch, and 10-inch hoops. Please use wooden hoops. Metal and plastic ones slip. For more ambitious projects, you may want a frame. Here is a popular kind:

needlework frame
Large adjustable needlework frame

Some other things you will need, if you don't already have them at hand, include: a pair of small, sharp scissors; a bag or basket that never contains anything but your needlework; a well-fitting thimble (if you use one) and a ruler or measuring tape.

For the next "family" of crewel stitches, both beginners and experienced stitchers can follow this link:


Watch for another crewel article soon. Enjoy!



 Creative Commons LicenseThis post by Annake's Garden is licensed under a Creative Commons Attribution-NonCommercial-ShareAlike 3.0 Unported License.

Sunday, April 8, 2018

Landscapes in Needlework, Part II

Cattails, photo by J.J.
"Cattails", photo by J.J.
The next two needlework landscapes are the result of a class I taught for adults at a Park and Recreation center some years ago. It was an intermediate class for people who had completed an introductory class in needlepoint, some other tapestry work, and basic crewel embroidery. They had acquired some skills, but were still turning to kits and published patterns for most of their needlework projects. I decided it was time for each of them to do a piece of original work. I challenged them to draw a simple landscape and bring it with them to class the following week. It could be any shape except rectangular. I wanted them to “think outside” that particular box. They could do a real landscape or an imaginary one, but this first class session was to be devoted to making a series of choices that would make up their plan for the project a plan they would then be expected to follow throughout the project. The chart below summarizes the list of choices that were decided upon. It worked somewhat like a Chinese restaurant menu: one from Column A, one from Column B, and so on.

ShapeLocationSeasonTime of Day
square evergreen forestspringdaybreak
circleEastern woodlandsummermorning
ovalprairie grasslandautumnafternoon
hexagonmountainswintersunset
desertnight
seashore

I handed out pre-cut templates and they traced their choices of shapes on plain paper. Those who had chosen ovals (ellipses) decided whether to use them horizontally or vertically. Once they had written their other choices on a planning page, we moved on to locations and what might be seen there. A couple of the students had grown up on prairie farms. They mentioned barns, haystacks, silos and windmills. That got the discussion started. Then we talked about how colors change with the seasons, times of day, and weather, and how light differs in forests, the desert, at ocean-side, etc. They had suggestions which I wrote on a chalkboard. They were still unsure about the assignment, but gaining some enthusiasm. The rest of the class was devoted to preparing canvas and making a list of materials.

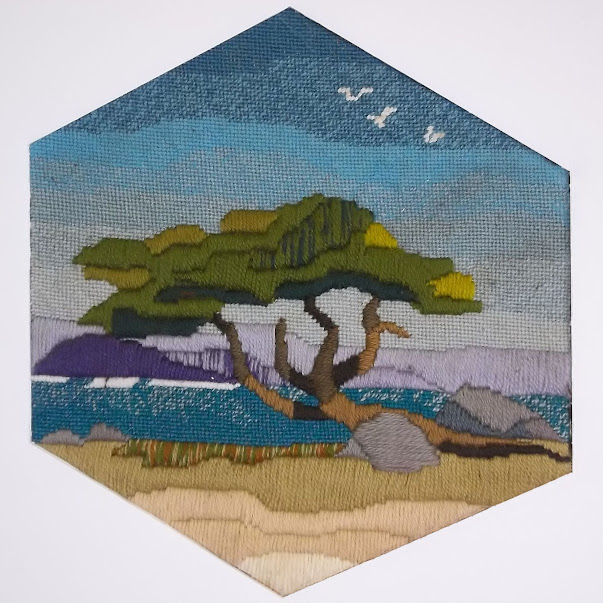
Monterey Cypress needlepoint landscape
"Monterey Cypress",  needlepoint landscape
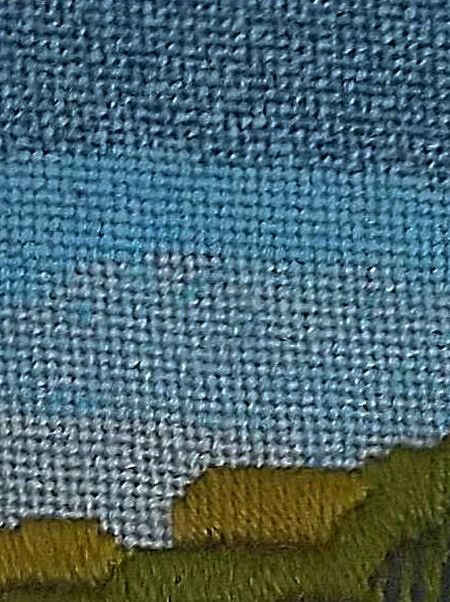
Since I never ask students to do any project that I don’t do along with them, I made my own plan from the “menu” and promised to have my design for the next meeting. I chose hexagon, seashore, summer, afternoon, clear weather. The result was “Monterey Cypress”. This is one of those landscapes mentioned in the previous chapter which try to capture the “essence” of an area without portraying a specific scene. It is a mixture of memory and sensations. There are scenes like this along the Monterey Peninsula, but neither the tree nor the headland in the distance represent a particular one. As I expected my students to do, I used examples of techniques learned in the previous class, as well as new ones. I also wanted the picture to have a 3-dimensional quality. I began at the top of the sky with conventional tent stitch, but used blended yarns to gradually lighten the sky from the zenith to the horizon. Tent stitches are very flat, which made the other elements of the composition stand out from the surface.

Monterey Cypress sky detail
Sky detail showing variegated & blended yarns
At our second meeting, I showed my class my hexagonal outline and the simple shapes that I had included in my design. They had drawn their landscapes inside the shapes made with templates. We discussed the idea that “less is more”. Most of them needed to simplify their pictures by tracing only the broad outlines of the most important features. I didn’t want them concentrating on small details at this stage. They then used the templates to draw their outlines and simplified landscapes on prepared canvases. I had completed a large section of the sky on my picture and gave them a lesson on blending yarns. They liked the effect and used that technique on their own skies.

Detail showing blended yarns
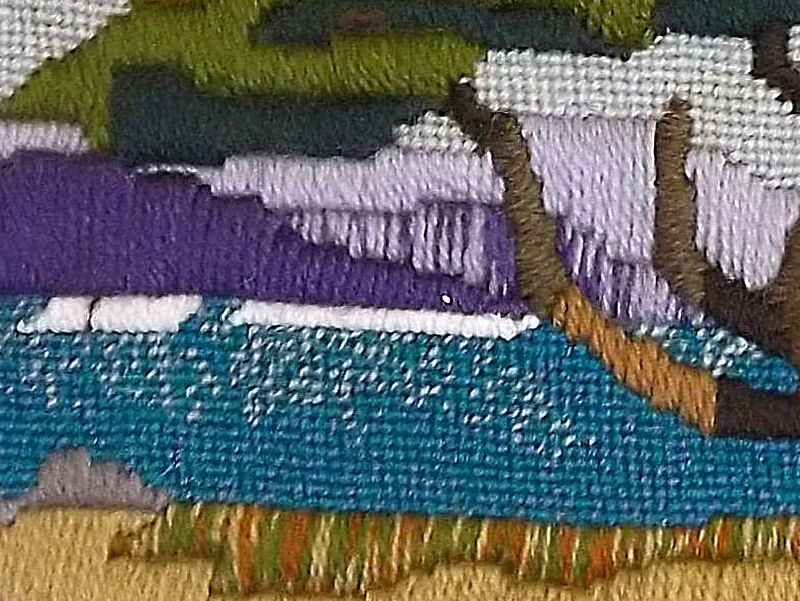
You blend yarn by threading two or more different shades into your needle at the same time. Begin with three shades in the same color range — a dark shade (D), a medium shade (M), and a light shade (L). Look at the sampler. Each division contains three strands of yarn used together. From left to right, you have the following color designations: DDD, DDM, DMM, MMM, MML MLL, LLL and DML. As you stitch, the strands of yarn will turn so that the same strand is not always on top. This is what creates the intermediate shades. You can see some of that effect on the cliffs of the headland in the distance. You will probably need to use several such combinations to create a “needle painting”.

blended yarns sampler
Blended yarns sampler

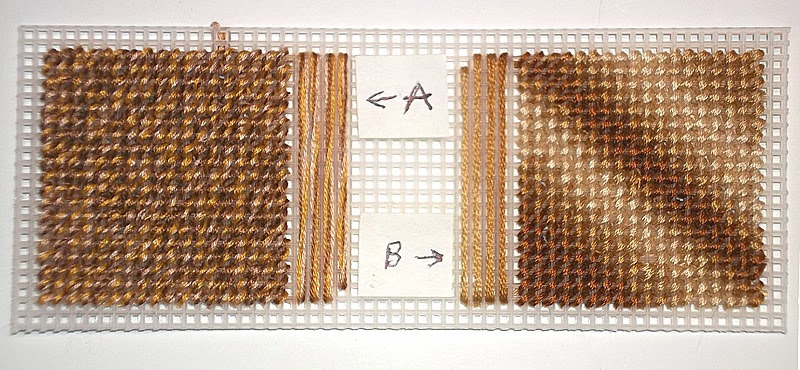
Blending embroidery floss works in a similar manner. With floss, however, you are working with 6 strands, rather than 3. Floss does not separate as easily as yarn does. I usually separate floss into three 2-ply strands, rather than six 1-ply strands. As I did with the yarn, I use a dark, a medium, and a light shade of the same color. You can use more closely related shades of the same color for even more subtle effects if you like. Variegated floss will give you a different effect.

Blended and Variegated Floss Sample
Blended (A) and Variegated (B) Floss Sample


Detail of cypress foliage
Detail of cypress foliage, showing raised stitching
By the following week the students were eager to start on the middle grounds of their pictures. l I had completed the cypress tree, using a lot of upright Gobelin stitch, a stitch which goes back to the Renaissance, where it was used to produce embroidered goods which looked like woven tapestries, but were far less expensive. These were in great demand from the rising middle class, who wanted goods that were similar to those that had only been available to royalty and the rich up to that time. Gobelin can be used either vertically, as I used it in the sections of the tree’s foliage, or horizontally, as I used it on the narrower limbs and tree trunk. I had used two strands of yarn for the foliage rather than a single strand, which made the foliage stand out from the background.

We had a short practice session with the stitches and they began picking out parts of their pictures where the technique was effective. Class sessions were often interrupted by such questions as “How do I get this wall to look like brick?” or “What stitch will make this tree trunk look and feel rough?” Each time I taught a new stitch, the class stopped what it was doing and learned that stitch. They did samples of each stitch on strips of plastic canvas, labeled them, and stored them in binders, folders. or envelopes, or stapled them to index cards for future reference.

Brick stitch sampler


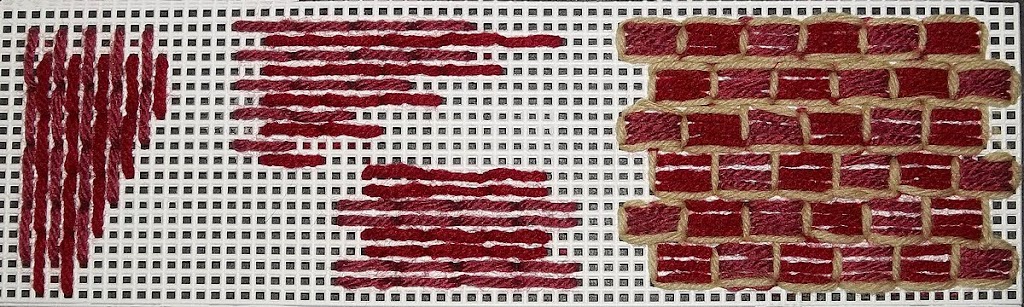
Brick stitch can be used either vertically or horizontally over 2 or 4 threads of canvas. Despite its name, it is more commonly used vertically than horizontally (upper left). Two colors are used. The stitches of the second color begin and end at the midpoints of the stitches of the first color. I have used stitches over 4 threads throughout. The next stitches (top middle) are done horizontally. To make them more brick-like, you will need to use at least two rows of stitches, if not more (bottom middle). When I did the piece on the right, I did three things: I used three rows of stitches for the bricks; I alternated the colors as well as the rows; and I outlined the brick shapes with a thinner tan yarn to represent mortar. In the top three rows, I used two layers of “mortar” between the rows. This makes the bricks look smaller, more irregular and worn — older, in fact. On the bottom three rows, I used a single layer of “mortar” between the rows. They look newer and less worn, but the coverage is not as good. This should not be a problem on needlepoint canvas, where the mesh is finer and the threads are thinner. Think about the age of the wall you are trying to portray. The older it is, the more worn and faded the bricks should look and the darker the mortar should be.

Padded stitch sample
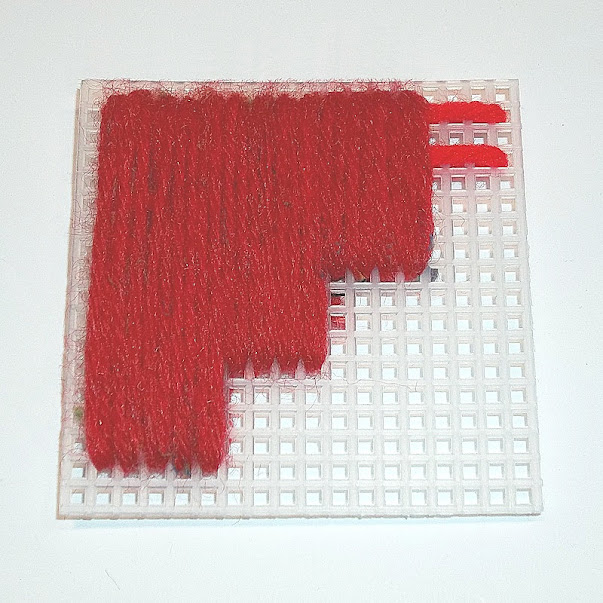
I used Gobelin stitches again in the foreground of my picture, but this time I padded the stitches for objects like the large boulder. Before I put in the double-strand stitches vertically, I laid in long stitches of a heavier yarn horizontally across the area to be stitched. This gave the areas extra dimension. You must be careful, however, to get the vertical stitches even, untwisted, and very close together so that none of the padding shows through. This takes a little practice.


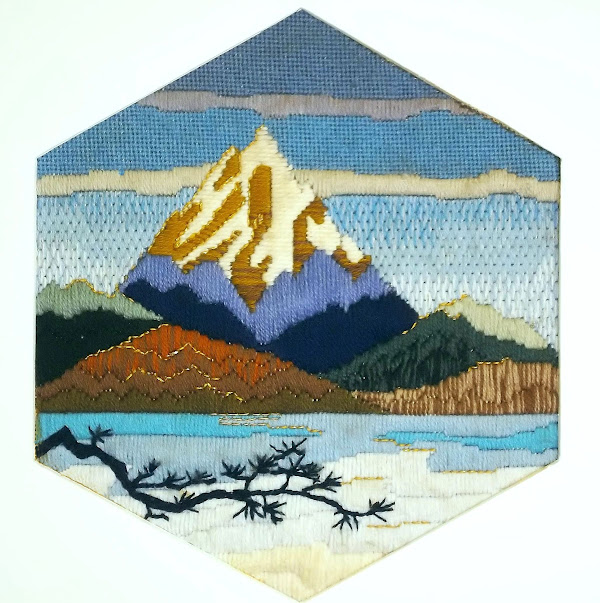
Cascades needlepoint landscape
"Cascades",  needlepoint landscape
By the middle of the class schedule, I had finished “Monterey Cypress”, given it a hexagonal picture mat, and framed it. I then started on a second example, keeping the hexagonal shape, but choosing a mountain scene on an early spring morning while the lake in the foreground still had a lot of ice on it. This is “Cascades”. Although it captures the “feel” of the area and shows my fondness for it, the scene is completely imaginary. Despite this, I have heard many viewers of it exclaim, “Oh, I’ve been there!” or “I just love that place!”.

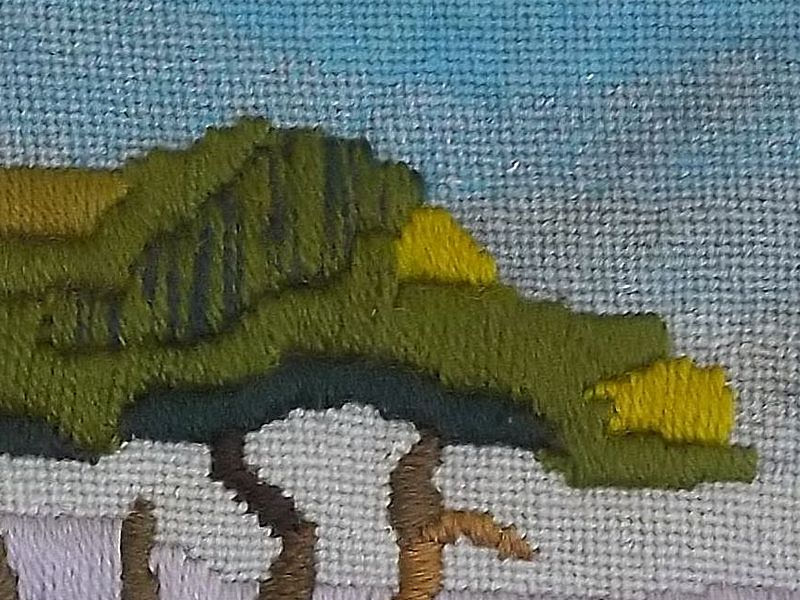
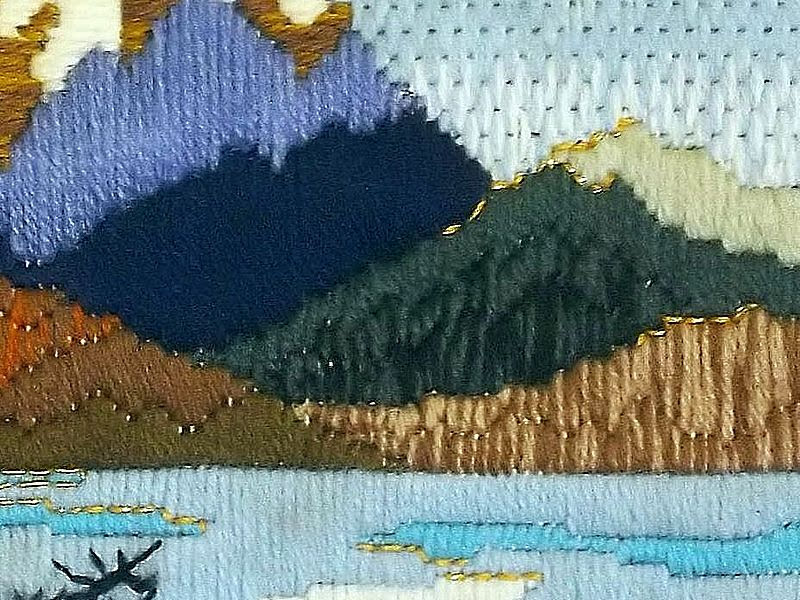
As the students finished the mid-grounds of their landscapes and moved on to the foregrounds, they had to decide what the focal point of their picture would be, so they would know whether to really emphasize the foregrounds or make them simple and understated. One of the lessons I gave at that time concerned the use of back-stitching for three different purposes. These are:

     a) back-stitching around an area with a single strand of the same color to help define it,
      b) back-stitching around an area with a contrasting color to draw attention to it, and
      c) back-stitching with metallic yarn or floss to indicate reflections or add sparkle.

You can see all three uses of back-stitching in this sample.

Detail showing backstitching
"Cascades" detail showing backstitching
I had embroidered three white gulls on the surface of the sky in “Monterey Cypress” without calling any particular attention to them. The gulls had, however, suggested a “finishing touch” to the pictures. At the end of the next-to-last session, I gave the students a final assignment. They were told to think of some small detail that they wanted to do in crewel embroidery on the surface of their finished needlework. It could be in color or a black silhouette. They were to bring a copy of this detail, in the size they planned to use, a crewel needle, and yarn or floss to the final class. Their landscapes were to be finished, except for this detail, and be ready to be shown to the class for critique.

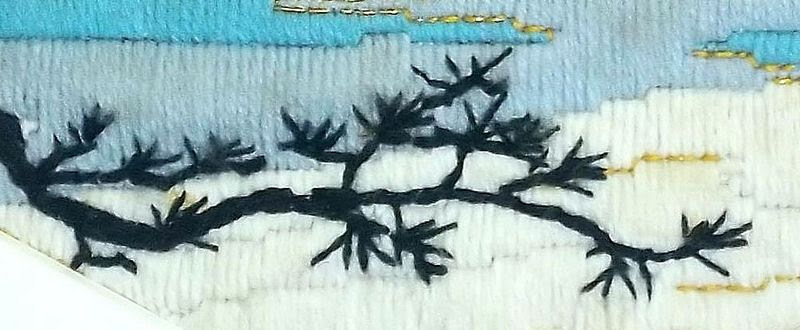
On the last day, I gave each student a piece of tissue salvaged from an old dress pattern and some straight pins. They traced their details on the tissue and pinned it in place. They embroidered the details through both the tissue and the canvas. I brought out the framed “Cascades” to show them how I had done the branches in the foreground. They used familiar crewel stitches like outline, stem, chain and satin to do the embroidery. Then they tore away the tissue and used tweezers to remove any remaining remnants. They removed the pins and brushed the surface of the needlework with a soft brush.

Detail of tree branch from Cascades
Detail of tree branch from "Cascades"
Each student then presented his or her completed landscape, told what had inspired it, and answered questions from other students about decisions they had made. Each of them went home proud of their accomplishments. They each had created an original, hand-crafted, one-of-a-kind work of needle art.

Now it is your turn. Return to the chart at the beginning of this chapter. Make your choice from each category. (Add other choices — even more categories — if you like.) Prepare your canvas. Make your simple sketch and trace it onto your canvas. You may want to color your sketch and keep it nearby. Choose your yarns and/or flosses with care. Work from background to foreground with your favorite stitches and stitch patterns. When you are sure your composition is complete, add that one detail to the surface of your work.

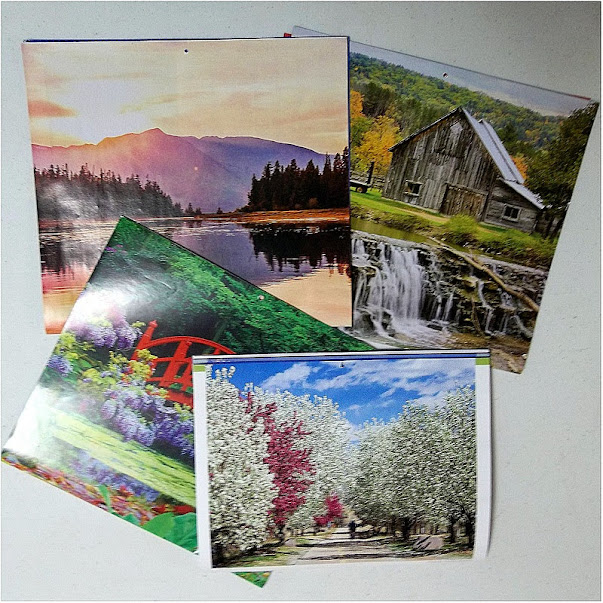
If there are features of your design that you really want to include, but feel you cannot draw, try to trace the outlines from a photograph. I have a caution about that, however. If you are tracing from a photograph, trace only the basic outlines or outstanding features. Don’t put in unnecessary details. J.J., whose photographs you will see often throughout these chapters, says that she finds it useful to half-close her eyes (squint) and mark only the features she sees that way. If you put in too much detail, you may make something that is difficult for other people to identify — as strange as that may seem. You can always refer to the photograph and add more detail later if you think it is necessary. A good source of photographs is wall calendars, many of which are on sale now.

Calendars
Calendars are a good source of inspiration for landscapes
I hope you will be as happy with your landscape as my students were with theirs. You may want to frame your work or make it into a wall hanging, pillow top, etc. Display it with pride!


Some material in this post was presented in a different form in a blog post in September, 2013

 Creative Commons LicenseThis post by Annake's Garden is licensed under a Creative Commons Attribution-NonCommercial-ShareAlike 3.0 Unported License.
Monday, February 5, 2018

More From Our Introductory Class

Annake is now offering needle arts classes for Cedaredge/Surface Creek/Delta County residents. If you are interested, please contact her at:  annakes_garden@yahoo.com

classroom
My "classroom", ready for action
Some of the results of our earliest classes were described, but not illustrated. I want to correct that oversight now. I mentioned that the students began filling in the backgrounds behind their completed upright gobelin designs. I had them do a very simple background, using the same upright gobelin stitch in narrow horizontal bands. Most of them chose a solid color for this. I did, however demonstrate a background done with a variegated yarn.


Waterlily with straight stitched background
The example I was using was a small waterlily, which we previously showed you front and back. Waterlilies always make me think of Monet’s paintings of them. I chose this particular variegated yarn for the background because it reminded me of relatively still water in a pond, reflecting light and the shadows of overhead vegetation. The students had to make some choices, omitting or shortening background stitches to intersect with the central figures without leaving any bare canvas between the two. They didn’t find this particularly difficult, and most were pleased with their results.

I showed them an alternative version of the waterlily, done with both horizontal and vertical stitches for additional texture, with a background in the same variegated yarn, but done in basket-weave tent stitch. They had not yet learned the tent stitches, but they expressed eagerness to do so after seeing this version in use.
Waterlily with tent stitched background


A length of one color from a variegated skein
There is one caution about using variegated yarns. If you are doing a background like the “water” one seen here, to get large areas of a single color — you will need (as I have done) to cut sections of the color you are using out of the variegated yarn. If you do so, be sure to leave at least an inch of the two adjacent colors at each end of the piece you have selected. After you cut the yarn, you can use these short sections to anchor the yarn at both ends by securing the colored tips under existing stitches. This leaves you with the maximum amount of your chosen color for stitching.

Finished mushrooms
Finished mushrooms
I also showed them the larger design of mushrooms with half of the background done in variegated yarn and half in a solid color. We showed you this last time as a work in progress. Whenever possible, I show students alternative methods of making similar projects — but only after having then do a sample in the simplest techniques. Here the “sky” is done with long upright stitches, but the areas are broken up so that the stitches don’t become too long and tend to sag or snag on other objects or surfaces. The lower half of the background, which represents straw or dead grasses, is done in a variegated yarn stitched both horizontally and vertically.


Backstitch closeup
Back-stitch closeup
When each of the students had done enough background that I was assured they could finish it, we began back-stitching the central design. I gave each student a small ball of black yarn and showed them how to separate it into individual strands. They were shown a sample back-stitched in two strands of yarn and one back-stitched in a single strand. They chose which one they preferred. I explained that the single strands would fray much faster than the whole yarn, so that they needed to use shorter amounts for back-stitching than they had for the gobelin stitches.

We began with 12-inch strands. Some people quickly mastered the back-stitching, while others needed some assistance. They were told that, if a stitch did not show up, they should go over it with a second stitch immediately. If a series of short stitches did not outline their section well, they could use a long stitch over the top of the short stitches. Some were disappointed that they couldn’t achieve truly curved lines while working on this canvas, but one thing I wanted to emphasize was that each canvas or fabric used imposes some restrictions on the materials and stitches that can be successfully used on it.

Waterlily with backstitching

For example, they were aware that the plastic canvas they were using is #7 canvas. (There are other, smaller gauges available.) They knew that this size accommodates 49 stitches per square inch and can easily take stitches in knitting yarn or a yarn of similar weight. They were told that they would eventually be using #14 needlepoint canvas, and that larger numbers mean smaller mesh. All right, they thought, 14 is 2 times 7, so there should be twice as many squares in a square of #14 canvas as there are in a square inch of #7 canvas. That sounds logical, but it is untrue. There are four times as many squares in a square inch of #14 canvas! (Do the math: 7 x 7 = 49, but 14 x 14 = 196.) So the finer canvas will only accommodate a much smaller yarn or fewer strands of yarn than the #7 canvas will.. It will, however, allow the users to make much finer curves and put smaller details into their pictures.

Samples of canvas in various "gauges"

The students were asked to complete the project before the next meeting and to bring it back for a critique and to see some ideas for using or displaying the sample if they chose to do so. Some of those choices include: framing the sample in a 5 in. x 7 in. frame, backing it with felt for use as a large coaster or small mat, using tent stitch to make a larger mat from the plastic canvas so it can be placed in a larger frame, mounting the sample on a larger piece of wood or Masonite, or covering a larger piece of heavy cardboard with wallpaper or gift wrap and mounting the sample. Some of these will be demonstrated, while students are asked to suggest other possibilities. They were also asked to read the posts on this blog for November 3, 2013 (Gobelin Droit) and March 8, 2015 (“Stained-glass” Stitchery), in that order.

I hope you enjoyed this "peek" into one of my classes in progress.


Some project finishing ideas


 Creative Commons LicenseThis post by Annake's Garden is licensed under a Creative Commons Attribution-NonCommercial-ShareAlike 3.0 Unported License.
Tuesday, January 16, 2018

How One Thing Leads to Another...

classsroom examples 1
Examples of different needle-craft techniques
Working with introductory needlework classes, I stress several things: learning basic skills so that you don’t need to depend on kits or patterns; making comparisons as you move from one technique to another so that you can apply the same skills to more than one kind of needlework; stressing your personal preferences for color, texture, stitches, etc.; saving money on materials and equipment; and using your imagination to create new uses for what you have learned. I believe that creating things builds character and confidence and brings a kind of satisfaction that is unique.

more classroom examples
More classroom examples
I begin with some general principles that I have learned from experience over many years — most of them learned from my own errors. (See “11 Secrets for Needlework Success” on our June 1, 2014 post.) These include such simple things as how and when to remove a bad stitch (using the eye of the needle rather than the point, and doing it immediately). I don’t believe in asking students to purchase a long list of supplies, so I provide most of what they will use for their first course of instruction. I do ask them to bring a bag (preferably cloth), that will not be used for anything but their needlework, scissors or shears that have not been used to cut anything but fabric or yarn, and a notepad and pencil for writing down instructions.

Butterfly drawing on plastic canvas
Butterfly line drawing on plastic canvas
We begin with a choice of simple outline drawings on 5-inch by 7-inch (10 cm X 15 cm) pieces of plastic canvas. Plastic canvas will be used for the first activities because it resists stitches being pulled too tight, which is the most common beginner’s mistake. The designs are simple — a flower, a butterfly, a cluster of mushrooms — yet they can be attractive when completed and can even be framed if the student likes her work. At the very least, they can be filed for future reference. After choosing a design, they are asked to decide on the colors they will use in completing it. They are not allowed to choose black as one of their colors (why will be evident later).

Egg carton with balls of yarn
Each one is given an egg carton with 12 openings in the top and invited to fill it with small balls of yarn. I roll balls of leftover yarn from each of my projects and store them in similar cartons, so there is always a large variety available. Once the yarns are selected, the free end of each one can be drawn through one of the 12 openings and the carton can be closed to keep the yarn clean.

First stage of a small water lily picture
Once they have made their choices and seated themselves, each one is given a tapestry needle with a large eye. I explain how the needles are numbered and tell them where they can buy additional needles locally when they decide they need them. I ask them to choose a section of the design to stitch first and to select a color of yarn. I explain why we don’t use lengths of yarn longer than 18 inches (46 cm.) and often use less. Each table has an 18-inch tape fastened to it so they can learn to estimate that length. After they have chosen and cut their yarn, I demonstrate the use of a waste knot to begin the work. I then demonstrate the upright gobelin stitch and show how it covers both sides of the canvas. I then ask them to make 5 stitches and stop.

Back view of water lily project
If the yarn they have chosen does not cover the canvas, I demonstrate the proper way to remove the stitches and replace each one with two side-by-side stitches. They are then to complete the section of design that they have chosen. As the first student nears the end of her yarn, we stop and I show them how to secure the end of the yarn under completed stitches and clip it close to the back of the canvas. I encourage them to look often at the back of their work. I don’t expect the back to look quite as good as the front, but there is no reason for it to look like an unmade bed, either! I then show them how to start a new piece of yarn by running it under existing stitches and we continue. I answer questions as we proceed.

Once a student has completed an entire section of her design, we stop. I show them how to start an adjoining section using the canvas “holes” where the stitches of the first section ended. In other words, how to make the design without leaving any bare bars of canvas showing inside the design. Once all have completed a few sections of their designs, I point out that there are details in each design which are so narrow (flower and mushroom stems, butterfly bodies, etc.) that they would look better worked horizontally rather than vertically. Students work one of those and make a note of any others. Then we ceremoniously sever the waste knot, thread the needle, and secure that piece of yarn under completed stitches.

Picture of mushrooms, in progress
Beginning sessions, especially with a large class, usually end with the rest of the central design to be done as “homework”. The next session begins with a consideration of the background. We look at a number of color samples and compare the effects of dark and light colors. I also demonstrate the effects of variegated yarns for this purpose — as a “water” background for a waterlily or “straw” for the ground under a group of mushrooms, for example. Long, straight stitches will be used for this also, but I will show that there can be advantages to using both horizontal and vertical stitches. Students work at least two adjoining sections of the background in class, joining them together and to the central design. The rest will be “homework”.

Students are then amazed to find they have learned the basics for doing a more complex design like these pictures in French long-stitch which are among the more than three dozen technique samples on the walls of my classroom. Moreover, since they have essentially been doing satin stitch on canvas, I show them how everything they have learned will ‘translate’ into work on either finer canvas or cloth with tapestry yarn or embroidery flosses (even the variegated ones).

Pronghorn and bighorn in French longstitch
Pronghorn and bighorn in French long-stitch

But the lesson is not yet finished. Students are given black yarn and taught how to separate strands. Using 12-inch (30 cm.) lengths, they are taught how to back-stitch, square to square, around their central design (and the background divisions if they like) to make “stained-glass” stitchery like this picture or the butterfly on this pillow. Back-stitching is one of the most useful and versatile stitches in a needleworker’s “vocabulary”.

Examples of "stained-glass stitchery"
See how “one thing leads to another”?


Cedaredge/Surface Creek/Delta County readers:
Annake is now offering needle arts classes on Wednesdays and Saturdays, and still has a few openings for the class that begins January 27th, 2018. If you are interested, please contact her at:  annakes_garden@yahoo.com

 Creative Commons LicenseThis post by Annake's Garden is licensed under a Creative Commons Attribution-NonCommercial-ShareAlike 3.0 Unported License.

Contact Us

Name

Email *

Message *

Blog Archive