Showing posts with label needle arts. Show all posts

Thursday, May 14, 2020

Trees in Art and Design

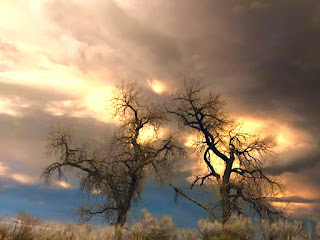
Bare trees against stormy sky
"Incoming Storm," photo by J.J.
Many trees change form drastically as they mature and age, sculpted by wind and weather.  A dwarfed, twisted tree at timberline can give real drama to a mountain scene. Some trees define the seasons. Last autumn we were in the high country, photographing the glorious colors of aspens and scrub oaks against the darker evergreens.

I like to study deciduous trees in the winter when their basic skeletal structure is most evident. Then I revisit the trees in the other seasons, sketching or photographing them to understand how that skeleton supports the masses of their leaves. Fruit trees are especially interesting because they have a flowering stage — often before any leaves have formed — and provide attractive backgrounds when the fruit is ripe. If I understand the way a tree is growing, I can anticipate where the masses of foliage are going to be once they develop.
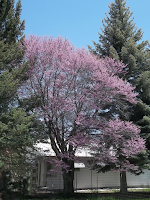
Fruit tree in bloom
Ornamental fruit tree in bloom
Trees are, of course, vital to many landscape compositions in graphic arts and needle arts, but they can compliment many other types of composition. For example, they can contribute in many ways to photography: to enhance an outdoor wedding or family picnic, as backgrounds for pictures of animals that use them for food and shelter, to soften the lines of street scenes or individual buildings, etc. One way to change a potential landscape or a picture with houses, for example, is to move the surrounding trees into different positions.


Click here to Download
Here is a quick watercolor study of a palm tree that I made many years ago in Panama. Imagine that you can "borrow" my palm tree. What do you see beneath it? An abandoned beach ball? A picnic lunch? A sunbather stretched out on a blanket? An animal digging in the sand for turtle eggs? See how a single tree can stimulate your imagination? Download the tree. Make a sketch of what you would include or look for a photograph that you could adapt.

Here are some things to consider when looking at trees. Study the patterns created by the direction of the light. If the sun shines directly on the tree from the front, which parts of the tree are darkest and lightest? What sorts of patterns are created around the tree? Where do the shadows fall? How do these things change when the trees are lit by light coming from behind them? (Sometimes it helps to half-close your eyes to really distinguish the masses of dark and light.)  If you are sketching the tree, put in the masses of middle value first. Then concentrate on the lighter and darker masses. Trees do not grow out of the ground like fence posts. Include the roots and the spread of the tree toward the roots in your study (sketch) of the tree. If you are doing a picture that includes a group of trees, remember that distance tends to add gray to more distant objects and try to make the farthest trees less distinct than those in the foreground.
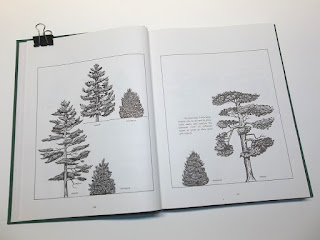
Landscaping tree book
I have, as a prized possession, a book written in 1983 specifically for landscape architects and nurserymen. It shows detailed drawings of trees and shrubs commonly used for those purposes. The pictures are all drawn to the same scale, so that you can make combined groupings and be sure that they would look natural together (in a park or garden, for example). It is also possible to enlarge a tree — or even part of a tree — to show how it would look beside or behind a building. You can also enlarge foreground trees and reduce background ones to show realistic perspective. Remember that distance not only makes trees look smaller. It also makes them look paler.
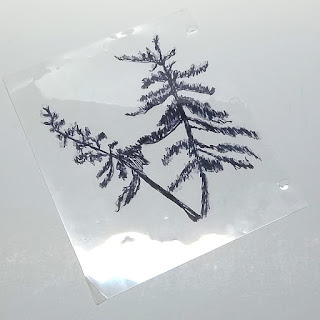
Transparency of an  evergreen
One of Annake's transparencies
Finally, the trees can be copied on clear overlays,  and be superimposed one on another. Although my book is probably long out of print, comparable photographs or drawings can be found in library books or online. Look for such topics as Forestry, Trees of <insert your country, region, continent, or the World>, Landscaping, or Ornamental Trees.

Here is a simple way to determine whether a tree might enhance your picture. When you have your photograph or sketch well organized, place a clear plastic overlay of the tree shape you are considering on top of it. This doesn’t have to be a detailed picture of the tree, just its general shape and growth pattern. You would be surprised, for example, how many shapes different kinds of evergreens can take. I have built up a collection of such overlays that I keep in a file folder. Because they are transparent, I can move them into any position I want on top of my sketch, reverse them, show only a portion of the tree, etc. Move a tree that blocks the view of a building to behind the building. You will still have its shape as a point of interest in the composition, but it will no longer overshadow the building or hide interesting architectural features. Even a single branch can have a big impact as you can see in this  needlepoint picture.
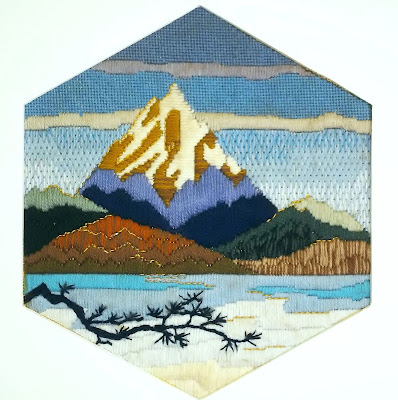
Cascades needlepoint by Annake
"Cascades," needlepoint by Annake

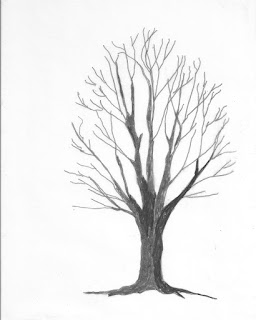
sketch of bare trunk and llmbs
Trunk and limbs
Let's go step-by-step through a tree sketch. I am going to use a simple #2 pencil because it is the one you are most likely to have available. I recommend you do this exercise in late spring or summer, when trees are usually in their best condition. It is neither necessary nor desirable to draw, paint, or embroider the majority of tree branches.  Get the larger ones and enough of smaller ones to show the directions in which the tree is growing. I like to think of the limbs as gesturing in these directions.  After all, when you portray a tree you are making an image of a living, growing creature, constantly adapting to its environment. Its growth is dictated by the amount of sunlight it gets and the directions and angles of that light. It responds to the winds and the amount and kind of moisture it gets — rain, fog, snow, etc.  Its form may be changed at various stages of its life by the presence of obstacles like large rocks, fences, buildings and other trees.  Try to see these influences in the living tree and indicate them in your sketch. And don't forget to show some roots in your sketch to connect the tree with the ground. When I am satisfied with my sketch, I move on to the next step.
sketch of trunk and llmbs with foliage blocked in
Foliage blocked in
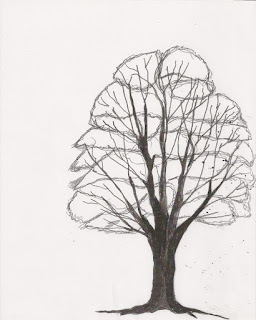
Just as it is not necessary to show all the tree limbs, it is not necessary to show all the foliage. If you look at a single tree, you will see the foliage is arranged in large clusters with parts of the trunk and limbs showing through between them. Look at the clusters. Which ones seem to be pointing — or gesturing — toward you? Which ones are pointing away from you, out to the sides, or up at the sky?  Treat them like separate pieces in a jig-saw puzzle. Sketch the general shapes of the most important ones. You don't need all of the clusters to make the tree look real. Make some little irregularities in the outlines of the shapes for realism. Indicate the larger limbs and parts of the trunk that show between the masses of leaves and where they may be seen in "holes" in the foliage. Carefully erase any of the trunk or limbs that you don't want to have showing in the finished design. (Pencil erasers tend to smudge, so it is a good idea to have a piece of sandpaper to remove the surface of the eraser as it starts to darken. A kneadable eraser is a good thing to have.)
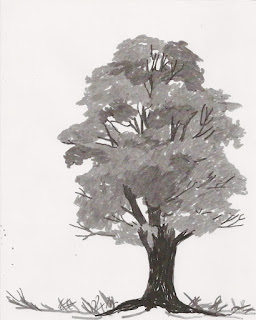
tree sketch in greyscale
Values
Now it is time to consider the values of the masses of foliage. Value refers to the relative lightness or darkness of objects or areas. (We are not going to consider color at this stage.)  Which cluster is the lightest and brightest in the tree? Leave it nearly as white as your drawing paper. Check to see if there are any areas that are almost as bright.  Fill them in as lightly as possible with your pencil. Now find the darkest cluster. Consider it carefully. Is it darker than the tree trunk and limbs? About the same? Lighter? Fill it in very solidly, pressing hard with the tip and side of your pencil point. Go over it as many times as you need to give it the value you want.  Continue working alternately with the next lightest and next darkest clusters until all of them have a value. Check the whole composition against the real tree for accuracy. Do you need to further darken any limbs or parts of the tree's trunk?

If you have easy access to the tree, this may be a good place to stop sketching and leave color decisions to another day. Put your sketch away and don't overwork it. If you can get a couple of photographs of the tree, that is an excellent idea. It might rain tomorrow.

Summer colors or autumn?


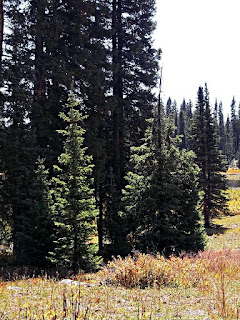
Evergreens photo by J.D.
Evergreens
So far we have only discussed broad-leaved trees. Evergreens present different problems and possibilities.  Because so many conifers have a generalized triangular shape, many people never try to learn the differences between the species and assign them cookie-cutter appearances. We have a number of different species close by. I love to look at them just before sunrise.  They do start out as very simple silhouettes, but, as the light begins to filter through them, you see that they grow in very different ways. Some of them reach for the sky with tiers of V-shaped branches. Others are less dense and produce their branches at much wider angles with their trunks. Still others have branches that curve or angle downward, sometimes touching the ground.  And there are ground-hugging evergreens which don't take a tree form at all.  They are all worth study and are particularly beautiful in winter.
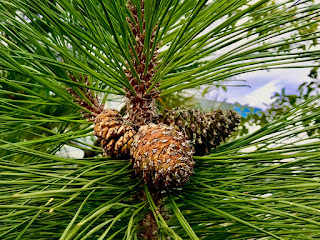
Pine cones, photo by J.J.
Trees that lose their leaves in autumn are known as broad-leafed trees. Evergreens have needles or scales instead of leaves. They lose these gradually all year long. You can usually find a pile of them underneath the tree.  A number of evergreen trees bear cones and are classified as conifers. A photograph or sketch simply featuring cones and needles can be very decorative.  If you are not familiar with the evergreen trees in your locality,  consult a tree guide book or have a talk with someone from a local nursery.

I often use trees to design needlework projects. Some of them are highly stylized like the evergreens and aspens in the two end photos, while others are more naturalistic like the design in the center.

Needleworks with trees

Simple tree silhouettes, particularly of evergreens, make nice border designs for illustrations, needlework borders or all-over patterns, photo mats, etc.
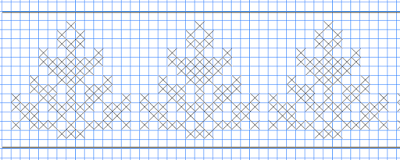
Chart for cross-stitched border
Chart for cross-stitched border of evergreen silhouettes

It is often useful to study how artists have represented trees in their works. For a long time trees were simply backdrops and not done with particular attention to detail. It wasn't until about the middle of the 19th Century that, particularly in France, they became viewed as subjects worthy of painting for their own sake. Jean Baptiste Camille Corot led the field in this respect. He strongly influenced the Impressionist painters. They, in turn, influenced whole schools of contemporary and Post-Impressionist artists. Pointillist painter Paul Signac also did beautiful trees. Look at paintings by your favorite painters to see how they handled the subject of trees.

If you missed our recent Arbor Day post, follow this link. For more information about trees, check our Extras section for "Teachable Moments" activities and a Self-Teaching Unit for teens.  And, if you can, plant a tree!

Now, as our favorite tree-house builder loves to say: "To the trees!"


 Creative Commons LicenseThis post by Annake's Garden is licensed under a Creative Commons Attribution-NonCommercial-ShareAlike 3.0 Unported License.

Saturday, March 21, 2020

Medallions for Needlecrafts

Blackwork border design

I would like to spend some time discussing the stand-alone, small cluster designs that I like to call medallions.   You can use these medallions, either separately or joined, to make borders.

simple medallion border

Now here is the same design ‘grown’ to a larger, more complex, motif. This can be done in a single color, but I have done it here with each addition done in a different color.

more complex design in colors

Besides "growing" the designs, you can continue to use the separate medallions, either as a single motif or as a repeated motif for a border. The motifs can be separated or joined.  They can be used — either singly or joined — for border designs.  Let's look at three simple medallion design patterns in black-line.

Three simple medallions

Here are the same three designs multiplied and done in more than one color.

medallions in color. repeated as border designs
Same medallions in color. repeated as border designs

Some of the simpler designs can be joined and repeated any number of times to make an all-over pattern. They may be in a single color, bi-colored, or multicolored.

Two colored medallions combined as a border
Two colored medallions combined as a border. Stacked they could be an all-over design.

Two or more different medallions that are similar in size and complexity can be combined to make a border or a frame design.
Simple border using two medallions
Chart for frame with medallion corners
A corner medallion can give a distinct change to a straight-line linear design as well. This can be particularly attractive if you are using the border design to frame a picture, a collage, a print or a piece of needlework.

Recently we gave you a set of simple medallion motifs to be used in blackwork. Now I'm going to repeat the designs in color. You can substitute your favorite color combinations.  I prefer back-stitch to work patterns like these on fabric, but there are other straight-line stitches from crewel or folk embroidery that will do just as well.

Simple medallions in color

Finally, the individual motifs may also be enlarged to make considerably bigger designs. These may easily be adapted for blackwork, counted cross-stitch,  crewel, or needlepoint. They, too, can be joined together to make deeper borders, such as a design for the bottom of a jacket or a skirt, or to make them into all-over patterns.
Larger more complex medallion
Larger, more complex medallion
If you have followed our blackwork — or redwork, whitework, and Holbein embroidery — posts,  you have probably tried taking a central medallion motif and "growing" it into a larger, more complex, design. If you have not done so, please follow this link to see what I am describing.

Now let me take a different central motif and take you step-by-step through the "growth" process.  These larger designs are nice to frame. You could make several of them to decorate those "problem" places like on a narrow section of wall beside a door, in an alcove, or above or below a window. They are also suitable for aprons, placemats, and pillows. You can keep extending them until they are the size you need for a particular project. You might chose to to do something different than what I have done at any or all stages of the medallion's development. That is what makes this process such fun!

Original motif (black) and 'grown' design in color

Now here are some things hat YOU can do:
  • Change a blackwork medallion to a red, white or multicolored one.
  • Take two small medallion designs and combine them to make a border, either separately or joined together.
  • Combine a linear design with four medallions to make a frame.
  • Do a medallion design in another form of needlework, like needleweaving or needlepoint.
  • Enlarge a medallion design to make it simple enough for a quilt block or a rug pattern.
  • Design a medallion pattern for the back yoke of a Western shirt or jacket, along with an accompanying linear design for the collar and cuffs.
Stretch your imagination. You can do it!


bottom border design


 Creative Commons LicenseThis post by Annake's Garden is licensed under a Creative Commons Attribution-NonCommercial-ShareAlike 3.0 Unported License.

Friday, December 20, 2019

Patterns, Pointers, and Practices: Fiber Arts Hacks

Three small needlepoint designs

Above you can see a group of small color patterns. One of them should look familiar to you because you saw a version of it turned into a larger all-over pattern on a table mat not long ago. With this post I want to emphasize several points that I have made over time about patterns — but that I have not before grouped together for emphasis.

Needlepoint placemat
Needlepoint placemat from our first post of 2019


Box of small needlework samples
Archive your small needlework samples!
First of all, I want to remind you of the value of working a small sample of a new pattern, whether it is geometric like these or more representational. This is especially important if you are planning to change the color scheme or other aspects of the pattern. I make many of my samples on durable plastic canvas in tent stitch, largely because I learned it early in life and use it as a kind of "shorthand". (If you want to learn about how I got started in the needle arts, follow this link: February 28, 2013 post) These samples are durable and easy to file in a convenient box for future reference. They may also have other uses, as you will see later in this post. If counted cross-stitch is easier for you, get a quarter yard of the small "baby check" gingham. That will make a number of samples that you can tape or staple on index cards and store in a larger box.

Ancient Pathways, framed needlepoint by Annake
"Ancient Pathways", framed needlepoint by Annake
We have worked with a few repeat patterns before, but now I want to show you how such a technique can work on a scale that is large enough to be suitable for framing or even larger projects. This one, like some of the smaller motifs on this post, was adapted from a Native American design. I call the resulting framed picture "Ancient Pathways", in honor of an ancestor who left the Appalachians and settled in the upper Midwest and all of the other Eastern Cherokees who settled there rather than follow the "Trail of Tears". Notice the alternation of colors at the edges of the motifs and the structure and strong diagonals of the turquoise background between the motifs. Negative spaces like backgrounds can contribute a lot to a design.

Graph of center design of three from first photo
Let's consider how one of these small patterns would work as a repeating design. Here is an enlarged graph of the middle design in the set at the top of this article. Decide how many horizontal and vertical repeats of the design you want on your selected canvas or fabric. I have left an empty row of squares all around the design so you can outline it if you prefer, rather than joining the design repeats directly together. If you don't want to border the motifs, simply trim that row of squares off the pattern or ignore it.  Check your canvas or fabric very carefully to make sure you have enough room for all of the repeats you want, plus an edge to turn under all around. Outline the spaces for the repeats with a running stitch (yes, even on canvas) in a bright or dark color that you are not using in the design, and pull those stitches out as you finish each motif. That is a little more work, but it will keep you from making disappointing mistakes.

Some of these small charts work well as linear designs. They can be expanded from one end or from both ends at the same time. See how the ends are each half of a design feature? Linear designs are great for belts, hatbands, straps of all kinds, etc. They make interesting picture frames. Or, if you like, they can simply be used to border a piece that is done in a solid color. The following chart shows the third design above repeated linearly.

Graph of 3rd design of top illustration repeated linearly
Graph of a simplified version of 3rd design at the top of post; choose your own color scheme.


Red hat with needlepoint band
I have a shady straw hat for the summer, a Stetson-like cowgirl hat, and a felt fedora for the winter — all of which can hold a series of changeable needlework hatbands. This has earned me the nickname of "The Lady in the Hat" at the local Farmers' Market (as in, "Ask the lady in the hat; she probably can tell you.")  For directions to center and join a hatband design, follow this link: post for Sept. 30, 2016. Ladies from a certain organization will understand the significance of the purple butterflies on the red hat.

If you look closely at the linear pattern, you will see that the top and bottom of the center of the motif are also halves of a feature, so this design can also be expanded upward and downward to make a 4-way design. Several others of these designs can be treated the same way.

Three more small needlepoint design samples


Pink & green diamond motif latch hook rug
These designs can be expanded for much larger articles like afghans and rugs, even tiled as flooring or back-splashes above kitchen counters. Here is a very simple design made into a rug. Notice that the changes in the shades of the selected colors creates an illusion that the designs are three-dimensional. This would be interesting on a needlepoint pillow, too. It also qualifies as an interesting optical illusion.

Simple optical illusion design in needlepoint
Optical illusions have been very popular with our readers and we have received requests for more of them. I promise to return to the subject in 2020 with more examples and patterns. I'm including a simple optical illusion in this group of sample patterns. Can you figure out how it is made? How might you use borders to make the design even more "dimensional? Think about it.

Those of you who have followed these posts for some time know that I like to start with a central design and "grow" it outward in all directions. We have worked with 4-way, 6-way, and 8-way designs. There will be new patterns in each category in 2020. When we do art and craft shows, we try to jot down notes about the questions and comments made by the people who stop by our booth. I base a lot of the next season's topics on those notes. We heard you "loud and clear"!

At the top of this post, I hinted that you might find some other uses for these small needlework samples besides practice pieces and reference. The most obvious ones are coasters from the square or diamond-shaped designs and bookmarks or luggage tags from the linear ones. I'm sure you can think of others (and we would like to hear about them). Each year I choose some of my favorite samples (often adding small decorative pins. buttons, or charms) and use them to decorate our holiday tree. Here are a few of our favorites.

Needlepoint tree ornaments


Season’s Greetings,


 Creative Commons LicenseThis post by Annake's Garden is licensed under a Creative Commons Attribution-NonCommercial-ShareAlike 3.0 Unported License.

Sunday, September 8, 2019

More Artists, Patterns, Suggestions, and Finished Projects: Very Late Summer Q & A

USPS commemorative stamp for Georgia O'Keeffe
I really like the idea of featuring women artists and telling us how to find their work. I never have thought that the women get the recognition they deserve. When are you going to introduce us to another one?

Right now! And you will ‘meet’ two more contemporary women painters in All About Color, Part II in a couple of weeks.  I agree with you that women have been neglected in the past — even ones who were famous in their own times. I have two huge books on art history and it is like pulling teeth to get good information about the women artists of past periods. But times are changing!

Australian flag
This post's contemporary artist is Australian. Her name is Katie Wyatt (www.katiewyatt.com) and her focus is on form. She paints landscapes and seascapes in oil paints, using both brushes and palette knives, creating rugged land forms from memory. She shows sharp layers of rock formations and coastlines against a simple background of sky, using rich, imaginative, and vivid colors. Dark lines of shadow indicate the depth of, and distance between, the geologic features. Vegetation is more suggested than portrayed. People or animals are not usually featured. Her paintings are large, complex, and evocative.

gathered materials for a needle art project
After viewing one particular painting, my fingers fairly itched to start composing a scene from one of our Western national parks, like Bryce Canyon or Grand Canyon, using ribbons, strips of colorful fabrics, and trimmings, accented with surface stitching! I have already started collecting materials, but I have a long way to go to find everything I need. I will show you the finished project in a future post.

Dead Horse Point, Utah   (public domain photo)
Dead Horse Point, Utah   (public domain photo)

Why don't you show us some of the artist's work?

If you are interested in an artist, you should want to know more about her — or him. I have listed a Web address for the each of the artists I have mentioned so far and I will continue to do so. Or you can simply enter the artist's name in your search engine and you will find a lot of interesting material, including pictures of the artist's work. Most of them are featured by several galleries or participate in numerous shows. Of course, artists like Georgia O'Keeffe (see the commemorative stamp at the top of this article)  passed away before they had a chance to have a Web site. Nevertheless, you can find a lot about them by entering their names. I am just the scout, folks. You need to be the explorers on your own.

soccer players test 1a
Soccer players color mock-up
While we are on the subject of featured artists, do you remember how I was inspired by Tilly Willis's print style to do something similar with women soccer players? I showed a very preliminary black-and-white sketch of two players with a ball. J.D. applied some of his computer magic to get something closer to what I envisioned. You can see the result above. It's still not quite there, so next I'll cut stylized figures from colored paper and move them around the background until I get a mock-up of the athletes' figures in a composition that I like. Then I can trace each of the paper sections onto needlepoint canvas for stitching in tent stitches, along with some proposed top-stitching. I will show the finished needlepoint in a follow-up post so you can see how the project "evolved".

Did you ever finish your version of the new 8-way bargello?

finished 8-way needlepoint by Annake
Finished 8-way needlepoint by Annake
Yes, but there were some changes in the final project. I'm very frugal, so I was determined to use a piece of leftover canvas, rather than cutting up a larger piece. The best piece I could find was not wide enough to accommodate squares that were 4 stitches over 3 threads or bars. It would accommodate squares with 3 stitches over 2 threads or bars. So that is what I used. The "squares" are more like little rectangular bars than the squares on the pattern, and that has caused some minor differences in the final outline of the design. Technically, I have a Gobelin stitch 8-way rather than an official bargello 8-way. Once I had established the center of the design, I began to rotate the canvas 90 degrees between sections, which also dictated tiny differences. I do not follow my designs slavishly. If one technique is not working well, I will modify it or exchange it for another technique. If I feel that a color should be darker, lighter, or altogether different, I go with my instincts. I used the dark turquoise yarn that appears around the center of the design to tent stitch the narrow background. This makes the design stand out a bit more than continuing with the pattern stitches would have done. I will not put it under glass because I want viewers to enjoy the tactile experience of touching the actual stitches. I like it and I hope you do, too.

A long time ago you were working on a cut-paper pattern of squirrels and oak leaves. Did you ever finish it? One of my kids is having an all boy birthday party in early October. I thought I might use that design for some of the decorations. He doesn't want anything "girly" and he doesn't want Halloween decorations We're renting a movie for most of the entertainment, but any other ideas for decorations or activities would be welcome. Thanks.

I did finish the design — a long time ago. I thought we had published it on a follow-up post, but J.D. can't find it in his archives. I found it in my files, so here it is, along with a full-sized outline of the squirrels that you can download.

Squirrels and oak leaves paper design

Downloadable squirrels outline
It would be easy to use the squirrels as corners for placemats and paper napkin rings or as decorations on party favors. Colorful artificial autumn leaves and acorns are decorations that could be used again for Thanksgiving and saved for future autumn occasions. You might make a large squirrel on posterboard and cut out a squirrel tail for each boy so they can play "Pin the Tail on the Squirrel". An old-fashioned game from my childhood featured apples, hung on sturdy strings, that we were supposed eat bites of without using our hands. The one who ate the most of his or her apple in a specific time won a prize.  J.D. says you must have lots of candy corn and sugar pumpkins!

Are You Nuts?  photo by J.J.
"Are You Nuts?",  photo by J.J.

Dear Readers,

This is really the beginning of "Crazy Season" for Annake's Garden. Not only do we have harvesting and preparation for what we are being told will be a very cold and snowy winter, but this month begins a series of art and craft shows that runs until mid-December. My grandmother had an appropriate expression: "as busy as a long-tailed cat in a room full of rocking chairs". That will describe us for the next few months! So I am apologizing in advance for the fact that we will not be publishing quite as many articles as usual between now and the first of next year. We have two rather than our usual three planned for this month. We will continue the series on Color, along with "how-to' articles, teachable moments, and additional Q & A's.  Please bear with us.


Aspens turning, photo by J.D.
On the road to autumn...


 Creative Commons LicenseThis post by Annake's Garden is licensed under a Creative Commons Attribution-NonCommercial-ShareAlike 3.0 Unported License.

Contact Us

Name

Email *

Message *

Blog Archive