Showing posts with label 8-way bargello. Show all posts

Tuesday, December 31, 2019

Reviews & Previews: Topics and Projects for the New Year

Mushrooms, crewel embroidery by Annake
Crewel embroidery by Annake (in progress)

Now that the art shows and craft shows are over for a while and we have caught up with most family and charitable events, we have time to look toward our plans for next year. While we work the shows, we try to jot down notes about questions we are asked by customers and comments made by people who just stop by the booth to look and chat. We try to show several kinds of artwork and photography when we do art shows and many kinds of needle arts and other handicrafts when we work craft shows. We base a lot of our plans for future articles and activities on our notes and the reflections that they generate.
Original crewel embroidery by Annake
For example, a sweet young lady bought a framed piece of crewel embroidery. She asked me what kind of embroidery it was. She had never heard of crewel.  I explained that it was done on fabric, not canvas, with fine wool yarn rather than embroidery floss — although I do sometimes do surface crewel embellishments on top of finished canvas work.  (There are good acrylic yarns that can be substituted if a person has an allergy to wool or doesn't want to pay the prices for wool). Some of the stitches used for floss embroidery are used for crewel (and most can be), but there are other stitches that are more popular for crewel than for other techniques like counted cross-stitch. We gave her our business card and told her how to use  the search engine on this blog to locate past articles on crewel and on stitch "families".

Heirloom crewel pillowslip from Annake's collection

Tracing a drawing with transfer pencil
Later a lovely white-haired lady complained that it was so hard to find stamped patterns for crewel embroidery. I told her that I make my own patterns, so I had not been aware of how serious the shortage had become. I suggested that she might find some at thrift or charity shops, as people might donate them rather than discard them.

By this time I had concluded that it was high time for me to revisit the way to make iron-on patterns for all kinds of embroidery, and I plan to re-visit crewel embroidery and demonstrate more of the "families" of stitches that are most appropriate for it. So you can look for those articles to appear early in 2020.

Assisi embroidery rose by Annake
Another type of needlework that got quite a bit of attention was Assisi work. This is something that should be fun for counted-cross-stitch fanciers who are looking for something new (although the art is very old). It can also be done in canvas work if you have a nice white or tinted canvas to use for a background. Look for an article on the subject, its origins, how it was initially used,  along with illustrations, directions for a modern version of it,  and a pattern or two early next year.


Star pillow, original design by Annake
Another young lady bought a pillow with a central motif of a starburst. She asked if the design was done in flame stitch. I assured her it was and was privately delighted that she knew the term (a common name for a particular kind of bargello stitchery). She was surprised and pleased that it could be used for working out from a center in different directions. she left with business cards for herself and a friend. I promised her some new articles on bargello with emphasis on linear designs and designs radiating out from a center, like 4-way, 6-way, and 8-way designs. So look for those as well.

I will be continuing the series on Color in the New Year, starting with an article tentatively titled "The Non-Colors: Black, White, Grays and Metallics".   J.D. also has some topics he wants to pursue.

We also pay attention to comments and questions from our readers, as you can see in our seasonal Question and Answer segments. We are very gratified by the questions addressed directly to this blog and try to answer as many as we can, sometimes combining questions from more than one reader. Here are some recent examples

What special project are you currently working on?

I am currently working on a project suggested by the work of Erin Henson, California landscape artist, who has done an entire gallery show in paintings done primarily in the color orange. I couldn't pass up that kind of challenging project! She also does beautiful renditions of scenes in U.S. parks and monuments.  Those are subjects I really like, as you can see in these needlework pictures:

Cascades and Monterey Cyprus, needlepoint landscapes
"Cascades" and "Monterey Cyprus", needlepoint landscapes by Annake

and in this latch-hook rug.

Delicate Arch latch hooked rug by Annake
"Delicate Arch", latch hooked rug by Annake
However, my real love is doing pictures of animals. I am currently working on a mixed media piece involving both a color rendering and collage elements. I'm going to use many shades of orange (remember that brown is considered in the orange family) along with white, black, and grays. I will show a photo of the new project as soon as it is completed (or perhaps in stages of development).

Did the soccer players finally get their heads?

Yes, after having been lost temporarily in the flood of fall and winter projects. the fabric collage looks very like the original sketch, but I will show it at some future time.

Are we going to get more blackwork patterns soon?

In the previous post I promised more Spanish blackwork patterns and more optical illusions, so I'd better get busy designing and stitching!

Wishing you a safe and happy New Year,


 Creative Commons LicenseThis post by Annake's Garden is licensed under a Creative Commons Attribution-NonCommercial-ShareAlike 3.0 Unported License.

Friday, December 20, 2019

Patterns, Pointers, and Practices: Fiber Arts Hacks

Three small needlepoint designs

Above you can see a group of small color patterns. One of them should look familiar to you because you saw a version of it turned into a larger all-over pattern on a table mat not long ago. With this post I want to emphasize several points that I have made over time about patterns — but that I have not before grouped together for emphasis.

Needlepoint placemat
Needlepoint placemat from our first post of 2019


Box of small needlework samples
Archive your small needlework samples!
First of all, I want to remind you of the value of working a small sample of a new pattern, whether it is geometric like these or more representational. This is especially important if you are planning to change the color scheme or other aspects of the pattern. I make many of my samples on durable plastic canvas in tent stitch, largely because I learned it early in life and use it as a kind of "shorthand". (If you want to learn about how I got started in the needle arts, follow this link: February 28, 2013 post) These samples are durable and easy to file in a convenient box for future reference. They may also have other uses, as you will see later in this post. If counted cross-stitch is easier for you, get a quarter yard of the small "baby check" gingham. That will make a number of samples that you can tape or staple on index cards and store in a larger box.

Ancient Pathways, framed needlepoint by Annake
"Ancient Pathways", framed needlepoint by Annake
We have worked with a few repeat patterns before, but now I want to show you how such a technique can work on a scale that is large enough to be suitable for framing or even larger projects. This one, like some of the smaller motifs on this post, was adapted from a Native American design. I call the resulting framed picture "Ancient Pathways", in honor of an ancestor who left the Appalachians and settled in the upper Midwest and all of the other Eastern Cherokees who settled there rather than follow the "Trail of Tears". Notice the alternation of colors at the edges of the motifs and the structure and strong diagonals of the turquoise background between the motifs. Negative spaces like backgrounds can contribute a lot to a design.

Graph of center design of three from first photo
Let's consider how one of these small patterns would work as a repeating design. Here is an enlarged graph of the middle design in the set at the top of this article. Decide how many horizontal and vertical repeats of the design you want on your selected canvas or fabric. I have left an empty row of squares all around the design so you can outline it if you prefer, rather than joining the design repeats directly together. If you don't want to border the motifs, simply trim that row of squares off the pattern or ignore it.  Check your canvas or fabric very carefully to make sure you have enough room for all of the repeats you want, plus an edge to turn under all around. Outline the spaces for the repeats with a running stitch (yes, even on canvas) in a bright or dark color that you are not using in the design, and pull those stitches out as you finish each motif. That is a little more work, but it will keep you from making disappointing mistakes.

Some of these small charts work well as linear designs. They can be expanded from one end or from both ends at the same time. See how the ends are each half of a design feature? Linear designs are great for belts, hatbands, straps of all kinds, etc. They make interesting picture frames. Or, if you like, they can simply be used to border a piece that is done in a solid color. The following chart shows the third design above repeated linearly.

Graph of 3rd design of top illustration repeated linearly
Graph of a simplified version of 3rd design at the top of post; choose your own color scheme.


Red hat with needlepoint band
I have a shady straw hat for the summer, a Stetson-like cowgirl hat, and a felt fedora for the winter — all of which can hold a series of changeable needlework hatbands. This has earned me the nickname of "The Lady in the Hat" at the local Farmers' Market (as in, "Ask the lady in the hat; she probably can tell you.")  For directions to center and join a hatband design, follow this link: post for Sept. 30, 2016. Ladies from a certain organization will understand the significance of the purple butterflies on the red hat.

If you look closely at the linear pattern, you will see that the top and bottom of the center of the motif are also halves of a feature, so this design can also be expanded upward and downward to make a 4-way design. Several others of these designs can be treated the same way.

Three more small needlepoint design samples


Pink & green diamond motif latch hook rug
These designs can be expanded for much larger articles like afghans and rugs, even tiled as flooring or back-splashes above kitchen counters. Here is a very simple design made into a rug. Notice that the changes in the shades of the selected colors creates an illusion that the designs are three-dimensional. This would be interesting on a needlepoint pillow, too. It also qualifies as an interesting optical illusion.

Simple optical illusion design in needlepoint
Optical illusions have been very popular with our readers and we have received requests for more of them. I promise to return to the subject in 2020 with more examples and patterns. I'm including a simple optical illusion in this group of sample patterns. Can you figure out how it is made? How might you use borders to make the design even more "dimensional? Think about it.

Those of you who have followed these posts for some time know that I like to start with a central design and "grow" it outward in all directions. We have worked with 4-way, 6-way, and 8-way designs. There will be new patterns in each category in 2020. When we do art and craft shows, we try to jot down notes about the questions and comments made by the people who stop by our booth. I base a lot of the next season's topics on those notes. We heard you "loud and clear"!

At the top of this post, I hinted that you might find some other uses for these small needlework samples besides practice pieces and reference. The most obvious ones are coasters from the square or diamond-shaped designs and bookmarks or luggage tags from the linear ones. I'm sure you can think of others (and we would like to hear about them). Each year I choose some of my favorite samples (often adding small decorative pins. buttons, or charms) and use them to decorate our holiday tree. Here are a few of our favorites.

Needlepoint tree ornaments


Season’s Greetings,


 Creative Commons LicenseThis post by Annake's Garden is licensed under a Creative Commons Attribution-NonCommercial-ShareAlike 3.0 Unported License.

Sunday, September 8, 2019

More Artists, Patterns, Suggestions, and Finished Projects: Very Late Summer Q & A

USPS commemorative stamp for Georgia O'Keeffe
I really like the idea of featuring women artists and telling us how to find their work. I never have thought that the women get the recognition they deserve. When are you going to introduce us to another one?

Right now! And you will ‘meet’ two more contemporary women painters in All About Color, Part II in a couple of weeks.  I agree with you that women have been neglected in the past — even ones who were famous in their own times. I have two huge books on art history and it is like pulling teeth to get good information about the women artists of past periods. But times are changing!

Australian flag
This post's contemporary artist is Australian. Her name is Katie Wyatt (www.katiewyatt.com) and her focus is on form. She paints landscapes and seascapes in oil paints, using both brushes and palette knives, creating rugged land forms from memory. She shows sharp layers of rock formations and coastlines against a simple background of sky, using rich, imaginative, and vivid colors. Dark lines of shadow indicate the depth of, and distance between, the geologic features. Vegetation is more suggested than portrayed. People or animals are not usually featured. Her paintings are large, complex, and evocative.

gathered materials for a needle art project
After viewing one particular painting, my fingers fairly itched to start composing a scene from one of our Western national parks, like Bryce Canyon or Grand Canyon, using ribbons, strips of colorful fabrics, and trimmings, accented with surface stitching! I have already started collecting materials, but I have a long way to go to find everything I need. I will show you the finished project in a future post.

Dead Horse Point, Utah   (public domain photo)
Dead Horse Point, Utah   (public domain photo)

Why don't you show us some of the artist's work?

If you are interested in an artist, you should want to know more about her — or him. I have listed a Web address for the each of the artists I have mentioned so far and I will continue to do so. Or you can simply enter the artist's name in your search engine and you will find a lot of interesting material, including pictures of the artist's work. Most of them are featured by several galleries or participate in numerous shows. Of course, artists like Georgia O'Keeffe (see the commemorative stamp at the top of this article)  passed away before they had a chance to have a Web site. Nevertheless, you can find a lot about them by entering their names. I am just the scout, folks. You need to be the explorers on your own.

soccer players test 1a
Soccer players color mock-up
While we are on the subject of featured artists, do you remember how I was inspired by Tilly Willis's print style to do something similar with women soccer players? I showed a very preliminary black-and-white sketch of two players with a ball. J.D. applied some of his computer magic to get something closer to what I envisioned. You can see the result above. It's still not quite there, so next I'll cut stylized figures from colored paper and move them around the background until I get a mock-up of the athletes' figures in a composition that I like. Then I can trace each of the paper sections onto needlepoint canvas for stitching in tent stitches, along with some proposed top-stitching. I will show the finished needlepoint in a follow-up post so you can see how the project "evolved".

Did you ever finish your version of the new 8-way bargello?

finished 8-way needlepoint by Annake
Finished 8-way needlepoint by Annake
Yes, but there were some changes in the final project. I'm very frugal, so I was determined to use a piece of leftover canvas, rather than cutting up a larger piece. The best piece I could find was not wide enough to accommodate squares that were 4 stitches over 3 threads or bars. It would accommodate squares with 3 stitches over 2 threads or bars. So that is what I used. The "squares" are more like little rectangular bars than the squares on the pattern, and that has caused some minor differences in the final outline of the design. Technically, I have a Gobelin stitch 8-way rather than an official bargello 8-way. Once I had established the center of the design, I began to rotate the canvas 90 degrees between sections, which also dictated tiny differences. I do not follow my designs slavishly. If one technique is not working well, I will modify it or exchange it for another technique. If I feel that a color should be darker, lighter, or altogether different, I go with my instincts. I used the dark turquoise yarn that appears around the center of the design to tent stitch the narrow background. This makes the design stand out a bit more than continuing with the pattern stitches would have done. I will not put it under glass because I want viewers to enjoy the tactile experience of touching the actual stitches. I like it and I hope you do, too.

A long time ago you were working on a cut-paper pattern of squirrels and oak leaves. Did you ever finish it? One of my kids is having an all boy birthday party in early October. I thought I might use that design for some of the decorations. He doesn't want anything "girly" and he doesn't want Halloween decorations We're renting a movie for most of the entertainment, but any other ideas for decorations or activities would be welcome. Thanks.

I did finish the design — a long time ago. I thought we had published it on a follow-up post, but J.D. can't find it in his archives. I found it in my files, so here it is, along with a full-sized outline of the squirrels that you can download.

Squirrels and oak leaves paper design

Downloadable squirrels outline
It would be easy to use the squirrels as corners for placemats and paper napkin rings or as decorations on party favors. Colorful artificial autumn leaves and acorns are decorations that could be used again for Thanksgiving and saved for future autumn occasions. You might make a large squirrel on posterboard and cut out a squirrel tail for each boy so they can play "Pin the Tail on the Squirrel". An old-fashioned game from my childhood featured apples, hung on sturdy strings, that we were supposed eat bites of without using our hands. The one who ate the most of his or her apple in a specific time won a prize.  J.D. says you must have lots of candy corn and sugar pumpkins!

Are You Nuts?  photo by J.J.
"Are You Nuts?",  photo by J.J.

Dear Readers,

This is really the beginning of "Crazy Season" for Annake's Garden. Not only do we have harvesting and preparation for what we are being told will be a very cold and snowy winter, but this month begins a series of art and craft shows that runs until mid-December. My grandmother had an appropriate expression: "as busy as a long-tailed cat in a room full of rocking chairs". That will describe us for the next few months! So I am apologizing in advance for the fact that we will not be publishing quite as many articles as usual between now and the first of next year. We have two rather than our usual three planned for this month. We will continue the series on Color, along with "how-to' articles, teachable moments, and additional Q & A's.  Please bear with us.


Aspens turning, photo by J.D.
On the road to autumn...


 Creative Commons LicenseThis post by Annake's Garden is licensed under a Creative Commons Attribution-NonCommercial-ShareAlike 3.0 Unported License.

Saturday, August 31, 2019

Inspiring Women Artists, Autumn Art, and A New 8-way

U.S. postage stamp of a Grandma Moses painting
Homage to an artist of the past
I have frequently advised you to look at the work of various artists, past and contemporary, to get inspiration for your needle art. I would like to  steer you to some very contemporary women painters. You can find their work online. I'll give you a brief analysis of how their work has inspired me to do some new pieces in different kinds of needlework. Look for the mention of more of these artists in future posts, along with my projects that they inspired. If you have other artists, past or present, whose work you think I should be looking at, please drop me a line at annakes_garden@yahoo.com.

Our first artist is Tilly Willis (www.tillywillis.com). She is a British citizen and a well-known portrait painter there. She has traveled extensively in Africa and done many studies of life in the countries she has visited. Her compositions have been made into color prints. Their style is quite different from the detailed work she does as a portrait artist. This pleased me greatly because i have always maintained that it was not necessary for an artist to be limited to a single style. Her pictures of people going about their daily tasks are made up of stylized two-dimensional flat shapes in vivid colors against a simple background, They are very expressive, both in outline and in gesture.
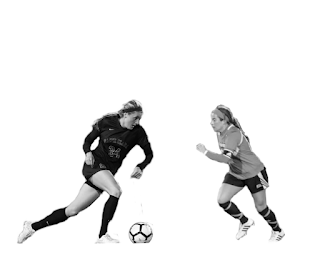
soccer players preliminary design sketch
Soccer players preliminary design layout
I plan to do something similar in simple tent stitches. I am going to plan my picture by cutting the simple shapes from colored construction paper that I can move around on my canvas until I have them placed just where I want them, like a collage. Then I can trace all the elements onto the canvas and begin to stitch. Considering the success of the U.S. Women's Soccer Team, I thought they would be a good subject for this project. The accompanying photograph will show you what I mean. I will show you the finished composition in a future post.
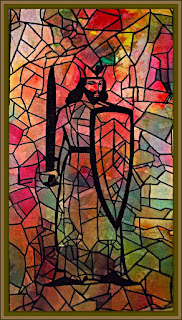
Untitled tissue paper collage by Annake
I realize that many of you do not think of collage as a major art form, but you would be mistaken. It is a major contemporary art form with large artwork and installations in both two and three dimensions. This is an art form where women probably outnumber men, but there are still many male collage artists. (Remember, Picasso and Braque introduced collage.) If you have become interested in this art form, I suggest you check out some of the many artists listed in Collage Artists of America online. There is a list of upcoming exhibitions. If you get a chance, try to see one of them. I think you will be impressed.
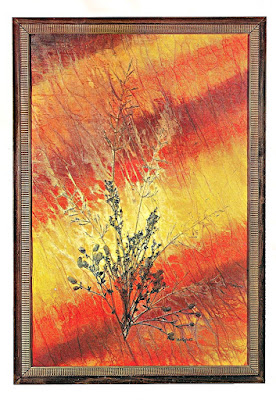


Autumnal Prophecy, collage by Roberta Bellofatto
"Autumnal Prophecy", collage by Roberta Bellofatto

A good area for collecting
A good area for collecting...
A different kind of collage is the "nature walk" collage — one of my favorites.   The idea is to go on a nature walk and collect leaves and flowers to press,  and small "found objects" like feathers, tiny seashells, etc., that can be glued to a prepared background. These are the perfect times to do one, when leaves are changing color and plants are producing seeds. Remember that you are not allowed to collect such things in most state and all national parks or on private property without permission. If you live in a city high-rise, you may not be close to places where such things can be collected. Or you may not feel safe taking your group for such a walk because of heavy traffic or other hazards. Sometimes just looking around familiar backyards or an uncut vacant lot will give you plenty of material.
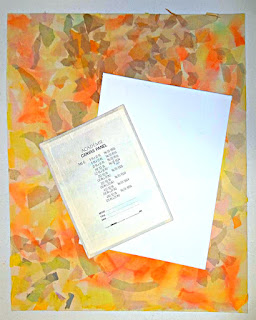
Canvas boards
Canvas boards
Since the items you may collect are heavier and bulkier than those we have featured in earlier collage posts, you will need heavier back-ground material than poster board or cardboard, or else the picture will not lie flat when it is finished. Individual packs of 8" X 10" canvas boards are good for individual artworks, but you will need larger ones for small groups working together. Mat board and heavy corrugated cardboard are alternatives, especially if cost is a major concern. For a permanent installation, Masonite can be used. It is dark in color and should be painted before use.
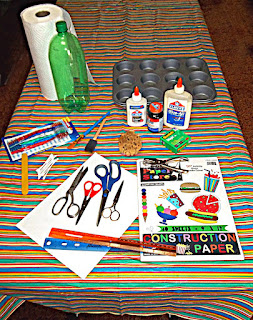

collage tools and materials
Some collage tools and materials
The boards can be used plain, pre-painted, or covered with one or more tissue paper sheets. If you have access to colored crepe paper, it can also be used, but be advised it "bleeds"  color into the composition, while tissue paper does little or no "bleeding". Check our earlier post for a list of materials that you will need. Have a pile of newspapers and paper towels for pressing the plant materials and general clean-up. Select your work area and assemble your materials in advance.
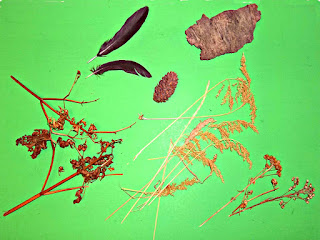
Found objects for collage use
The next step is an excursion to collect the grasses, leaves, seedpods, etc. for the compositions. Small children will need supervision and should be taught to ask an adult before collecting plants and other materials. Everyone should have a collecting bag, An adult should have a pair of pruning shears to detach small branches or cut tough stems. Delicate materials like feathers and fragile plant parts that should not be pressed may be stored in the crisper drawer of a refrigerator until used. Everything else should be placed between layers of newspaper on a flat surface and dried thoroughly before attaching them to the canvas. Canvases may be prepared in advance or on collection day, whichever works best for you.

At the beginning of this section is a picture of a completed collage to give you an idea of what can be done quite simply. Make sure materials are thoroughly dry. Use the white glue full-strength to secure the three-dimensional materials to the board and let them dry. Delicate materials should be attached with the half-and-half glue/water mixture. Brush the area of canvas first. Tweezers are useful for placing tiny stems and branches. Carefully place the delicate materials on that area and gently brush the mixture over them until they are covered completely. (The milky-looking glue mixture will dry clear.) Let that layer dry.
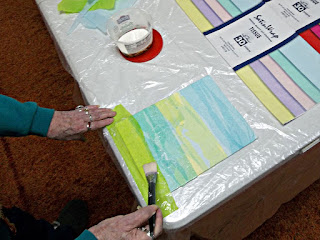
Brushing on the glue and water mixture

Add tissue paper over the top if you like, brushing it (both bottom and top surfaces) with the glue mixture to hold it in place. To get a glossy surface, you will need several all-over coats of the half-and-half mixture, dried between applications. A hand-held hair-dryer can speed up the drying, but it should be wielded by an adult and not held less than a foot away from the surface or the surface may buckle and warp. Spaced dryings are preferred. The finished picture should be hard and glossy to the touch. Now you are ready to frame the picture if you like.
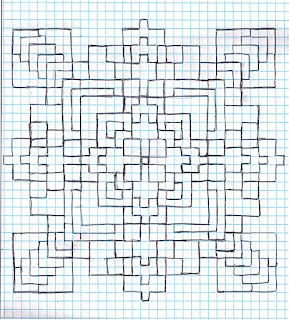
Preliminary sketch for 8-way bargello
A few months ago (May 5, 2019) I did an article in which I showed some alternative ways to use a small all-over pattern to make different kinds of needlework. I expressed a desire to use it as a 4-way or an 8-way bargello project. One of the easiest ways to make an 8-way design is to superimpose one 4-way pattern on another 4-way pattern. That is essentially what I have done here. My idea was to "marry" a 4-pointed star design with a strong diagonal one without sacrificing either one. This design (see the end of this post) has more colors in it than any of my other designs.  I added some different colors to make it more varied, while retaining its autumnal feel. However, the colors you see on your monitor may not be the exact colors I see on mine. It would be best if you choose your own colors for your design.
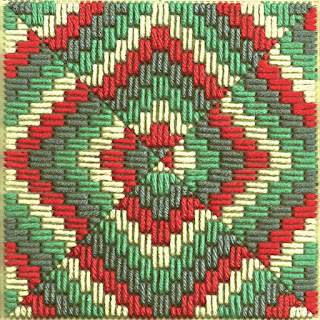
unusual 4-way bargello by Annake
 An unusual 4-way bargello by Annake
It is designed to be a typical bargello pattern, but it is versatile enough to be used in a number of different techniques. It is important for you to decide which technique you want to use before you begin shopping for materials The simplest way to use this would be a tent stitch design. For this, count the squares in your design carefully. You will need a minimum of needlepoint or plastic canvas with one square of mesh for each square of the design, plus an extra vertical row because tent stitch is slanted. If you plan to surround the motif with a background larger than the one I have left blank on the pattern, add another row of canvas squares for each row of background. The next easiest technique would be latch-hook. Each square of the design would require one square of mesh. add additional rows for background, plus at least 3 rows on all sides to turn to the back of the finished work and secure.  Finally you could do the motif in cross-stitch on needlepoint or plastic canvas, monk's cloth or aida cloth, or checked gingham. You will need 2 rows of "holes” for each cross stitch or one printed square on the gingham.

In a 4-way or 8-way bargello, each square represents 4 upright stitches, each over 3 threads of needlepoint canvas. (Unless you can get plastic canvas by the yard, it will not be wide enough for this project). This pattern is not for beginners. If you have never done any bargello, I suggest you use our 'Search My Blog' gadget in the sidebar to look up past articles on bargello and choose a simpler design for your first project.  If you have done some bargello patterns, I still suggest having some scrap canvas at hand to work out any trouble spots that you may find before you have to take out a number of stitches.  And count and measure before you begin! Depending on the size of your canvas mesh, this can be a fairly large project. I'll show mine in a future post.

Downloadable 8-way pattern


Our latest Teachable Moments project, "Teachable Moments: The Moon", is now available on our Extras page (see the tabbed menu above this post.) While it was designed for use by teachers or parents, others may find it useful as a companion piece for our Skyscapes 3 post (July 11, 2019).


 Creative Commons LicenseThis post by Annake's Garden is licensed under a Creative Commons Attribution-NonCommercial-ShareAlike 3.0 Unported License.

Contact Us

Name

Email *

Message *

Blog Archive