Showing posts with label design. Show all posts

Friday, October 18, 2019

‘Growing’ Geometric Designs

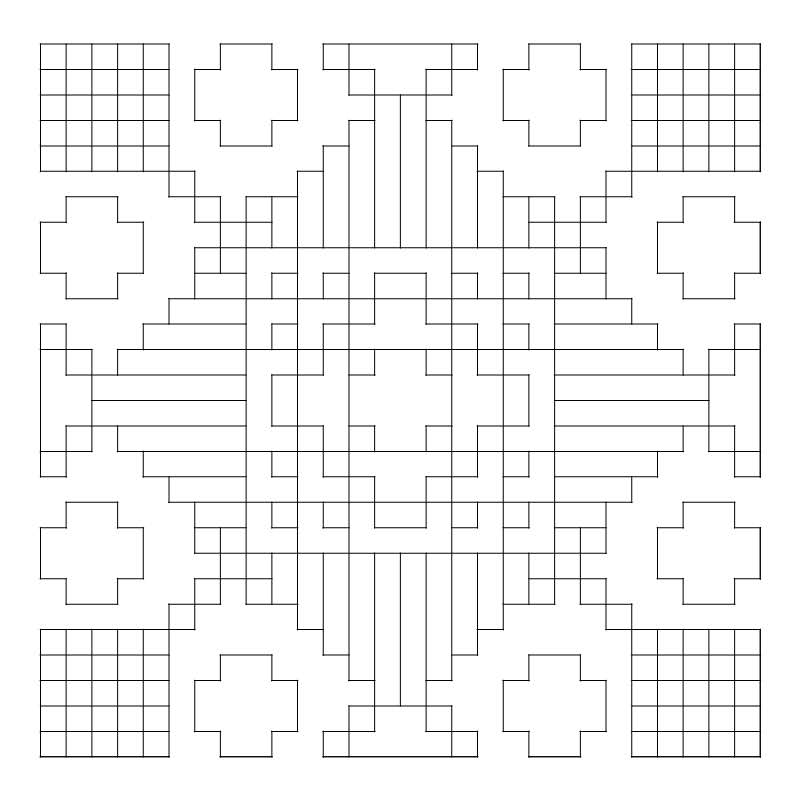
scan of new geometric design
First draft of a new geometric design, future project
You readers have been so responsive and enthusiastic about the new 8-way design that we published last month. Thank you so much for your interest and supportive remarks. A number of you have asked for more information on expanding patterns. That is a subject that I have touched on several times over the years we have been doing these posts, but I am always happy to return to it. This article is going to focus more on design, rather than on specific projects. In our January 1st post of this year, we showed how to rotate a simple one-and-a-half inch pattern on quarter-inch graph paper to make a symmetrical three-inch design which could be repeated over and over again to make it as large as you wished — up to the size of a patchwork quilt top, for instance. Each of the little squares in the design could represent a single stitch on canvas or even-weave fabric, a much larger square of fabric, or even a floor tile. Let's revisit one of those designs. Instead of taking one of the little squares as the basis of our design, this time let's consider the entire three-inch square as a single, repeatable part of our design.

Center design for the 8-way needlepoint
Central square from the 8-way needlepoint

Alphabet chart for the design
If you are going to follow along with me directly, you will need quarter-inch graph paper, a sharp pencil, an eraser (preferably a kneadable one, to get into the small squares), a straight-edged ruler or triangle, and a selection of colored pencils that can be erased. You can use pens or crayons, but they will not correct easily and can make the process frustrating. Or you can use an alphabet letter for each color written in plain pencil and fill the colors in later.


Central square in light blue, turquoise, and deep violet
The first thing I did was to center the design on my graph paper so I could work around it in all directions. The next thing I did was to change the color scheme of the design, leaving out the white, which is not a color. (You may want to use black, white, or gray in your design.) I chose to make this design in analogous colors (colors next to each other on the color wheel) because I wanted to make some points about color combinations. Analogous colors reflect wavelengths of colored light that are closely related.  Since these colors are closely related, we are pretty well assured of a pleasant design. I chose blue-green, blue, and blue-violet for my color combination, but you need not use those colors if you want to try others. For a trio of warm, bright colors, you might choose red-orange/orange/yellow-orange (the exact opposite of the three I chose), for example.  For more about color combinations, see our "Pigments and Palettes" article. A word of caution about colors. What I see on my screen in the office is not necessarily what J.D. sees on his screen in the workshop or what you will see on your device. And if you are printing something out, there are even more possible differences. That is why I identify the color range that I am using each time.

Central square in royal blue, medium violet, and aqua
Notice that I have used one light color, one medium color, and one dark color (a tint, a tone, and a shade) in each design. I do this to make it easier to place each color when I begin ‘growing’ the design. Each color is in the same set of squares on all three versions of the design; only the intensity of the colors changes. As you can see, which color is emphasized most does alter the design — a fact you will need to consider not only when growing your design, but also before choosing the yarns, fabrics, paints or other materials for your final project. Changing the positions of the colors as well as the intensity will give you even more varied results. I ‘grew’ all three of the blue-green/blue/blue-violet designs. You can see illustrations of the set at the end of this article.

Central square in aquamarine, medium blue, and lilac
Now that you have chosen both your color combination and your plan of light/medium/dark placement, you are ready to 'grow' the design. The simplest way to grow this design is to treat it the same way we did the little 6×6 square to get the 12×12 one we have now. If you want to proceed in this fashion, you may want to cut out your chosen 12×12 square and place it at the lower right-hand corner of a new sheet of graph paper. You can copy the pattern from your screen or print it as many times as you need it. You can then reproduce it immediately to the left, directly above right, and diagonally to the left of your original design. From there you can expand the design in any direction you desire.

Here is an outline pattern of the design to download.

Downloadable geometric design
Click here to download

Detail of mosaic from Ur, circa 2500 BCE (public domain photo)
Detail of mosaic from Ur, circa 2500 BCE
This design technique is called tiling. It is an ancient art process used primarily for creating inlays and mosaics. It was used in Mediterranean civilizations long before those of the Greeks and Romans. The earliest known mosaics were made in Mesopotamia before 2,000 BC (BCE)  Just last month there was news of a remarkable mosaic discovered in the ancient city of Hippo.

J.D. preferred the sample design with the light blue/turquoise/dark violet combination, so I tiled it first. Once I had a completely correct 4-part design, I reproduced it in colored pen for J.D. to photograph. I went through the same process with the other two samples. Somewhere in the midst of all this, he slipped up behind me and snapped this picture of my worktable, with the designs in progress. (He says he wanted to show you how much work I do before I publish anything for my readers. I think he just wanted to show what a mess my worktable usually is!)

Annake at work designing
Annake at work, designing


Expanded center square, stage 1
Now I turned my attention to the original black-line design to see how it would work as a 4-way or 8-way bargello design. Once again I placed the 12×12 pattern with the empty squares in the center of my graph paper and began to expand the design. I did this in plain pencil so I could erase any lines I didn't like. I worked strictly with lines and shapes at this point. (Although I planned to use some of the analogous colors in my final design, I intended to incorporate a variety of warm-color contrasts to the design, and I didn't want to be influenced by colors at this stage.) Since the top, bottom, and sides of the design were flat, I decided to begin there. I extended the lines that formed the sides of the squares outward in a stepped pyramid pattern of varying lengths. Once satisfied with one side of the design, I repeated it on the other three sides.

Outline of completed design
Then I turned my attention to the corners. Instead of closing the corner to make it the center of a design like those already completed, I opened it out with a stem-like addition and spread the arrowhead-like ends.  I returned to the north/east/south/west areas of the design and repeated and capped the pyramids with a small motif that I had used around the original center..Then I looked for ways to connect the corner designs to the expanded side designs. I decided not to connect them completely, but to leave areas where the background color could fill in around the shapes. The small center shape of the design was used in a detached fashion and repeated around the entire pattern in places where groupings seemed too empty.

Once the pattern was complete,  I went about filling in the colors.  I used many of the blue-green, blue, and blue-violet colors again that I had used in the trio of original designs — but sparingly. The feeling of the new design was rather heraldic for me, so I decided to incorporate reds and golds liberally in the final version. You can see the result at the top of this post. I left the background white so that the color details would be clear. I have saved an electronic copy of the design, however, and am planning to 'flood' the background with other colors later in order to compare the results. I also have some ideas for varying the central design. I haven't decided yet on what form of needlework I will make with this design. The design will probably change somewhat as I translate it for the medium in which it will finally appear. I'm already considering using a metallic thread, floss, or yarn in some areas — an antique gold or perhaps a copper tone. I will show the more interesting of these experiments in future posts.

I hope you have found this demonstration and discussion useful, and that it has encouraged you to experiment with designs of your own.  If you would like us to feature your design or designs on this blog, you can e-mail them to us at annakes_garden@yahoo.com .

As always, have fun!

tiled versions of analogous color design squares
Tiled versions of the analogous color design squares above

 Creative Commons LicenseThis post by Annake's Garden is licensed under a Creative Commons Attribution-NonCommercial-ShareAlike 3.0 Unported License.

Tuesday, July 17, 2018

Landscape in Needlework, Part V

Lake reflections photo byJ.J.
"Reflections",  photo by J.J.
This time I’m going to give you some tips and suggestions for making attractive landscapes in needlework. These are not “rules”; they are ideas that I have found useful. I have only two “rules”. You will find them at the end of this article.

Whether you are sketching a real landscape or marking things of interest in a photograph to make a pattern you can follow in your needlework, limit yourself to 45 minutes. Set a timer or arrange for a reminder on your cell phone.  This will force you to simplify what you include on your pattern, leaving out unnecessary details. Try to capture the essence of the place you have chosen for your subject.  You might want to follow J.J.’s suggestion and half-close your eyes so you aren’t seeing minor details and can become more aware of major forms and the spaces between them. You will also become more aware of the masses of light and dark when you are not distracted by unnecessary detail. What you leave out can be just as important as what you put in. You will want some repetition of shapes, lines, and colors in your picture to both “pull it together” (unify it) and to give it variety so that it doesn’t become boring. Be careful that you don’t repeat any of these things too often.

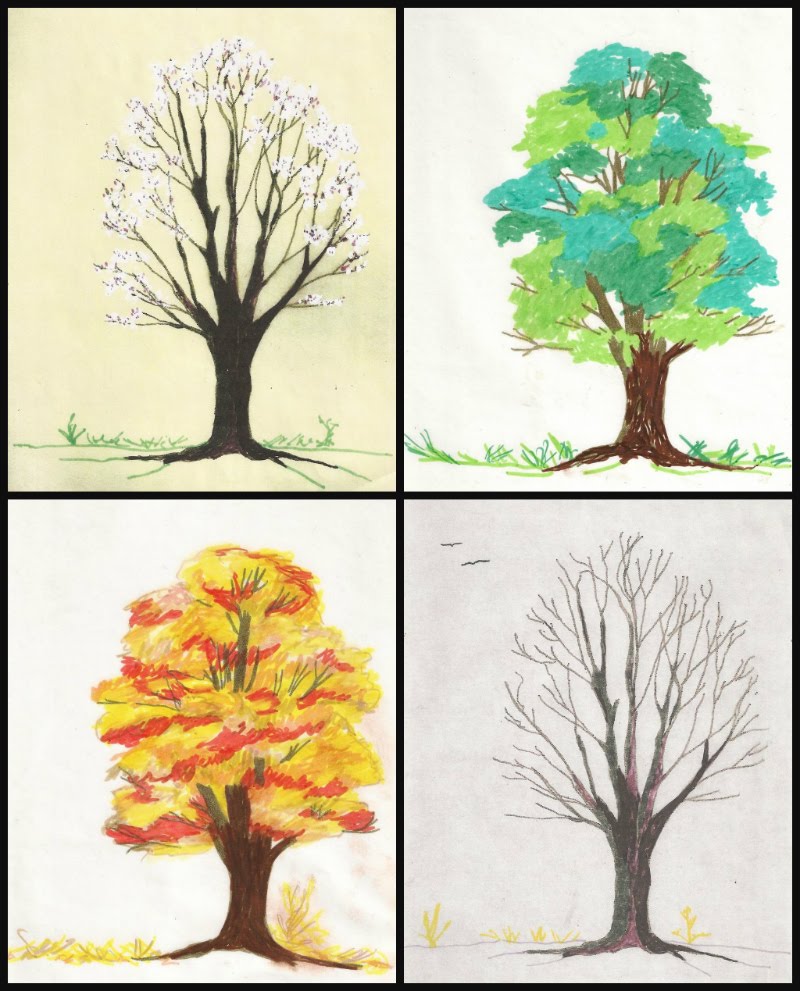
Montage of sketches of the same tree in four seasons
Sketches of the same tree in four seasons
One of my favorite landscape painters, Zoltan Szabo, put it this way: “The human mind tends to organize everything to death.” For example, when a person plants trees, they tend to be the same kind of tree, arranged in straight lines, equidistant from each other and meant to grow to about the same height. When Nature plants trees, they are in interesting clusters of different species and different heights, colors, and textures. Believe me, Nature is by far the better artist! From my kitchen door, I can see three kinds of evergreens and about a dozen deciduous shade and fruit trees. I can observe them and study them in all four seasons. I can mentally move them around into any combination I wish.  Find a place with good trees and get to know them, capture them on paper or film, and keep them for reference.

Photo of trees in winter by J.D.
A winter scene by J.D.
Trees are important components in many landscapes. Here’s an assignment for you. Get a library book or use the search engine on your computer to look up works by the Impressionists. Study the way they painted trees. Compare them. Be sure you include work by Vincent Van Gogh, Paul Signac, Claude Monet, Pierre-Auguste Renoir and Alfred Sisley. If you can find them, look at the work of Dominique Lang (Luxembourg) and Friedrich Eckenfelder (Switzerland). Choose one or two examples of the artist’s brushwork and try to think of stitches that would give you similar textures and effects. Try some of them on scraps of fabric and file the ones you like.

Photo by J.J. pedestrian on a path
"Heading Over the Hill", photo by J.J.
If you are using something like a fence, wall, or stream to lead the viewer’s eye into your picture, it should slant or curve into the picture. Ideally, it should disappear once it has led the viewer to an important point, although it may appear again somewhere else in the picture. Remember that as objects stretch further away from you, they become smaller and less distinct, less detailed, and lighter and grayer in color.

Pencil sketch of a fence
Gray is a color you can use to get wonderful effects. Collect gray yarns or flosses. Use black sparingly. Like straight lines, true black does not appear often in nature. The posts and rails get lighter, thinner, and shorter as they recede into the distance. Here is a simple sketch  that illustrates what I mean. If I were doing this in needlework, I would start the first post with 4 to 6 strands of dark yarn or floss and exchange one thread for a lighter one on the second post, two on the second, three on the third, and so on. See my discussions of blended yarn part II of this series (April 8, 2018).

Transparent grid tool
Speaking of points of interest, here is a simple device you can make to locate them. Start with a piece of thin, clear plastic and a permanent marker. Measure carefully. Put in two straight horizontal lines that divide your plastic into three equal sections. Then put in two straight vertical lines that do the same thing. The four places where the lines intersect are the attention (esthetic) points. These are the areas a viewer is likely to seek out first. Place the plastic on your canvas and mark the four points. If you are working on fabric, you may want to put in rows of long running stitches where the lines would be, Use a bright color that is not in the picture so that you can easily remove the lines when they are no longer needed. Choose one of the attention points for the area of greatest interest in your picture. If you have a second area of interest, it is probably best to place it at or near the attention point directly or diagonally across from the first one you chose. If you use the one directly above or below the first one you have shifted the “weight” of the picture to one side without anything to balance it.

Mountain poppies, photo by J.J.
"Mountain Poppies" by J.J.
The three divisions on the plastic device represent the three planes of the picture: foreground, midground (or middleground), and background. These are the aspects of perspective that make a picture look three-dimensional on a two-dimensional surface. In a landscape, you need to pay attention to the distance that appears to exist between the viewer’s eye and the furthest object in the background. If the proportions do not look correct, the scene will not be believable. This does not mean that the three planes always have to be of equal space or have equal emphasis. Ordinarily, the focus would be on the foreground because it is the closest to the viewer. Details would be sharper in that part of the picture and colors and values (degrees of lightness and darkness) more intense. The midground would be in softer focus and lighter than the foreground. The background would be still lighter and less well-defined. This is the most natural approach.

Simple pencil sketch of a landscape
A simple landscape to experiment with
But you can add importance to any of the three planes if you make it very light or very dark in strong contrast with the other two planes. If you make the midground noticeably lighter and brighter than the other two planes, you will suggest a change in the atmosphere. Add that eerie yellow-green light that sometimes comes before a storm. The background should be very dark; the sky, full of storm clouds. The foreground should also be shadowed and the colors flatter and less distinct. This can make a very dramatic scene. On the other hand, If the background is brighter and more colorful than the other two planes, as it would be at sunrise or sunset, it will dominate the scene, The foreground would be lighter than the midground and its colors would be grayer than normal. The midground would be the darkest plane, with very few details. You have total control over these aspects of the scene, but it is easy to put in too much detail. Use restraint and don’t make the differences between the planes so great that the scene is not believable. You can practice with the landscape sketch above.

Annake toning a canvas
Try working on a colored background. You can tone canvas with diluted acrylic paint. That’s what I am doing in this picture. I often pick up unused canvases at yard sales. If there is a printed design on the canvas, I paint over it until it does not show through. You will not want to leave an area of bare canvas, so match your yarn or floss as closely to the background color as seems necessary.  If you are working on fabric, try to find a medium tone of your major color. For example, use a medium blue fabric for a picture that is mostly sky, a medium green for a woodland scene, etc. You may want to limit yourself to other tones of the same color, plus black, white, and gray. Let some fabric show through. If you like this effect, you can apply it to other genres, like still lifes and even portraits. (For more about toning a canvas, see the post for June 15, 2014.)

Here are some generalizations about color that you may find useful.
  • Color and value are not the same. Think of value in terms of intensity and saturation.
  • A pure color, like the twelve seen on a conventional color wheel, is a hue. Every hue can be a tint (hue mixed with white), a tone (hue mixed with gray), or a shade (hue mixed with black). Use these variations to make your composition more interesting and realistic.
  • Warm colors (red through yellow-green on the color wheel) seem to advance toward the viewer. Cool colors (blue-green through red-violet) seem to recede.
  • Your picture should be predominantly warm or cool, depending upon the light, to assure color harmony. Warm colors are generally cheerful; cool colors are serene.
    Needlepoint of colored squares
    Needlepoint of colored squares
  • A color may look very different in different contexts, depending on the colors that are next to it. Note how the colors seem to change in this needlepoint when the center squares change from white to black.
  • The farther away an object is a picture, the paler (less intense, less saturated) it appears. Colors tend to gray as they approach the horizon.
  • Grays are not always made from mixing black and white. Blending complementary colors can give you some interesting effects. Blue’s complement is orange. Brown is a part of the orange “family”. I have had some success in blending blues and browns in yarns and flosses. Not all combinations work. Blend a short length and place some stitches close together on a scrap of fabric. If you like the result, file the sample along with the color names or numbers that you used. Try to incorporate some of the complementary colors into your shadows.
And here are my two “rules”:

Don’t get discouraged and quit if a project isn’t turning out the way you expected.

A few days ago, J. D. asked me how I was doing with a project. I told him I had come to love it and hate it with about equal intensity. Put the project away for a few days (no longer). When you look at it again, you may find there is nothing wrong with it. You may find you now know how to fix it. You may like it better than your original idea. Give it a chance.

Rules were made to be broken.

Take constructive criticism gracefully, but do not follow it until you have tried it and decided for yourself. Develop your own set of ideals. Listen to yourself. Be your own best critic.

Good luck,



 Creative Commons LicenseThis post by Annake's Garden is licensed under a Creative Commons Attribution-NonCommercial-ShareAlike 3.0 Unported License.

Tuesday, May 8, 2018

Landscapes In Needlework, Part III

Miguel Hermoso Cuesta, Fresco fontana piccola 05, CC BY-SA 4.0
Landscape fresco in Pompeii (Wikimedia)
People have been painting on walls for a very long time. Cro-Magnons painted wonderful animals on cave walls. The Egyptians painted on the walls of their tombs. Other ancient civilizations produced paintings and mosaics featuring conquerors and their armies, gods and heroes and, from the Greeks, athletes. But any attempts at landscapes were just sketchy backdrops for the figures. We have to go back to doomed Pompeii and Herculaneum to see landscapes painted for their own sake around 2,000 years ago. Today, even more of these murals are being uncovered as new excavations and restorations are done there. The cities were destroyed in 79 AD (CE). Buried so long in the ashes of Vesuvius, these murals are remarkably well-preserved.

Tuscan landscape
Tuscan landscape, not too different than it would have appeared in Roman times
Mountain landscape photo by J.D.
Detail and color fade with distance
We will probably never know the names of the artists or whether they were Romans or Greeks or people brought in from some other part of the Empire. They painted villas, hills, groves, mountains, seashores, farms, bridges, people, domestic animals, gardens, vineyards, boats, temples, rock formations, even small wildlife realistically. They had mastered atmospheric perspective, making distant objects proportionately smaller than those in the foreground and slightly graying colors near the horizon. They used trompe l’oeil (“fool the eye”) so effectively that viewers must have reached out to touch features of the paintings, believing that they were real. The artists sought to portray the peaceful and pleasant life of people living close to, and caring for, the land. The free, fluid brushstrokes and delicate colors would not appear again in Western art until the time of the Impressionists — more than eighteen centuries later! This photograph shows how background features become smaller and grayer.

Mountain panorama, photo by J.J.
In the 11th Century, landscape painting began to flourish in China. Painters studied rock formations, trees and grasses, flowering plants, birds and insects, and drew them expertly. They portrayed the changing of the seasons with great delicacy. Despite their attention to detail, however, their landscapes do not represent specific places. Instead they represented the artist’s spiritual journey to connect with Nature in a perpetual search for enlightenment. These “journey” paintings are meant to be experienced by the viewer moving from right to left across them. This is probably because many paintings were done on scrolls, which were held in the right hand (and sometimes re-rolled), while the left hand unrolled the scroll, revealing a small area at a time.

Rustic cabin, photo by J.D.
I really like the proportions of the Chinese paintings. I have never been thrilled with the Golden Mean, which dictates our conventional frame sizes of 5 in. x 7 in., 8 in. x 10 in., 9 in x 12 in., 11 in. x 14 in., and so on. Whether vertical or horizontal, their pictures are more than twice as high as they are wide, or more than twice as long as they are deep. That is one reason that I like to do wall hangings. The eye cannot take them in at a glance, and so is drawn to look at one section at a time as the gaze travels the length of the work. Spring Thaw, for example, (3/11/2018) is meant to be viewed as it was stitched, from bottom to top. Here is one of J.D.’s ‘painterly’ photographs with similar proportions and lines that draw the eye from bottom to top.

Yucca Before the Storm, watercolor sketch by Annake
Watercolor sketch by Annake
This is a picture of one of my paintings that eventually became “translated” into a wall hanging. The picture was painted from memory some years after the experience, but I can still remember many of the sensations. We had pulled our van over to the side of the road, parking by a large cluster of yucca plants, to watch a spectacular sunset. The yucca flowers were glowing, reminding me why one of their names is “Candelas del Dios”. A storm was moving in swiftly from the northwest. Thunder rumbled. Lightning flashed. I remember the smell of the dust blowing in the wind. Still we lingered, watching the afterglow as the yuccas became dark silhouettes against it. Then the storm was upon us. I may have mentioned that I love storms; my companions, however, were not as fond. We closed the windows and fled before the storm.

Yucca Sunset, latch hook wall hanging by Annake


Later, I made a latch-hook wall hanging as a kind of abstraction of the painting. Both of them are also intended to be “read” from bottom to top, from earth to sky. J. D peeled and polished the branch that holds the hanging, and secured it with leather thongs.


 Horses, photo by J.J.
Horses, photo by J.J.

For several centuries after the fall of the Roman Empire, landscapes were primarily backdrops for religious themes. In the late 15th Century, a well-known Flemish painter, Joachim Patinir, broke from this tradition. While his paintings bear the names of saints and martyrs (who do appear somewhere in the pictures), the viewer is much more likely to be impressed by the stunning landscapes which dominate the paintings. The artist used very high horizons and filled the foreground and middle ground, as well as the background, with an astonishing collection of landscape features. He included examples of human enterprise among the many natural features in his paintings. Human eyes could not have been able to distinguish in reality all the area included in a single canvas, no matter what their vantage point was.

 Storm Reflections, photo by J.J.
Storm Reflections, photo by J.J.
By the 16th Century, Spanish artists were moving away from strictly religious painting, embracing court paintings and portraits, and experimenting with still lifes and genre paintings. A man from the island of Crete went to Spain looking for a patron and found one in the city of Toledo. His name was Domenokos Theotokopoulos. Apparently that was too much of a mouthful for the Spanish people, who called him “El Greco” (“The Greek”). Although most of his paintings were religious scenes or portraits of church notables, he is probably best known for his View of Toledo, in which he captures the onset of a violent storm and the eerie light that sometimes precedes such a storm. Here is one of J.J.’s photos that has also captured that light. Notice how much darker the clouds are when reflected in the water.

Mountain lake, unattributed picture from a calendar
Landscape with no sign of humans
Landscapes, with or without structures and/or figures, became an important new painting category in Northern Europe after the Reformation. While Flanders remained Catholic, Holland, Germany, and some other northern countries did not. Many of the Dutch painters turned to painting sunny interiors or elaborate still lifes, but others preferred to paint their local landscapes. German artists tended to emphasize, even romanticize, landscapes. Even the great Albrecht Durer, best known for his woodcuts and meticulous engravings, painted rather “dreamy” watercolors of the Alps, which he passed through on his way to and from studying in Italy. (The artist is rather special to J.D., who was born on Durer’s birthday.) Another German artist, Albrecht Altdorfer, achieved fame for his paintings of the Danube River Valley. He occasionally included buildings and people, but the landscape clearly dominated his paintings.

You may wonder why I have put so much emphasis on photos in this chapter. If you are at home with a new baby or toddlers; if you are a caretaker for a loved one; if you work from home; if your movement is limited by physical or financial conditions; if transportation is an issue or you live in a neighborhood where it is not safe to wander around, photos may be your best source for landscapes. In my long life, I have faced all of those situations. Some of them still apply to me. I have a large collection of sketches, my own and family photographs, art prints, etc., to draw upon for my work, but I still look for and collect drawings, logos, and pictures that attract my eye for some reason. If you are serious about doing needle art, I suggest that you start a collection of your own. Really look at everything you can see. Ask yourself questions like:”What colors can I see here?” and “What kind of stitches would it take to look like that texture?” As you learn — or invent — new stitches and stitch patterns, keep samples for future reference. A shoebox can hold a whole library of stitches.

Delicate Arch, unattributed photo from calendar
Delicate Arch, unattributed photo from a calendar
Speaking of photos, I came across one in a calendar that really makes my point about how few places there are at Delicate Arch to sketch or photograph. This photographer stood a few feet to the right and a few feet closer to the drop-off in the right foreground than where I made sketches for the rug in Landscapes in Needlework, Part I. Unfortunately, no information was given about the photographer who took this beautiful winter sunset.


Train your eyes!


Photo Credits:
Roman fresco: Miguel Hermoso Cuesta, Fresco fontana piccola 05, CC BY-SA 4.0
Tuscan landscape, Mountain lake, Delicate Arch are all unattributed from calendars with no publisher or manufacturers information: if you see your work or that of someone you know, please contact us so that we can give credit where due.
All other photos, copyright Annake's Garden

 Creative Commons LicenseThis post by Annake's Garden is licensed under a Creative Commons Attribution-NonCommercial-ShareAlike 3.0 Unported License.

Friday, March 31, 2017

Quickpoint: Big Stitches for Needle Art Success

ferret and butterfly detail
Quickpoint is a form of needlework that I recommend to several groups of people. First of all, to beginning needleworkers. It is easy to do and the results are achieved quickly. Almost any kind of design can be adapted to the technique. There are some absolutely beautiful pillow kits currently available that originated in Belgium. You may not want to start out with something quite that expensive, however. You also know, if you are a regular reader of this blog, that I feel kits sometimes discourage creativity.*  I would personally rather see all craftspeople do something that is original and that expresses their tastes and personalities. A second group for whom quickpoint is appropriate is that of creative people who have very limited time to do projects. The final group would be those people who once enjoyed needlework, but now find their eyes and hands do not respond as well as they once did. I belong to that group myself. Please don't give up an activity that you love. Find less physically demanding ways to work. Quickpoint is large and the canvas mesh is easy to see. The needles are large and have eyes that are easy to thread. The yarns are thick and cover the canvas quickly. Projects can be any size that is easy for you to hold.


quickpoint wall hanging, "Spring Thaw"
Quickpoint wall hanging, "Spring Thaw"
The “point” part of quickpoint implies that it is only done in needlepoint. This is misleading. Although it is done on a canvas background, quickpoint is also lovely done in counted cross-stitch. (I believe needlepointers and cross-stitchers together form the largest group of people doing stitchery today.) The wall hanging here, “Spring Thaw”, is done in cross-stitch. This is how it looked completed.


#3.75 & #5 canvas
#3.75 & #5 canvas
 Traditional quickpoint canvas has 4.5 stitches to he inch. I do not have a source for this canvas at the moment, so I cannot show it to you. I can, however, show you a larger-mesh and a smaller-mesh canvas, both of which work well for quickpoint. The canvas with the larger squares is #3.75 conventional latch-hook rug canvas. It can be worked in uncut rug yarn or one of many thick craft or novelty yarns. The canvas with the smaller mesh is also a rug canvas, but one which requires a special hook. It is #5 canvas. You can use two strands of knitting worsted yarn or several strands of crewel or tapestry yarn on this canvas. For the best results, do not double the yarn; instead, cut two or more separate strands the same length and thread all of them through the eye of the needle at the same time. Some of these materials can be hard to find. Good paces to look for them are thrift stores, charity shops, and yard or garage sales.

Framed needlework ferret & butterfly
Framed needlework, "Are You Endangered, Too?"


From time to time, I create a needlework picture for a series I call “Close Encounters”. The photograph at the beginning of this post is a close-up of one of these pictures, entitled “Are You Endangered, Too?” You can see the entire picture at the right. It is done primarily in cross-stitch with some tent stitch.


Framed quickpoint, "Let's Do Lunch"
Another of the series is the one at the left, “Let's Do Lunch”. It also has some star stitches in the more heavily textured areas. A star stitch is made by stitching a + (like a plus sign) over a completed cross-stitch. A conventional cross-stitch occupies four squares of mesh. A star stitch (which has many other names, including Double Cross, and St. George & St. Andrew) occupies nine squares of mesh as you can see in the sample. As with cross-stitch, it does not matter which part of the “plus stitch' you do first as long as you are consistent and do the stitch the same way every time.


Steps in making the star stitch

Tip: If you are doing a framed picture or a wall hanging that you want to stay rigid and not sag, you need to work on jute canvas. To do a pillow or other soft object, you will need cotton canvas or a nylon mesh. Again, you may have to do some searching to find the appropriate materials.

Quickpoint cross-stitched butterfly

 
Here is one last example of combined quickpoint. The butterfly was done in cross-stitch. The outlining is done in a single strand of crewel yarn, as are the “floating” lines that represent veins in the wings. The background is done in tent stitch. This is easier to see in the enlargement below.


Detail of butterfly's wing


Annake working on "Spring Thaw"
When I am planning a complicated piece with many different shades of color, I often make a detailed graph of the planned design before I begin stitching. You can see part of such a graph over my shoulder as I am working on “Spring Thaw”. On the “Close Encounter” pictures, however, I charted some features and simply outlined everything else. I didn't chart the butterfly, simply outlined it. I'm currently starting a new picture in the “Close Encounter” series. In the next post on this topic, I will take you through the process for that picture, step-by step.


In the meantime, think “big stitches” and do a little quickpoint.


* My apologies if I have offended anyone from Belgium. I have many fond memories of the country and its friendly people.

 Creative Commons LicenseThis post by Annake's Garden is licensed under a Creative Commons Attribution-NonCommercial-ShareAlike 3.0 Unported License.

Contact Us

Name

Email *

Message *

Blog Archive