Showing posts with label Quickpoint. Show all posts

Thursday, June 11, 2020

That's a Good Question!: Summer 2020 Q & A


working aids for senior crafters
Some of Annake's aids
Ordinarily I do seasonal Question and Answer posts, but I haven't kept to that schedule lately. I apologize for that. Having been through a bad flu epidemic when I was in graduate school many years ago, I got worried when the first news of sickness in China appeared in January. I feared that such a large and populous country with so many connections around the word would not be able to confine the epidemic, so we began making long-range plans immediately. When it became evident that the virus was spreading quickly from country to country, we redoubled our efforts. Because I am high-risk, I have been in self-quarantine for about two weeks longer than most of you. I thought that if isolation is difficult for me — when I work from home all the time —- it must be doubly difficult for those who are unused to it. So J.D. and I decided that, along with our planned posts we would create the EXTRAS section of the blog (see the tab on the menu bar above) and fill it with all sorts of things from photo essays to how-to articles and free patterns to teaching units. We have put up a number of these items and plan to do more until mid-summer. Since most of these questions center on topics in our recent post about easing eye and hand problems for older needleworkers, J.D. suggested that we show some of the devices (shown above) that I personally use.

Do you do quickpoint from charts, or on painted canvas?

Butterfly chart no.4
Click here to download
Either or both, plus other choices as well. I prefer to work from charts because I make my own. By the time I put symbols on graph paper, I have a pretty clear mental picture of what I hope to accomplish. If you are working from a chart in a needlework book or magazine, there are some things to consider. The chart was probably designed for a specific project with well-defined dimensions. If you are doing quickpoint, which is larger than tent stitch and regular cross-stitch, you will need to count squares carefully to figure out just how large your finished project will be. (I add an extra inch all the way around, just in case.)  Most of the charts I put into these posts are meant to be used for a large variety of sizes and colors. but let me give you one that is a little less variable. Because this is a specific butterfly rather than a generalized one, the colors need to be followed closely. You will still need to count squares as described above for the figure to work on the background you have selected.

Painted canvas of South American child
If you are working on a painted canvas, start in a corner and work a 10-stitch square of the stitch you plan to use  (be ready to take the stitches out if you need to) to see if you will be able to put in the smaller details of the design. 
I buy painted canvases when I can get a bargain, but I paint out the design and replace it with one of my own, either painted on the canvas or outlined on it. You need to examine the canvas carefully because some, especially ones made for kits,  are just starched cotton and don't hold up well.

Monk's cloth
Monk's cloth
If you are used to working on even-weave fabric like Aida, you can use several easier alternatives. One is monks' cloth, which has easy-on-the-eyes squares, but it requires a lot of preparation. It needs to be pre-shrunk. Then you need to bind the edges or at least put 2 rows of machine stitching around the edges. When I do use it, I back it with non-woven interfacing, which I work through, and use it for something that doesn't get a lot of wear. On the other hand, if you can find a good quality decorator burlap, you can use it just like Aida and get some lovely surface effects with crewel, tapestry, or novelty yarns.

What is wrong with using printed gingham?

Printed vs. woven gingham
I can show you with the two examples in the picture. The fabric on the left is printed gingham.  It is folded so that both the top surface and the bottom one are showing.  Notice how the design doesn't look the same on the wrong side?  There is no guarantee the cloth was printed so that each square wound up with the same thread count or that your cross-stitches will come out the same size. Now look at the woven gingham on the right. See how the squares are the same on both sides of the fabric? This is true whether you are using baby-check, standard quarter-inch check, or one of the  "jumbo" checks. Your stitches will be the same size and will line up properly both horizontally and vertically. The woven gingham is a little more expensive, but is well worth it.

Love the Bear and the Bee. Does it have a title? And are you going to make any more "Close Encounters" pictures?

The things that fit nicely into my typed scripts don't always fit as nicely when J.D. sets the format for publication. The title was too long for the caption, so he left it off. It is "What Kind of Flower Are You?"  The titles are designed to be said by either one of the pair of animals to the other. I try to do one a year, but — as with everything right now — I am running a bit behind. I am almost ready to do the color cartoon stage of the design. Did you know that the word "cartoon" originally meant the complicated chart for a tapestry weaving? I use the term for the stage when I make a full-sized color rendering to trace permanently on my canvas. I may also graph some of the finer details. Since you know how the titles are chosen, I will give you a hint about the two animals — one a mammal and the other not — coming up next.  The title is "Want to Race?"

You mentioned  'Window Wonders' when you were showing tracing a pattern against a sunny window. What are they and what do you do with them?

materials for making Window Wonders
Some materials for making Window Wonders
They aren't a form of needlework, but they are pretty and fun to do. I make them for craft shows, usually in three graduated parts, featuring a hummingbird, a butterfly, and a flower, but I have done colorful frogs, dragonflies, small tropical fish, and more. I draw my own pictures, but it is easy to trace them from photographs and drawings. You will need an embroidery hoop (wooden or plastic) with a screw adjustment for each individual picture. I usually make a set of three with a 3-inch, a 4-inch, and a 5-inch hoop, but that varies. I use both circular and oval hoops. You can paint the wooden ones if you like and the plastic ones come in colors. You will need permanent markers in a variety of colors. You will need a transparent or translucent fabric that is stiff when you stretch it across the hoop.  Sheer organdy is ideal.  You will also need a small, sharp pair of embroidery or manicure scissors.


Cut a square of the sheer fabric about an inch larger all around than your drawing.  Center the square over the design and trace the design with permanent markers. (Practice on a scrap first.) When the picture is dry, stretch it over the bottom of the hoop and push the top of the hoop down firmly. Pull the fabric until it is as firm as you can make it.  Turn the hoop over and carefully cut away all excess cloth. Fasten the hoops together as J.D. has shown you here.  I hang the 'wonders' surface-side-out in a sunny window. The design can be seen from outdoors and indoors. If you have a light-colored wall across from the window, you may get still another image on it.  Some people hang the item on screened-in porches or sheltered patios. I showed some outdoors in a 40-mph wind once and all survived beautifully. This is a craft that can be taught to children in elementary school. (For more on 'Window Wonders', see the article in our Extras section.)

You mentioned a kind of pattern-making that you didn't discuss because you said it would probably be hard to get the materials for it right now. My mother-in-law has a lot of materials that she lets me use, so she might have what I need. Would you tell me about that technique?

I'll be glad to — and show you as well. Also, I am so glad that you have a good relationship with your mother-in-law. I had one of the best in the world and I miss her greatly. Cherish that relationship. (And I'll bet she will be a wonderful grandma, too.)

I am going to teach you to make a simple hot-iron transfer. You will need the following materials:
    an ironing board
    an iron, preferably a steam/dry iron
    fabric to transfer the design to (cotton is best for beginners)
    a simple design
    a sheet of tracing paper larger than your design
    a transfer pencil (this is the tough one!)
    a pencil sharpener
    straight pins
    scissors

Downloadable owl outline
Click here to download
I do a lot of children's patterns, so I am going to give you a simple one. Or you may substitute a design of your own. Mine faces forward, so you don't have to worry about design reversal. If your design is facing to one side, it will be reversed in the finished pattern. If you are going to put words or names in the design, you will need to reverse them before they are added to the design or leave them out of the design and chart them separately.

Draw or trace your design on the tracing paper with a hot-iron transfer pencil.
These red pencils are made by several companies. I use Aunt Martha's™ (2 to a package for around $3.00.) Each pencil will make many transfers.  Keep the pencil point sharp and go over the lines firmly until they look dark. Set the transfer aside.

Finished blackwork owl
Finished blackwork owl - no red marks
Cut you fabric at least an inch larger all around than your paper pattern. Set your iron for the proper temperature for your fabric. Press your fabric. Fold it in half lengthwise and press a strong crease along the fold. Refold it in half crosswise and press another pleat. these should meet in the center of the fabric. At this point i like to stitch a row of bright-colored basting stitches down each pleat that I will pull out once the transfer to the fabric is complete. Stretch the fabric flat. Place the transfer penciled side down on the fabric and lift the center of the transfer up with the center of the fabric. Pin the pattern to the fabric all the way around. Set the iron no higher than cotton and put it on dry (no steam). Press the pattern in to the fabric, pressing hard and go back and forth several times, but don't scorch the paper. It takes at least 5 seconds of hard pressure on each line to get a good transfer. Unpin one corner and lift it carefully. Peek under it to see if your lines have been transferred. If not, re-pin it in the same place iron over it until they do. Turn off the iron and unpin the pattern from the fabric.  I gently pull the basting threads out of the fabric at this point. Work the pattern in any needlework style you choose. The red lines will wash out of the fabric with warm water and a good detergent (I like Dawn® dish detergent) when your project is finished.

I hope these clarifications have answered your questions. Keep creating!



Annake's 24" monitor
Annake's 24" monitor & soundbar - more help for aging senses


 Creative Commons LicenseThis post by Annake's Garden is licensed under a Creative Commons Attribution-NonCommercial-ShareAlike 3.0 Unported License.


Monday, May 25, 2020

Easier on The Eyes: Needlework for Older Needlecrafters

Quickpoint picture by Annake of ferret and butterfly
Original quickpoint by Annake
Are you one of those people who once enjoyed needlework, but now find their eyes and hands do not respond as well as they once did? I belong to that group myself. Please don't give up an activity that you love. Find less physically demanding ways to work. I believe needlepointers and cross-stitchers together form the largest group of people doing stitchery today, so I will start with those pursuits.

Quickpoint is a form of needlework that I recommend to senior needlecrafters who are accustomed to doing counted cross-stitch or needlepoint. It is easy to do and the results are achieved quickly. Almost any kind of design can be adapted to the technique. Quickpoint is large and the canvas mesh is easy to see. The needles are large and have eyes that are easy to thread. The yarns are thick and cover the canvas quickly. Projects can be any size that is easy for you to hold. This wall hanging, "Are You Endangered, Too?", is done in quickpoint. The “point” part of quickpoint implies that it is only done in needlepoint. This is misleading. Although it is done on a canvas background, quickpoint is also lovely done in counted cross-stitch. The picture here is done in a combination of cross-stitch and tent stitch.

3.75 and 5 rug canvas
#3.75 (left) and #5 (right) rug canvas
Traditional quickpoint canvas has 4.5 stitches to the inch. I do not have a source for this canvas at the moment, so I cannot show it to you. I can, however, show you a larger-mesh and a smaller-mesh canvas, both of which work well for quickpoint. The canvas with the larger squares is #3.75 conventional latch-hook rug canvas. It can be worked in uncut rug yarn or one of many thick craft or novelty yarns. The canvas with the smaller mesh is also a rug canvas, but one which requires a special hook. It is #5 canvas. You can use two strands of knitting worsted yarn or several strands of crewel or tapestry yarn on this canvas. For the best results, do not double the yarn; instead, cut two or more separate strands the same length and thread all of them through the eye of the needle at the same time. Some of these materials can be hard to find. Good places to look for them are thrift stores, charity shops, and yard or garage sales. I know those are not available right now, but they will return.

“Let's Do Lunch”, quickpoint by Annake
Another of the "Close Encounter" series is “Let's Do Lunch”. It also has some star stitches in the more heavily textured areas. A star stitch is made by stitching a + (like a plus sign) over a completed cross-stitch. A conventional cross-stitch occupies four squares of mesh. A star stitch (which has many other names, including Double Cross and St. George and St. Andrew) occupies nine squares of mesh as you can see in the sample. As with cross-stitch, it does not matter which part of the ‘plus’ stitch you do first as long as you are consistent and do the stitch the same way every time.

Star stitch sample
Star stitch sample

If you are doing a framed picture or a wall hanging that you want to stay rigid and not sag, you need to work on jute canvas. To do a pillow or other soft object, you will need cotton canvas or a nylon mesh. Again, you may have to do some searching to find the appropriate materials.

Detail of cross-stitch butterfly wing
Here is another example of combined quickpoint. The butterfly was done in cross-stitch. The outlining is done in back-stitching with a single strand of crewel yarn, as are the “floating” lines that represent veins in the wings. The background is done in tent stitch. This is easier to see in the enlargement.


Butterfly, cross-stitch on canvas
Here is the completed butterfly framed under glass.  I had planned to go in with a single strand of yarn to cover the little white flecks left by stitches, but it seemed to me that they added some sparkle to the wing, like the butterflies' natural iridescence, so I left them there.

When I am planning a complicated piece with many different shades of color, I often make a detailed graph of the planned design before I begin stitching. On the “Close Encounter" pictures, I charted some features and simply outlined the rest. I did not chart the butterfly, just outlined it.

Bear and bee quickpoint by Annake
Original quickpoint by Annake
This quickpoint picture shows a bear in a field of sunflowers with a background of mountains and blue Colorado sky. The last step for the bear's head was to complete her features. The eyes, nose, and mouth were first done in tent stitch. Then some of the stitches were gone over in embroidery floss to give shine to the features. I tried to give the bear a startled expression. Tiny stitches show the reflections in her eyes. I exaggerated the size of the nose just a little because that is where the ‘close encounter’ will occur. I call these pictures “Close Encounters” because each shows a mammal encountering a very different kind of animal (in this case, a bee).

Waste canvas
Waste canvas
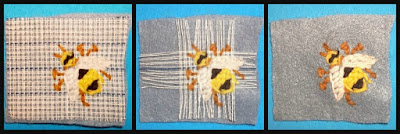
In order to add the bee to the picture I had to make smaller stitches than the quickpoint canvas would allow. I used a special canvas, called waste canvas. Its threads can easily be removed after the needlepoint (or cross-stitch) is complete. It can be used on fabric as well as on canvas or completed stitches. Let me show you how it is done, starting with a picture of the waste canvas, which can be worked as either mono canvas or penelope canvas. Since I planned to do the bee in tent stitch, I chose the mono option.

Closeup of bear and bee
I had to work out the bee design on graph paper. There are hundreds of species of wild bees in our western mountains. Some of them have bodies as large as as the last joint on my thumb! (This design does not represent any particular wild species.) Since I expected the thickness of the stitches on the bear's nose to present some problems, I first tried the pattern on waste canvas over a piece of heavy felt. I first cut a piece of waste canvas larger all around than the design to be stitched. If the design is very large, it is then pinned or basted to the background. I prefer basting because it is more secure. This one was so small that it didn't need to be basted. Then the stitches were put in just as they would be on regular mono needlepoint canvas. I didn't pull the stitches quite as tight as I would do ordinarily. The next picture shows the finished design with some of both the horizontal and vertical threads pulled out. A pair of small tweezers is useful for this. The last picture shows the design on the felt with all waste canvas removed.

Bee, waste canvas test sequence


Quickpoint can be used for geometric or stylized designs as well. Here is a pillow that I stitched in a pattern meant to represent evergreen trees and a canvas designed to represent our autumn aspens.

Quickpoint pillowtops


Cross-stitch rose on check gingham
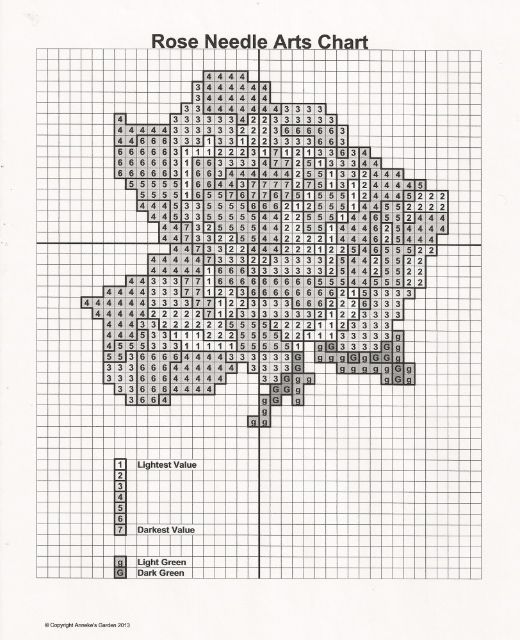
When I start a class on counted cross-stitch, Spanish blackwork, or similar techniques, I start with a project on quarter-inch checked gingham because it closely resembles graph paper. This makes it easy for students to follow simple graphs and encourages them to try their own graphs. Graphs are very versatile. It is possible to do the same design in a multitude of sizes, from a covered button to a king-sized quilt. The same chart can be used for many different techniques: afghan stitch, beading, mosaic, latch-hook, piecework, etc. A chart like the one you can download today works for a whole rainbow of color schemes. Charts are easy to file for future reference and, laminated, long-lasting. Another advantage of the quarter-inch checked gingham is that it is easier on both the eyes and the hands than most canvases, Aida cloth, etc.

Let's say you want to do a rose in cross-stitch or needlepoint. Prepare your background, choosing the color carefully so it does not overpower the rose. Fabric should be backed with inter-facing. Canvas, except for plastic, should be taped on the edges. Find the center of your material. Run a row of basting stitches through the center, both vertically and horizontally, using a bold color that does not appear in your version of the rose. Now select the colors of your rose.  This pattern will work for most colors. You will need a range of 7 shades of your main color, plus two greens. Shades of the main color are represented by numbers on the chart, with 1 being the palest one and 7 the darkest one. Capital G represents the darker green and small g the lighter green. Lay your 7 materials out in front of you in light-to-dark order. Tag them with the numbers if you like. (I'll admit I'm greedy when it comes to needles; I used a separate needle for each shade.)

Downloadable rose chart
To download, click here
Here is the pattern for you to download. The pattern is a forgiving one. If you place an occasional stitch in the wrong square, it should not spoil your rose. Small differences are to be expected in handmade items. If you run out of a color, continue with the closest match you can find. The vertical and horizontal center rows on the chart are marked. Start stitching at the center and work outward. When the rose is complete, pull out the basting threads.

Patterned stitches such as Spanish blackwork, Russian redwork, Scandinavian whitework, Holbein embroidery and Assisi embroidery also work well on quarter-inch gingham. Be sure the gingham pattern is woven into the cloth, not printed on it. Choose your background color carefully so that it does not overwhelm your design. Here is a simple blackwork butterfly on quarter-inch gingham.

Blackwork butterfly on check gingham

"Heritage Rose", latch hooked rug
Years after I made the rose design, I enlarged and modified it for the center of a latch-hook rug.  Latch-hook is another technique that is easy on the eyes. I once taught the technique to a lady who was legally blind but could still distinguish colors. Latch-hook uses packs of pre-cut rug yarn. what is used in kits works well enough on on #5 canvas, but you may need to use 2 strands of some colors on #3.75 canvas to make good coverage. Commercial rug yarn packets work well on either mesh.

Upright gobelin stitch sample
Another technique that works well on canvas is one of long straight stitches of varying lengths (commonly called French longstitch). You can see these well in the portrait of the bighorn ram below. You can see the stitches used horizontally as well as vertically. There are even a few used diagonally. I did the background in tent stitch, but it could have easily been done in rows of straight up-and-down stitches. Don't leave any blank canvas; the bottom of one stitch shares a square of mesh with the top of the stitch in the next row.

"Bighorn", original needlepoint by Annake
I deliberately ended with the bighorn ram's 'portrait' because it was finished about this time last year. I have done a number of projects since and there are several in various stages of development. I have been doing needlework now for more than seven decades, so I know what I am talking about. I have made many changes and adaptations as I have aged, in order to keep doing the work I love so much; so I hope you will believe me when I say, "And you can do it, too!"

With love,


 Creative Commons LicenseThis post by Annake's Garden is licensed under a Creative Commons Attribution-NonCommercial-ShareAlike 3.0 Unported License.

Sunday, March 11, 2018

Landscapes in Needlework: Part I

Mountain sunset by J.J.
Mountain sunset photo by J.J.
I’m attracted to landscapes, both to look at and to create. I’m especially attracted to landscapes sculpted by wind and water, ice and fire. The kinds that don’t easily accommodate the priorities of humanity. The kinds of landscapes that change the people who choose to live in them rather than the other way around. Mountains and deserts, canyons and seacoasts — enduring places. Sometimes my depictions are realistic, based on sketches and photographs of specific locations. Sometimes they are composites, based on the characteristics of a region, rather than a single location. Sometimes they are impressions, based on sensations and emotions as much as on memory. And sometimes my landscapes are completely imaginary. We are going to examine each of these kinds of landscape over the next chapters, as well as seascapes, skyscapes, and cityscapes. Let’s begin with a realistic landscape.


This is Delicate Arch, the iconic rock formation from Arches National Monument near Moab, Utah, just an easy day trip from where we live. The reason that this landmark is so readily recognizable is that there are limited viewpoints where a person can sit or stand safely and in relative comfort to view, sketch, or photograph the arch in its entirety. Most people visit the area in the summer, when the sun beats down like a hammer of brass. But, despite its high desert location, in late spring or early autumn it is possible to encounter an out-of-season snow shower. Few people visit it in winter, although this is changing because of creative advertising. Both the arch and its surroundings are spectacular in the snow. I chose to present it as a wintry scene with a winter storm in the background. I love the drama of stormy skies and like to incorporate them into my artwork. As for the viewer, you may consider the storm as approaching or moving away, whichever you prefer.

Detail of Delicate Arch rug
The ‘medium’ in which this work was created is cut acrylic rug yarn on jute rug canvas, and the technique is latch-hooking. The Impressionists, especially the pointillists, discovered that they got the most realistic colors by combining small amounts of color next to each other, rather than blended together. The pointillists did this with tiny dots of color. Latch-hooking is pure pointillism because each piece of rug yarn produces a “dot” on the canvas. This allowed me, for example, to indicate the many colors in the banded sandstone that makes up the arch.

Delcate Arch line drawing
To download, click here
I make a number of sketches and line drawings before I begin a project of this size. Here is one of the early line drawings I made to establish the proportions I wanted in the final design. It really emphasizes the collection of rock formations that make up the arch. Download it if you like and use it as the basis for a needlework landscape in your choice of “medium”.

The next picture is a composite landscape. The ridgeline is real. The saguaro cactuses and their companion plants are real. They are just more distant from each other than they appear here. In other words, there is no place where a person can stand and see this exact landscape. Nor would easterly sunlight cast these exact shadows on the rocks at sunrise. The ‘medium’ here is Persian wool yarn on #10 needlepoint canvas. The technique is tent stitch in both continental and basket-weave. Some of the colors are achieved by blending two or three shades of yarn in each stitch. Again, this is related to the technique the pointillists achieved with their dots of color.

"Sunrise on Saguaro" needlepoint landscape
"Sunrise on Saguaro" -  needlepoint landscape
To make a blended yarn, you need to begin with yarns that divide easily. Most common yarns have 3 or 4 strands (called plies) that separate fairly easily. These are called 3-ply and 4-ply yarns and include tapestry and crewel yarns, as well as the heavier knitting weights. Novelty yarns are not as easy to separate. You can usually determine whether a yarn will separate by examining the end of the yarn. You should be able to see the separate fibers, or plies. Spread them apart with your fingertips. If they spread apart easily, cut a length of the yarn. See if you can gently pull two strands free. Then separate the two strands from each other in the same way. You should now have either 3 or 4 individual strands of yarn.

Detail of needlepoint landscape with blended yarns
Detail of needlepoint, showing blended yarns
Just because a yarn separates easily, however, doesn’t mean that it will be suitable for blending. Wrap the ends of a strand around your hands. Pull, twist, and tug it to make sure it doesn’t fray. If it doesn’t, it should be a good yarn for blending. Here is a close-up view of blended stitching.


The last project is a landscape that captures the essence of an area and a season without portraying a specific place. It is done in “quickpoint”. Quickpoint is a form of needlework that I recommend to several groups of people. First of all, to beginning needleworkers. It is easy to do and results are achieved quickly. Almost any kind of design can be adapted for the technique. A second group for whom quickpoint is appropriate is that of creative people who have limited time to do projects. The final group would be people who once enjoyed needlework, but who now find that their eyes and hands do not respond as well as they once did. I belong to that group myself. Please don’t give up an activity that you love. Find less physically demanding ways to work.

Detail of quickpoint showing cross stitches
Cross-stitch on #5 rug canvas
Quickpoint is large and the canvas mesh is easy to see. The needles are large and have eyes that are easy to thread. The yarns are thick and cover the canvas quickly. Projects can be any size that is easy for you to hold. The “point” in “quickpoint” implies that it is only done in needlepoint. This is misleading. Although it is done on canvas, quickpoint is also lovely done in counted cross-stitch, as I have done here.


Traditional quickpoint canvas has 4.5 stitches to the inch. I don’t have a source for this canvas at the moment, so I can’t show it to you. I can, however, show you a larger-mesh canvas and a smaller-mesh canvas, both of which work well for quickpoint. The canvas with the larger squares is #3.75 latch-hook rug canvas. It can be worked in uncut rug yarn or any of the many thick craft or novelty yarns. The canvas with the smaller squares is #5 canvas, also a rug canvas, but one that requires a special hook.

#3.75 and #5 rug canvas compared
#3.75 and #5 rug canvas
You can use two strands of knitting worsted or several strands of tapestry or crewel yarns on the canvas. For the best results, do not double any of the yarns; instead, cut multiple separate strands of the same length. Thread them through the eye of a rug needle or a chenille needle. Some of these materials can be hard to find. Good places to look for them if you cannot find them at yarn or needlework shops are: second-hand stores, thrift and charity shops, yard or garage sales.

When working on a large cross-stitch design like this one, I often make a detailed chart first. I prefer to do a full-color chart with a colored square for each cross-stitch. Since I was planning to make a wall hanging, I made a large outline drawing of my original sketch. I started by taping several pieces of quarter-inch graph paper together and trimming them to the same relative proportions as the sketch I had drawn. Beginning at the bottom of the paper, I drew in the outlines from my drawing. Using that as a framework, I colored the segments of my design with markers. The squares on the graph paper each represented a cross-stitch I intended to make on a square of canvas.

Annake working on quickpoint landscape
Annake working on the quickpoint landscape
I measured and cut the canvas so that I had as many squares to work on as there were squares on the graph paper — plus a small margin along both sides. I chose acrylic yarns that matched the colors of my chart as closely as possible. Beginning at the bottom row of the design, I made one cross stitch for each square on my paper pattern. The sizes of the squares of the graph paper are a little larger than the stitches on the canvas, but they are still close enough to be easy to work from. Here is a picture of me stitching on the canvas (below) while looking at my hand-drawn colored chart (above).


Color range in the quickpoint landscape
Detail showing range of colors used
The colors of the yarns are more vivid than the colors of the markers I used on the chart, but they are still in the same color range. The picture shows tall evergreen trees on both sides of a small mountain stream. Sky and clouds show above the stream, More distant trees mark the horizon. The snowbanks along the stream are beginning to thaw and water is pooling at the bottom of the picture. The darker blues, grays, greens and violets in the lower part of the scene emphasize the cold of lingering Winter, while the lighter blues of the sky and the warmer whites of the clouds offer a promise of Spring.

cart with chart and quickpoint in progress
Cart with chart and quickpoint in progress
I “re-purposed” a small rolling cart from my kitchen to hold my chart above my canvas. The chart was rolled and taped to the top edge of the upper “basket” of the cart. The canvas was rolled on a piece of plastic pipe that rests on the second level, or “basket”, of the cart. The two bottom levels held my yarns. I secured the canvas to the plastic tube with masking tape so that I could work on one section at a time. I rolled up the canvas each time I stopped working on it in order to keep it clean. Here is a picture of the cart as it looked when in use.

The edges of the finished canvas were turned under and stitched down. The work was backed with a large piece of blue felt. Enough felt was extended at the top to make a pocket for a dowel. After the dowel was inserted in the pocket, two large wooden beads that had been painted to match the felt were glued to the ends of the dowel, which rests on two slender nails that do not show past the beads. The entire piece measures 31 inches long by 13 inches wide (79 cm long X 33 cm wide). Here's a picture of the finished work, I call it “Spring Thaw”.

Finished quickpoint, "Spring Thaw"
Finished quickpoint landscape, "Spring Thaw"
One of the things I want you to notice about these pictures and the ones that will follow them is the position of the horizon, the place where the land (or sea) meets the sky. Study the ways in which those positions influence the composition of the pictures. Remember that we have demonstrated that all of our landscapes do not have to be real, horizontal, framed, or hung on walls.


*Some content in this post has been presented previously, in a different form.
 Creative Commons LicenseThis post by Annake's Garden is licensed under a Creative Commons Attribution-NonCommercial-ShareAlike 3.0 Unported License.

Sunday, May 21, 2017

Quickpoint: Unfinished Business

Bear picture from previous post
Where we left off...
I want to apologize for dashing off last time and leaving you with an unfinished project. Things can get very hectic at Annake's Garden this time of year. We were doing a quickpoint project which was destined to be a new addition to my series of whimsical needlepoint pictures that I call ‘Close Encounters’. This quickpoint picture features a bear in a field of sunflowers and a background of snowy mountains and Colorado blue sky. When I left you, the picture was complete except for the bear's features and one more finishing touch...

Detail of bear's face
The last step for the bear's head was to complete her features. The eyes, nose, and mouth were first done in tent stitch. Then some of the stitches were gone over in embroidery floss to give shine to the features. I tried to give the bear a startled expression. Tiny stitches show the reflections in her eyes. I exaggerated the size of the nose just a little because that is where the “close encounter” will occur.

Then it was time to remove the picture from the frame and gently steam-press its surface. J.D. then polished the frame and got it ready to receive the finished picture.

Bear quickpoint with one step left
Just one step left...


Waste canvas
Waste canvas
I call these pictures ‘Close Encounters’ because each shows a mammal encountering a very different kind of animal (in this case, a bee.) In order to add the bee to the picture I had to make smaller stitches than the quickpoint canvas would allow. I used a special canvas, called waste canvas. Its threads can easily be removed after the needlepoint (or cross-stitch) is complete. It can be used on fabric as well as canvas or completed stitches. Let me show you how it is done, starting with a picture of the waste canvas, which can be worked as either mono canvas or penelope canvas. Since I planned to do the bee in tent stitch, I chose the mono option.

I had to work out the bee design on graph paper. There are hundreds of species of wild bees in our western mountains. Some of them have bodies as large as as the last joint on my thumb! This design does not represent any particular wild species. Since I expected the thickness of the stitches on the bear's nose to present some problems, I first tried the pattern on waste canvas over a piece of heavy felt.

Steps in creating the bee on felt using waste canvas
First a piece of waste canvas larger all around than the design to be stitched was cut out. If the design is very large, it is then pinned or basted to the background. (I prefer basting because it is more secure.) This one was so small that it didn't need to be basted. Then the stitches were put in just as they would be on regular mono needlepoint canvas. (I don't pull the stitches quite as tight as I would do ordinarily.) The next picture shows the finished design with some of both the horizontal and vertical threads pulled out. (A pair of small tweezers is useful for this.) The last picture shows the design on the felt with all waste canvas removed

The remaining steps were to repeat the design on the bear's nose and to turn the piece over to J.D. for framing. Now this ‘Close Encounter’ (title as yet undetermined – suggestions?) is complete. The meetings, so far, have been friendly. I hope this one will be, too.

Finished quickpoint picture of bear and bee

Now I want to mention a use of quickpoint that I neglected to discuss in the previous post about quickpoint (March 31, 2017): quickpoint bargello.

Quickpoint bargello pillow top "Aspen Trees"
Unlike tent stitch and the other traditional needlepoint stitches, bargello stitches are not short, slanted stitches. They are long, straight stitches. The lengths may differ, but a common stitch covers four strands of canvas thread. Two stitches share a square of canvas where one stitch begins and the other one ends. If you are working on #5 canvas, as I did in today's project, each of those straight stitches covers a lot of canvas, so you want to use a yarn that is going to cover that space under each stitch. You can see these long stitches put together in the “Aspen Trees” canvas here.

Quickpoint bargello pillow "Ocean Waves"


This type of bargello works up really quickly and is not hard for older eyes and hands. Here are some other examples of quickpoint bargello from the post for May 1, 2013. If you have never tried bargello, quickpoint is a good way to get started. The first one is called “Ocean Waves” for obvious reasons.

Bargello pillow and picture using the same stitch


The second pillow is called “Evergreens” and features a strong all-over bargello pattern. The picture on the wall is entitled “Firs and Feathers”. It is done in a technique that I call ‘Bargello Plus’. This combines a large area of a bargello pattern with an area of conventional tent stitch to give a realistic addition, like the eagle in the picture.


Bargello picture "Bear-ly There"
"Bear-ly There", available in our Etsy shop


Here is another example of 'Bargello Plus', entitled “Bearly There”. It combines the bargello pattern used in “Aspen Trees” with a realistic figure of a bear.


Finally, here is a picture which uses the “Ocean Waves” bargello design with tent stitch inserts of a fish and a seagull. I called it “Seafood Surprise”. You can decide for yourself which creature is going to get the biggest surprise!

Bargello Plus picture "Seafood Surprise"

Finally, a question from a reader: Did you ever find a source for standard quickpoint canvas?

JoAnn's online site shows some simple quickpoint kits designed for children. They are inexpensive. You could re-purpose them to do any picture you want to do. Otherwise, I think your best sources are the “gently used” shops, yard sales, and garage sales. If you have a weekly shopping flier, you might put an ad in the “Wanted” section. Contacting needlework and craft shops online is another possibility. If you find a good source, please let me know, and I will pass the information along.

Have fun!


 Creative Commons LicenseThis post by Annake's Garden is licensed under a Creative Commons Attribution-NonCommercial-ShareAlike 3.0 Unported License.

Contact Us

Name

Email *

Message *

Blog Archive