Showing posts with label close encounters. Show all posts

Thursday, June 11, 2020

That's a Good Question!: Summer 2020 Q & A


working aids for senior crafters
Some of Annake's aids
Ordinarily I do seasonal Question and Answer posts, but I haven't kept to that schedule lately. I apologize for that. Having been through a bad flu epidemic when I was in graduate school many years ago, I got worried when the first news of sickness in China appeared in January. I feared that such a large and populous country with so many connections around the word would not be able to confine the epidemic, so we began making long-range plans immediately. When it became evident that the virus was spreading quickly from country to country, we redoubled our efforts. Because I am high-risk, I have been in self-quarantine for about two weeks longer than most of you. I thought that if isolation is difficult for me — when I work from home all the time —- it must be doubly difficult for those who are unused to it. So J.D. and I decided that, along with our planned posts we would create the EXTRAS section of the blog (see the tab on the menu bar above) and fill it with all sorts of things from photo essays to how-to articles and free patterns to teaching units. We have put up a number of these items and plan to do more until mid-summer. Since most of these questions center on topics in our recent post about easing eye and hand problems for older needleworkers, J.D. suggested that we show some of the devices (shown above) that I personally use.

Do you do quickpoint from charts, or on painted canvas?

Butterfly chart no.4
Click here to download
Either or both, plus other choices as well. I prefer to work from charts because I make my own. By the time I put symbols on graph paper, I have a pretty clear mental picture of what I hope to accomplish. If you are working from a chart in a needlework book or magazine, there are some things to consider. The chart was probably designed for a specific project with well-defined dimensions. If you are doing quickpoint, which is larger than tent stitch and regular cross-stitch, you will need to count squares carefully to figure out just how large your finished project will be. (I add an extra inch all the way around, just in case.)  Most of the charts I put into these posts are meant to be used for a large variety of sizes and colors. but let me give you one that is a little less variable. Because this is a specific butterfly rather than a generalized one, the colors need to be followed closely. You will still need to count squares as described above for the figure to work on the background you have selected.

Painted canvas of South American child
If you are working on a painted canvas, start in a corner and work a 10-stitch square of the stitch you plan to use  (be ready to take the stitches out if you need to) to see if you will be able to put in the smaller details of the design. 
I buy painted canvases when I can get a bargain, but I paint out the design and replace it with one of my own, either painted on the canvas or outlined on it. You need to examine the canvas carefully because some, especially ones made for kits,  are just starched cotton and don't hold up well.

Monk's cloth
Monk's cloth
If you are used to working on even-weave fabric like Aida, you can use several easier alternatives. One is monks' cloth, which has easy-on-the-eyes squares, but it requires a lot of preparation. It needs to be pre-shrunk. Then you need to bind the edges or at least put 2 rows of machine stitching around the edges. When I do use it, I back it with non-woven interfacing, which I work through, and use it for something that doesn't get a lot of wear. On the other hand, if you can find a good quality decorator burlap, you can use it just like Aida and get some lovely surface effects with crewel, tapestry, or novelty yarns.

What is wrong with using printed gingham?

Printed vs. woven gingham
I can show you with the two examples in the picture. The fabric on the left is printed gingham.  It is folded so that both the top surface and the bottom one are showing.  Notice how the design doesn't look the same on the wrong side?  There is no guarantee the cloth was printed so that each square wound up with the same thread count or that your cross-stitches will come out the same size. Now look at the woven gingham on the right. See how the squares are the same on both sides of the fabric? This is true whether you are using baby-check, standard quarter-inch check, or one of the  "jumbo" checks. Your stitches will be the same size and will line up properly both horizontally and vertically. The woven gingham is a little more expensive, but is well worth it.

Love the Bear and the Bee. Does it have a title? And are you going to make any more "Close Encounters" pictures?

The things that fit nicely into my typed scripts don't always fit as nicely when J.D. sets the format for publication. The title was too long for the caption, so he left it off. It is "What Kind of Flower Are You?"  The titles are designed to be said by either one of the pair of animals to the other. I try to do one a year, but — as with everything right now — I am running a bit behind. I am almost ready to do the color cartoon stage of the design. Did you know that the word "cartoon" originally meant the complicated chart for a tapestry weaving? I use the term for the stage when I make a full-sized color rendering to trace permanently on my canvas. I may also graph some of the finer details. Since you know how the titles are chosen, I will give you a hint about the two animals — one a mammal and the other not — coming up next.  The title is "Want to Race?"

You mentioned  'Window Wonders' when you were showing tracing a pattern against a sunny window. What are they and what do you do with them?

materials for making Window Wonders
Some materials for making Window Wonders
They aren't a form of needlework, but they are pretty and fun to do. I make them for craft shows, usually in three graduated parts, featuring a hummingbird, a butterfly, and a flower, but I have done colorful frogs, dragonflies, small tropical fish, and more. I draw my own pictures, but it is easy to trace them from photographs and drawings. You will need an embroidery hoop (wooden or plastic) with a screw adjustment for each individual picture. I usually make a set of three with a 3-inch, a 4-inch, and a 5-inch hoop, but that varies. I use both circular and oval hoops. You can paint the wooden ones if you like and the plastic ones come in colors. You will need permanent markers in a variety of colors. You will need a transparent or translucent fabric that is stiff when you stretch it across the hoop.  Sheer organdy is ideal.  You will also need a small, sharp pair of embroidery or manicure scissors.


Cut a square of the sheer fabric about an inch larger all around than your drawing.  Center the square over the design and trace the design with permanent markers. (Practice on a scrap first.) When the picture is dry, stretch it over the bottom of the hoop and push the top of the hoop down firmly. Pull the fabric until it is as firm as you can make it.  Turn the hoop over and carefully cut away all excess cloth. Fasten the hoops together as J.D. has shown you here.  I hang the 'wonders' surface-side-out in a sunny window. The design can be seen from outdoors and indoors. If you have a light-colored wall across from the window, you may get still another image on it.  Some people hang the item on screened-in porches or sheltered patios. I showed some outdoors in a 40-mph wind once and all survived beautifully. This is a craft that can be taught to children in elementary school. (For more on 'Window Wonders', see the article in our Extras section.)

You mentioned a kind of pattern-making that you didn't discuss because you said it would probably be hard to get the materials for it right now. My mother-in-law has a lot of materials that she lets me use, so she might have what I need. Would you tell me about that technique?

I'll be glad to — and show you as well. Also, I am so glad that you have a good relationship with your mother-in-law. I had one of the best in the world and I miss her greatly. Cherish that relationship. (And I'll bet she will be a wonderful grandma, too.)

I am going to teach you to make a simple hot-iron transfer. You will need the following materials:
    an ironing board
    an iron, preferably a steam/dry iron
    fabric to transfer the design to (cotton is best for beginners)
    a simple design
    a sheet of tracing paper larger than your design
    a transfer pencil (this is the tough one!)
    a pencil sharpener
    straight pins
    scissors

Downloadable owl outline
Click here to download
I do a lot of children's patterns, so I am going to give you a simple one. Or you may substitute a design of your own. Mine faces forward, so you don't have to worry about design reversal. If your design is facing to one side, it will be reversed in the finished pattern. If you are going to put words or names in the design, you will need to reverse them before they are added to the design or leave them out of the design and chart them separately.

Draw or trace your design on the tracing paper with a hot-iron transfer pencil.
These red pencils are made by several companies. I use Aunt Martha's™ (2 to a package for around $3.00.) Each pencil will make many transfers.  Keep the pencil point sharp and go over the lines firmly until they look dark. Set the transfer aside.

Finished blackwork owl
Finished blackwork owl - no red marks
Cut you fabric at least an inch larger all around than your paper pattern. Set your iron for the proper temperature for your fabric. Press your fabric. Fold it in half lengthwise and press a strong crease along the fold. Refold it in half crosswise and press another pleat. these should meet in the center of the fabric. At this point i like to stitch a row of bright-colored basting stitches down each pleat that I will pull out once the transfer to the fabric is complete. Stretch the fabric flat. Place the transfer penciled side down on the fabric and lift the center of the transfer up with the center of the fabric. Pin the pattern to the fabric all the way around. Set the iron no higher than cotton and put it on dry (no steam). Press the pattern in to the fabric, pressing hard and go back and forth several times, but don't scorch the paper. It takes at least 5 seconds of hard pressure on each line to get a good transfer. Unpin one corner and lift it carefully. Peek under it to see if your lines have been transferred. If not, re-pin it in the same place iron over it until they do. Turn off the iron and unpin the pattern from the fabric.  I gently pull the basting threads out of the fabric at this point. Work the pattern in any needlework style you choose. The red lines will wash out of the fabric with warm water and a good detergent (I like Dawn® dish detergent) when your project is finished.

I hope these clarifications have answered your questions. Keep creating!



Annake's 24" monitor
Annake's 24" monitor & soundbar - more help for aging senses


 Creative Commons LicenseThis post by Annake's Garden is licensed under a Creative Commons Attribution-NonCommercial-ShareAlike 3.0 Unported License.


Monday, May 25, 2020

Easier on The Eyes: Needlework for Older Needlecrafters

Quickpoint picture by Annake of ferret and butterfly
Original quickpoint by Annake
Are you one of those people who once enjoyed needlework, but now find their eyes and hands do not respond as well as they once did? I belong to that group myself. Please don't give up an activity that you love. Find less physically demanding ways to work. I believe needlepointers and cross-stitchers together form the largest group of people doing stitchery today, so I will start with those pursuits.

Quickpoint is a form of needlework that I recommend to senior needlecrafters who are accustomed to doing counted cross-stitch or needlepoint. It is easy to do and the results are achieved quickly. Almost any kind of design can be adapted to the technique. Quickpoint is large and the canvas mesh is easy to see. The needles are large and have eyes that are easy to thread. The yarns are thick and cover the canvas quickly. Projects can be any size that is easy for you to hold. This wall hanging, "Are You Endangered, Too?", is done in quickpoint. The “point” part of quickpoint implies that it is only done in needlepoint. This is misleading. Although it is done on a canvas background, quickpoint is also lovely done in counted cross-stitch. The picture here is done in a combination of cross-stitch and tent stitch.

3.75 and 5 rug canvas
#3.75 (left) and #5 (right) rug canvas
Traditional quickpoint canvas has 4.5 stitches to the inch. I do not have a source for this canvas at the moment, so I cannot show it to you. I can, however, show you a larger-mesh and a smaller-mesh canvas, both of which work well for quickpoint. The canvas with the larger squares is #3.75 conventional latch-hook rug canvas. It can be worked in uncut rug yarn or one of many thick craft or novelty yarns. The canvas with the smaller mesh is also a rug canvas, but one which requires a special hook. It is #5 canvas. You can use two strands of knitting worsted yarn or several strands of crewel or tapestry yarn on this canvas. For the best results, do not double the yarn; instead, cut two or more separate strands the same length and thread all of them through the eye of the needle at the same time. Some of these materials can be hard to find. Good places to look for them are thrift stores, charity shops, and yard or garage sales. I know those are not available right now, but they will return.

“Let's Do Lunch”, quickpoint by Annake
Another of the "Close Encounter" series is “Let's Do Lunch”. It also has some star stitches in the more heavily textured areas. A star stitch is made by stitching a + (like a plus sign) over a completed cross-stitch. A conventional cross-stitch occupies four squares of mesh. A star stitch (which has many other names, including Double Cross and St. George and St. Andrew) occupies nine squares of mesh as you can see in the sample. As with cross-stitch, it does not matter which part of the ‘plus’ stitch you do first as long as you are consistent and do the stitch the same way every time.

Star stitch sample
Star stitch sample

If you are doing a framed picture or a wall hanging that you want to stay rigid and not sag, you need to work on jute canvas. To do a pillow or other soft object, you will need cotton canvas or a nylon mesh. Again, you may have to do some searching to find the appropriate materials.

Detail of cross-stitch butterfly wing
Here is another example of combined quickpoint. The butterfly was done in cross-stitch. The outlining is done in back-stitching with a single strand of crewel yarn, as are the “floating” lines that represent veins in the wings. The background is done in tent stitch. This is easier to see in the enlargement.


Butterfly, cross-stitch on canvas
Here is the completed butterfly framed under glass.  I had planned to go in with a single strand of yarn to cover the little white flecks left by stitches, but it seemed to me that they added some sparkle to the wing, like the butterflies' natural iridescence, so I left them there.

When I am planning a complicated piece with many different shades of color, I often make a detailed graph of the planned design before I begin stitching. On the “Close Encounter" pictures, I charted some features and simply outlined the rest. I did not chart the butterfly, just outlined it.

Bear and bee quickpoint by Annake
Original quickpoint by Annake
This quickpoint picture shows a bear in a field of sunflowers with a background of mountains and blue Colorado sky. The last step for the bear's head was to complete her features. The eyes, nose, and mouth were first done in tent stitch. Then some of the stitches were gone over in embroidery floss to give shine to the features. I tried to give the bear a startled expression. Tiny stitches show the reflections in her eyes. I exaggerated the size of the nose just a little because that is where the ‘close encounter’ will occur. I call these pictures “Close Encounters” because each shows a mammal encountering a very different kind of animal (in this case, a bee).

Waste canvas
Waste canvas
In order to add the bee to the picture I had to make smaller stitches than the quickpoint canvas would allow. I used a special canvas, called waste canvas. Its threads can easily be removed after the needlepoint (or cross-stitch) is complete. It can be used on fabric as well as on canvas or completed stitches. Let me show you how it is done, starting with a picture of the waste canvas, which can be worked as either mono canvas or penelope canvas. Since I planned to do the bee in tent stitch, I chose the mono option.

Closeup of bear and bee
I had to work out the bee design on graph paper. There are hundreds of species of wild bees in our western mountains. Some of them have bodies as large as as the last joint on my thumb! (This design does not represent any particular wild species.) Since I expected the thickness of the stitches on the bear's nose to present some problems, I first tried the pattern on waste canvas over a piece of heavy felt. I first cut a piece of waste canvas larger all around than the design to be stitched. If the design is very large, it is then pinned or basted to the background. I prefer basting because it is more secure. This one was so small that it didn't need to be basted. Then the stitches were put in just as they would be on regular mono needlepoint canvas. I didn't pull the stitches quite as tight as I would do ordinarily. The next picture shows the finished design with some of both the horizontal and vertical threads pulled out. A pair of small tweezers is useful for this. The last picture shows the design on the felt with all waste canvas removed.

Bee, waste canvas test sequence


Quickpoint can be used for geometric or stylized designs as well. Here is a pillow that I stitched in a pattern meant to represent evergreen trees and a canvas designed to represent our autumn aspens.

Quickpoint pillowtops


Cross-stitch rose on check gingham
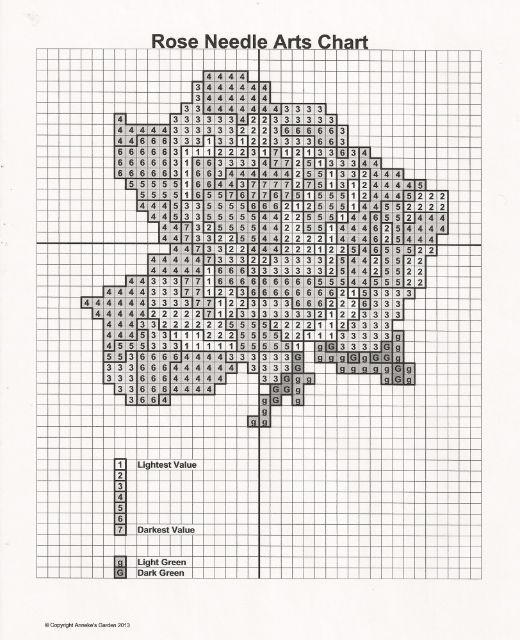
When I start a class on counted cross-stitch, Spanish blackwork, or similar techniques, I start with a project on quarter-inch checked gingham because it closely resembles graph paper. This makes it easy for students to follow simple graphs and encourages them to try their own graphs. Graphs are very versatile. It is possible to do the same design in a multitude of sizes, from a covered button to a king-sized quilt. The same chart can be used for many different techniques: afghan stitch, beading, mosaic, latch-hook, piecework, etc. A chart like the one you can download today works for a whole rainbow of color schemes. Charts are easy to file for future reference and, laminated, long-lasting. Another advantage of the quarter-inch checked gingham is that it is easier on both the eyes and the hands than most canvases, Aida cloth, etc.

Let's say you want to do a rose in cross-stitch or needlepoint. Prepare your background, choosing the color carefully so it does not overpower the rose. Fabric should be backed with inter-facing. Canvas, except for plastic, should be taped on the edges. Find the center of your material. Run a row of basting stitches through the center, both vertically and horizontally, using a bold color that does not appear in your version of the rose. Now select the colors of your rose.  This pattern will work for most colors. You will need a range of 7 shades of your main color, plus two greens. Shades of the main color are represented by numbers on the chart, with 1 being the palest one and 7 the darkest one. Capital G represents the darker green and small g the lighter green. Lay your 7 materials out in front of you in light-to-dark order. Tag them with the numbers if you like. (I'll admit I'm greedy when it comes to needles; I used a separate needle for each shade.)

Downloadable rose chart
To download, click here
Here is the pattern for you to download. The pattern is a forgiving one. If you place an occasional stitch in the wrong square, it should not spoil your rose. Small differences are to be expected in handmade items. If you run out of a color, continue with the closest match you can find. The vertical and horizontal center rows on the chart are marked. Start stitching at the center and work outward. When the rose is complete, pull out the basting threads.

Patterned stitches such as Spanish blackwork, Russian redwork, Scandinavian whitework, Holbein embroidery and Assisi embroidery also work well on quarter-inch gingham. Be sure the gingham pattern is woven into the cloth, not printed on it. Choose your background color carefully so that it does not overwhelm your design. Here is a simple blackwork butterfly on quarter-inch gingham.

Blackwork butterfly on check gingham

"Heritage Rose", latch hooked rug
Years after I made the rose design, I enlarged and modified it for the center of a latch-hook rug.  Latch-hook is another technique that is easy on the eyes. I once taught the technique to a lady who was legally blind but could still distinguish colors. Latch-hook uses packs of pre-cut rug yarn. what is used in kits works well enough on on #5 canvas, but you may need to use 2 strands of some colors on #3.75 canvas to make good coverage. Commercial rug yarn packets work well on either mesh.

Upright gobelin stitch sample
Another technique that works well on canvas is one of long straight stitches of varying lengths (commonly called French longstitch). You can see these well in the portrait of the bighorn ram below. You can see the stitches used horizontally as well as vertically. There are even a few used diagonally. I did the background in tent stitch, but it could have easily been done in rows of straight up-and-down stitches. Don't leave any blank canvas; the bottom of one stitch shares a square of mesh with the top of the stitch in the next row.

"Bighorn", original needlepoint by Annake
I deliberately ended with the bighorn ram's 'portrait' because it was finished about this time last year. I have done a number of projects since and there are several in various stages of development. I have been doing needlework now for more than seven decades, so I know what I am talking about. I have made many changes and adaptations as I have aged, in order to keep doing the work I love so much; so I hope you will believe me when I say, "And you can do it, too!"

With love,


 Creative Commons LicenseThis post by Annake's Garden is licensed under a Creative Commons Attribution-NonCommercial-ShareAlike 3.0 Unported License.

Sunday, April 21, 2019

Earth Day 2019: An Open Letter from Annake, J.D., & J.J.

Dear Readers,

Welcome to Earth Day, 2019.

Earth Sciences collage

Annake:  In 1967 I was teaching science in a secondary school not far from Washington, D.C. I was privileged to work on a committee that developed a mandate to include the Earth Sciences — Astronomy, Geology, Meteorology and Oceanography — in science education for grade levels K through 12 all across the United States.  We also developed standards for the most important topics to be taught at the various levels. We did a massive amount of research for this project. Much of what we learned, particularly in meteorology and oceanography, we found very distressing. We agreed that much more attention needed to be paid to climate change, air pollution, water pollution, ocean pollution and vanishing species. Our program was approved. Many publishers vied to make good textbooks for the program. I still have a couple of those "first edition" textbooks.

We put the program to work the following year. Quite a number of our students were interested in the issues we raised and went on to take follow-up courses in college. A few even chose one of those fields for his or her profession. Unfortunately, not enough people listened to us or to the scientists whose work we respected and described. That was more than half a century ago. These are not new issues.

Leaping dolphin, mixed media by Annake
... and Oceanography
Now hardly a day passes that we don't see pictures of some large-scale disaster or hear cautions about new ones yet to come — some of them in the very near future. We assumed that the Earth had such riches that we could exploit them forever. We thought that the oceans were so huge and so deep that nothing that we did to them would make any difference. We imagined that huge numbers of species of plants and animals could go extinct and it wouldn't matter to us.  Well, we were wrong!

Kaibab Squirrel drawing by Annake
Kaibab Squirrel
I don't have grandchildren. If I did, I would be worried that their children would not know the beautiful creatures of the Rocky Mountain West (much less those of the rest of the world) except from the pictures that I, their great-grandmother had drawn for them. They might never know the joy of watching a young eagle swoop and dive, riding the thermals just for fun. Or see a native trout swim up through clear water to snatch a fly from the surface. Or see a family of mountain goats dash nimbly down a steep rock face. Or see Kaibab squirrels frisking along the rim of Grand Canyon.

I cannot fight on all the ecological fronts, but I have chosen to use my art, my writing, and my voice to support efforts to protect, preserve, and propagate the wonderful creatures we still have around us.  That is my Earth Day promise.
ANNAKE

Rocky Mountain Bighorn, needlepoint by Annake

J.D.:
  In the early 1970’s, I spent a year taking classes on one of the University of Colorado campuses. Two courses stand out in my memory: Environmental Economics and Biogeochemical Cycles. In the first, we ran cost-benefit analyses on the pluses and minuses of various environmental policies. In the latter class we examined the interaction between all of those systems and cycles we were exposed to in high school science classes – like the Krebs cycle, or the eleven-year cycle of sunspot activity.

A half-century after completing those classes, two conclusions have stuck with me: first, when you stack simple systems one on top of the other, and then hook them together, things get very complicated and hard to predict. Second, when it comes to building, maintaining, and modifying complex systems that are robust, redundant, and efficient, Nature does an infinitely better job than humans.

So, when it came time to make an appeal to preserve and conserve the ecology of this planet and the multitude of endangered species we share it with, I decided I would simply speak to your self-interest.

Wood Frog (NPS)
Wood Frog
Amphibians — frogs, toads, and salamanders — as an order are under massive threat of extinction. Species after species are suffering huge population losses, and we don’t understand why in a lot of cases. Why should we care about a bunch of small, slimy, cold-blooded creatures? They aren’t a potential food source, they aren’t cute and cuddly, most of them aren’t even pretty. Why should we spend our limited resources on trying to save them when other things demand our immediate attention?

Many amphibians can regrow lost limbs and we don’t know yet how they do it. Researchers are racing to learn all they can before their study subjects disappear. Many species of amphibians estivate: they survive in a state of “suspended animation” through extended periods of extreme climate conditions with minimal signs of life, then miraculously emerge when conditions improve. You don’t have to stretch your imagination very far to see the medical benefits to you, personally, of being able to regrow a lost or damaged limb or survive a crisis in suspended animation.

Endangered Buckwheat (USFWS)
Endangered Buckwheat
Let's consider plants. There is an extremely threatened type of wild buckwheat in western Colorado that grows in alkaline clay, a notoriously tough soil to get anything to grow in. Buckwheat is a good food plant (just try some buckwheat pancakes, they’re delicious) and this particular variety of plant has been observed hosting over fifty different pollinator species, which local crops may depend on with the spread of honeybee diseases.

Hummingbird Moth
Hummingbird Moth, a pollinator native to Colorado

Endangered Milk Vetch (USFWS)
Endangered Milk Vetch
Also in our region of the state there are two highly endangered species of milk vetch, an unlovely name for a pretty ordinary-looking plant. Vetches are members of the pea family, so they fix nitrogen in the soil to keep it fertile. One of these species also concentrates selenium in its parts. Selenium is an important micro-nutrient that is essential for people in small doses, but harmful in higher concentrations — fish from many impoundments in Colorado are inedible due to selenium from agricultural runoff. Milk vetches are members of the genus Astralagus, the same sort of plants as what’s in the herbal supplement section in your grocery store. It's been used for centuries to treat a variety of human ills. Who knows what medical benefits we might miss out on if these plants are lost.

There you have my argument for supporting endangered species preservation: no blaming, no fuzzy New Age philosophy, no moral arguments; just cold, simple logic. Your ability to grow food, treat your ills and injuries, have safe water to drink, even air to breathe, could depend on plants and animals that are close to being gone forever. We need to save these organisms and every one that we can of thousands more because our very existence may depend on them.  We don’t know nearly enough to replace them or bring them back when they’re gone.
J.D.

J.J.:  Greetings to the readers of Cuttings from Annake’s Garden.  I'm J.J. I'm so pleased to make your acquaintance. I understand that you have "met" me through some of my photographs. Thank you for your positive comments about them. Positivity is very important to me. Like Annake and J.D., I am a blogger. Since this is Earth Day, it seems like the perfect time to tell you about my work and to explain why I do it.

Meerkat
Meerkat
After I became discouraged with seeing all the negative posts on Facebook™, I made a commitment to share only Positive posts on my Timeline, letting it be known that my Timeline needed to be a place anyone could come to, from teen to great grandparents; knowing they would not have to see negativity, but instead be uplifted by Positive shares. That was when I created Facebook™ Critter Friends (FBCF).  ("Critter" is simply a term of endearment encompassing all animals, including our pets.) It did not start off with a bang, as it was not your typical project. It was NOT a charity, nor a fundraiser, you were NOT expected to go out and adopt a pet. In fact, you needn't even have a pet, as this was about the love of critters and the fact that anyone could participate. It confused people as they thought there must be a catch. However, the only stipulation to participate in FBCF was (and is) to change your profile picture to that of a pet or critter for one day.

Cheetah cubs
Cheetah cubs
The FB Critter Friends Albums belong to everyone who has participated, by having a critter as their profile picture. Some critters are wild and funny, some are sentimental, perhaps a share of a beloved pet who has passed over the Rainbow Bridge. I've invited artists and photographers, thinking what a positive way to showcase their work. The result is not only the Critter albums, it is much, much more! We have an awesome group of loving, caring people, who may not use the same spoken language, yet understand the universal language of respect and love of our Critter Friends. If you are a positive person, who promises to share with no negativity towards animals, you are a perfect FB Critter Friend.

Baby Squirrels
"Are You Nuts?", photo by J.J.
I work on many albums daily. Humans and critters are similar in surprising and wonderful ways. We have a Rainbow Bridge album where we recognize our beloved pets who have gone on before us. We have albums which show kids and critters, different species who get along just fine, older humans and critters, a black and white album, as well as a colorful critter album. There are some informative albums, fantasy albums, oceanic critters, butterflies. My favorites are the ones that make people smile.

Endangered Lemur
Endangered Lemur
I do see more Positive signs in the treatment of critters and the attitudes toward them. More people than ever are concerned about endangered species all over the world. There are more and more groups working to help those displaced by natural disasters and to find them Forever Homes. Scientists are really studying how critters do the amazing things they do and are even using what they have learned to make people's lives better. For example, look at all the dogs and others that have become service animals. People pledge more money for rescue and adoption efforts. Zoos are no longer just for entertainment, but now serve as educational institutions and places where endangered species are not only protected, but also able to grow their numbers so that someday they can, hopefully,  be returned to the wild.

The goal, of course, is to teach people to love and respect critters. There is so much to learn from them.  And new species are being discovered and identified all the time. My goal is to help educate so that generations from now, the critters we learn to love will no longer make lists for endangered or extinct species. I, for one, cannot imagine a world without critters.
 J.J.

Best Wishes to all of you, for a Happy Earth Day!


Picture Credits: All needlepoint, drawings, and other artwork are by Annake (photos by J.D.);  "Geology" photo by J.D.                                   Wood Frog courtesy of National Parks Service;  Buckwheat and Milk Vetch photos courtesy of USFWS 
 All other photos by J.J.

 Creative Commons LicenseThis post by Annake's Garden is licensed under a Creative Commons Attribution-NonCommercial-ShareAlike 3.0 Unported License.

Saturday, April 6, 2019

Our New Print Series: Some FAQs

Barred owl print
Barred owl print by Annake
Hi — J.D., Annake’s Garden Gnome here. Annake is feverishly working away on at least three upcoming posts, planning for something special on the coming Earth Day, and grinding away on the final chapters of the first of several e-books we hope to publish later this year. She’s asked me to step in here to give explanations of the whys, hows, and wherefores of what we are doing with the series of prints we have been rolling out for sale. The first draft of this post was much longer than what we try to hold these posts to, so I’ve pared it down to a fairly spare set of FAQ’s.


Why are you suddenly putting all this emphasis on prints?

A number of trends and circumstances came together over the winter: an enthusiastic reception for Annake’s drawings at the late art and crafts shows last year and to their use as gifts over the holidays; a change in emphasis for Annake’s Garden, moving toward a more gallery-oriented business model; Annake’s quest for more and better studio space, and the need to cull decades worth of old notes, projects, clippings and unidentified STUFF out of the way to make room for current projects; the need to upgrade my graphics editing capabilities to meet the increasing technical requirements involved in various projects we’ve taken on; and, last but not least, a very long/cold/wet/gray winter and early spring which limited a lot of activities we usually engage in.

Why are all the prints black and white? Annake’s needlework is so colorful, I was hoping for prints that were, too…

The Rower, watercolor by Annake
Scan of a watercolor by Annake, not ready for printing yet
They are in the works. Our plan is to keep things as simple as possible to begin with — and color reproduction opens a whole new can of worms, so we are going to introduce color to our line slowly and carefully. Differences between types and brands of color printers, the difference between what you see on your computer monitor and what comes out of the printer, even the differences between the way different screens render colors make getting consistent quality a REALLY complicated job.

Annake is hand-tinting some new drawings for our Earth Day post. I’m going to do my best to get good electronic reproductions of those into the shop as soon as possible. Look for a few of my photos, and maybe some of J.J.’s, to show up there in the next few weeks. A lot more color is on the way, but it’s coming on baby steps.

Most of those ‘black and white’ prints we are offering are actually in gray scale, which might make a difference if your printer insists on sucking the color ink cartridges to make grays the way our HP does. I told you it was complicated.  Speaking of the complexity of doing things in color, look for Annake’s first post in her new series on using color in needle arts (and other arts) in May.

leopard print collage
Leopard print in gray scale (left) and true black & white. We prefer the detail in gray scale.


Why so many animals, with just a few prints of people, no landscapes, no still lifes…?

A lot of the reason is just timing — it’s Spring, all the animals are coming out of hibernation, new babies are being born, new life is on peoples' minds — it’s part of our culture this time of year, and reflected in our holidays:   Easter, Arbor Day, even the relatively new addition of Earth Day. We’re just reflecting the calendar. Also, Annake is wrapping up her series of posts on landscapes and seascapes — and those final posts happened to include animals as focal points.  Plus, we have long planned something special for Earth Day (April 22), and endangered animals seems an important issue to address for that post.

Rabbit photo by jljardine
One of J.J.'s many critter photos
Annake really likes doing animals (she WAS a biology major in college, after all); and my sister, J.J., who has her own addiction to cute furry things, keeps feeding the flames with torrents of emailed photos she has taken; even I have been know to take photos of animals (when I can get them to sit still long enough) so we have lots of raw materials for new posts and projects. It just makes sense to take the editing process for these a few steps further to produce something suitable for sale.

ferret print
Ferret (print of pen-&-ink sketch)
Finally, we already had a lot of nearly camera-ready material to work from. Annake does a lot of preliminary sketching and plotting before she begins major needle arts projects like her “Close Encounter” series or the American wildlife set she has done (and plans more of) on canvas.  She returns to the theme of endangered species often in a number of media. Many of those preliminary drawings don't make the cut for technical reasons like the size, orientation, or materials of the final project. It’s a lot less expensive in materials and time to sort out the problems on paper than fix them halfway through a major needlework piece. If you follow this blog, you have already seen the genesis of the wolf, which became a needlepoint piece last fall, and the black-maned lion, a piece done several years ago that we revised the original plan for and made into a print. The grizzly was a sketch that didn’t quite fit for the bear-and-bumblebee piece we showed you in progress. The ferret to the left was a first sketch for the “Close Encounters” quickpoint we showed in earlier days of this blog. That needlework was one of our first sales on Etsy.

While it sometimes requires Annake to do quite a bit of extra work to make one of these drawings suitable for printing (the lion, for instance, took several days of modifications before she was satisfied with it), it 's still a lot less time and material intensive than creating a new needle artwork. We’ll be adding all the genres you mentioned above (and others) as the seasons move along — but the animals will keep coming back.

Why are you only offering one size of print? Other places online have prints of the same pictures in a variety of sizes…

print in 3 frame sizes
Same print in three frame sizes
This is our first venture into selling print-your-own, downloadable files — we assume there are going to be bugs and glitches, so we are trying to keep things as simple as possible until we are sure the system works the way it is supposed to. Adding more choice of sizes is our first priority after that. The files we are offering will print on 8.5 x 11 inch (U.S. standard document size) paper, so they can easily be trimmed to fit any 8 x 10 inch (U.S.) picture frame, should fit most off-the-shelf commercial mattes for 11 x 14 inch frames, and will even print on A5 (UK standard) paper with a minimum of fiddling — just center the print all around. That is a pretty wide variety of choices to start with.

Why are you using .pdf files? I was expecting JPEGs or some other graphic file format…

Basically, the same answer:  to keep things as simple and predictable as possible while we iron out the wrinkles in the process. PDFs (Portable Document Files) are specifically designed to produce identical results across all platforms, regardless of operating system, hardware differences, or bandwidths; nearly everyone, everywhere has or has access to free PDF reader software; so these files will print the way they are suppose to on just about any home printer and can be handled by any commercial print shop anywhere in the world.

Boy, there sure is a difference between the styles of some of these prints… were they really done by the same artist?

snarling tiger print
Originally done as needlepoint pattern
Yes, they really were: if it has Annake’s signature, it is her original work. Please remember that these were done 1) for a wide variety of purposes: what is appropriate for planning a big needlepoint project is very different from what is useful for teaching a class of 10 year-olds; 2) made over a very broad stretch of time; and, 3) done in a variety of media. Although these versions are all for printing on digital printers, the originals were sometimes in pencil,  marker, charcoal, or pen — often on just whatever was handy at that particular time and place.


Originally done as a demonstration for elementary students, pencil versus  pen & ink

Does this mean Annake is going to stop doing needlework to concentrate on these prints?

pronghorn needlepoint
A new needlepoint, still unframed
Oh, Good Heavens, NO! While some of these drawings were made specifically to turn into prints (mostly to fill out sets and series — Annake prefers to do things in sets), most of them are byproducts of other projects: preliminary sketches, additional illustrations to make a point in articles, examples done for teaching purposes, and sometimes just for fun. Turning them into products to sell is pretty much my responsibility while Annake pursues her next endeavors.


I hope this set of FAQs answers most of your questions about what we are doing, and why — and that you’ll take advantage of this new opportunity to own some of Annake’s original artwork, quickly and inexpensively.

J.D., Annake’s Garden Gnome, sitting in for...


 Creative Commons LicenseThis post by Annake's Garden is licensed under a Creative Commons Attribution-NonCommercial-ShareAlike 3.0 Unported License.

Contact Us

Name

Email *

Message *

Blog Archive