Sunday, January 27, 2019

On the Other Hand...Our Mid-winter Q & A

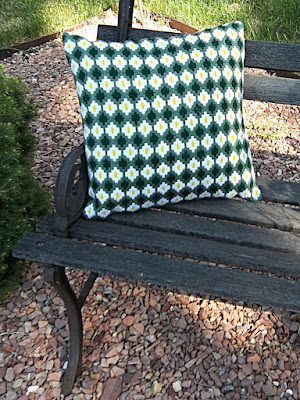
Daisy pattern pillow
Daisy pattern pillow, based on our icon
We began this blog in late February, 2013. Since then it has grown a lot. Some of you, bless your hearts, have been with us from the beginning. While it is possible to work your way backward to that beginning, it would take a very determined person to do so. Most of you have joined us in later years, found one or more topics that interest you, and used the search engine to find posts on those topics. Sometimes someone asks a question about topics from long ago. I'm going to try to answer a couple of them today. Those of you who already know all this, feel free to use the search engine to just browse or check back for our next topic in a week or so.

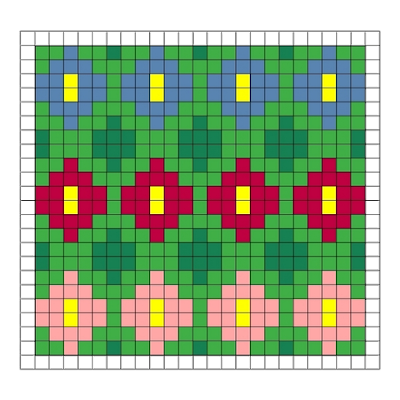
"I want to do a pillow like the one you did with the daisies all over it, but I get confused by the chart you gave for it.. Can you give me one with the graph paper squares instead? I don't have any trouble with those. Also, I want to use different colors of daisies. What is the best way to arrange them?”
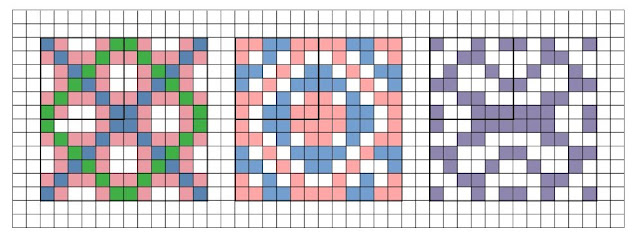
Graphed pattern for daisy needlepoint stitches
Here is the pattern in squares. Each square represents 2 stitches side-by-side, each stitch over 2 threads on #10 canvas. If you are working on #14 canvas, you may want to adjust the squares to 3 stitches over 3 threads for each square. I hope you find it much easier to follow this chart. I prefer to start in the center of the canvas and work outward. For arrangement of colors, there are many ways; here are four suggestions. Make the center row in your main color and do the rows above and below it in the other colors, (above) ending with the outer rows in the main color. Do the same thing but put the colors in diagonal lines, with the main color in the center and at the corners. Put the main color in the center square and make concentric squares of different colors around it, repeating the center color at least once, preferably in the outer square. Or you can scatter the colors randomly, even if you use a different color for every flower. It is an excellent way to use up odds and ends of yarn. I'm sure other patterns will occur to you as you lay out your colors.

"My needlepoint is starting to feel heavy and awkward. Is it all right if I turn it around and work from the other end when I get to the middle?”

That depends.  I doubt that it is going to feel any lighter, but it might seem less awkward. If you are working with continental stitch on a printed or hand-painted canvas, and both the canvas and the design are even, you can safely turn the canvas 180 degrees. If there are patterned stitches in the design, don't turn it. If you are working from a chart, I advise you not to turn it. If you are working on a symmetrical geometric design such as a 4-way, 6-way, or 8-way, definitely don't turn it.  If you do turn it, be sure you reverse it the entire 180 degrees. If you turn it 90 degrees or some in-between amount, the stitches will not join properly at the center.

Home-made device for rolling needlepoint canvas
I suggest you try this instead. After completing two or more inches of the design, use masking or packaging tape to secure the top edge to something cylindrical: a mailing tube or the center of a roll of paper towels or gift wrap.  Use small metal clips to hold the canvas in place and readjust them as you make each new turn. I think you will find this helpful and the finished piece will require less blocking.

"I would really like to do needlepoint, but I am left-handed and all the directions and charts seem to be made for right-handed people. I have seen advice to sit across from someone who is doing needlepoint and make a mirror image of what they are doing, but I don't know anyone. I got some plastic canvas like what you advise us to learn with, but that is as far as I've gotten. I don't want to put a lot of time or money into a project and then find out I'm not able to do it. Can you help me?"

I will certainly try. I expect you will be able to do it. I understand your hesitation, though. My mother was strongly left-handed and I am right-handed. She did embroidery and some conventional needlepoint, but she got frustrated trying to teach me and stopped trying. I had to teach myself. I agree that you should not invest much money to begin with, but I hope you are willing to invest time.  If you find you enjoy needlepoint, it will become a lifelong pastime and pleasure.

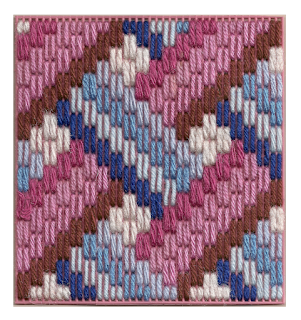
complex-looking Gobelin stitch pattern
A complex-looking Gobelin stitch pattern
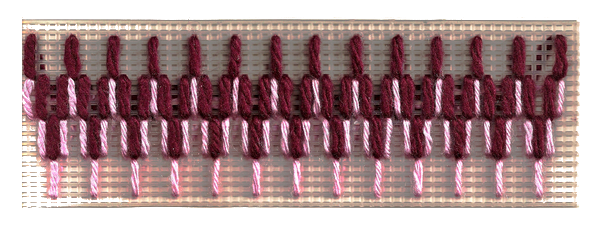
You will need at least two contrasting colors of knitting-weight yarn and tapestry needles with eyes large enough to thread the yarn through.  Later I will teach you a simple way to do continental stitch, with which you can stitch canvases with patterns printed on them or ones from black-and-white charts. There are other tent stitches, but continental is the only one you really need. Right now I want you to practice some patterns with upright stitches. You don't need to be concerned with the slant of the stitches, as you do with tent stitches. These patterns often look much more difficult than they are.

Each stitch in the patterns below comes up through a square of mesh, passes over 4 bars of canvas (which represent the threads in needlepoint canvas), and goes down in the hole directly below where it came up. The bottom of each stitch in the first row shares a square of canvas with the top of the stitch in the second row. No canvas is left bare. We count threads, not holes.  Leave a couple of inches of yarn dangling below the first stitch. When you reach the end of the row, push your needle under the finished stitches on the back of your work for an inch or two and cut the yarn. Thread the dangling yarn into a second needle and secure it under stitches on the back. Get into the habit of doing this each time. Bad things can happen when ends of yarn are not secured.
Sample 1
Sample 1
The first pattern is a simple 2-color checkerboard with 4-stitch clusters. Begin at either the left or the right side, whichever is more comfortable.
Sample 2
Sample 2
This scalloped design is a little more difficult because the stitches follow a curve. Count carefully. Once the first line is done, it is easy to follow.
Sample 3
Sample 3
Working from top to bottom, the next row, in the second color, will begin in the bottom of the first stitch of the first color. Continue with the pattern until you feel that you have mastered it. To complete your sample swatch, turn your canvas around and work as much of the pattern in reverse as you can until the rows are even.

These simple patterns can be done in as many colors as you like and can be used to make things as small as a bookmark or key ring or as large as a piano bench cover. The stitch you have been using is called upright Gobelin and is used in a technique called Bargello. If you liked doing the samples, here is a link to a lesson in beginning bargello: [Link].

Directions for doing the Continental stitch
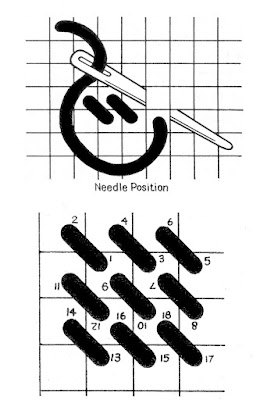
Here is an easy way to learn continental stitch. Your stitches should look like those in the diagram above. Begin in the upper right-hand corner of your canvas. Your first stitch goes from lower left to upper right. Work the entire first row. There are two ways to proceed.. One is to turn your canvas at the end of each row and keep stitching as you did before. This diagram shows you the way to do this by numbering the stitches. This may be the easiest way for you. Or you can just remember that working from left to right, stitches go from lower left to upper right; working from right to left,  your stitches go from upper right to lower left. Incidentally, the smallest design on the post for January 1, 2019 is worked almost entirely left-handed except for two parallel green lines that were worked right-handed.

I hope these steps help all three of you. Good luck. Have fun.


 Creative Commons LicenseThis post by Annake's Garden is licensed under a Creative Commons Attribution-NonCommercial-ShareAlike 3.0 Unported License.

Saturday, January 12, 2019

Fog, Flashing Lights, and Flotsam: Seascapes, Part III

Surf & Rainbow, photo by jljardine
Surf & Rainbow, photo by J.J.
It is foggy this morning. Fog is essentially a cloud that has dropped to ground level. The tiny droplets of water that we feel on our faces as mist are not large or heavy enough to fall as rain, nor are they cold enough to start crystallizing into snowflakes.  Fog is relatively rare in this high, dry country. It is usually welcome because it brings the promise of rain or snow to this drought-damaged region. I can, however, remember a year when fog lingered from mid-December through mid-January,  leaving people short-tempered and depressed. Fog is an emotional thing.

Fog dampens sounds, distorts distances, and interferes with our sense of direction, making it easy to become lost. From an artistic standpoint, it reduces even a complex scene to a few basic shapes. That simplifies the scene and gets rid of a lot of clutter. Only the closest objects and the most distinctive shapes remain. Any source of light or reflection becomes a focal point. On the other hand, fog neutralizes the colors of everything. Fog is gray.
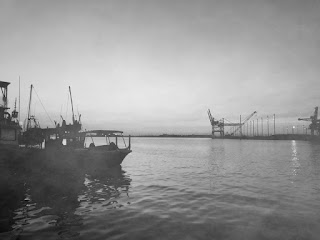
Grey-scale of silhouettes at sunrise
Grey-scale of photo by J.J.
In Part I of this series, we showed J.J.'s photograph of sunrise over the harbor. J.D. has shown it here in gray scale as it might have looked on a foggy morning. Old black-and-white snapshots could also give you more ideas for how things might appear in a light fog.

Much of my artwork lately consists of prints J.D. makes from detailed drawings I've done in graphite, charcoal, and black ink, so I am very interested in grays. I work with them practically every day. We think of grays as mixtures of black and white, but that is a very limited view. Very lively grays can be achieved by mixing complementary colors — the ones directly opposite each other on the color wheel. This technique can give you an array of warm grays, cool grays, soft grays, opaque grays, etc.
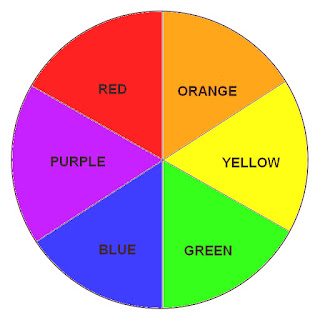
simple color wheel
Simple color wheel
It is a good practice to mix complementary colors in needlepoint, particularly in shadows, which always show some of the complementary color of the object which casts the shadow. You might want to make some reference samples of this kind of work. You can do this with separate strands of floss or yarn. The strands can be twisted together or you can use them separately, side by side. Stitch fine lines of the colors close together on small swatches of fabric or canvas that you can keep for future reference. Hold the finished sample at arm's length to see how the blend appears. Keep and use the combinations you like best. Sometimes you may even get an iridescent effect. Orange and blue are complementary colors. Browns are grouped in the orange family of colors. I have gotten nice results with some mixtures of blues and browns. Try a cool greenish blue with a warm reddish brown, for example, or a purplish blue with a yellowish tan.*
Complementary colors from the wheel with mixed grays
Complementary colors from the wheel with their mixed grays

People have been going to sea for thousands of years. Many must have perished in fog, perhaps tragically close to safe harbors. Seacoast cities began building tall towers with large fires burning on top of them to serve as beacons.  The most famous one of these lighthouses was on the island of Pharos by the mouth of the harbor at Alexandria, Egypt. Built by Pharaoh Ptolemy II between 290 and 280 B.C. (BCE),  it was one of the Seven Wonders of the Ancient World.  It survived for more than 16 centuries before it was destroyed by an earthquake. Writers described it as 450 feet (135 meters) tall. Focused by huge polished bronze mirrors, its light could be seen 40 miles (65 km) at sea. There has recently been a magnificent computer reconstruction of it.
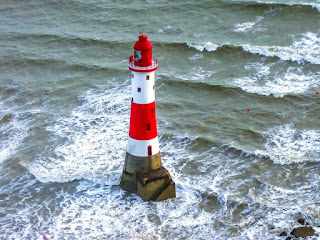
A U.S. lighthouse (public domain photo)
Many of these lighthouses were built along the coasts of the United States and some of the Great Lakes to guide ships by their fixed or flashing lights.  Their use has declined since World War II because so many vessels now use SONAR and GPS positioning systems. A few, mostly remotely controlled, are still in use. Others have become converted to tourist attractions, maritime museums, even private homes.  But the lighthouse is still a romantic structure, loved by painters, photographers, and fiction writers. Lighthouses are a popular subject for large photograph calendars. Now that 2019 has already begun, you may find these handsome pictorial calendars on sale for a reduced rate. They are good references for creating your own lighthouse design. Those of you who prefer landscapes to seascapes may be content with the small amount of ocean visible around a lighthouse.
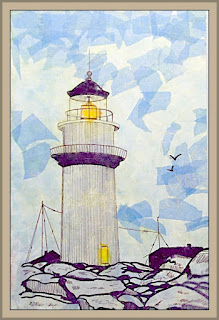
Lighthouse collage by Annake
This picture is one of my collages, now belonging to J.D. Those of you who are quilters can probably imagine stitching a scene like this on top of a patchwork background. It would also be attractive done in trapunto, a type of decorative raised quilting, on a pillow top. In trapunto, two parallel lines are stitched through at least two layers of material to outline the design. Then the bottom layer has slits made in it and stuffing is inserted between the lines. If the lines are quite close together, a heavy cord,  instead of stuffing,  can be worked into the space between the lines.
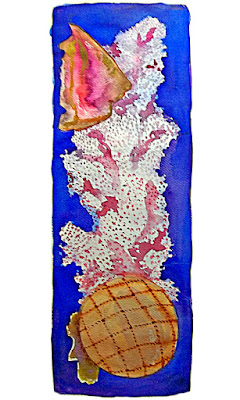


Watercolor study for a wall hanging
The word flotsam comes to us from maritime law, where it referred to items deliberately dumped into the ocean from ships. Over the years it has come to mean anything that floats on the water. Much of this flotsam eventually washes up on beaches. Most of it is just garbage that needs to be removed in order to keep the beaches clean and safe. It is unsightly; some of it is dangerous. Nevertheless, an attentive person walking on a beach will find something attractive: pretty seashells, branches of coral, deep-sea fishing lures, glass floats, etc. These objects can be put together in collections or made into artistic arrangements.

The picture at the side of this section of the article is a watercolor sketch for a quickpoint wall hanging. It is 23 inches (58 cm) long and 9 inches (23 cm) wide. When the wall hanging is completed, it could be hung either horizontally or vertically.  I think I prefer to hang it vertically, so that is the way I have shown it here. A sketch in progress for a similar composition is shown horizontally, below. I have not chosen a final background color for that composition yet. Those of you who enjoy doing still life designs should enjoy putting together an assortment like one of these. A pattern like one of these, with a wider background, could also be used for a latch-hook rug.
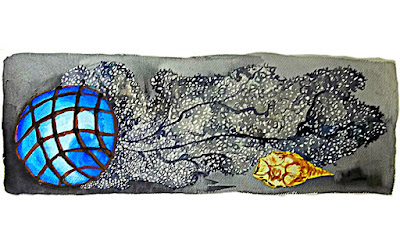
Another watercolor study of flotsam
Think of a foggy day as a fortunate time to spend with a good book (or sketchbook) or to read blog posts like this one.


* Look for more on this subject in our series on using color, coming this spring,

 Creative Commons LicenseThis post by Annake's Garden is licensed under a Creative Commons Attribution-NonCommercial-ShareAlike 3.0 Unported License.
Tuesday, January 1, 2019

Adjustments, Additions, and Adaptations

All-over pattern worked from a "corner" design
A phone call from a friend alerted me to an error in the December 5th post. She called to say she had accidentally reversed the numbers in the sample she was doing of the multicolored 4-way bargello pattern. Instead of making her stitch squares 3 stitches over 4 threads, she had made 4 stitches over 3 threads and wondered if she should take the completed stitches out and start over. This puzzled me because when making stitch squares, I recommend 4 stitches over 4 threads. I suggested that she do another sample with those numbers and keep the original one to see how they differed. She agreed. Then I went back to the blog post to see what went wrong.

What happened was that sometime before posting J.D. had told me the post was too long and something needed to be cut from it. I took out a section about using this design as an all-over design, along with a completed sample. Somehow the stitch directions given for this change got detached and the stitch count I had recommended for that exercise got attached to a place it did not belong. My apologies if this has confused anyone. J.D. doesn't do needlework, so he wouldn't have caught the error. I should have caught it, but didn't.  The error has now been corrected in the initial post.

I was trying to make two points with that segment of text. First, that, since this was an all-over pattern, it was not necessary to start in the middle of the canvas. I started the piece pictured at the top of this page at the upper right-hand corner of the design and expanded it both horizontally and vertically as far as my canvas segment allowed. Second, the pattern can be worked to fit rectangular projects. They do not have to be square, as the 4-way ones do need to be.  I suggested that viewers might want to do a sample using the 3 stitches over 4 threads formula that I used for this sample, which elongates the squares into rectangles vertically. (That's where the text error occurred.) The pattern stitch my friend was using elongated the squares to rectangles horizontally. Here is an example of what that would look like done on the same canvas as mine and beginning in the same corner of the design. The result is definitely rectangular — and large. It is probably not a good design for a 4-way, unless you are using much smaller squares of canvas. It would probably work on #14 needlepoint canvas.

Pattern resulting from error in directions
Pattern done as tent stitch
Same pattern done as tent stitch, 1 stitch per square
The samples I usually show on these posts are done on #7 plastic canvas. I recommend this for practice and to make pattern samples that are meant to be filed for future reference. But before we leave this pattern, I would like to show you one more variation. This is the pattern square done in conventional tent stitch, with one stitch for each square of the pattern. It is also done on #7 canvas, so you can imagine how small it would be on a canvas with more squares to the inch!  These patterns are very versatile. If you do latch-hook, for example, you can use a pattern like this one by putting in a knot for each square of the pattern. This would work as both a four-way pattern, perhaps for a pillow, and an all-over one for a mat or rug. Beading and mosaics could also be done with such a pattern.

When working a multicolor pattern like this, I recommend using a separate needle for each color. This cuts down on the time spent in threading needles and decreases yarn waste. Secure each color often on the back of your canvas. Do not carry long strands of yarn across the back of your canvas while moving from one colored segment to the next.

The designs made from the small corner squares have proven to be popular. For that reason, I am giving you some more of them to work with. In each case, the original square that was rotated is shown in its proper position and is emphasized by a black outline. The two-color pattern is suitable for an all-over design, but perhaps is not as good for a 4-way design.

3 patterns based on different corner patterns

New 8 way bargello design
We have a new 8-way bargello to show you. Because some stitches are horizontal or vertical, while others are slanted on the canvas, some segments of the eight do not reflect the light in the same way that others do. This gives a feeling of movement to the composition. I don't know how well this will show up in a photograph, but I hope you can see the effect. I also hope you enjoy the new design.

We have used plain backgrounds behind bargello patterns a great deal. Only once, when we emphasized the use of a bargello pattern behind the capital A in the original Annake's Garden's logo, have we discussed the use of bargello as a background for other kinds of stitchery. Here is a picture of a screaming eagle that we use to decorate our table when we are doing an event on or near a patriotic holiday. The background is made up of strips of bargello patterns in red, white, and blue combinations. Doing slanted designs like this requires some planning. I recommend drawing a few diagonal lines lightly in pencil on your background canvas to guide your stitches. I worked the eagle first in conventional tent stitch,  then ran the last stitches of each pattern under the edges of the eagle's feathers.
                                    
Screaming eagle with bargello stitch background
I urge you to try making some of your own new designs. All you will need is some graph paper and colored pencils, pens, or crayons. Often what looks like a very simple pattern on a 6-part square turns out to be unusual and beautiful when fully rotated.  Then you will want to see it done in yarn. Keep your small samples in a container of some kind (any thing from a shoebox to an expandable portfolio), so that you can return to them whenever you like. Also, when you have a pattern you really like, try it in several different color combinations.

Have fun - and a wonderful new year!


 Creative Commons LicenseThis post by Annake's Garden is licensed under a Creative Commons Attribution-NonCommercial-ShareAlike 3.0 Unported License.

Contact Us

Name

Email *

Message *

Blog Archive