Showing posts with label recycling design ideas. Show all posts

Saturday, October 10, 2020

Fun With Felt

Felt butterfly picture by Annake
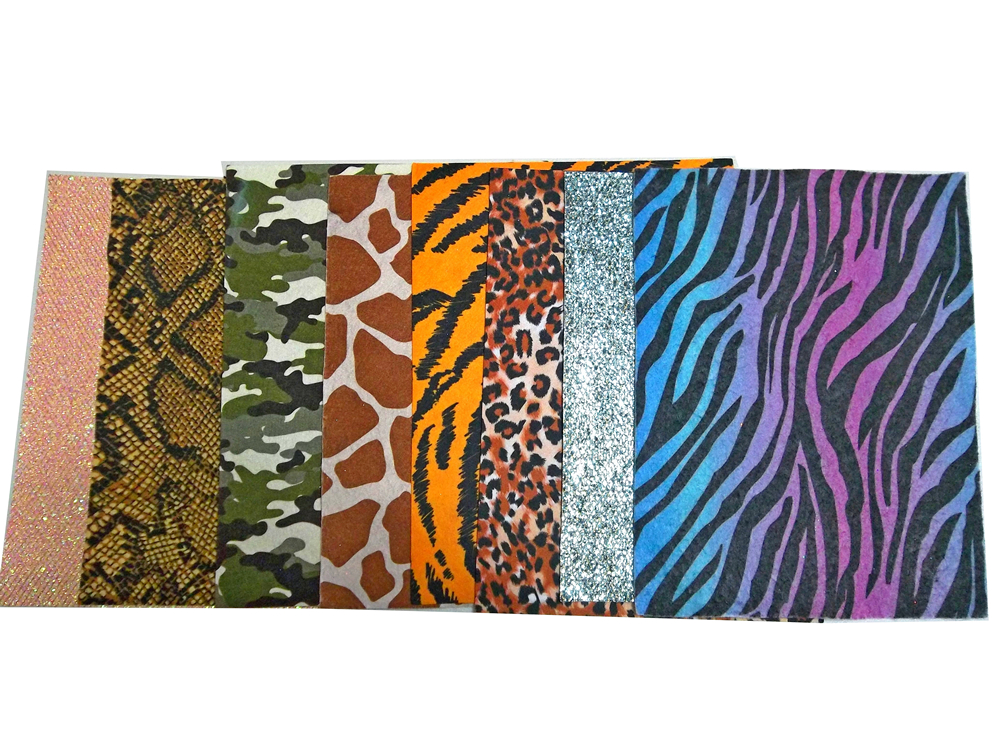
Felt is a versatile fabric with many uses. Because it does not need to be hemmed, it takes less time and work to make something from it. It comes in a wide variety of colors and a number of patterns like zebra or tiger skin,  "psychedelic" colors, and small repeated motifs.  Most of the felt pictures you will see today are done with fabric glue, but there is no reason you cannot stitch them down by hand or machine if you prefer. They will probably be more durable done that way, but if you are going to frame the design. sewing is probably not necessary.

Fancy felt assortment


Projects like this, whether backed, framed or hung with a fancy hanger, are good to fill narrow or awkward wall spaces, like beside or above a door, above or below a window, down the wall beside a staircase, or beside a set of shelves.

Simple pattern idea, adaptable to felt

They are great for children's rooms, unframed or framed without glass, because they are unbreakable. I make my own patterns, but you may not feel comfortable doing that. However, pictures for small children should be simple. Too much detail is confusing and makes it harder for them to identify and name things. There are patterns available online. Some of them are free; others have a fee. But you can use children's coloring books or trace pictures from children's picture books. Here is a design I adapted from one of my puppets.

 
Shopping bag with felt applique
 
Tools and materials
You will need;
     a felt rectangle for each color of your design
     fabric glue
     sharp scissors for the felt*
     another pair of scissors for paper patterns
       a pencil or marker
     paper for the pattern parts

* Please don't use your fabric scissors for anything but fabric. You would be amazed how much paper will blunt a blade edge. We have a gentleman who sharpens scissors here in our little town, but that sort of help can be hard to find and you can end up spending quite a bit for another good pair of scissors or shears.

Because shopping is so difficult this year, I am not going to recommend any brand names for materials. The felt pieces can usually be found at the big chains like Walmart or Target, fabric stores, or craft shops. Read the directions on the fabric glue carefully and follow the directions closely. If you are using a spray glue, which I don't recommend, try to use it outdoors or in a large space like a garage and wear a mask while dealing with it. Elmer's white glue will work for a piece that is meant to be temporary, but it is messier and may seep through.

Simple Iris pattern

When you are making a pattern for a felt picture, keep it as simple as possible. Once your sketch is finished, make a clean copy of it. Use paper about the weight of computer paper. I like to go around the outlines of the pattern pieces with a colored marker. That makes a thicker line than a pencil or a pen, so that I can more easily cut right down the center of the marker line. I find this gives me a better fit with adjacent pieces which share a common borderline.


Saved pattern pieces
Choose your background color. As each piece of the picture is cut out, remove that part of the pattern. write the name of that particular piece (for example "long leaf, upper right") and store the pattern piece in a business-sized envelope for future reference. Label the front of the envelope with an appropriate title and file it in a shoebox or similar container.

Finished felt iris picture
Arrange the pattern pieces on the background exactly where you want them to be in the finished composition. Carefully lift the pieces one at a time and apply the fabric glue as directed on the container. Carefully put each section in place and let the pieces dry completely. If you decide you need to press the piece, use a pressing cloth over the felt and a moderate temperature for the iron.


Easy hanger method
The finished composition can then be backed, framed without glass, framed under glass, or whatever you wish. If you want it to be a small wall hanging, stitch or glue a folded piece of another color of felt at the top of the picture so that it becomes a tube that will hold the hanger. Slide the rod of the hanger through the tube, close and fasten it.


Are you taking the advice I have seen and heard for having a candy "treasure hunt" around your house or apartment for your children, instead of the traditional "Trick or Treat" activity this year?  Here is an idea for something a little special for the dinner table before the treasure hunt. Make a special Halloween placemat for each child and cover it with clear plastic wrap or slip it into a clear plastic bag to prevent food spills. Then the child can have it for a keepsake, room decoration, or whatever they choose. I think everything we can do to make this very different celebration special for the children is worthwhile. (We are talking about felt today, but of course you can do this activity with colored papers; however, the mats will not last long and won't make very good keepsakes.) If you want another activity, make a draw-string bag for the collection of the candy. The child can use the bag for other purposes after the holiday.
 
You can do quite a bit with a simple design like this. For example, you can make any kind of jack-o'-lantern design on the pumpkin that you like — friendly or scary or silly.  You don't have to have a black cat coming out of the pumpkin. It could be a bat, a ghost, an owl, a pirate — anything you want.

Finished leopard "portrait"
For "portraits" of animals or storybook characters, just the head is necessary. I enlarge the heads of my puppets for such pictures. We have published several articles about puppets with color photographs and the occasional pattern. You can find those by using the "Search My Blog" feature at the side of this article. Just type in the word "puppet".  Incidentally, all the dog and cat puppets I do are outfitted with a collar and tag to remind people to do that for their pets. There is also an article about teaching with puppets in our EXTRAS section, listed at the top of this article.

An easy way to display a picture is to "frame" it with a wooden or plastic embroidery hoop. Plastic hoops come in a variety of colors. A wooden hoop can be left as it is, varnished, or painted. Choose a hoop that will display the amount of background that you want. Place the felt picture over the bottom part of the hoop. Adjust the upper part of the hoop so that the tension screw is directly above the center of the picture. Push the top part of the hoop gently down over the felt. Tighten the screw a little at a time, pulling the felt taut as you do so. When the picture is completely flat, turn it over and trim away the extra felt. The small space left under the screw is usually large enough for you to slip the screw over a "headless" nail for hanging.

Stuffed toy from puppet pattern


I stuff the heads of my puppets with fiberfill (you can use cotton), leaving just enough room for one or two fingers of the puppeteer. You can make a soft doll by stuffing the whole body and sewing the bottom edge securely closed.


Puppet used as treat bag
Or you can prepare it as a working puppet but fill the body with cellophane-wrapped hard candies, miniature candy bars, small trinkets, etc. Sew the bottom shut with easy to remove stitches so the child can pull them out to open the seam. Then he or she can enjoy the treats in the gift bag and still have the puppet to play with.


Felt scraps
Save your felt scraps in a bag or a large mailing envelope for use in future projects.  For, as my Grandma used to say:

"Use it up,
Wear it out,
Make it do,
Or do without."

I hope you have gotten some ideas from this article. I put the emphasis on fun because that is something we all need to get us through these challenging times.

Stay safe. Be well. Our best wishes go to all of you.



 Creative Commons LicenseThis post by Annake's Garden is licensed under a Creative Commons Attribution-NonCommercial-ShareAlike 3.0 Unported License.

Wednesday, August 5, 2020

New Geometric Patterns

Three small geometric patterns, graphed

A couple of years ago we began drawing some small, simple geometric patterns which could easily be repeated to make larger, more complex designs.  These were designs that could be adapted for many different crafts — not just needlecrafts.  Designs could be repeated a number of times just as they were in the picture, or they could be reversed, rotated, even taken apart and put together in new configurations.

First geometric pattern
Let's look at the three patterns at the top of the page. Here is the first one, a very simple design in a single color on white. In the larger version, the original pattern has been rotated to make a design of squares. This one can be continued outward as far as you want to go.

First geometric pattern, rotated
Now let's consider the pattern at the other end of the line. You may remember this one.  Later we showed you how to change the design from a square pattern to a rectangular one by elongating the internal squares either vertically or horizontally.

Third geometric pattern, rotated


Third pattern, vertical & horizontal  versions
Vertical & horizontal  versions
I was trying to make two points. First, that, since this was an all-over pattern, it was not necessary to start in the middle of the canvas. I started the piece on the left at the upper right-hand corner of the design and expanded it both horizontally and vertically as far as my canvas segment allowed. Second, the pattern can be worked to fit rectangular projects. They do not have to be square, as the 4-way bargello designs do need to be.  I suggested that viewers might want to do a sample using the 3-stitches-over-4-threads formula that I used for this sample, which elongates the squares into rectangles vertically. The third sample elongated the squares to rectangles horizontally. The result is definitely rectangular — and large. It is probably not a good design for a 4-way bargello unless you are using much smaller squares of canvas. It would probably work on # 14 needlepoint canvas, however.

Second pattern repeated, variation 1
The middle pattern can be repeated just as it is, of course, but I want to play with it a while. How you approach this pattern depends on whether you want to place the emphasis on the heavier "North/East/South/West" part of the square pattern or the more delicate diagonal components. I will start with the heavier aspects. Here is the result. You can change this from a square pattern to a horizontal one by simply adding another repeat of two of the smaller squares to any side of the original.

I returned to the design, this time concentrating on the slender lines that formed the diamond shapes inside the frames.

Second pattern repeated, variation 2

These designs made from the small corner squares have proven to be popular. For that reason, I am giving you some more of them to work with. In each case, the original square that was rotated is shown in its proper position and is emphasized by a black outline.
Three more corner patterns

Suppose you are ready to enlarge a design but are not sure how to proceed.

First corner pattern, expanded
Take a clean sheet of graph paper and mark its center both horizontally and vertically. Repeat your desired pattern (diagram above) on top of the horizontal line, starting just to the left of the vertical line. Now repeat your pattern in reverse to the right of the vertical line. Turn the paper upside-down. Repeat what you just did below the horizontal line above the horizontal line now. Now you have a 4-way starting pattern.  Each colored square represents a stitch or a square of stitches in your pattern. Empty squares can be worked in white, black, beige, etc. Work the four parts of your design in the center of your canvas, then decide how you want to "grow" your finished pattern.

Second corner pattern, expanded
The samples I usually show on these posts are done on #7 plastic canvas. I recommend this for practice and to make pattern samples that are meant to be filed in a box for future reference. If you are working in tent stitch, this is the pattern square, with one stitch for each square of the pattern. It is also done on #7 canvas. These patterns are very versatile. If you do latch-hook, for example, you can use a pattern like this one by putting in a knot for each square of the pattern. This would work as both a four-way pattern, perhaps for a pillow, and an all-over one for a mat or rug. Beading and mosaics could also be done with such a pattern.

When working a multicolored pattern like this, I recommend using a separate needle for each color. This cuts down on the time spent in threading needles and decreases yarn waste. Secure each color often on the back of your canvas. Do not carry long strands of yarn across the back of your canvas while moving from one colored segment to the next.

Third corner pattern, expanded

This two-color pattern is suitable for an all-over design, but perhaps is not as good for a 4-way design.

A word of caution about colors. What I see on my screen in the office is not necessarily what J.D. sees on his screen in the workshop or what you will see on your device. And if you are printing something out, there are even more possible differences. Use your own color choices on any of these designs.

Before we leave the 12-square designs above, here are the three designs as I have expanded them to 16-square designs.

Three 16 square designs

The first one is done in the same way I changed the smaller squares to 12-squares. I took more liberties with the second one, repeating some parts of the design and modifying others. Bear in mind that none of my designs are the only way to "grow" the designs. You need to find your own ways to do that to make designs that please you. I have taken even more liberties with the third design, repeating none of either the dark or light elements exactly as I expanded the design, while keeping the "feel' of the design.

Letter chart
Letter chart
There is another way to record graphed designs, and this one can be done in any color combination that you desire.  Instead of filling in colors on a design sample that you like, put in alphabet letters for each of the colors that you used.  You can then experiment with different color combinations and record alphabetically the ones you want to keep. This diagram will show you what I mean.

Each of the little squares in the design could represent a single stitch on canvas or even-weave fabric, a square of upright gobelin, a much larger square of fabric, or even a floor tile. Let's revisit one of those designs. Instead of taking one of the little squares as the basis of our design, this time let's consider the entire three-inch square as a single, repeatable part of our design. I chose to make this design in analogous colors (colors next to each other on the color wheel) because I wanted to make some points about color combinations. Analogous colors reflect wavelengths of colored light that are closely related Since these colors are closely related, we are pretty well assured of a pleasant design. I chose blue-green, blue, and blue-violet for my color combination, but you need not use those colors if you want to try others. For a trio of warm. bright colors, you might choose red-orange/ orange/ yellow-orange (the exact opposite of the three I chose), for example.

Analogous color 12 square designs

Notice that I have used one light color, one medium color, and one dark color (a tint, a tone, and a shade) in each design. I do this to make it easier to place each color when I begin "growing" the design. Each color is in the same set of squares on all three versions of the design; only the intensity of the colors changes. As you can see, which color is emphasized most does alter the design — a fact you will need to consider not only when "growing" your design, but also before choosing the yarns, fabrics, paints or other materials for your final project. Changing the positions of the colors as well as the intensity will give you even more varied results. I "grew" all three of the blue-green/blue/blue-violet designs. Here are the expanded designs.

Analogous color designs, tiled


Annake at work
Annake at work
Somewhere in the midst of all this, J.D. slipped up behind me and snapped this picture of my worktable, with the designs in progress. (He says he wanted to show you how much work I do before I publish anything for my readers. I think he just wanted to show what a mess my worktable usually is!)

This design technique is called tiling. It is an ancient art form used originally for creating inlays and mosaics. It was used in Mediterranean civilizations long before those of the Greeks and Romans. The earliest known mosaics were made in Mesopotamia before 2,000 BC (BCE)  Just recently there was news of a remarkable mosaic discovered in the ancient city of Hippo.

Of course, I do a lot of preliminary work on the computer to save time.  One place where this comes in handy is in choosing the background color for a geometric center design.  What J.D. does is put up the center design on screen and then "flood" the background of the design with a variety of colors to see how they compare. J.D. did this electronically.  Here are the ones we liked best.

Same geometric pattern with 3 different background colors

We often show pieces of finished work without showing the design patterns.   Here are three that are suitable for tiling in one or more of the ways we have discussed in this article.

New tiking patterms


So far we have worked with patterns based on small squares or rectangles because they are so easy to duplicate on standard graph paper. When we return to this topic in the future, we will discuss other base shapes like triangles and hexagons.

Have fun with your design experiments.


 Creative Commons LicenseThis post by Annake's Garden is licensed under a Creative Commons Attribution-NonCommercial-ShareAlike 3.0 Unported License.

Saturday, February 29, 2020

Roots, Leaves, & S.T.E.M.: Our Anniversary Issue, 2020

colored pencil sketch of a tree
Pencil sketch by Annake
Welcome to our 168th post, and the beginning of this blog’s 8th year. While it does not seem that long since I talked Annake into doing this blog, things have really changed in the world, even our remote little piece of it. And we’ve changed, too, with different wants, needs, and capabilities than we had when we began.

So, we have decided to emphasize three areas in the coming year in this blog: first, art forms and techniques which have fallen out of fashion and could be forgotten; second, using art to support causes that are important to us, like promoting women in art and preserving endangered wildlife; and finally, presenting you — our readers — with more tools and techniques which can be used in a variety of forms and styles, so you can better make the art you want and make it uniquely yours.

Below are some of the things we've been thinking about.
J.D., Annake's Garden Gnome

Collage of bull paintings through history
Bulls: 1) Lascaux cave, 15,000 BCE  2) Egyptian tomb, 1000 BCE  3) Goya lithograph, 1825

Roots

J.D.: Roots are the beginnings of things, the first attempts to satisfy the most basic needs. When a seed germinates, the first thing to emerge is the root, seeking immediate sustenance and a hold on its place in its environment. Humans,  have much the same basic survival needs, like food, protection from the elements, safety from predators. But just beyond these immediate needs, there seems to be a strong need to express one's self. In even the mot primitive societies, people use whatever is at hand to decorate themselves, their possessions, and their immediate surroundings. These decorations are very individualistic — a way to say, "This is me!"

ANNAKE: I'm sometimes asked why I discuss the history of an art form in my articles, or why I trace the changes in it over a long period of years.  I simply believe that knowing something about the origins of a genre will help you understand its processes better.  It certainly does that for me.  I also like to know how it has progressed over time and how it adapted to the tastes. economy and customs of different historic periods. That helps me to design activities that relate to the present, whether it be the raw materials or tools that I use,  new techniques, themes that are currently popular or appropriate, or ways to use the principles of the genre in a totally different art form.

Much of the history of these technologies (and, yes, that is exactly what they are) has been lost in time because the materials used were bio-degradable and were only preserved under unusual circumstances, like the tombs of the Egyptian Pharaohs.  But enough survived to make inroads in the mystery, and, after trading became widespread, it is possible to trace the development of certain techniques and even styles.

J.D.: Pigments wash off, flake off, fade in the weather. Feathers, hides, wood — even bone — weather and decay over time. Still, the more we find in archaeological digs, the further back in time we push decorative processes. This is certainly true of the fiber arts, which have been the main focus of this blog. Until just over a century ago, textile fibers were one of the most fragile and transient materials in common use. Specimens of clothing, fabric, and needlework from as recently as 1,000 years ago are very rare, and most of what we know about fiber arts before about 2,000 years ago comes from implements and depictions in other media like painting.

ANNAKE: Embroidery, like other techniques, evolves over time.  It evolved from sewing, which has been around for at least 30,000 years. This was the sewing which made survival in the cold possible.  Also sail-making, which made travel along the ancient rivers like the Tigris, Euphrates, and Nile possible and led to sailing on seas and oceans. Tent-making, which allowed nomadic tribes to venture into and across unknown territories, also contributed. The tent stitch used in needlepoint is a tent-maker's and sail-maker's stitch.  Basket-making and weaving contributed patterns.

For much of recorded history, art forms, including the fiber arts, were limited to possession by churches and other religious institutions, royalty, and a few people who who had become wealthy through banking and trade. Now they are within the reach of the general public. Partly this is due to the proliferation of modern materials. For example, it it is not only possible to embroider with silk, linen, or wool, but also with rayon, nylon, cotton, acrylics, metallics, even bamboo.

collage of arts with mixed technologies
 1) Folk art, traditional materials and methods  2) Traditional needlepoint, high tech design aids  3) Needlepoint, acrylic yarn on plastic canvas (modern materials)


Leaves

J.D.: Leaves are the part of the plant where most of the work takes place. Their most important job is to provide the fuel which lets the plant grow, survive, and reproduce. They take in oxygen to burn for fuel, and get rid of the exhaust fumes. They have different sizes and colors, different shapes, always variations in small details. Leaves are the first place a plant experiments and adjusts itself to get the most out of its environment. Leaves are the first place where changes in the plant's health or challenges from a changing environment appear. They are the first place where extreme or unusual temperature changes, changes in soil chemistry or the amount of light, and attacks by parasites or diseases show up. Plants have evolved methods to counteract environmental crises; these show as changes in the leaves.

ANNAKE: I tend to think of kinds of art as being like the branches and leaves of a tree — some growing out from the same cluster, but differing slightly from each other; others supporting old, traditional pursuits, then suddenly sending out a new and atypical branch or two,

Art has moved further toward abstraction in recent years, going first through a period of minimalism. Today, however, it is trending toward more color, more contrast, the juxtaposition of shapes, and the emphasis on surface textures.  Needle arts and other art forms that we feature lend themselves to these trends. For example, I recently did an article on Assisi work.  In this period of marches and demonstrations, the technique — whether or not it is used in needlework — lends itself greatly to signs and slogans, as well as to more traditional subject matter.

J.D.: If you think of the forms and styles of needle arts that Annake has explored in this blog as leaves, you can often see results of changes in economic and social environments. The rise of the middle class in Europe resulted in needlepoint as a less expensive substitute for woven tapestry. The Muslim conquest of Spain resulted in geometric patterns that became blackwork, which English royalty enthusiastically embraced. Changes in trade flow with East Asia influenced the availability of silk,  popularity of different styles of garments, and the needlework that decorated them. The development of coal tar dyes in the 19th Century and synthetic fibers in the 20th have revolutionized how we approach fiber arts.

ANNAKE: We have learned that hands-on activities are very important in improving learning abilities. Having spent half a century as an educator,  I learned early to introduce creative activities into my curriculum whether I was dealing with kindergarten children or college students, G.I.'s, Seniors, or people needing physical or occupational therapy.  That is a pretty large portion of society. I believe we should encourage creative practices whenever we can.

S.T.E.M. collage
1) Color theory  2) Annake at the computer  3) Re-engineered kitchen cart  4) Designing a six-way needlepoint


S.T.E.M.

J.D.: The stem is the part of a plant that provides the structural integrity which holds the leaves up where they can get the sunlight they need to accomplish their tasks, and that maintains the link between the roots and the leaves. Unlike leaves, stems are seldom disposable: as the cells of the stem age, or even die, they remain incorporated in the growing structure which supports all the other above-ground parts and functions of the plant. You can read the entire life history of a tree in the rings of its trunk.

S.T.E.M. is also a very "in vogue" acronym in the U.S., standing for "Science, Technology, Engineering, and Mathematics"; areas of study Americans feel are essential for young people to be well-versed in to obtain good jobs and to support the massive and complex economy we depend upon for security, comfort, and the continuation of the society we are used to.

"Science" does not require armies of lab-coated nerds in laboratories full of glistening machinery and odd-shaped bottles full of unpronounceable contents. "Science" is what happened when one of our paleolithic ancestors noticed that herds of edible creatures seemed to be at a particular spot when the sun was at a very specific place in the sky, and determined to be hunting with a spear at that spot the next time that happened.

"Technology" is not the latest electronic gadget. It is as simple as learning that, when you strike two particular kinds of rock together in a certain way, one of them will flake off with a very useful, extremely sharp edge.

"Engineering"' does not need to feature pages (or screens) of arcane symbols, numbers, and calculations. It can be as basic as figuring how best to attach that sharp rock you just cut to a stick with some resin so that it will stay attached and you won't cut your fingers with it.

"Mathematics" was what your thousand-times great-grandfather used to figure how many spearheads he needed to flake to replace the ones lost or broken during the last hunt. I' m not going to suggest that what most people think of when they see or hear "S.T.EM." is not important and worthwhile to invest time, effort, and money into its study.  What I do want to say is that S.T.E.M. is a basic set of problem-solving tools, mindsets, disciplines, and points-of-view that people have used to survive and prosper since the beginning of human consciousness.  All those steps in between, from sharpening stones to making smart phones, are a history of how people used these disciplines; and they are still with us, like the  growth rings in the tree trunk.

ANNAKE: And you should be using those disciplines every day, even in something as "old-fashioned" as needlework. You don't need to invent anything. Just learn what's available and choose the best options for what you want to make. Do you need a sharp needle or a blunt one? Long or short? Large eye or small eye? Yarn or floss? Fabric or canvas? Colors? It is as easy as that. The result of your decisions will be something uniquely yours that would have never existed if you hadn't created it. (On the other hand, if you find a way to use existing tools and materials in a novel way..... Congratulations! You have just invented a new technology!)

J.D.: Engineering is often a matter of improvisation, like using a picture frame in place of a large embroidery hoop that you don't have. Or it might be a matter of using a common tool for a purpose it was never intended to fill, but which fits your situation well.  Design a tool that works well for you, but isn't on the market. You're an engineer!

It is almost impossible to avoid math while doing needlework, even if you are only counting threads in fabric or squares in canvas, figuring how much yarn it will take to crochet an afghan, or plotting a graph-paper pattern.

ANNAKE: I would like to challenge all you readers to make something original with your hands. (Hey, J.D., is it okay if I dare them to do it?)

J.D.:
It works for me.

makers collage
What will you make?


 Creative Commons LicenseThis post by Annake's Garden is licensed under a Creative Commons Attribution-NonCommercial-ShareAlike 3.0 Unported License.

Tuesday, January 21, 2020

New Patterns for Blackwork and Holbein Embroidery

linear design in 3 colors
A simple linear stitch design in 3 colors (two blues and gold)

Holbein embroidery is a special case of Spanish blackwork, so popular in the 15th and 16th centuries. The name is sometimes used interchangeably with “blackwork”. I've taken the position that, as I use the term “Holbein embroidery”, it differs from the traditional blackwork or redwork in two ways: it is done in multicolor, rather than solid black or red, and it can be done on canvas as well as fabric. (Blackwork and redwork are traditionally done on linen, but that's a “rule” I break — a lot!) Besides, I find “Holbein embroidery” a term less confusing than “blackwork done in color”. Our purpose here is to bring these Renaissance techniques into the 21st Century to use on contemporary projects. For example, here are my “Onion Domes” done both in blackwork and in Holbein embroidery. I seldom do the same design more than once — and never in the exact same way — but it seemed worthwhile to repeat this one in order to let you compare and contrast the two techniques.

Onion Domes in b&w and color
Annake's "Onion Domes" and "Colorful Onion Domes"


Detail of blackwork from painting by Hans Holbein the Younger
Detail of blackwork from painting by Holbein the Younger
The Holbein style of needlework is named in honor of Hans Holbein the Younger, a Dutch artist who was the official court painter for King Henry VIII of England from 1537 to 1543, and who painted detailed renderings of the fancy embroidered clothing of that era.  The Holbein stitch is a double-running stitch used widely in Holbein embroidery. Its virtue is that it covers both sides of the fabric. When it is done skillfully, there is no “right” or “wrong” side to the piece.  Once a couple of lines of Holbein stitches are laid in parallel to each other, they can be whipped, couched, threaded. laced, back-stitched, interlaced, made into Pekinese stitch, etc. (For more on these techniques, see our recent post about crewel embroidery.)

Holbein stitch sampler
Holbein stitch sampler, black and gold on blue gingham
Holbein stitch is made up of evenly-spaced running stitches worked in one direction, then worked in the reverse direction to fill the spaces between the stitches, using the same needle holes that were used the first time. The running stitches may be horizontal, vertical, or diagonal. I've tried to simplify the process by stitching on checked gingham so the stitches are of uniform lengths, and by using different colors for the forward and backward stitches. Traditionally, the first stitches go from right to left. If you are left-handed, however, you may find it easier to work from left to right. You can turn your fabric at the end of each stitch row if you like, so that you are always stitching in the same direction. Check your practice work from time to time to see that the stitches are uniform on both sides of the fabric. This takes some practice, especially to avoid splitting stitches. On the stitch sampler we have: 1) double-running stitch, 2) a Greek Key design, 3) a stepped design, 4) the stepped design reversed, 5) a design using Holbein stitch vertically, 6) a pattern with diagonal stitches and 7) the last stitch pattern reversed. Combine 3 and 4 to get a border with plenty of space for another design in cross-stitch, star stitch, lazy daisy, etc., inside each outlined space. Combining 6 and 7 gives you a smaller border, but still has room for an extra motif inside. Holbein embroidery uses the same filling designs and diaper patterns that we have used for blackwork, as well as more elaborate leaf, flower, fruit and insect designs.

Snowflake cross-stitch pattern


These patterns are very versatile. In fact, here is that kind of design as the basis for counted cross-stitch!  Can you see how you can adapt patterns from one kind of needlework to another? The pattern could just as easily be done in tent stitch or even latch-hook.


Holbein embroidery design 'doodles'
Here are some of the designs I've been playing around with as fillers or for use on small projects. If you like to “doodle” and make little drawings while you talk on the phone or wait at the doctor's office, you should try making small motifs of your own like these. The stylized flowers are easy. They can be used in closely arranged rows as filling in a design, in single rows as a border, or broken apart to scatter and repeat over a larger area (a diaper pattern). The little “bugs” were fun to do, as was the snail. Designing them is something enjoyable you can do with your children or grandchildren, too. Some of the larger separate designs are attractive additions to babies' or children's clothing. You can apply these by using a chart and counting threads, by making your own transfer patterns, or by embroidering through waste canvas — a removable needlepoint canvas that isn't interlocked. You pin or baste a piece of the waste canvas, somewhat larger then your design, loosely in the desired spot on the background. Embroider the design as you usually would, not pulling your stitches too tight. When the design is finished, gently pull out each of the canvas threads. I like to steam-press the embroidery afterward.

10 step 3 color stich pattern
10 step 3 color pattern. Click to download step-by-step
But you do not have to use the Holbein stitch if you don't want to do it. Just use the stitches the way you have been doing for blackwork, but do them in the colors you desire. We have shown you a way to "grow" a blackwork pattern using colors. I mentioned then that I use alternate colors when planning a complex blackwork pattern, so that I can do the changes in each new round exactly the same way all around. Then we showed you the design done in rainbow colors.  Now I am going to show you a new design using 3 colors alternately. I will show the first 10 steps.  I have worked the design through four further steps, but I am not going to show those. Instead, I will challenge you to do the next 4 steps in any way you like. I'm pretty sure none of your final designs will be exactly like mine — or like each other's designs. (If you have friends who are interested, make it a competition.) Use as many colors of yarn or floss as you like, but make sure each step is in a different color than the one before it and the one after it, so you will need a minimum of 2 colors.

Here are some simple patterns that each give you the center ‘spot' or ‘cluster’ pattern for one of these developing designs.

Spot or cluster stich patterns
Choose any one of them and draw it in color at the center of a sheet of graph paper. Then start at each side or each corner — or both — with a repeatable element in another color. Be sure you have done the same markings all the way around. Then change colors again and continue in the same way until the design is large enough to suit you. Once it is complete, reproduce it in yarn or floss on an even-weave fabric like checked gingham or monk's cloth. When you have finished, you should have something entirely unique.  Doesn't that feel good?

Another way to use these small motifs is to arrange them in a straight line, either vertically or horizontally, in order to create a border design.  If your border is to be used to frame something, be very careful that your corner motifs line up, with exactly the same spaces between them, both horizontally and vertically. Or you may want a different motif just for the four corner spaces. Be sure your corner motifs are similar enough in design to the motifs for the four sides that they don't overwhelm them. Notice the extra stitch pointing to the appropriate corner on this motif.

Corner motif stitch pattern

My intent is not to give you designs to follow slavishly. My intent is to give you designs that teach you the basic stitch patterns and then — hopefully — encourage you to get enough out of your comfort zone to invent simple patterns of your own. From that stage, I would hope you'd continue until you were adapting patterns to make larger and more complex designs or to apply skills you have learned in one technique to something entirely different, like calligraphy or painting. Another desirable outcome, from my point of view, would be to use something you have learned in another craft — like decoupage or cake decorating, for example — and apply it to some form of needlework like trapunto or needle-weaving.  I want you to come to see the tremendous possibilities inherent in these simple techniques. Look! Try! Do! Explore possibilities! Create!

YES, YOU CAN! I have confidence in you!


 Creative Commons LicenseThis post by Annake's Garden is licensed under a Creative Commons Attribution-NonCommercial-ShareAlike 3.0 Unported License.

Contact Us

Name

Email *

Message *

Blog Archive