Showing posts with label diaper patterns. Show all posts

Tuesday, March 10, 2020

Into the Borderlands: Decorative Borders to Stitch

Colorful needlepoint border design

Borders are attractive by themselves, but that is not their only potential use. They can be used to construct frames, or they can be repeated multiple times to make an all-over design. One of the things that interests me so much about borders is that reversing them sometimes surprises me. For example, I planned to use the design above for the top of a wall hanging and then turn the pattern upside-down to complete the bottom edge.  When I reversed the design, however, I discovered that not only would it serve the purpose I intended for it, but it was also an interesting design in its own right, with an entirely different "feel" than its mirror image. Either one can easily stand alone. You will see the reversed design at the end of this post.

You may not feel ready to take on such a large project right away, so let's start with something simple and see how it can be changed a step or two at a time to work in a number of needlework techniques.  We will start with this simple cross-stitch pattern, which can be repeated over and over to make a border that is as long as you wish.
Simple cross-stitch butterfly, repeated for a border

Obviously, the same pattern can be done in counted cross-stitch on fabrics like checked gingham, monks' cloth, Aida, etc., or as blackwork.  The only modification I would  make is to switch from black to another color of floss.
Same cross-stitch butterfly border in red

Colorful butterfly on plastic canvas
I liked this one so much that I decided to make the body of the butterfly slimmer and enlarge the top and bottom wings. I also liked the empty squares on the original design, thinking that they could be left open or filled with a stitch like a French Knot or a bullion knot.   I finally decided to fill them with spots of other colors. The result for me was this multicolored butterfly. This version of the pattern was done in upright Gobelin on canvas with backstitching for the outline and antennae and French knots for the eyes. It could just as easily have been done in counted cross-stitch or needlepoint.

Simplified butterfly design in needle weaving
Once I started to think about canvas, I had to experiment with it some more. I modified the butterfly a bit, making it somewhat smaller for more repeats, and added vertical columns of stitches between the butterflies. This was done with acrylic yarn on # 7 plastic canvas  in a technique called needle-weaving, which consists of in-and-out horizontal stitches worked either left-to-right or right-to-left — or both alternately. I did not put in antennae on this motif. The colors were limited to red and blue.

Simplified butterfly design in gobelin stitch
Butterfly design, modified again, in Gobelin stitch
I had been looking for a motif to use on the hatband of a red hat for a dear friend who belongs to the Red Hat Society. With minor changes, I thought a modified version of the design above would do nicely. I put in simple antennae. I chose a dark purple for the bodies, a lighter purple for the lower wings, and a dark lavender for the upper wings. The design was eventually made on a stiff canvas with the butterflies done in upright Gobelin stitch and the white background done in tent stitch. You can see for yourself how many different techniques the little butterfly design has suited — and perhaps add a few more ideas of your own to the list.

Simple blackwork border design
I'm careful to keep patterns of my border designs  (in both black-and-white and color), not only for reference, but also because I often can change them into all-over
Simple blackwork border design, stacked
designs by simply stacking them with very little space between them or by joining them together.  For example, this simple border design becomes an interesting all-over pattern.

Flower motif repeated vertically, horizontally, & fancy corner
Flower motif repeated vertically, horizontally, & a fancy corner
Or I may need to design a corner block or modify a horizontal design to a vertical one, so that the motif can be used as a square or rectangular frame for something.


Here are a few new designs shown as blackwork. They can easily be done in colors.  If you play with them to make borders, frames,  or all-over designs, modify them in any way you like.
Three new blackwork borders

Some of you may be ready for a more challenging project.  For example, you may want to use a border design for many more repeats to produce an all-over design. Here is one I have done for a pillow top, tentatively entitled "Persian Pillow".  I made a single, repeatable design with the initial row and repeated it 15 times, each row in a different color.  Then I repeated the whole block until I had covered the pillow, filling in the corners at the top with stitches in the appropriate colors in reverse order. Here is the original block:
"Persian Pillow" stitch block

"Persian Pillow" pillow top

And the pillow top.

Now, here are some things YOU can do:
  • Make up a simple border design on graph paper and try it out as blackwork or counted cross-stitch.
  • Choose one of the simple blackwork line patterns that we have given you and do it in color.
  • Choose a single line pattern and "stack" it four or five times to make an all-over pattern.
  • Take a horizontal pattern and use it as a vertical one to make a corner deign, modifying it as needed.
  • Use a simple line design to make a pattern for a small embroidered frame.

Border design from top of post, flipped

See, YOU can be a designer, too!!


 Creative Commons LicenseThis post by Annake's Garden is licensed under a Creative Commons Attribution-NonCommercial-ShareAlike 3.0 Unported License.

Tuesday, January 21, 2020

New Patterns for Blackwork and Holbein Embroidery

linear design in 3 colors
A simple linear stitch design in 3 colors (two blues and gold)

Holbein embroidery is a special case of Spanish blackwork, so popular in the 15th and 16th centuries. The name is sometimes used interchangeably with “blackwork”. I've taken the position that, as I use the term “Holbein embroidery”, it differs from the traditional blackwork or redwork in two ways: it is done in multicolor, rather than solid black or red, and it can be done on canvas as well as fabric. (Blackwork and redwork are traditionally done on linen, but that's a “rule” I break — a lot!) Besides, I find “Holbein embroidery” a term less confusing than “blackwork done in color”. Our purpose here is to bring these Renaissance techniques into the 21st Century to use on contemporary projects. For example, here are my “Onion Domes” done both in blackwork and in Holbein embroidery. I seldom do the same design more than once — and never in the exact same way — but it seemed worthwhile to repeat this one in order to let you compare and contrast the two techniques.

Onion Domes in b&w and color
Annake's "Onion Domes" and "Colorful Onion Domes"


Detail of blackwork from painting by Hans Holbein the Younger
Detail of blackwork from painting by Holbein the Younger
The Holbein style of needlework is named in honor of Hans Holbein the Younger, a Dutch artist who was the official court painter for King Henry VIII of England from 1537 to 1543, and who painted detailed renderings of the fancy embroidered clothing of that era.  The Holbein stitch is a double-running stitch used widely in Holbein embroidery. Its virtue is that it covers both sides of the fabric. When it is done skillfully, there is no “right” or “wrong” side to the piece.  Once a couple of lines of Holbein stitches are laid in parallel to each other, they can be whipped, couched, threaded. laced, back-stitched, interlaced, made into Pekinese stitch, etc. (For more on these techniques, see our recent post about crewel embroidery.)

Holbein stitch sampler
Holbein stitch sampler, black and gold on blue gingham
Holbein stitch is made up of evenly-spaced running stitches worked in one direction, then worked in the reverse direction to fill the spaces between the stitches, using the same needle holes that were used the first time. The running stitches may be horizontal, vertical, or diagonal. I've tried to simplify the process by stitching on checked gingham so the stitches are of uniform lengths, and by using different colors for the forward and backward stitches. Traditionally, the first stitches go from right to left. If you are left-handed, however, you may find it easier to work from left to right. You can turn your fabric at the end of each stitch row if you like, so that you are always stitching in the same direction. Check your practice work from time to time to see that the stitches are uniform on both sides of the fabric. This takes some practice, especially to avoid splitting stitches. On the stitch sampler we have: 1) double-running stitch, 2) a Greek Key design, 3) a stepped design, 4) the stepped design reversed, 5) a design using Holbein stitch vertically, 6) a pattern with diagonal stitches and 7) the last stitch pattern reversed. Combine 3 and 4 to get a border with plenty of space for another design in cross-stitch, star stitch, lazy daisy, etc., inside each outlined space. Combining 6 and 7 gives you a smaller border, but still has room for an extra motif inside. Holbein embroidery uses the same filling designs and diaper patterns that we have used for blackwork, as well as more elaborate leaf, flower, fruit and insect designs.

Snowflake cross-stitch pattern


These patterns are very versatile. In fact, here is that kind of design as the basis for counted cross-stitch!  Can you see how you can adapt patterns from one kind of needlework to another? The pattern could just as easily be done in tent stitch or even latch-hook.


Holbein embroidery design 'doodles'
Here are some of the designs I've been playing around with as fillers or for use on small projects. If you like to “doodle” and make little drawings while you talk on the phone or wait at the doctor's office, you should try making small motifs of your own like these. The stylized flowers are easy. They can be used in closely arranged rows as filling in a design, in single rows as a border, or broken apart to scatter and repeat over a larger area (a diaper pattern). The little “bugs” were fun to do, as was the snail. Designing them is something enjoyable you can do with your children or grandchildren, too. Some of the larger separate designs are attractive additions to babies' or children's clothing. You can apply these by using a chart and counting threads, by making your own transfer patterns, or by embroidering through waste canvas — a removable needlepoint canvas that isn't interlocked. You pin or baste a piece of the waste canvas, somewhat larger then your design, loosely in the desired spot on the background. Embroider the design as you usually would, not pulling your stitches too tight. When the design is finished, gently pull out each of the canvas threads. I like to steam-press the embroidery afterward.

10 step 3 color stich pattern
10 step 3 color pattern. Click to download step-by-step
But you do not have to use the Holbein stitch if you don't want to do it. Just use the stitches the way you have been doing for blackwork, but do them in the colors you desire. We have shown you a way to "grow" a blackwork pattern using colors. I mentioned then that I use alternate colors when planning a complex blackwork pattern, so that I can do the changes in each new round exactly the same way all around. Then we showed you the design done in rainbow colors.  Now I am going to show you a new design using 3 colors alternately. I will show the first 10 steps.  I have worked the design through four further steps, but I am not going to show those. Instead, I will challenge you to do the next 4 steps in any way you like. I'm pretty sure none of your final designs will be exactly like mine — or like each other's designs. (If you have friends who are interested, make it a competition.) Use as many colors of yarn or floss as you like, but make sure each step is in a different color than the one before it and the one after it, so you will need a minimum of 2 colors.

Here are some simple patterns that each give you the center ‘spot' or ‘cluster’ pattern for one of these developing designs.

Spot or cluster stich patterns
Choose any one of them and draw it in color at the center of a sheet of graph paper. Then start at each side or each corner — or both — with a repeatable element in another color. Be sure you have done the same markings all the way around. Then change colors again and continue in the same way until the design is large enough to suit you. Once it is complete, reproduce it in yarn or floss on an even-weave fabric like checked gingham or monk's cloth. When you have finished, you should have something entirely unique.  Doesn't that feel good?

Another way to use these small motifs is to arrange them in a straight line, either vertically or horizontally, in order to create a border design.  If your border is to be used to frame something, be very careful that your corner motifs line up, with exactly the same spaces between them, both horizontally and vertically. Or you may want a different motif just for the four corner spaces. Be sure your corner motifs are similar enough in design to the motifs for the four sides that they don't overwhelm them. Notice the extra stitch pointing to the appropriate corner on this motif.

Corner motif stitch pattern

My intent is not to give you designs to follow slavishly. My intent is to give you designs that teach you the basic stitch patterns and then — hopefully — encourage you to get enough out of your comfort zone to invent simple patterns of your own. From that stage, I would hope you'd continue until you were adapting patterns to make larger and more complex designs or to apply skills you have learned in one technique to something entirely different, like calligraphy or painting. Another desirable outcome, from my point of view, would be to use something you have learned in another craft — like decoupage or cake decorating, for example — and apply it to some form of needlework like trapunto or needle-weaving.  I want you to come to see the tremendous possibilities inherent in these simple techniques. Look! Try! Do! Explore possibilities! Create!

YES, YOU CAN! I have confidence in you!


 Creative Commons LicenseThis post by Annake's Garden is licensed under a Creative Commons Attribution-NonCommercial-ShareAlike 3.0 Unported License.

Wednesday, October 30, 2019

Blackwork Revisited: Some New Patterns and Processes

Still life by Annake, blackwork stitching on Aida cloth
Still life by Annake, blackwork stitching on monk's cloth

Periodically, J.D. checks to see what topics readers are searching for in earlier posts. One that always seems popular is Spanish blackwork. It just so happens that there has been a good bit of interest in the subject lately. Also, I have gotten both a request for new blackwork patterns and a question about using them, so I am going to address those issues today.

First of all, I want to present some new blackwork patterns. These are designed primarily to fill larger areas of design than many of the ones we have shown previously. It takes several repeats of the design elements to really display the pattern properly. These would show up well on checked gingham, for example. If you want them to appear smaller and denser, you will need something like #14 needlepoint canvas or a comparable Aida fabric. I suggest you practice by drawing each design at least once on a piece of graph paper before you begin stitching it.  Then you will have the paper patterns for future reference.

Blackwork stitch pattern 1
This open-weave design not only covers large areas quickly, but also can give an optical illusion of depth. If I were doing this, I would stitch around all of the woven pieces first. Then I would put three or four closely packed upright stitches in to fill each square between them. This would look like a dark background some distance behind the lattice. If you don't want to create the illusion, then put an X, a plus sign, or an asterisk (made by combining the X and the plus} in each of the small squares to complete the pattern.

Blackwork stitch pattern 2
This next pattern is a true tiling pattern. If you draw the large squares with points, you will create the shapes between them without further drawing. Conversely, if you draw the in-between shapes correctly, you will create the squares without further drawing. The little asterisks in the squares just add texture to the design.

Blackwork stitch pattern 3


The last pattern is a large one that can be used alone as an all-over pattern for a pillow, baby carriage cover, or an even larger article. It can be made considerably smaller by using fabrics with a much higher thread count. Either way, it requires concentration. I really recommend that you work this one out on graph paper before you begin stitching. You may want to do it in two steps. Step 1 would be to draw in the long-stemmed Y shapes that form the North, East, South and West supports of the design. Add the X at the center of the design. Step 2 is to draw the  ‘petals’ at the four corners of the design. Step 3 puts in the small diamond shapes and the X-shapes between the motifs.  Notice that the arms of all the X-shapes extend through the motifs to make diamond shapes connecting the motifs. It is important that these lines be as straight as possible. To make this more visible, draw Steps 1 and 3 in a dark green pencil or pen, while you do the Step 2  ‘petals’ in a bright color.  This chart will help you even if you are going to do the whole design in black later. Used at a smaller size, the motifs create another type of illusion.  While you will only use straight stitches to construct the design, the illusion will form that you have used curved lines to make it.

Little Red Dragon, embroidery on checked gingham
"Little Red Dragon", embroidery on checked gingham
The question I got was: "Can I do blackwork patterns in other colors?" The answer is most emphatically "Yes!" There was a time when similar pattern stitching was done in red in countries like Russia, Poland, Lithuania, Latvia and Estonia. It came to be known as Russian Redwork. A friend who has traveled to Russia assures me that pieces adorned with this type of embroidery are still being sold at the Moscow airport. I do my own version of it, as you can see in my baby dragon.

Unicorn, embroidery on checked gingham
"Unicorn", embroidery on checked gingham
Scandinavian needle workers do exquisite surface embroidery — often combined with cut work — in white on both white and colored fabrics. Again, I do my own version, as you can see in my rampant unicorn. I did not do any cut work on this picture because it did not seem appropriate. I did use a heavy gold thread for the unicorn's horn and a lighter one on the mane, tail, hooves, nostril and around the eye.  I made the eye itself with a dark blue French knot.

Colorful Onion Domes
"Colorful Onion Domes", embroidery on monk's cloth


When the patterns are done in multicolor, the work is called Holbein embroidery. To be strictly legitimate, Holbein embroidery involves using a stitch that covers both sides of the fabric (see our August 20, 2014 post), but you can do a very good simulation using the traditional blackwork stitching. Here is my blackwork "Onion Domes" pattern done in multicolor.

If you think you may have missed some of our past blackwork patterns, simply go to our search engine ("SEARCH MY BLOG" in the sidebar), type in the words “blackwork pattern” and press Search. When you come to the bottom of the first set of posts, click on Next Posts and follow that procedure until you reach a point where there are no more posts with patterns. Not everything the search gives you will be pertinent: search engines can be rather erratic in their selections. But you should find some useful charts. If you are just starting to do blackwork, or if you are still deciding whether you like it, follow the same search procedure using the term “blackwork” alone to get all the tutorials and other useful tips.

hand drawn pattern in two colors
Hand-drawn draft of a complex pattern in two colors
Finally, here is another color technique I use when designing complex patterns that expand from a central design. The colors make it clear where each round of stitches begins and ends so that I don't produce a lop-sided, uneven pattern. Such a pattern, when completed, can be done as blackwork or in two or more colors.

In fact, I liked that idea so much that a did a new pattern for you in all the colors of the rainbow!
rainbow design
New stitch pattern in rainbow colors
Use your patterns to make something unique.


 Creative Commons LicenseThis post by Annake's Garden is licensed under a Creative Commons Attribution-NonCommercial-ShareAlike 3.0 Unported License.

Thursday, February 28, 2019

Return to Reverse Applique

Tropical Fish Wall Hanging
Tropical Fish Wall Hanging from June, 2016
As we promised, we are re-visiting a popular project and offering another pattern for the same technique. To the left is the completed reverse-applique of a tropical fish. (For extensive directions for doing this type of reverse applique, see the post for June 24, 2016.)

First, let me explain the changes I made from my original plans for this tropical fish. I decided to do a small wall hanging rather than a framed picture because I wanted all the textures in the piece to be visible and even touchable. For the background I chose a suede-like fabric in a medium teal color. After appliqueing the fish and its watery background to this material, I decided not to use the narrow black felt “frame” I had cut for it, substituting instead a glittering edging in blue and silver. I liked this much better than the felt and plan to use a similar fabric for the current project. A narrow pocket at the top of the teal fabric contains a small dowel, from which the hanging is suspended.

For the current project, here is a downloadable silhouette of a fantail goldfish. You may use the narrow frame or discard it and substitute your choice of trimming.

Downloadable Goldfish Outline
Downloadable Goldfish Outline (click here)

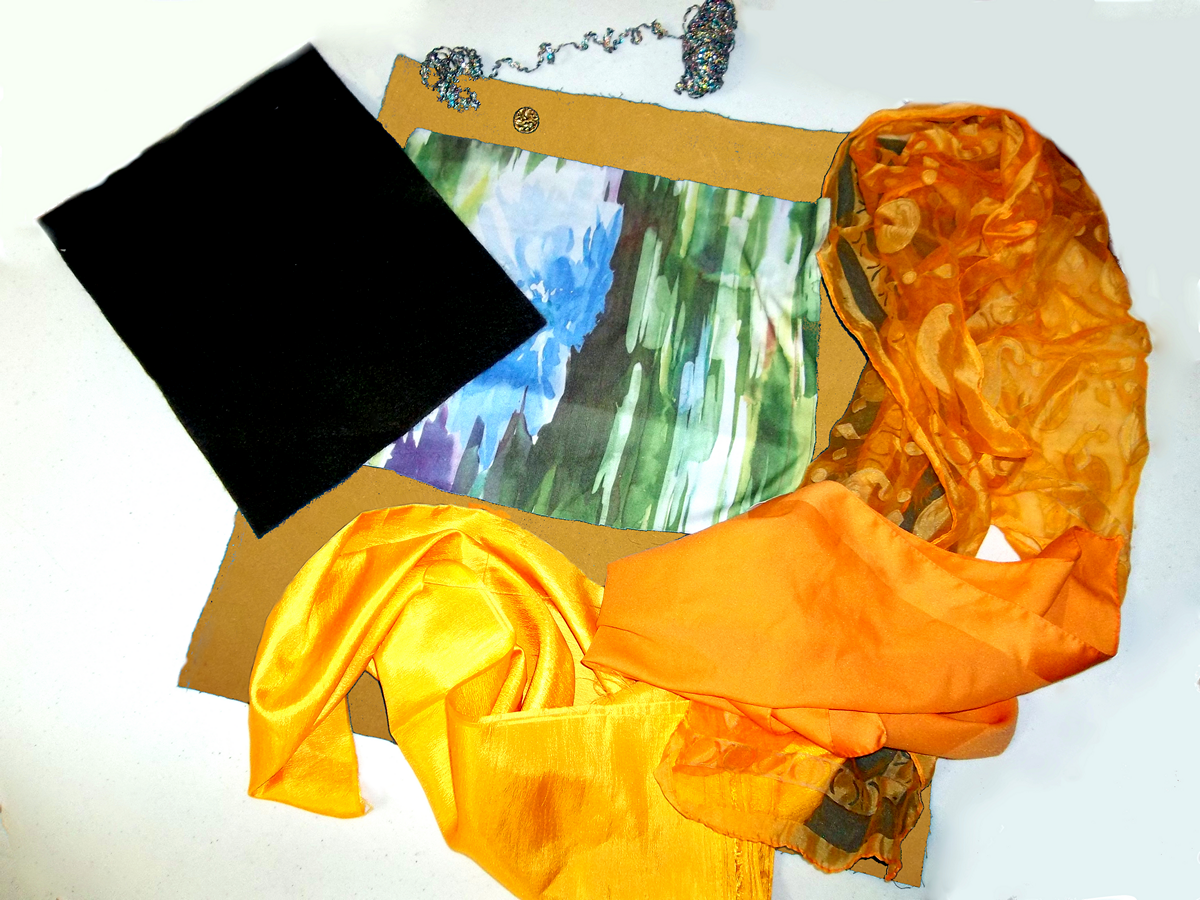
You will need the following materials:
materials for project
Materials you will need
  •   a rectangle of black felt approximately 81/2 inches X 11 inches (22 cm X 31 cm)
  • a piece of silk or nylon crepe approximately 10 inches X 13 inches (26 cm X 33 cm) in a “watery” pattern
  • scraps of silk or nylon, from old scarves, in shades of yellow, gold, and orange
  • a glittery button for the eye
  • various trims
  • matching threads
  • heavier material for the backing fabric
  • a small dowel if you are making a wall hanging, and cord or wire to suspend it

You will need the following equipment:
equipment you will need
Equipment you will need
  • scissors or shears that are used only for fabric, yarn, or floss
  • small, sharp-pointed embroidery scissors
  • manicure scissors (optional)
  • a ruler or other measuring stick
  • straight pins
  • permanent markers in yellow, gold, and/or orange (optional)

You will also need access to an ironing board and a steam iron.

NOTE: In the original article, I showed the equipment I used to cut the silhouette. However, if you are not accustomed to using craft knives I recommend that you use scissors instead. Manicure scissors with their curved blades are useful for getting around small curves cleanly. And to teenagers or ‘tweens who may want to make one of these as an art project or for a Girl Scout badge, please do not use craft knives or razor blades unless an adult is present. Accidents can happen very quickly and can be serious.

The step-by-step procedure is similar to that for the tropical fish.

    1. Assemble your materials and equipment. Press your fabrics, being careful to use the right temperature setting for each one. Since I use so many kinds of delicate fabrics, I use a press cloth between the fabrics and the iron.
    2. Download the goldfish pattern and make a second copy, which will be cut apart. Pin one copy to the felt rectangle.       
    3. Cut around the outside of the fish. Make your cuts as clean and neat as possible. Then make a slit in the middle of each interior section of the fish and carefully remove both the paper and the felt.

Felt cut-out of goldfish outline

4. Lay out the fabric for the big fantail. (The curved top half of this section of the fish is indicated by the dotted line on the pattern.) I cut two pieces — one for the entire tail and one for just the curved top half. I pinned the two together with the smaller piece underneath, then pinned both underneath the black felt frame, trimming off any fabric that showed around the frame. I basted the fabric to the frame with a bright-colored thread so that the basting will be easy to remove later.

Step 4
Step 4

5. Repeat step 4 for the body, head, and three smaller fins.

Step 5
Step 5

6. Place the whole assembly on the “watery” background. Because goldfish are pond dwellers, I chose a fabric that suggested some plant material in the water and some sunlight reflections on the surface. Pin the assembly in place on the fabric, pinning both the outside and inside edges of the black felt.  Using black thread,  sew around the inside of each section. If you are sewing by hand, as I do, make your stitches as small and close together as you can. Remove the pins from the insides of the sections and make sure all pieces lie perfectly flat. Re-pin the outside edges as needed. Now sew around the outside edges of the felt. Remove all pins and basting threads and press the assembly lightly, using a press cloth over it.

At this point I chose to do some light shading with the markers I mentioned earlier and a small amount of embroidery. If you decide to use markers, practice on scrap materials first.  Use light, quick stokes and don't let the marker tip press into the fabric and make spots.

Step 7
Step 7
7. Since some of these fabrics are slippery, you may want to make a cardboard cutout to draw around. Cut the cardboard to the size you need. Turn the fabric over and place the cardboard cutout on the back of the fabric. Mark around the edges of the cardboard with a pencil. Remove the cardboard. Clip off a small triangle from each of the four corners of the material to be turned under. Turn under the raw edges of the “watery” fabric and baste them. Press again if necessary.

8. Cut your background fabric, hem it if necessary, and sew the pocket for the dowel if you are making a wall hanging. The background fabric should be enough larger than the applique to serve as a picture mat. If you are going to frame the piece, trim the outside to fit the frame you plan to use. Mark the place where the applique should go. If you plan to make a pillow, you will need double the amount of background fabric, plus a pillow form or stuffing.

9. Place the applique on the background fabric and pin it in place. Sew it to the background fabric. Sew the black felt “frame” or some decorative trimming over the seam where the applique is sewn to the background fabric. Place the button for the fish’s eye on the head and sew it through all layers of fabric so that it will not sag or droop when the piece is hung on the wall. I prefer shank buttons for eyes because they stand out from the fabric and cover the stitches used to sew them on.

Goldfish finished through Step 9
Reverse applique Fantail Goldfish, finished through Step 9

Downloadable blackwork goldfish pattern
Downloadable blackwork goldfish pattern (click here)
I never discard a pattern I like.  Here is the goldfish done as a pattern to be used in an entirely different kind of needlework! The pattern is yours to download and embroider in Spanish blackwork. If you are not familiar with Spanish blackwork, you may want to refer to these two previous blog posts (October 6, 2013 and October 18, 2013). The downloadable pattern for the tropical fish was given in the post for May 28, 2018. The two blackwork patterns may be used as a facing pair if you like. You will notice that the present chart has a number of new diaper patterns.

Keep watching for a second tropical fish, made as a companion piece to the first one, this summer. It will also have both a downloadable outline pattern for reverse applique and another downloadable pattern for a Spanish blackwork piece, with several more new diaper patterns.

Enjoy!


 Creative Commons LicenseThis post by Annake's Garden is licensed under a Creative Commons Attribution-NonCommercial-ShareAlike 3.0 Unported License.

Tuesday, February 12, 2019

A Little Eye Candy: Our 6th Anniversary Issue*

Hard Winter, photo by J.J.
"Hard Winter", photo by J.J.
Greetings, readers old and new. We are currently winding up our 6th year of this blog, and gearing up for Year Number 7. J.D. has a lot to show you and tell you, so I will turn this post over to him. I’ll be back to introduce some of the topics you can expect to see in the coming months.

Hello, all;  J.D.,  Annake’s Garden Gnome here.
 
First, a special welcome to last year’s new visitors from Andorra, Bangladesh, Cote d’Ivoire, El Salvador, the Republic of Georgia, and Mozambique. We have now had visitors from at least 121 of the 197 countries recognized by the UN.  I say at least, because Google Analytics classifies a growing segment of our visitors as ‘Not Set’,  so any of you who has never seen your country mentioned — blame Google!
 
Last year’s most popular new posts were the five parts of our series on ‘Landscapes in the Needle Arts’, followed by the post ‘Back to Blackwork’, and (surprisingly) our periodic Question & Answer posts. I don’t know whether we are doing a better job of promoting those posts, or more of our readers have figured out that they are full of juicy bits of new information;  we’re just glad to see them getting more attention. And, since many of you first come to this blog searching for material in our archived past posts, I’ll note that cumulative visits since we launched are still highest for tutorials on various bargello topics, blackwork embroidery, Holbein and Assisi embroidery, and cross-stitch; but last year, Swedish weaving and the posts on optical illusions started to catch up.

Lion art print
Now available for download in our Etsy shop
And now, a major addition to our Etsy shop: by the time you read this, the first downloadable prints of some of Annake’s work will be available for you to buy, for a very reasonable price. We’ve shown a few of these in recent past posts — remember the wolf and bear prints? These and many more will be in our Etsy store. Initially, what will be available is going to be limited in size and scope; but, as we figure more of this process out, you can expect to see many more subjects, colors, and sizes that you can download immediately and print at home, or take to a print shop to have your own high quality example of Annake’s work. This includes our international readers — no hassles with expensive shipping, customs forms, or currency exchanges:  just download from the Internet!

So — why this, now? Doesn’t Annake mostly do needle artwork? Where is all this coming from?

Well, the prints are being offered as a result of a number of converging headaches, needs, and trends, which I will tell you all about in a much longer post later this spring. For now, a quick example:

Black-maned lion needlepoint


Remember this black-maned lion needlepoint (we showed it, still unframed, in this post)? Annake came across her original sketch while digging through files looking for something else. (We do a LOT of that!) 

Damaged original working sketch for lion needlepoint
Damaged original working sketch


You can see that it was in pretty rough shape, so I said, “Let me scan it into the computer; I can clean it up, and then you’ll have it when you need it, and we can print it out in any size you want.” So I did — the result is below.


Edited scan of lion sketch
Annake said, “Hmmmm… print me a copy, I’ll put in some shading to indicate what I had in mind for stitching, then you can scan that in for future reference.” So she did — and by the time I had scanned and cleaned it up, it looked pretty darned good. We decided to sign it, put it into a high-quality print file, and — you can see the result above at the beginning of this section.  And, you can now download and print your own.

Look for lots more prints to come over the next several months… as well as printable downloads of some of my photos, and some of J.J.’s — all in our revamped Etsy shop.

Back to you, Annake...


Here are some of the topics you can look for this year:
  • Our next issue will feature a new reverse applique with step-by-step photographs and a pattern to download.
  • Then watch for Seascapes IV and V and at least one issue on skyscapes.
  • I’m going to revisit Folk Embroidery and feature several new “families” of stitches.
  • There will be a new series on color, starting this spring. I think you will get some new ideas from it that will be fun.
  • Expect features on collage and scratchboard plus more optical illusions.
  • There will be new bargello patterns for 4-way and all-over designs, plus new “diaper” patterns for Spanish blackwork, Russian redwork, and Scandinavian whitework.
  • I’ve been looking at landscapes again from a new perspective that I want to share with you.
collage of photos from future posts
Photos from some future posts...

Don’t forget out Question and Answer issues where I try to answer your questions and provide additional information.

I’m really looking forward to starting the next year of blog posts with you.

Take care of yourselves. Stay safe, come back often.


* If you're wondering about the title of this post, candy is a traditional 6th anniversary gift.

 Creative Commons LicenseThis post by Annake's Garden is licensed under a Creative Commons Attribution-NonCommercial-ShareAlike 3.0 Unported License.

Contact Us

Name

Email *

Message *

Blog Archive