 |
| Tropical Fish Wall Hanging from June, 2016 |
As we promised, we are re-visiting a popular project and offering another pattern for the same technique. To the left is the completed reverse-applique of a tropical fish. (For extensive directions for doing this type of reverse applique, see the post for June 24, 2016.)
First, let me explain the changes I made from my original plans for this tropical fish. I decided to do a small wall hanging rather than a framed picture because I wanted all the textures in the piece to be visible and even touchable. For the background I chose a suede-like fabric in a medium teal color. After appliqueing the fish and its watery background to this material, I decided not to use the narrow black felt “frame” I had cut for it, substituting instead a glittering edging in blue and silver. I liked this much better than the felt and plan to use a similar fabric for the current project. A narrow pocket at the top of the teal fabric contains a small dowel, from which the hanging is suspended.
For the current project, here is a downloadable silhouette of a fantail goldfish. You may use the narrow frame or discard it and substitute your choice of trimming.
You will need the following materials:
You will need the following equipment:
You will also need access to an ironing board and a steam iron.
NOTE: In the original article, I showed the equipment I used to cut the silhouette. However, if you are not accustomed to using craft knives I recommend that you use scissors instead. Manicure scissors with their curved blades are useful for getting around small curves cleanly. And to teenagers or ‘tweens who may want to make one of these as an art project or for a Girl Scout badge, please do not use craft knives or razor blades unless an adult is present. Accidents can happen very quickly and can be serious.
The step-by-step procedure is similar to that for the tropical fish.
1. Assemble your materials and equipment. Press your fabrics, being careful to use the right temperature setting for each one. Since I use so many kinds of delicate fabrics, I use a press cloth between the fabrics and the iron.
2. Download the goldfish pattern and make a second copy, which will be cut apart. Pin one copy to the felt rectangle.
3. Cut around the outside of the fish. Make your cuts as clean and neat as possible. Then make a slit in the middle of each interior section of the fish and carefully remove both the paper and the felt.
4. Lay out the fabric for the big fantail. (The curved top half of this section of the fish is indicated by the dotted line on the pattern.) I cut two pieces — one for the entire tail and one for just the curved top half. I pinned the two together with the smaller piece underneath, then pinned both underneath the black felt frame, trimming off any fabric that showed around the frame. I basted the fabric to the frame with a bright-colored thread so that the basting will be easy to remove later.
5. Repeat step 4 for the body, head, and three smaller fins.
6. Place the whole assembly on the “watery” background. Because goldfish are pond dwellers, I chose a fabric that suggested some plant material in the water and some sunlight reflections on the surface. Pin the assembly in place on the fabric, pinning both the outside and inside edges of the black felt. Using black thread, sew around the inside of each section. If you are sewing by hand, as I do, make your stitches as small and close together as you can. Remove the pins from the insides of the sections and make sure all pieces lie perfectly flat. Re-pin the outside edges as needed. Now sew around the outside edges of the felt. Remove all pins and basting threads and press the assembly lightly, using a press cloth over it.
At this point I chose to do some light shading with the markers I mentioned earlier and a small amount of embroidery. If you decide to use markers, practice on scrap materials first. Use light, quick stokes and don't let the marker tip press into the fabric and make spots.
7. Since some of these fabrics are slippery, you may want to make a cardboard cutout to draw around. Cut the cardboard to the size you need. Turn the fabric over and place the cardboard cutout on the back of the fabric. Mark around the edges of the cardboard with a pencil. Remove the cardboard. Clip off a small triangle from each of the four corners of the material to be turned under. Turn under the raw edges of the “watery” fabric and baste them. Press again if necessary.
8. Cut your background fabric, hem it if necessary, and sew the pocket for the dowel if you are making a wall hanging. The background fabric should be enough larger than the applique to serve as a picture mat. If you are going to frame the piece, trim the outside to fit the frame you plan to use. Mark the place where the applique should go. If you plan to make a pillow, you will need double the amount of background fabric, plus a pillow form or stuffing.
9. Place the applique on the background fabric and pin it in place. Sew it to the background fabric. Sew the black felt “frame” or some decorative trimming over the seam where the applique is sewn to the background fabric. Place the button for the fish’s eye on the head and sew it through all layers of fabric so that it will not sag or droop when the piece is hung on the wall. I prefer shank buttons for eyes because they stand out from the fabric and cover the stitches used to sew them on.
First, let me explain the changes I made from my original plans for this tropical fish. I decided to do a small wall hanging rather than a framed picture because I wanted all the textures in the piece to be visible and even touchable. For the background I chose a suede-like fabric in a medium teal color. After appliqueing the fish and its watery background to this material, I decided not to use the narrow black felt “frame” I had cut for it, substituting instead a glittering edging in blue and silver. I liked this much better than the felt and plan to use a similar fabric for the current project. A narrow pocket at the top of the teal fabric contains a small dowel, from which the hanging is suspended.
For the current project, here is a downloadable silhouette of a fantail goldfish. You may use the narrow frame or discard it and substitute your choice of trimming.
 |
| Downloadable Goldfish Outline (click here) |
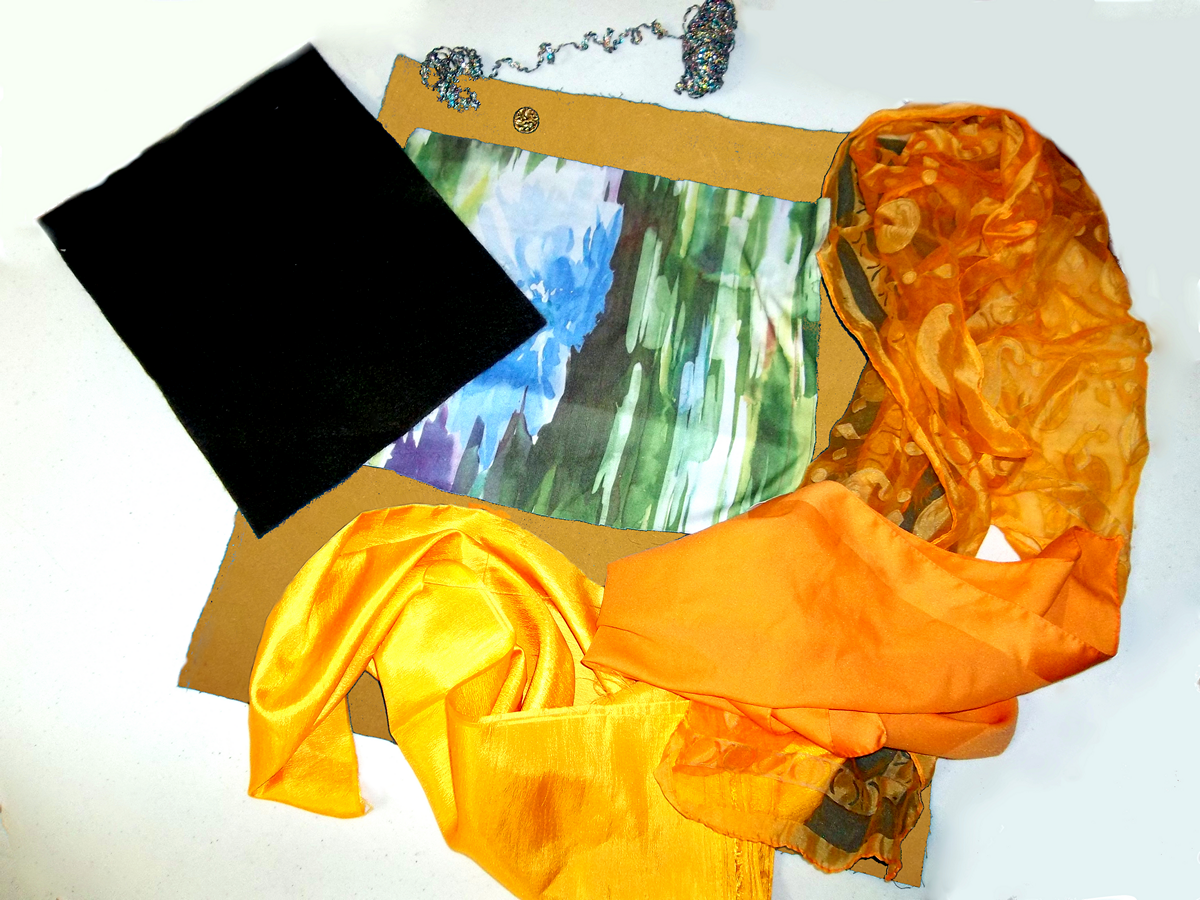
You will need the following materials:
 |
| Materials you will need |
- a rectangle of black felt approximately 81/2 inches X 11 inches (22 cm X 31 cm)
- a piece of silk or nylon crepe approximately 10 inches X 13 inches (26 cm X 33 cm) in a “watery” pattern
- scraps of silk or nylon, from old scarves, in shades of yellow, gold, and orange
- a glittery button for the eye
- various trims
- matching threads
- heavier material for the backing fabric
- a small dowel if you are making a wall hanging, and cord or wire to suspend it
You will need the following equipment:
 |
| Equipment you will need |
- scissors or shears that are used only for fabric, yarn, or floss
- small, sharp-pointed embroidery scissors
- manicure scissors (optional)
- a ruler or other measuring stick
- straight pins
- permanent markers in yellow, gold, and/or orange (optional)
You will also need access to an ironing board and a steam iron.
NOTE: In the original article, I showed the equipment I used to cut the silhouette. However, if you are not accustomed to using craft knives I recommend that you use scissors instead. Manicure scissors with their curved blades are useful for getting around small curves cleanly. And to teenagers or ‘tweens who may want to make one of these as an art project or for a Girl Scout badge, please do not use craft knives or razor blades unless an adult is present. Accidents can happen very quickly and can be serious.
The step-by-step procedure is similar to that for the tropical fish.
1. Assemble your materials and equipment. Press your fabrics, being careful to use the right temperature setting for each one. Since I use so many kinds of delicate fabrics, I use a press cloth between the fabrics and the iron.
2. Download the goldfish pattern and make a second copy, which will be cut apart. Pin one copy to the felt rectangle.
3. Cut around the outside of the fish. Make your cuts as clean and neat as possible. Then make a slit in the middle of each interior section of the fish and carefully remove both the paper and the felt.
 |
| Felt cut-out of goldfish outline |
4. Lay out the fabric for the big fantail. (The curved top half of this section of the fish is indicated by the dotted line on the pattern.) I cut two pieces — one for the entire tail and one for just the curved top half. I pinned the two together with the smaller piece underneath, then pinned both underneath the black felt frame, trimming off any fabric that showed around the frame. I basted the fabric to the frame with a bright-colored thread so that the basting will be easy to remove later.
 |
| Step 4 |
5. Repeat step 4 for the body, head, and three smaller fins.
 |
| Step 5 |
6. Place the whole assembly on the “watery” background. Because goldfish are pond dwellers, I chose a fabric that suggested some plant material in the water and some sunlight reflections on the surface. Pin the assembly in place on the fabric, pinning both the outside and inside edges of the black felt. Using black thread, sew around the inside of each section. If you are sewing by hand, as I do, make your stitches as small and close together as you can. Remove the pins from the insides of the sections and make sure all pieces lie perfectly flat. Re-pin the outside edges as needed. Now sew around the outside edges of the felt. Remove all pins and basting threads and press the assembly lightly, using a press cloth over it.
At this point I chose to do some light shading with the markers I mentioned earlier and a small amount of embroidery. If you decide to use markers, practice on scrap materials first. Use light, quick stokes and don't let the marker tip press into the fabric and make spots.
 |
| Step 7 |
8. Cut your background fabric, hem it if necessary, and sew the pocket for the dowel if you are making a wall hanging. The background fabric should be enough larger than the applique to serve as a picture mat. If you are going to frame the piece, trim the outside to fit the frame you plan to use. Mark the place where the applique should go. If you plan to make a pillow, you will need double the amount of background fabric, plus a pillow form or stuffing.
9. Place the applique on the background fabric and pin it in place. Sew it to the background fabric. Sew the black felt “frame” or some decorative trimming over the seam where the applique is sewn to the background fabric. Place the button for the fish’s eye on the head and sew it through all layers of fabric so that it will not sag or droop when the piece is hung on the wall. I prefer shank buttons for eyes because they stand out from the fabric and cover the stitches used to sew them on.
 |
| Reverse applique Fantail Goldfish, finished through Step 9 |
 |
| Downloadable blackwork goldfish pattern (click here) |
Keep watching for a second tropical fish, made as a companion piece to the first one, this summer. It will also have both a downloadable outline pattern for reverse applique and another downloadable pattern for a Spanish blackwork piece, with several more new diaper patterns.
Enjoy!

 This post by Annake's Garden is licensed under a Creative Commons Attribution-NonCommercial-ShareAlike 3.0 Unported License.


