We considered just posting this to our Extras section; but, since there is still a little summer left to chase butterflies outdoors, we decided to post it here. Enjoy! — J.D.
About 600 million years ago, plants and animals which had lived successfully in the ocean began to venture onto the pieces of land that had risen above the waves. Some of them were able to adjust to life in small pools and later in lagoons that were a mixture of saltwater and fresh water. Some of the most successful of these animals belonged to the group we now call
arthropods (arthro=joint, pod=leg or foot). Arthropods have jointed legs. They don't have warm blood, bones, fins, feathers, or fur. They do have hard coverings called
exoskeletons (exo=outer, skeleton=body framework) outside their bodies. Those are the things we can count on. Everything else about them is a case of usually-but-there-may-be-exceptions. Today close to 75 per cent of all the
species (a special group) of animals on Earth are arthropods. You didn't think
we ran the planet, did you?
 |
| Some of those many arthropods... |
The largest group or
phylum (rank)
Arthropoda is the
class (division)
Insecta. Okay, we all know some insects. The largest group or
order (arrangement) of insects is
Coleoptera (coleo=sheath, ptera=wing), the beetles. The second largest order is
Lepidoptera (lepido=scale, ptera=wing), the moths and butterflies. That is a good description because they do have wings covered by tiny scales made from flattened hairs. The names "butterfly" and "moth" are Old English names for the insects, written about since 700 AD. and later by English authors like Chaucer and Shakespeare. And no, "butterfly" is NOT "flutterby" twisted around. There are at least 160,000 species of moths and 20,000 to possibly as many as 45,000 species of butterflies.
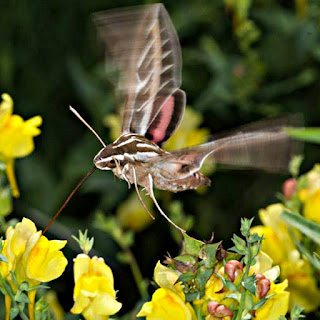 |
| Hummingbird moth, photo by J.J. |
When and how did the Lepidoptera separate from the other arthropods? That is a hard question to answer because these creatures are so delicate that they are seldom preserved as fossils. Most of their fossils are of wing scales that left an impression in a material that later fossilized. We can compare them to modern moths and butterflies, but we cannot recreate the original animals. The exceptions are when butterflies or moths were preserved in amber. Amber is fossilized tree sap. When it was fresh, the sap often flowed over insects and other small animals and hardened, preserving them just as they were in life. We do know that the moths came first. There were at least three families of primitive (first or earliest) moths which have been traced to nearly 200 million years ago. If there were three families already at that time, there must have been a common ancestor even earlier which has not yet been found. Butterflies, on the other hand, came along later, 40 to 50 million years ago.
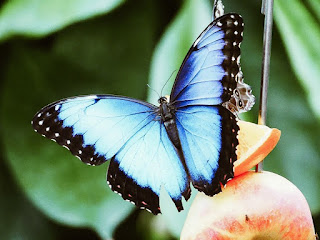
What is the difference between a butterfly and a moth? All butterflies are really moths, but they behave differently. Even then there are exceptions to the 'rules'. Most, but not all, moths are active at night. Most butterflies are active in the daytime. Some of each fly at dusk or dawn. Most moths are relatively small and dull-colored, but we will show you some that are big, boldly colored, and beautiful. Many butterflies are brightly colored and some are large. Moths tend to rest with their wings flat, while most butterflies hold their wings upright and pressed together when they are at rest. Most moths are darker colored on top and lighter underneath, while many butterflies are just the opposite. Both use devices like eye-shaped spots to startle or scare away enemies. Look at the 'eyes' on this Io moth.
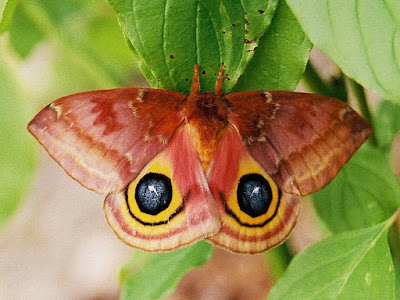 |
| Io moth |
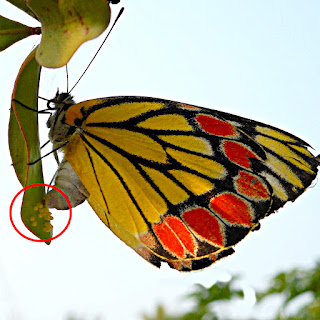 |
| Butterfly laying eggs (circled in red) |
All butterflies and moths hatch from eggs laid by the females of their particular species. A female may lay eggs even if she has not mated, but they will not contain
caterpillars (old North French word meaning "hairy like a cat"), also called
larvae (an immature form of the species which does not resemble the adult). The eggs come in different sizes and in many shapes, including round, oval, teardrop-shaped and drum-shaped. They also come in many colors and surface textures. A female may lay only a few eggs, usually one-at-a-time on the underside of a leaf, or she may lay hundreds. The average number is from 150 to 200. Some females lay their eggs on a specific plant because that is all her babies will eat once they hatch. Others prefer a wide range of plants. The female will die soon after she has laid all her eggs.
Somehow a small generalized form, or several forms together, gave rise to the Lepidoptera. How they did it is not yet understood. The most likely idea goes like this:
1. In order to get a caterpillar, start with a worm something like an earthworm, but give it strong jaws with small sharp teeth and simple eyes that can tell light from dark. A caterpillar chews with jaws that work from side to side, not bottom to top like ours. Watching one chew is really strange!
2. Divide the worm's body into segments (sections) and stick a leg on each side of every segment. Now you have something like a
millipede (milli=1000, pede=leg or foot), which is also an arthropod, except that millipedes have 2 pairs of legs on each segment. They don't have a thousand legs; the record is 750.
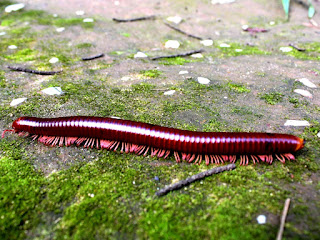 |
| Millipede |
3. Maybe that wasn't such a good idea. Let's try this: Make the first 3 pairs of legs the only walking legs and strengthen the segments below them to be flexible and able to wave around in different directions until the legs can find a foothold. Give some of the remaining legs the ability to clasp a surface and keep the animal from falling off a stem or leaf.
4. Give your caterpillar a color and pattern that helps it hide or a bold, colorful one that advertises "You will be sorry if you eat me!" Many caterpillars are poisonous, having absorbed poisons from the plants they eat, while others just taste nasty. A bird or frog might eat one, but it wouldn't make that mistake again!
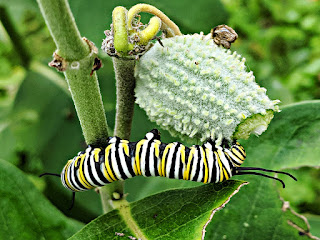 |
| Monarch butterfly caterpillar |
When the caterpillar is ready to leave the egg, it chews a hole in the egg's shell and pulls itself out. Many caterpillars then turn around and eat the rest of the eggshell, probably getting needed minerals or
enzymes (proteins that speed up a chemical reaction) from it. The caterpillar has a head with jaws and simple eyes. It has six walking legs close behind the head. It has tiny holes called spiracles ("breathing holes"), on the sides of its segmented body. Toward the rear end of its body it has leg-like structures called
pro-legs (pro=before, earlier), which it uses to grip the surface of a leaf. It may be colored to match its leaf, have a textured pattern that hides it, or have a bright-colored pattern that sends a warning. It may look like dirt, a dead leaf, or bird droppings. At least one looks like a snake!
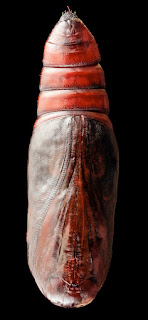 |
| Pupa |
The caterpillar's only desire is to eat, eat, eat. It grows fast. While its skin does stretch, there soon comes a time when it must be shed. This is called
molting (molt=throw off). The next skin has already formed under the first one. Sometimes, when the outer skin has pulled away, it becomes so transparent that it is possible to see the new one through it. It is soft and damp and can be stretched greatly before it hardens. Not only is the caterpillar now much larger, but its color and pattern may be unlike the previous one. Most caterpillars molt five times over a period of a couple of months. They then stop eating and prepare to move on to the next stage of their lives, the
pupa (a name given the structure by the scientist and classifier Linnaeus) or
chrysalis ("golden", from the color of many of them).
The caterpillar finds a secure location in which to make the change. It spins silk threads to fasten itself in place. A butterfly caterpillar usually hangs by its tail, although it may hold itself upright with a band of silk. Over time they have discarded or lost much of the covering that moths use. Moths are more likely to spin tough, papery-looking silk
cocoons (French for "sheaths") which may be hidden by dead leaves or the ground itself. The pupa no longer looks like a caterpillar, but does not reveal what its adult form will be.
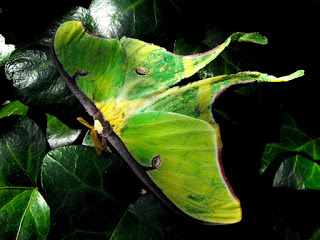 |
| Luna moth |
Scientists can cut open the coverings of the pupa to see what happens on each day. This kills each pupa, but gives them a look at the "what" of each day's process, and even suggestions about some of the "why" a process is going on, but there are still mysteries concerning the "how". Suppose you were designing a process that would turn a pupa into a butterfly or moth. Here are some of the changes you might make.
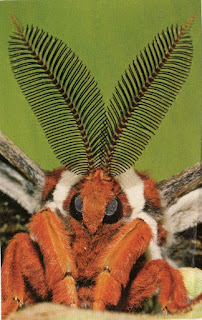 |
| Moth antennae |
1. Fuse the first few segments next to the eyes and mouth to make a head. Give it more complicated compound eyes with excellent vision even into colors and wavelengths of light that we cannot see, including polarized light.
2 Get rid of the jaws and teeth and substitute a flexible mouth-part that can be rolled into a tube for sucking nectar or other juices from a plant and can be rolled up neatly below the head when it isn't in use. Stick on a pair of sense organs known as
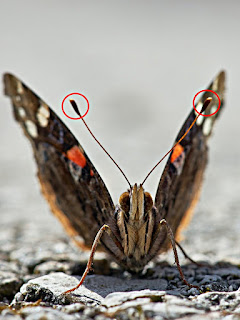
antennae (old sailor's term for a "sail yard", the long structure that supports a sail) or "feelers" at the top of the head. The term "feeler" is misleading. These organs carry the animal's sense of smell. Only the males have the super-large feathery antennae seen here. They're sniffing for females.
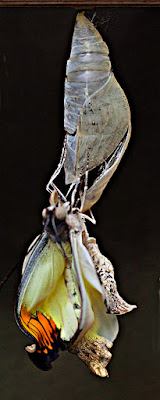 |
| Emerging butterfly |
3. Fuse the next three segments and put a pair of jointed legs on each one. These are the same legs the caterpillar had, just rebuilt. If a leg is damaged in the caterpillar stage, the butterfly or moth will be lame when it emerges as an adult.
4. Expand and harden the next section to make a
thorax (chest). Make this part of the body anchor the 3 pairs of jointed legs and the powerful muscles that move the wings. There are 4 wings. The pair of wings up by the head are called the forewings. The pair farther down are the hindwings. Poke some holes for the spiracles so that air can move in and out.
5. Stretch the last part of the body to make the
abdomen (belly). This should have about 10 segments and contain a long tubular heart, muscles for breathing, the digestive system, the reproductive organs, and an
ovipositor (ovi=egg, positor=placer) for the female. This is a tube through which she can lay her eggs. That should do the job!
 |
| Butterfly antennae |
The change from the pupa to the adult is a process called
metamorphosis (transformation}. The adult breaks out headfirst. Most butterflies have thready antennae with little knobs on the ends. Moths have heavier antennae, usually without knobs, and larger scales on their wings. They usually have thicker bodies with coverings of hairs or what looks like fur — probably to keep them warm at night. You should discover fairly soon whether the adult is a butterfly or a moth.
One difference which isn't visible is that many moths have hearing organs (not "ears") on or inside their bodies. Moths and bats have been having an "arms race" for millions of years. The bats develop better ways to find the moths and the moths develop better ways to confuse the bats. Some moths actually make clicking noises that interfere with bats' 'radar'. But moths had some of these organs before there
were any bats. Scientists have found that some male moths make sounds to attract the females.
 |
| Cecropia moth |
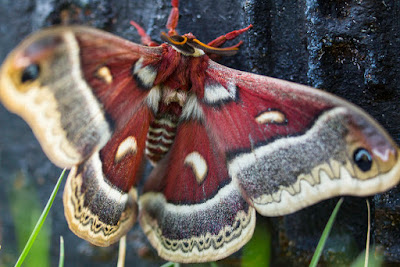
When I was a teenager, I used to collect cocoons every autumn. My room was the coldest place in the house, so I pinned the cocoons to the curtains in the north window. In the spring I was rewarded with the appearance of big silk moths like this one. They never failed to hatch. Most were females. The males just dry off and fly away. The females linger, giving off a musky perfume that many people don't like, but I enjoyed. They wait patiently until the males, lured by their scent from as much as a mile away, come calling. The ladies each chose their favorite and flew off to mate and start the life cycle all over again.
 |
| Polyphemus moth |
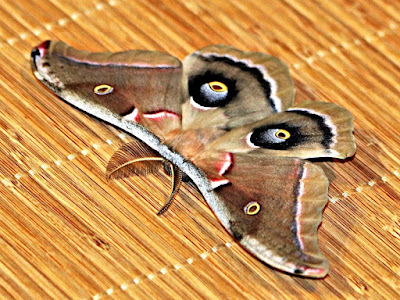
Moths have had many millions of years to adapt to all kinds of conditions and can be found all over the world except in the polar regions. They are not a problem in themselves, but some of their caterpillars have become serious pests because they eat clothing, food crops, and other things that we value. On the other hand, they produce silk and pollinate a number of plants. They pick up pollen while they are feeding on one flower; some of it rubs of inside the next flower. Even butterflies, although they are great pollinators, can have harmful caterpillars. A good example is the white cabbage butterfly.
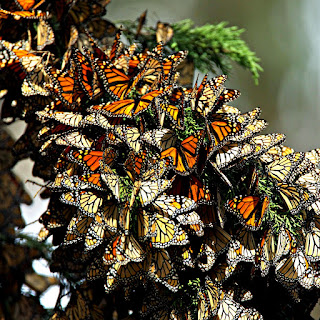 |
| Migrating Monarch butterflies |
Many butterflies have a relatively small range, usually tied to their choice of a food plant. Others, like the Monarch, migrate seasonally and return to "home base" for the winter. But one little butterfly has already established itself on all the continents but South America and Antarctica. (They are established in Central America and tend to stay in the mountains in hot countries, so we may find them there in South America soon.) Its name is the Painted Lady. It has divided into a number of species over time and distance, but none exceed the 2-21/2-inch size range, All have the same color combination and similar patterns. We have 2 species: the American Painted Lady and a slightly larger species that was probably its ancestor, which visits from Mexico every year. Their range has expanded northward until it is now well north of the Canadian border. The butterflies have been collected by the thousands over the centuries and preserved in collections, but look at any one of them and you will recognize a Painted Lady. Scientists now believe that this species may be the first to solve the problem of flying long distances and set out from Africa thousands of years ago in its quest to conquer the world.
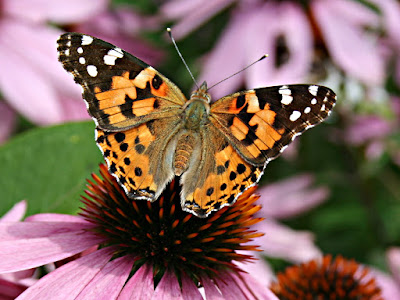 |
| Painted Lady butterfly |
I could never bring myself to kill butterflies and moths, stick pins through their dead bodies, and store them in a box. I learned so much more from them alive. I'm glad that I didn't kill them. Because of global warming, plastics, deforestation, spraying with insecticides, etc., many species may already be extinct and thousands of others are threatened. They need our help now.
The study of insects is called
entomology. The study of word origins and meaning is called
etymology. I hope you have enjoyed the examples I included.
Now I have a personal message. Humanity is a single species. No segment of it is superior or inferior to any other. Humans, in all their infinite variety, should be accepted and appreciated.


 This post by Annake's Garden is licensed under a Creative Commons Attribution-NonCommercial-ShareAlike 3.0 Unported License.

