Showing posts with label needlepoint. Show all posts

Sunday, March 28, 2021

Give a Hoot!

"St. Agnes' Eve ... Ah, bitter chill it was. The owl, for all his feathers,  was     a-cold."
John Keats

There was a blizzard on New Year's Eve. My dad and I had worked hard during the day to give the livestock and poultry extra food, water, and straw bedding and shut the barn and out-buildings tight. Now it was New Year's Day. After the breakfast dishes were done, I had most of the day all to myself, with no school for a couple of days.  It was a foggy day, so I pulled my chair close to the window for additional light. I have always loved poetry and was reading Keats. I had just read the words above when a movement in a tree close to my window attracted my attention.  A great horned owl was settling itself on a branch at about my eye level.  How wonderful, I felt, the way that the words and the bird's arrival coincided!  We stared at and studied each other often during the day.  I came to feel that the two of us, from such different species, had forged a bond. We had shown interest in, and respect for, each other.  As I stood up, reluctantly, to set the supper table, the owl shook itself, gave a loud "hoot", and lifted away into the twilight.

This post will feature owls — real and imaginary — and will show art-work, provide patterns, and hopefully produce a few chuckles with some "improbable" owls.

But there is also another reason for this issue. I listened to a very impressive high school student whose message was: "We can all do SOMETHING for others during these troubling times!"  Then he set about recruiting others to do just that.  As a senior citizen who has been  "sheltering-in-place" for 12 months, dependent on others, that statement really resonated with me!  So J.D. and I made lists of things which might have helped us or others like us, and we will include some of them between the art and craft projects. We ask those of you who read this post to consider something from one of our lists or one that you make for yourself. Thank you!

Here is a little owl I made back in 2014.  The pattern is to make him in cross-
stitch, but the photo is of the same design in needlepoint.


J.D.: If you "give a hoot" about helping out house-bound people this winter, here are some things you might do: 
  • Clear snow and ice from sidewalks.
  • Walk dogs.
  • Rake leaves.
  • Roll trashcans to the curb and put them away when empty.
  • Run errands.
  • If you have a car, provide transportation.
  • Just stop by occaisionally, in a safe socially distanced way, to check on their welfare.
In a previous post we started a series on background designs. This owl shows how body parts can be indicated by using background designs similar to those we showed in that post.  Colors need not be realistic.  Make them as vivid or as subtle as you wish.


Owls don't have to be confined to needlework. They can be produced in any number of crafts Here is one done in stained glass, one that is a metal candle lantern, and a sterling silver pin with opal triplets set in.


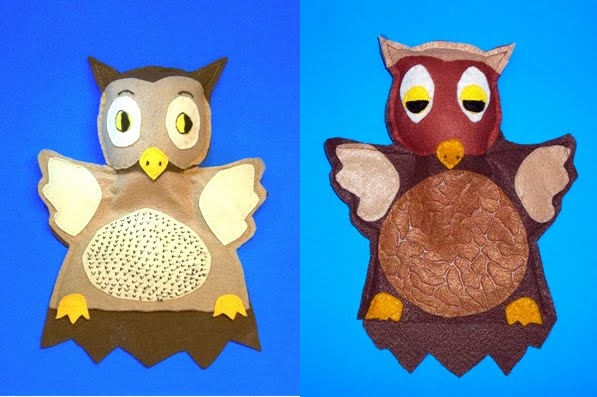
Owls are one of my favorite animals for making into puppets.

Two variations on the owl puppet pattern

Annake: Here are some more thoughts on "Giving a hoot":
  • Women of my generation still like to write letters and send actual greeting cards, not virtual ones.  Donate notepaper, greeting cards, envelopes, pens that really write, or a few stamps.
  • Call frequently to see how the person is getting along,  ask how you can help, and take the time to chat for a few minutes.
  • Listen carefully to what the person has to say, checking for signs of distress or confusion.
  • Prepare a casserole that can be reheated or a dessert that can be refrigerated for several days.
  • Keep track of the person's appointments and remind them.
  • Make a scrapbook about something the person loves — scenes, flowers, wildlife, sports, etc., from magazines and calendars.
  • Offer to care for pets or plants if the person has to be away for a few days.
This is an owl originally done in Spanish black-work on checked gingham.  It can be stitched just as well on a plain even-weave fabric like monks' cloth or Aida or done in needlepoint.  Click on the pattern to download it.

Click here to download the blackwork pattern.


While looking over our black-and-white prints, we found that we had never published a photo of our barn owl print, shown here. Because of their distinctive shapes and upright postures, owls make good subjects for artwork.
       

Those same attributes make them easy to do as readily recognizable cartoons or nature drawings.  It is even possible to do semi-abstract renderings.  Here are a couple of sketches friends made for me which used very different techniques.

Original sketches from Annake's personal collection


Click here to download
Finally, here is a pattern that could be done in a number of techniques of your choice.  Click on the pattern to download it.

The owls we have used are primarily just for fun, but there are two serious ideas here.  One is the idea of helping others because you "give a hoot". The other is that large numbers of our native birds are declining in numbers, including owls.  I used to hear a pair of great horned owls calling to each other on summer nights while they hunted up and down the nearby alleys, but I have not heard them for several years.  We need to do all we can to protect the wild birds, and do it NOW.

Still waiting for Spring,
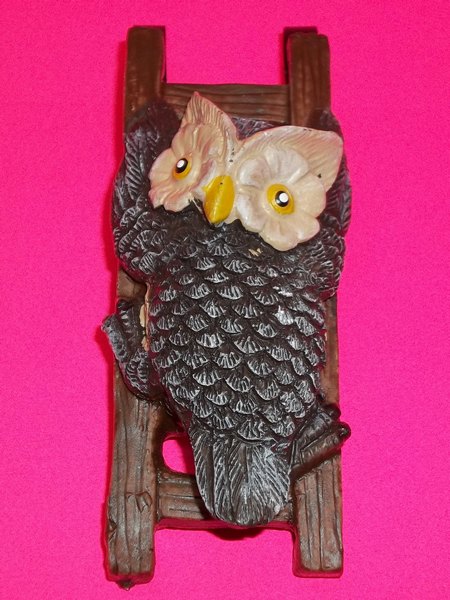


A gift from J.J., a little owl shelf hanger


 Creative Commons LicenseThis post by Annake's Garden is licensed under a Creative Commons Attribution-NonCommercial-ShareAlike 3.0 Unported License.

Sunday, January 31, 2021

Needlepoint Tweaks: No More Boring Backgrounds!

One od Annake;s many work bags
Backgrounds don't need to be boring! My mother used to buy needlepoint canvases with the central motifs already worked and then fill in the backgrounds with a simple tent stitch. I thought it was the most boring occupation that I could imagine. But one day she cut off a strip of the canvas that didn't suit her purpose and threw it away. I picked it up and studied it carefully. Then I drew a small picture of a flower on it. I collected some scraps of yarn and a couple of needles. Using the background stitch I had seen my mother use so often, I filled my flower with bright colors. I was "hooked" for life! Since then I have always had a bag of canvas or even-weave fabric and yarn (or two or three) positioned by every comfortable chair in the house.

Backgrounds can be fun to do and they can give your work a very modern look. There are a couple of things that you need to consider, however. You don't want the background to overwhelm your central motif. You can use use muted colors that complement the center design — light ones for a bright design or darker ones for a motif with a collection of pale colors, for example. Of course, as with all "rules", there are always exceptions. Take this "Screaming Eagle" picture for example, with its many background patterns and its diagonal arrangement of them.

The second thing to keep in mind is to slip your background stitches under the edge of the center design wherever they meet. This ensures that no empty canvas or background fabric shows through where it shouldn't. You can see a light-colored background with a bright-colored motif.  Notice that there are no spaces between the motif and the background.

I'm going to do some samples of background patterns for you on plastic canvas because the stitches are fairly large and show up well in J.D.'s photographs. We will start with upright stitches because they are the easiest. I'm using small balls of leftover yarn that I store in egg cartons for practice or demonstration pieces. You can split or double such yarns to cover your canvas or even-weave fabric completely.  I have used colors that have more contrast than I would usually use in a background so that it is easy to see what I am doing.
 
In the first sample the rows of stitches are the same size, with the different colors starting and finishing in the same squares of mesh. If the yellow rows look narrower than the orange ones, it is an optical illusion. In the second sample, however, the yellow rows are narrower than the orange ones, and in the last sample the yellow is a simple line of back-stitching between two rows of orange stitches. The differences are slight, but the results are subtle shifts. In each case, the yarn covers both sides of the canvas.

Now, instead of strips of color, I am going to use little blocks of two colors.  Notice that the colors alternate on each row.  This gives a checkerboard effect. No empty canvas shows because the stitches are placed right next to each other and the stitches in adjoining rows begin and end in the same squares of mesh.

The second set of red and blue blocks are made with stitches that slant upward and to the right. The first block stands alone at the beginning of the group, along with a small diagram of the stitches. (Unfortunately, many stitchery books are made for needle-workers with wide experience, and their diagrams may be difficult to decipher. I hope this simple one will be more useful.) The block looks a bit difficult at first, but, after doing a couple, you should find them easy and even fun. Use a separate needle for each color. This is the same checkerboard idea, but with somewhat different effects. This block is known as Scotch stitch. There are several variations, and we will see more of them as we go along.

Here is a good muted background made with closely related colors. Study the number of lines of stitches carefully to get the first couple of layers established. After that, it is just a matter of following the pattern upward or downward. The dark blue stitches show a single row of the design stitches so that you can see how the line is constructed. I would not use this pattern at a larger size unless I were working a fairly large design. The two lighter blues are appropriate for the background around a bright and colorful center design. The sample also shows you how to use partial blocks to even the top and bottom edges of the background. The second sample in the light blues shows a half-size pattern that would work with a smaller or more delicate design. I don't recommend using white in one of these backgrounds, but off-white, cream, or soft light grays and beige work well.

Here is an easy pattern of little diamonds in two or three colors. The third sample is done in a variegated gray yarn that gives a random all-over effect.

Here is a slightly more complex diamond pattern. Instead of three stitches to construct a diamond, we will use five stitches.  Use different needles for the two colors.  Look at the first light-colored diamond. The first stitch goes over two bars of plastic canvas,  the second over four, and the third one over six. The fourth stitch is just like the second one and the fifth stitch is just like the first one.  Work a row of the light-colored diamonds from left to right as I have done in the sample, leaving an empty row of canvas between them. Check each group of stitches as you make them and correct any mistakes. (It is easy to think: "That one is a little off, but nobody will notice it." I hate to disillusion you, but "that one" is exactly the one they will "zero in" on!)


Once the row is complete, work the row of darker color below the diamonds, starting in that empty square of mesh. After the row is complete, start working a row of light diamonds under the darker row. Don't worry about the first diamond in that row.  You can fill it in later.  Notice that the darker diamonds have a double stitch at top and bottom, with the two stitches sharing that empty square of mesh.  Finish the darker row.  By now you should know all you need to know about the pattern and can begin working across the top of the sample from right to left.  This is a fairly large pattern and works up quickly. If you are looking for a pattern that is fast and fun, this one might be just the one you want!

Now I am going to use the Scotch blocks to make a pattern with more "movement" to it. Let's start with a solid block of one color at the upper left of the sample. (If you are left-handed, feel free to work any of these patterns in reverse.)  Once that block is done, move your needle to the row of canvas just below the block and bring the needle up under the last stitch.  Work an identical block, starting there. Continue to work the blocks in the same way until you have established a diagonal pattern of them.  With a second color, work a block just below the top block in the series and all the blocks as far down as you have space for them.  Continue in this fashion until you have used all the colors you want to use.  Follow the sample. To finish the large square, continue making the blocks, but do the colors in the reverse order. In this case, yellow-green, medium green, and dark green.


This technique can also be used to make a rainbow of lines for an all-over design which stands alone rather than being used as a background for a central design.  Here is a somewhat different version of the technique as a stand-alone project. Can you spot the differences?

As you find a design that works for you. it is a good idea to make a copy of it on canvas or even-weave fabric and save it in a large envelope or a box for future reference, whether you have used it or not.

These ideas for background treatments lend themselves to other kinds of craft-work as well. For example, see how the idea works for this latch-hook rug. Because rugs are made to be walked on, the background is darker than it would be for a picture or pillow, for example. The background for this rose rug involved closely related tones of gold.

I am rapidly running out of time and space for this issue, but I'm certainly not out of patterns! So let's consider this the beginning of a new series and I will add more issues on the subject from time to time.
 
Stay safe, keep warm, and practice your patterns!


 Creative Commons LicenseThis post by Annake's Garden is licensed under a Creative Commons Attribution-NonCommercial-ShareAlike 3.0 Unported License.

Sunday, November 29, 2020

Something Fishy

angelfish border design
Recently J D. pointed out that I had done a number of sketches, designs, and pieces of needlework involving fish and other water-dwelling creatures, and that perhaps I should "do something" with them. Without giving the matter much serious thought, I replied that I might do a post called "Something Fishy".  I hadn't given the project much thought, until he later asked what I had done about it.  I said I had to think about fish before I write about them. I got a long look with a seriously raised eyebrow in reply. "I'm thinking!"  I said. His expression suggested that I just might think a little faster.  So when, I thought, did I first get interested in fish? (Isn't memory a strange thing?) And there was the memory, as vivid as if I were watching it on a screen.

Bluegill
Bluegill
It was the summer before I turned seven. It was a hot, dry summer.  Our well had not run dry, but there was already talk abut hauling water for the livestock from an artesian well in the next township. (We did not have electricity, running water, central heat or indoor plumbing, if you can picture that.) We did have a cistern to catch rainwater, but it had gotten so low that we had already hauled enough water from a spring at the back of the property to refill it. I volunteered to go to the bottom of our big hill and see how the creek that ran there was faring. The creek was no longer running. There were a few pools of water that were rapidly evaporating. In the largest pool I found three colorful fish lying on their sides, just barely alive.

Crappie
 I raced to the top of the hill. Charlie, a teen-aged cousin, was staying with us for a couple of weeks. "Charlie," I cried, "We have to save the fish!" Once he understood, he agreed.  We dipped a couple of buckets of the water from the cistern and hurried back down the hill. We carefully lifted the fish from their puddle and hurried to relocate them in the cistern. My dad had been attracted by the commotion. He was a hunter and trapper as well as a farmer, but not much of a fisherman. He identified the fish for us: bluegill, crappie (pronounced croppie), and sunfish. He suspected they came originally from the Wabash River, to which our creek was distantly connected, and mentioned that all three were tasty.   Charlie and I both protested that we hadn't saved their lives just to turn around and eat them!

Green Sunfish
Green Sunfish
Dad agreed good-naturedly and we three set about catching flies, mosquitoes, earthworms, any any other handy tidbits to feed the fish. We kept that up for two more days, between chores. And then Nature relented and produced a spectacular thunderstorm and two full days of rain, through which we slogged to care for the livestock. We carried the fish back to the creek and released them. They swam away in three different directions, apparently anxious to end their forced association.

 
Tropical fish needlepoint
A couple of decades later I was the head of a science department in a junior high school in northern Virginia. One of our favorite field trip destinations was the National Aquarium in Washington  D.C., which was then housed in the Department of Commerce Building. By that time I had flown back and forth across the Atlantic, seen the coast of Newfoundland, gotten acquainted with the North Sea from Holland, and gotten a glimpse pf the Irish Sea, but I hadn't seen the creatures that lived in those waters. So I also visited the National Aquarium on my own, content to sit for hours. sketching or just watching the infinite variety of fish. Those are also good memories. But, like today, those were turbulent times, and eventually we were forbidden to take field trips into D.C. because of the dangers from riots. Perhaps it is that memory that has been what has turned my eyes and hands to depictions of fish recently.

When you are showing a fish like this, its shape and colors make it stand out. Then you are left with the problem of what to do with all that background around it. You can, of course,  just paint or stitch a flat background in a single color, as if the fish were stuffed and mounted, but that isn't very interesting. I prefer to at least suggest the water through which the fish is swimming.  This is the simplest way to do that. Just use several closely related shades of blue in the watery background, varying the concentration of of each shade so that the water doesn't look like it has stripes.

Rough pattern for oscar needlepoint
This is a color sketch for an Oscar. Oscars are cichlids,  freshwater fish originally from South America, which have now been established in parts of Asia and Australia. These fish have become very popular for personal aquariums. Many are smaller than this one, which is depicted (on an 8.5" x 11" sheet) at about the size limit You can feel free to make the fish in any color scheme you like. If there isn't one like it in captivity, no doubt one will be discovered — or bred — sometime soon. There are multitudes of color photos online if you want to do a realistic rendering. I 'squared-off' some features in order to make a needlepoint picture of the fish which I worked on a standard canvas.

 
Oscar needlepoint

I chose to put my fish in shallow water, lit from above with sunlight, and to surround it with suggestions of different species of water plants. Their unusual colors and patterns, despite their brightness, break up the fish's outline and provide good camouflage.  Some species can also change color to some extent. It is a hunter and has even been described lying flat on one side and "playing dead" to attract its prey. In aquariums they are usually fed crustaceans, earthworms, insects and specially prepared mixtures that are designed to be fed to much larger carnivorous fish.

My memory served up another delight. We were living in Idaho at the time. My husband had some leave time, so we had gone to a weekend affair in the Grand Tetons. We both liked to fish, but he wouldn't eat the fish so we went to "catch and release" before it was even popular. We always had fishing gear in the back of the van, even when we weren't pulling the boat. So we decided to stop at a reservoir on the way home to see how fast the ice was melting.  There was about a three foot stretch of open water, so we took our gear and started along the embankment. We met a lone fisherman and he and my husband started talking. I moved on quite a way ahead of them.

Brown trout
Brown trout
The water was as clear as glass. I could see a big brown trout — my favorite trout — on the bottom. I had a small red and white lure with a lot of action to it on my line, so I dropped it gently on the surface some distance ahead of the brown and started twitching it every few seconds.  I watched him come up from the bottom, opening his mouth wide as he hit the lure.  I set the hook. He fought me the short distance to the shore. My shout as I lifted him out of the water brought the two men running.  The brown was indeed a beautiful fish.  He wasn't badly hooked, and was soon freed. I took him back to the edge and eased him into the frigid water, watching him until he disappeared under the ice.  It was one of those small, perfect moments that you remember forever.


I am often asked for border designs for embroidery, and so have used several in this article. I hope you will find them useful. These are designed for linear stitches like outline and chain stitches. The figures can all face one direction or be used in face-to-face positions alternating with tail-to-tail pairs.

Repeatable fish design for borders
But counted cross-stitch and needlepoint can also be used for larger panels and borders. Here is a segment of a repeatable design that can be done in either of those techniques. If you are going to do needlepoint on a fabric background, use the kind of canvas that is designed to be pulled out when the design is completed and don't pull your stitches so tight that the canvas threads cannot be removed. If this technique is new for you, I recommend you practice on a piece of the canvas and fabric before you undertake a larger composition. Check the work from time to time to make sure your stitches are not getting tighter as you go along, because that is an easy mistake to make.

Fishing can, of course, be frustrating, especially when the fish aren't biting.  But I remember one occasion when it was frustrating because the fish was biting. No, that is not an error in grammar. Let me explain.  It was during the time when we were stationed in Panama. My husband wanted to try fishing from a solitary dock on the Pacific side of the Isthmus. I went along to keep him company. It was a nice
Tiny, spiny puffer fish
day and I was enjoying watching the water birds skim and dive to do their fishing.  My husband was not getting any action. Finally he got a strong tug on his line. The fish put up a good fight, but he finally brought it in. Much to his dismay, it was a small puffer fish that had swallowed enough water to become the size of a football. There are quite a number of these species in tropical and sub-tropical waters. This was one of the kind that, when inflated, was covered with sharp spines poking out of its skin in all directions and was able to deliver a poison if handled improperly.*  He put on heavy gloves and freed the fish from the hook. It was obviously not the first time it had been hooked because it had a distinct scar on one side of its jaw. He took it to the far end of the dock and dropped it back into the water. Twenty minutes or so later, he got another strike and reeled in the fish. He groaned, "It's another one!" "No," I said, pointing to the scar, "it's the same one." He decided that the third time had to be the charm he needed.  Another twenty minutes. Another strike.  Same fish. (I really thought it looked ashamed that time, but it was probably just water-logged.)  My husband announced that since there was apparently only one fish left in the water that the birds hadn't eaten, we might as well go home.  So we did.  And I managed not to laugh once, at least not out loud.

*Not all puffer fish produce the potentially deadly tetrodotoxin, but, if you encounter one, it is probably best to assume that it does. The toxin is also found in other fish like porcupine fish, triggerfish, and ocean sunfish, snails and other mollusks,  some crabs and sea urchins.  On land, it is found in some newts, toads, and frogs. The deadliest carrier of the toxin is the blue-ringed octopus.

Panama Canal. Pacific end
The Panama Canal has caused a lot of problems for local populations of fish and other aquatic or marine creatures. Pacific species, long held back by the unbroken shoreline, invaded the Atlantic Ocean and Atlantic species did the same thing to the Pacific Ocean. These transfers, no longer in a controlled environment, affected not only the species themselves, but also the organisms which ate them or were eaten by them. Some species have disappeared completely and some of the "foreign" species have spread widely, affecting areas a long distance from the Canal itself.

Seahorse drawing by Annake
Here is a big drawing of a very small fish. I think that if I had to choose just one kind of fish to study and draw it would be the seahorses and the related — and even stranger — sea dragons.  These are among the most fascinating of sea creatures, both in appearance and in habits.  many people don't even realize that they are fish.

But there are many species of sea creatures on tropical coral reefs, under the polar ice, and at the bottom of the seas that are little known or understood, if they have even been discovered. And many of them are in danger of extinction before they have even been studied.  The effects of climate change have been magnified and multiplied by our failure to understand and protect the lives of these creatures, many of whom have survived millions, even billions, of years of planetary changes before we ever existed.  The damage that has been done to both freshwater and saltwater habitats in just the past couple of centuries is appalling.  However, I am greatly encouraged by the growing interest among teenagers and young adults in combating these problems. They are taking a global approach toward the problems and are prepared to work cooperatively to overcome them.  I hope all of us will get behind their efforts and support them in any way we can.

Stay well. Stay safe.  Stay positive.


Seascape watercolor by Annake


Creative Commons LicenseThis post by Annake's Garden is licensed under a Creative Commons Attribution-NonCommercial-ShareAlike 3.0 Unported License.

Sunday, July 12, 2020

Fool the Eye: Illusions in Textile Art


Three Early American quilt designs
What are "optical illusions"? They are patterns that fool the eye into seeing things that are not really there. These include 3-dimensional objects that appear to extend out from the canvas, “hollow” spaces in the canvas showing depth, textured surfaces, and interwoven areas where sections appear to pass over and under each other. Some optical illusions can be traced back to Early American quilt blocks.

When European settlers came to America, for a long time they were dependent upon supplies of cloth shipped in from Europe.  Therefore, everything needed to be made to last as long as possible. When a garment was no longer wearable, any usable pieces were cut out and saved. When a new garment was made, all fabric scraps were saved. When enough scraps were accumulated, they were sewn together to make woolen quilts like the ones seen here.

A popular pattern was the one shown in blocks on the first quilt in this trio, which was called the "Nine Patch". If you look closely, you will see that each block is made up of nine small squares.  It is an easy beginners' pattern. With the instruction of a patient and loving grandmother, I learned to sew a simple seam and made a little Nine Patch quit for my doll when I was about four years old — and I have been sewing ever since. The second quilt is also composed of small squares, arranged in larger squares which are placed in a diamond configuration. This pattern was commonly called "Sunshine and Shadows". As quilters became more assured (and more competitive) they began to use more complex pieces and designs, like the third quilt shown here, made with sharp diamond-shaped pieces. This is one of many "Star" designs.

Tumbling blocks
Tumbling blocks
Well, these are very pretty, but they don't "fool the eye". This one, called "Tumbling Blocks" does. It forms an illusion still used broadly today.

It appears that you are looking at a surface that is further away than the surface of the canvas. Your eye moves back and forth from blocks that appear to be pointing upwards and acting like stepping stones to blocks that appear to be pointing downwards and coming out of the surface toward you. The effect is achieved by using a bright yarn, a dark yarn, and a light yarn of the same color. The sample was done in longstitch (upright Gobelin) on a #7 mesh canvas. The edges are so sharp that back-stitching is optional. The finer the mesh this is done on, the more distinct the illusion will be.

block design in longstitch
A tumbling block design in longstitch
illusion of depth


The next example shows the illusion of depth. It appears that you are looking down at a surface that is farther away than the surface of the canvas. The pattern starts with a network of light-colored diamond shapes. One of these has been filled in with successively shorter rows of successively darker shades of the yellow color. The darkest shade forms a solid diamond that our eyes tell us is the bottom of a 3-dimensional space. The more layers of color that are used, the deeper that the "box" or "room" appears to be.


Another needlepoint illusion
This illusion is made by making rows of zig-zag pointed patterns which meet only at their highest and lowest points, which are staggered from one row to the next. This leaves small blocks of canvas in between the rows. Since the rows are off-set slightly, the empty blocks are not diamond-shaped as one might expect. These parallelogram-shaped parts of the pattern are sometimes called "lozenges". These are used frequently in bargello patterns.  The odd numbered rows are identical to each other. The even-numbered rows are identical to each other, but slightly different from the odd-numbered rows. This causes the "lozenges" to point to the lower right in one row and to the lower left in the other.  Would such a construction be possible in three dimensions — say using shoeboxes?

The illusion below appears to show two flat striped ribbons twisted around each other.  Notice that the bottom edge of each ribbon is slightly lighter than the matching top edge.  The sample is done in long, straight stitches. It would be a bit more difficult to chart and work in tent stitch, but the illusion would probably be more distinct.

Follded ribbons in longstitch

Bachelor's puzzle construction steps

Here is a step-by-step series of diagrams for an illusion I know only as "Bachelor's Puzzle".  It is derived from a quilt block. Below is a small framed picture of it done in needlepoint.  A collection of several pictures like these is nice for a narrow wall space next to a door or between windows.

Bachelor's puzzle needlepoint

This time we are going to adapt two designs and combine them to make a framed "op art" picture. I started with a pattern I know as "Ring Around the Star".  (Many patterns have multiple names.) I don't know the origin of the pattern, but I suspect it is 18th Century American.  However, I believe it may be derived from a much older English pattern called "King's Cross". The center of the "King" pattern is just to the left below. The center of the "Ring" pattern is next. The last two diagrams are sketches I made to decide which shading gave the effect that I wanted.  I chose the one on the right.

Ring-Around-a-Star development sketches


The two pictures below show the shading I did for the color stitching. You will find a photo of the framed picture at the end of this article.

Ring-around-a-star shading

King's Cross in a rectangle
Square frames are harder to find than rectangular ones, so I have modified the "King's Cross" design to fit a rectangular frame.  I did this pattern for a 5-inch X 7-inch frame (13 X 18 centimeters), but I can show you how to adapt it for any rectangular frame. Turn the frame upside-down on your canvas and draw around the opening with a pencil. Remove the frame. (If necessary, use a ruler or straight-edge to square the corners and make the sides straight.) Leave extra canvas around the rectangle so that you can tape the edges. Find the center of the rectangle and mark it with a dot (O on the diagram), continuing to use a pencil. Find the centers of the top and bottom — the short sides — and mark them with dots (A). Find the centers of the long sides and mark them (B). Mark the four corners (C). Mark the centers of the lines between the A's and the center O (D). Mark the centers between the B's and the O (E). Mark the centers between the C's and the A's (F) and the centers between the C's and the B's (G). Now connect the dots as follows:
  1. A-O-A
  2. B-O-B
  3. Both C-O-C's
  4. Both E's on the top and bottom with the nearest D
  5. Both G's on the sides with the nearest E. You may then erase the A-D and the B-E lines if you wish to do so.
Now you are ready to begin stitching.

King's Cross sketch
King's Cross sketch
This sketch will work with any three-color combination as long as the white sections are in the lightest color, the pencil-shaded sections are a darker shade of the same or a similar color, and the inked-in triangles are in a very dark color. You will notice that the pairs of triangles are not quite the same. Also, the shapes that were parallelograms in the original pattern are now polygons. These are large areas, so use a heavier yarn than usual or double your regular yarn to cover the canvas completely. Once again, I recommend doing the triangles in basket-weave, starting at the center points and working outward this time. Any irregularities where two colors of yarn join, or at the edges, may be covered by back-stitching if you choose.


Once, as I worked on the design for a 6-way bargello pattern, I told J.D. that I could see an optical illusion forming in one of the designs. He said he could see one, too, but that he would have to erase some of the lines in the design to make it. I suggested that we each draw the design we imagined, to see if we had different illusions in mind. When we compared our results, we had indeed seen different illusions. We were delighted. This “game” continued for some time. Below are two of the more interesting ones, for the benefit of those of you who have taken up this pursuit. You can use black, white, and grays for your shading or you can use various tones and shades of a single color. If you use different colors, you may achieve an interesting design, but lose much or all of the illusion.


Hexagon grid
Hexagon grid
Working with a hexagonal shape requires us to adjust our thinking just a bit. We are used to thinking in terms of a base of 90 degrees (0 degrees, 90 degrees, 180 degrees, 270 degrees, 360 degrees).  A hexagon, however, is based on 60 degree angles (0 degrees, 60 degrees, 120 degrees, 180 degrees, 240 degrees, 300 degrees, 360 degrees). The design is constructed along each axis from the degree mark to the center. Although the hexagon is basically two overlapping triangles, it seems more balanced than any triangle.  On the other hand, it is more versatile and less static than a square or a rectangle. Try starting with a hexagonal outline and building shapes inside it.

In the first example, two overlapping 3-dimensional squares have been fused together to make an angular figure-8 shape.  The most shadowed areas are shaded in black. The intermediate shading is done in a medium green.  The most illuminated areas are done in a light blue. The background is the white of the drawing paper. Once the figure is complete, the little construction lines can be erased, along with the unnecessary bits of the hexagonal outline.


The second figure is made up of small cubes.  You would need to put the construction lines in very lightly because many of them would have to be erased in order to achieve the final illusion. The same three colors have been used to show the amount of light reflected from the surfaces. Once again the white of the paper is the background, but you could put in another very light color if you wished. Study the construction diagram on the top right to determine how the figure was constructed. The finished illusion is shown on the bottom right with the construction lines and unnecessary hexagonal lines erased.

Now that you are familiar with hexagons, you might want to try constructing a six-pointed star pattern.  Here is a hint:  connect 0 degrees (which is also 360 degrees) to both 120 degrees and 340 degrees; connect180 degrees to both 60 degrees and 300 degrees. Two more straight lines will complete the star.

Finally, here is a photo of the finished and framed project that we promised you earlier in this post.


If you enjoyed this article, watch for a new post on the subject this Fall.


 Creative Commons LicenseThis post by Annake's Garden is licensed under a Creative Commons Attribution-NonCommercial-ShareAlike 3.0 Unported License.
Contact Us

Name

Email *

Message *

Blog Archive