Did you ever make something with the rose diagram you showed us on the post in early 2017? If so, I would really like to see a picture of it. I loved the design. It looked like such a romantic rose.
Oh my goodness, you have been waiting for that rose for a long time! I would really be embarrassed if I hadn't done anything with it! Actually, I stitched it within a few weeks of the posting of the blog you referred to. So no one has to look up the original blog, Here is a downloadable pattern of the rose and its bud that you may use any way you choose.
Originally I planned to do just the full-blown rose. Although I liked it, it seemed incomplete. I arranged the leaves and added the partially open bud. I was happy with the experiment, so I traced my sketch onto needlepoint canvas. I did the rose, bud, and leaves in French longstitch — basically a directional satin stitch — with some back-stitching around the edges. I used a background in a patterned of two-toned Parisian stitch (samples below) in yellow tones. It could just as easily have been done in tent stitch or a combination of patterned stitches When the piece was completed, J.D. scanned it for future reference. Then he matted it with a mat that matched the deepest tones in the rose and framed it under glass in a gold frame. But I sold it so quickly that he did not get to photograph it. (I'm still hearing about that!) So I can't show you the framed result, but I can show you J.D.'s scan.
You weren't the only one to find the rose romantic. I sold it to a couple of newlyweds who were decorating their first home.
I'm going to give directions for doing a needlework pattern with the design, but I sincerely hope you will choose your own color scheme. The colored scan can give you an indication of where light and dark areas were intended to go in the design. Begin by centering the design on your canvas and tracing it with a permanent marker. Scrub off any excess ink with a tissue or paper towel. Now select the colors of your yarn or floss. The more choices you make, the more completely the rose will belong to you The pattern will work easily for most colors. A white rose is a bit of a challenge, but can be done with off-whites, cream, ivory, ecru, etc. I've never tried a black rose, but it should be possible with a range of grays, blues, or purples. You will need a range of several shades of your main color, plus at least two greens. An opening bud is often more vivid than the full-grown rose. Lay your materials out in front of you in light-to-dark order. Tag them with numbers if you like. Add needles, scissors and any other items you think you will need. (I'll admit I'm greedy when it comes to needles; I used a separate needle for each shade.) The pattern is a “forgiving” one. If you place an occasional stitch in the wrong section, it should not spoil your rose. Small differences are to be expected in handmade items. If you run out of a color, continue with the closest match you can find.
Here is an enlarged part of the scan, showing some of the stitching and some of the background. I did it as a picture, but you may use it any of the ways suggested below or one I haven't even thought about. You can make all those decisions for yourself. Here are just a few ideas for its use, many of which have nothing to do with needle arts:
I do, however, want to show you how to modify this outline so that it works more easily as a chart. The first thing to do is to transfer the pattern to quarter-inch graph paper. I use either dressmaker’s carbon or a sheet of paper which I have colored heavily with a graphite pencil. Aligning one major straight line in the design with a line on the graph paper, i transfer the design by going over the outline with a ball-point pen that has used up all its ink. Once the transfer is complete, I draw straight lines, square corners, and forward and backward diagonal lines to come as close as possible to the curved lines in the original design. The resulting new design can then be enlarged or reduced to fit any size of graph paper. (It can also be simplified if you wish.) Before I use or store the pattern, I trace it once again with a permanent marker.
Some uses for this type of pattern include:
When we started this blog I had just retired from teaching and suddenly had a lot of time to devote to activities like needlework and gardening, so those were most of the topics that J.D. and I discussed as posts for this blog. As time went on, we got questions about a lot of subjects we had brought up in articles. We answered those questions individually as best we could.
Sometimes I would make a note of a question that I thought might interest a number of people, so we began to do periodic Question and Answer posts. We will continue to do these. As we became more active in Farmers' Markets, art exhibits, craft shows, etc., I devoted the occasional post to a subject that was not directly connected to our usual topics. These were also well-received.
I want to interject here the fact that I really dislike the distinction that is made between "art" and "crafts". I feel very strongly that any weaver, quilter, woodcarver, glass-blower, jeweler, or other artisan — a word I do approve of — makes something original, beautiful, and perhaps even useful, that person is just as much an "artist" as someone who paints three stripes on a canvas and hangs it in a gallery! Therefore, I encourage everyone to express themselves in whatever medium appeals to them. I want our readers to try a variety of activities, to pursue the ones they like, and to never, ever, let the criticism — however well-meaning — of others deter them from expressing themselves.
Last year we began series of posts showing how accepted visual art genres, like still life and landscape, could also be expressed in the needle arts. I included some historical and geographical information and tried to show how attitudes toward each genre changed over time and how new materials and techniques were applied We illustrated each article with photographs, diagrams, reproductions of paintings and color sketches. These articles proved to be popular and have continued this year.
In the course of researching and writing those articles, we always had background material that we left out for reasons of space, or because it was not immediately needed for the points we were making. But now we want to use that material to look at some basics that apply to many creative fields. For example, the use of color — a topic rarely discussed in books about needle arts — from the physical science behind it to the psychology of it.
J.D.: Often, necessity has led us off in new and unexpected directions. For instance, Annake needed photographs illustrating specific points she was making in the series of posts about Still Life in the Needle Arts; so I composed and shot a lot of them, something I had never really considered before. That process was so fascinating that I want to pursue it further. And there was Annake’s need for more working space and better organization for years of collected files and patterns — which led us to making digital art prints. Plus, the necessity of improving my digital editing capability to make some of those pieces printable has led me in all sorts of wild and wonderful new directions.
We do not intend to stop posting about the topics that filled this blog in earlier years, but we really feel the need to follow these new paths too, wherever they may lead. We hope you will join us; and we always love to hear from readers about the things we have covered (or failed to cover!) in this blog, and any creations our posts have helped to inspire. Tell us what you think about this change of direction, and what you would like to see. You can reach us through email at:
Good Journeying,
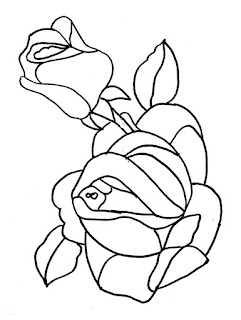 |
| Downloadable rose pattern |
Originally I planned to do just the full-blown rose. Although I liked it, it seemed incomplete. I arranged the leaves and added the partially open bud. I was happy with the experiment, so I traced my sketch onto needlepoint canvas. I did the rose, bud, and leaves in French longstitch — basically a directional satin stitch — with some back-stitching around the edges. I used a background in a patterned of two-toned Parisian stitch (samples below) in yellow tones. It could just as easily have been done in tent stitch or a combination of patterned stitches When the piece was completed, J.D. scanned it for future reference. Then he matted it with a mat that matched the deepest tones in the rose and framed it under glass in a gold frame. But I sold it so quickly that he did not get to photograph it. (I'm still hearing about that!) So I can't show you the framed result, but I can show you J.D.'s scan.
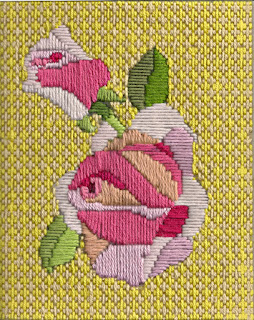 |
| The rose in longstitch |
I'm going to give directions for doing a needlework pattern with the design, but I sincerely hope you will choose your own color scheme. The colored scan can give you an indication of where light and dark areas were intended to go in the design. Begin by centering the design on your canvas and tracing it with a permanent marker. Scrub off any excess ink with a tissue or paper towel. Now select the colors of your yarn or floss. The more choices you make, the more completely the rose will belong to you The pattern will work easily for most colors. A white rose is a bit of a challenge, but can be done with off-whites, cream, ivory, ecru, etc. I've never tried a black rose, but it should be possible with a range of grays, blues, or purples. You will need a range of several shades of your main color, plus at least two greens. An opening bud is often more vivid than the full-grown rose. Lay your materials out in front of you in light-to-dark order. Tag them with numbers if you like. Add needles, scissors and any other items you think you will need. (I'll admit I'm greedy when it comes to needles; I used a separate needle for each shade.) The pattern is a “forgiving” one. If you place an occasional stitch in the wrong section, it should not spoil your rose. Small differences are to be expected in handmade items. If you run out of a color, continue with the closest match you can find.
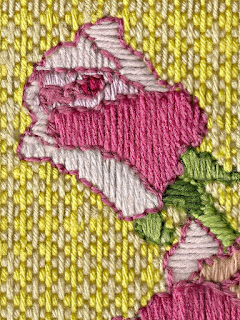 |
| Detail of the longstitch rose |
- a painting
- a standing or hanging wire sculpture
- a collage
- a felt applique with cut-out pieces glued or sewn to a background
- a wood carving
- a trapunto pillow
- an embossed piece of copper foil
- tooled leather
- the center panel for a quilt
- a decorated lampshade
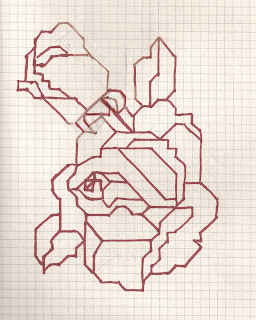 |
| Rose pattern modified for graph paper chart |
Some uses for this type of pattern include:
- a counted cross-stitch design
- a panel of ceramic tiles
- Spanish blackwork
- Russian redwork
- Scandinavian whitework
- a mosaic
A Change of Direction
When we started this blog I had just retired from teaching and suddenly had a lot of time to devote to activities like needlework and gardening, so those were most of the topics that J.D. and I discussed as posts for this blog. As time went on, we got questions about a lot of subjects we had brought up in articles. We answered those questions individually as best we could.
Sometimes I would make a note of a question that I thought might interest a number of people, so we began to do periodic Question and Answer posts. We will continue to do these. As we became more active in Farmers' Markets, art exhibits, craft shows, etc., I devoted the occasional post to a subject that was not directly connected to our usual topics. These were also well-received.
I want to interject here the fact that I really dislike the distinction that is made between "art" and "crafts". I feel very strongly that any weaver, quilter, woodcarver, glass-blower, jeweler, or other artisan — a word I do approve of — makes something original, beautiful, and perhaps even useful, that person is just as much an "artist" as someone who paints three stripes on a canvas and hangs it in a gallery! Therefore, I encourage everyone to express themselves in whatever medium appeals to them. I want our readers to try a variety of activities, to pursue the ones they like, and to never, ever, let the criticism — however well-meaning — of others deter them from expressing themselves.
Last year we began series of posts showing how accepted visual art genres, like still life and landscape, could also be expressed in the needle arts. I included some historical and geographical information and tried to show how attitudes toward each genre changed over time and how new materials and techniques were applied We illustrated each article with photographs, diagrams, reproductions of paintings and color sketches. These articles proved to be popular and have continued this year.
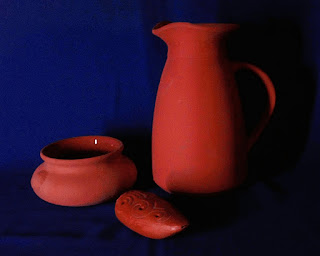 |
| Still life photo by J.D. |
J.D.: Often, necessity has led us off in new and unexpected directions. For instance, Annake needed photographs illustrating specific points she was making in the series of posts about Still Life in the Needle Arts; so I composed and shot a lot of them, something I had never really considered before. That process was so fascinating that I want to pursue it further. And there was Annake’s need for more working space and better organization for years of collected files and patterns — which led us to making digital art prints. Plus, the necessity of improving my digital editing capability to make some of those pieces printable has led me in all sorts of wild and wonderful new directions.
We do not intend to stop posting about the topics that filled this blog in earlier years, but we really feel the need to follow these new paths too, wherever they may lead. We hope you will join us; and we always love to hear from readers about the things we have covered (or failed to cover!) in this blog, and any creations our posts have helped to inspire. Tell us what you think about this change of direction, and what you would like to see. You can reach us through email at:
annakes_garden@yahoo.com or annakesgnome@gmail.com .
Good Journeying,
 This post by Annake's Garden is licensed under a Creative Commons Attribution-NonCommercial-ShareAlike 3.0 Unported License.

