
A couple of years ago we began drawing some small, simple geometric patterns which could easily be repeated to make larger, more complex designs. These were designs that could be adapted for many different crafts — not just needlecrafts. Designs could be repeated a number of times just as they were in the picture, or they could be reversed, rotated, even taken apart and put together in new configurations.
 Let's look at the three patterns at the top of the page. Here is the first one, a very simple design in a single color on white. In the larger version, the original pattern has been rotated to make a design of squares. This one can be continued outward as far as you want to go.
 Now let's consider the pattern at the other end of the line. You may remember this one. Later we showed you how to change the design from a square pattern to a rectangular one by elongating the internal squares either vertically or horizontally.
I was trying to make two points. First, that, since this was an all-over pattern, it was not necessary to start in the middle of the canvas. I started the piece on the left at the upper right-hand corner of the design and expanded it both horizontally and vertically as far as my canvas segment allowed. Second, the pattern can be worked to fit rectangular projects. They do not have to be square, as the 4-way bargello designs do need to be. I suggested that viewers might want to do a sample using the 3-stitches-over-4-threads formula that I used for this sample, which elongates the squares into rectangles vertically. The third sample elongated the squares to rectangles horizontally. The result is definitely rectangular — and large. It is probably not a good design for a 4-way bargello unless you are using much smaller squares of canvas. It would probably work on # 14 needlepoint canvas, however.
 The middle pattern can be repeated just as it is, of course, but I want to play with it a while. How you approach this pattern depends on whether you want to place the emphasis on the heavier "North/East/South/West" part of the square pattern or the more delicate diagonal components. I will start with the heavier aspects. Here is the result. You can change this from a square pattern to a horizontal one by simply adding another repeat of two of the smaller squares to any side of the original.
I returned to the design, this time concentrating on the slender lines that formed the diamond shapes inside the frames.

These designs made from the small corner squares have proven to be popular. For that reason, I am giving you some more of them to work with. In each case, the original square that was rotated is shown in its proper position and is emphasized by a black outline.

Suppose you are ready to enlarge a design but are not sure how to proceed.
 Take a clean sheet of graph paper and mark its center both horizontally and vertically. Repeat your desired pattern (diagram above) on top of the horizontal line, starting just to the left of the vertical line. Now repeat your pattern in reverse to the right of the vertical line. Turn the paper upside-down. Repeat what you just did below the horizontal line above the horizontal line now. Now you have a 4-way starting pattern. Each colored square represents a stitch or a square of stitches in your pattern. Empty squares can be worked in white, black, beige, etc. Work the four parts of your design in the center of your canvas, then decide how you want to "grow" your finished pattern.
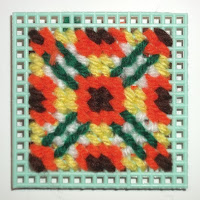
 The samples I usually show on these posts are done on #7 plastic canvas. I recommend this for practice and to make pattern samples that are meant to be filed in a box for future reference. If you are working in tent stitch, this is the pattern square, with one stitch for each square of the pattern. It is also done on #7 canvas. These patterns are very versatile. If you do latch-hook, for example, you can use a pattern like this one by putting in a knot for each square of the pattern. This would work as both a four-way pattern, perhaps for a pillow, and an all-over one for a mat or rug. Beading and mosaics could also be done with such a pattern.
When working a multicolored pattern like this, I recommend using a separate needle for each color. This cuts down on the time spent in threading needles and decreases yarn waste. Secure each color often on the back of your canvas. Do not carry long strands of yarn across the back of your canvas while moving from one colored segment to the next.

This two-color pattern is suitable for an all-over design, but perhaps is not as good for a 4-way design.
A word of caution about colors. What I see on my screen in the office is not necessarily what J.D. sees on his screen in the workshop or what you will see on your device. And if you are printing something out, there are even more possible differences. Use your own color choices on any of these designs.
Before we leave the 12-square designs above, here are the three designs as I have expanded them to 16-square designs.

The first one is done in the same way I changed the smaller squares to 12-squares. I took more liberties with the second one, repeating some parts of the design and modifying others. Bear in mind that none of my designs are the only way to "grow" the designs. You need to find your own ways to do that to make designs that please you. I have taken even more liberties with the third design, repeating none of either the dark or light elements exactly as I expanded the design, while keeping the "feel' of the design.
There is another way to record graphed designs, and this one can be done in any color combination that you desire. Instead of filling in colors on a design sample that you like, put in alphabet letters for each of the colors that you used. You can then experiment with different color combinations and record alphabetically the ones you want to keep. This diagram will show you what I mean.
Each of the little squares in the design could represent a single stitch on canvas or even-weave fabric, a square of upright gobelin, a much larger square of fabric, or even a floor tile. Let's revisit one of those designs. Instead of taking one of the little squares as the basis of our design, this time let's consider the entire three-inch square as a single, repeatable part of our design. I chose to make this design in analogous colors (colors next to each other on the color wheel) because I wanted to make some points about color combinations. Analogous colors reflect wavelengths of colored light that are closely related Since these colors are closely related, we are pretty well assured of a pleasant design. I chose blue-green, blue, and blue-violet for my color combination, but you need not use those colors if you want to try others. For a trio of warm. bright colors, you might choose red-orange/ orange/ yellow-orange (the exact opposite of the three I chose), for example.

Notice that I have used one light color, one medium color, and one dark color (a tint, a tone, and a shade) in each design. I do this to make it easier to place each color when I begin "growing" the design. Each color is in the same set of squares on all three versions of the design; only the intensity of the colors changes. As you can see, which color is emphasized most does alter the design — a fact you will need to consider not only when "growing" your design, but also before choosing the yarns, fabrics, paints or other materials for your final project. Changing the positions of the colors as well as the intensity will give you even more varied results. I "grew" all three of the blue-green/blue/blue-violet designs. Here are the expanded designs.

Somewhere in the midst of all this, J.D. slipped up behind me and snapped this picture of my worktable, with the designs in progress. (He says he wanted to show you how much work I do before I publish anything for my readers. I think he just wanted to show what a mess my worktable usually is!)
This design technique is called tiling. It is an ancient art form used originally for creating inlays and mosaics. It was used in Mediterranean civilizations long before those of the Greeks and Romans. The earliest known mosaics were made in Mesopotamia before 2,000 BC (BCE) Just recently there was news of a remarkable mosaic discovered in the ancient city of Hippo.
Of course, I do a lot of preliminary work on the computer to save time. One place where this comes in handy is in choosing the background color for a geometric center design. What J.D. does is put up the center design on screen and then "flood" the background of the design with a variety of colors to see how they compare. J.D. did this electronically. Here are the ones we liked best.

We often show pieces of finished work without showing the design patterns. Here are three that are suitable for tiling in one or more of the ways we have discussed in this article.

So far we have worked with patterns based on small squares or rectangles because they are so easy to duplicate on standard graph paper. When we return to this topic in the future, we will discuss other base shapes like triangles and hexagons.
Have fun with your design experiments.


 |
| Vertical & horizontal versions |

I returned to the design, this time concentrating on the slender lines that formed the diamond shapes inside the frames.

These designs made from the small corner squares have proven to be popular. For that reason, I am giving you some more of them to work with. In each case, the original square that was rotated is shown in its proper position and is emphasized by a black outline.
Suppose you are ready to enlarge a design but are not sure how to proceed.


When working a multicolored pattern like this, I recommend using a separate needle for each color. This cuts down on the time spent in threading needles and decreases yarn waste. Secure each color often on the back of your canvas. Do not carry long strands of yarn across the back of your canvas while moving from one colored segment to the next.

This two-color pattern is suitable for an all-over design, but perhaps is not as good for a 4-way design.
A word of caution about colors. What I see on my screen in the office is not necessarily what J.D. sees on his screen in the workshop or what you will see on your device. And if you are printing something out, there are even more possible differences. Use your own color choices on any of these designs.
Before we leave the 12-square designs above, here are the three designs as I have expanded them to 16-square designs.
The first one is done in the same way I changed the smaller squares to 12-squares. I took more liberties with the second one, repeating some parts of the design and modifying others. Bear in mind that none of my designs are the only way to "grow" the designs. You need to find your own ways to do that to make designs that please you. I have taken even more liberties with the third design, repeating none of either the dark or light elements exactly as I expanded the design, while keeping the "feel' of the design.
 |
| Letter chart |
Each of the little squares in the design could represent a single stitch on canvas or even-weave fabric, a square of upright gobelin, a much larger square of fabric, or even a floor tile. Let's revisit one of those designs. Instead of taking one of the little squares as the basis of our design, this time let's consider the entire three-inch square as a single, repeatable part of our design. I chose to make this design in analogous colors (colors next to each other on the color wheel) because I wanted to make some points about color combinations. Analogous colors reflect wavelengths of colored light that are closely related Since these colors are closely related, we are pretty well assured of a pleasant design. I chose blue-green, blue, and blue-violet for my color combination, but you need not use those colors if you want to try others. For a trio of warm. bright colors, you might choose red-orange/ orange/ yellow-orange (the exact opposite of the three I chose), for example.
Notice that I have used one light color, one medium color, and one dark color (a tint, a tone, and a shade) in each design. I do this to make it easier to place each color when I begin "growing" the design. Each color is in the same set of squares on all three versions of the design; only the intensity of the colors changes. As you can see, which color is emphasized most does alter the design — a fact you will need to consider not only when "growing" your design, but also before choosing the yarns, fabrics, paints or other materials for your final project. Changing the positions of the colors as well as the intensity will give you even more varied results. I "grew" all three of the blue-green/blue/blue-violet designs. Here are the expanded designs.
 |
| Annake at work |
This design technique is called tiling. It is an ancient art form used originally for creating inlays and mosaics. It was used in Mediterranean civilizations long before those of the Greeks and Romans. The earliest known mosaics were made in Mesopotamia before 2,000 BC (BCE) Just recently there was news of a remarkable mosaic discovered in the ancient city of Hippo.
Of course, I do a lot of preliminary work on the computer to save time. One place where this comes in handy is in choosing the background color for a geometric center design. What J.D. does is put up the center design on screen and then "flood" the background of the design with a variety of colors to see how they compare. J.D. did this electronically. Here are the ones we liked best.
We often show pieces of finished work without showing the design patterns. Here are three that are suitable for tiling in one or more of the ways we have discussed in this article.
So far we have worked with patterns based on small squares or rectangles because they are so easy to duplicate on standard graph paper. When we return to this topic in the future, we will discuss other base shapes like triangles and hexagons.
Have fun with your design experiments.

 This post by Annake's Garden is licensed under a Creative Commons Attribution-NonCommercial-ShareAlike 3.0 Unported License.


