I love flowers! That is why my business is called
Annake's Garden and my blog is called “
Cuttings from Annake's Garden”. More of my work involves flowers than any other single subject. I am a great admirer of Georgia O'Keeffe's giant flowers and her determination to get people to really
look at flowers. While my individual flowers don't approach the size of her paintings, I do like to work larger than life. Actually, this goes back to a time when I was teaching fifth graders about Georgia O’Keeffe. I made several oversized flower pictures in various media to show the students, along with samples of O’Keeffe's work, before I asked them to make their own large flower pictures. Their favorite sample was a study in pastels and crayon of an orange daylily. Several students asked me to make computer copies of the picture for them. I did that, filed the picture, and essentially forgot about it.
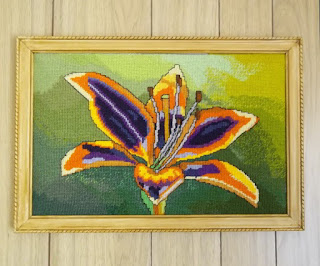 |
| "Day-glo Daylily", needlepoint by Annake |
After I retired, I cleaned out my files and came across the original drawing. I decided to make a rug, using the sketch as a basis for my design. It was the first rug I ever sold. Fortunately, J.D. had already been archiving photos of my work, so I can show you what that piece looked like (above). I've also done a daylily as a large needlepoint (right). The colors came from my imagination; however, I see one in this year's catalogs that comes very close to my imaginary one. Is art imitating life or is life imitating art?
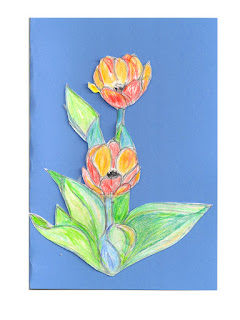 |
| Sample card |
In both cases, I was working on a scale considerably larger than life. Doing this frees you to include as many details as you like — whether or not those details existed in an actual flower. There are many instances, however, when this is either not possible, or when it not desirable. Sometimes less
is really more. Sometimes it is simply a matter of space. Suppose you are making a series of greeting cards. The entire card may be smaller than the flower you are depicting. Instead of cropping the flower to fit, why not do a depiction of the flower that fits the card and eliminate unnecessary details?
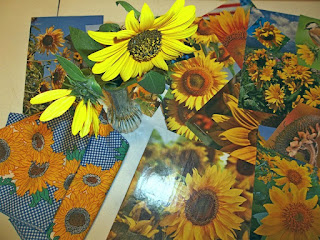 |
| Sunflower project materials |
Once again the size of the finished project dictates what you can and cannot do. Take, for example, a sunflower that I decided to do in needlepoint in a round frame that was only 9 inches in diameter. Now, I love sunflowers. They are large and complex. They are not dainty, shy blossoms. They are large, bright, and kind of in-your-face. They never fail to cheer me.
Before I began working on the design, I collected pictures of sunflowers, fabric decorated with them, live flowers, all kinds of materials.
After tracing several examples of both the inside and outside edges of the frame, I worked to get a sunflower center that would be in correct proportion for the ring of petals. These proportions differ between sunflower species, as we discovered from planting Central and South American species. I found a combination that I liked and filled in details of the center. I didn't attempt to put in all the seeds, just suggested them. Then I determined how many outer petals I could arrange around the center, making them similar but not identical. I shaded petals that were overlapped to indicate depth. At that point, I was ready to start on the actual project.
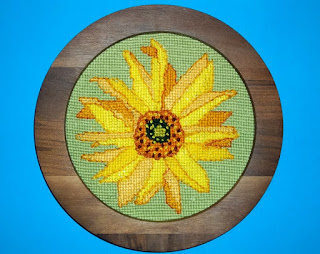 |
| Finished sunflower needlepoint |
I prepared my needlepoint canvas (#14 white mono) and ran colored threads horizontally and vertically through the center. Then I centered the canvas over the drawing and traced it onto the canvas with a fine-lined permanent marker. Once it was dry, I rubbed the lines vigorously on both sides with a paper towel to pick up any bits of ink that might discolor the yarn and I pulled out the centering threads. With the color areas of the picture completed, I filled in the background in a neutral color. Finally, I began back-stitching around certain segments with a single strand of yarn. (This is traditionally done on counted cross-stitch pictures, sometimes using a single color for all the back-stitching.) When I use it on needlepoint, I prefer to use lighter, darker, or grayer yarns to emphasize the features I'm outlining. Purists won't do this sort of surface stitching on conventional tent stitch. I'm not a purist. I'll not only use back-stitching, but also any surface embroidery that will enhance the canvas work and make it match my mental vision of the piece.
When making a pillow in folk embroidery on gingham, I made a less realistic sunflower, concentrating more on texture. Backstitching here gives the center a different appearance.
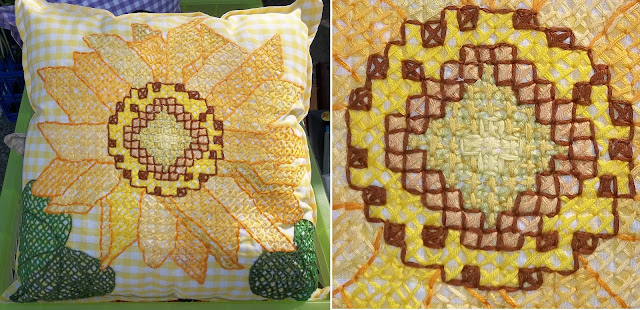 |
| Sunflower pillow with detail |
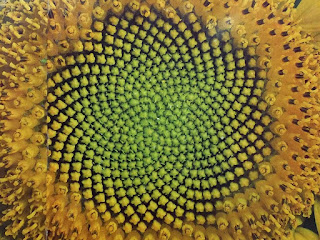 |
| Sunflower center |
Incidentally, sunflowers should delight the readers who enjoyed our
Roots, Leaves, and S.T.E.M. post (February 29, 2020), because they represent both Science and Mathematics. A sunflower is not a single flower, but a
composite of masses of two entirely different kinds of flowers. What we think of as petals are actually individual strap-shaped ray flowers whose bright colors attract pollinators. The central disc is made up of large numbers of disc flowers which, when pollinated, will produce seeds. These flowers are arranged in curved lines which follow the Fibonacci number sequence. The sequence is 1, 1, 2, 3, 5, 8, 13, 21, 34, 55, 89, and theoretically continues to infinity. Each number is the sum of the two previous numbers. The sequence is found many places in Nature — out to the structure and motion of spiral galaxies.
I do a lot more work from quick sketches and studies in pencil, watercolor, pastel. and marker and from handmade charts than I do from photos. However, I've done enough to offer some advice. If you are planning to sell your projects, be sure you have not used anyone's copyrighted material. I work from my own photos and those of J.D. and J.J. (with their permission, of course). If accuracy is important, take lots of photos from different angles, distances, and lighting effects. Be selective about the parts you use. Leave out anything that does not improve the composition. Let me show you what I mean.
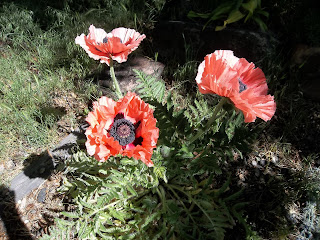 |
| Original photo |
This photo of poppies has several things going for it. The lighting is interesting. The poppies show up well against the dark background. The red of the petals is complemented by the green stems. But look at the gray, dead leaves at the lower left. They do not help the composition at all. Now look at the picture after J. D. has modified it. Cropping and/or otherwise altering a photo can add a great deal to its appeal.
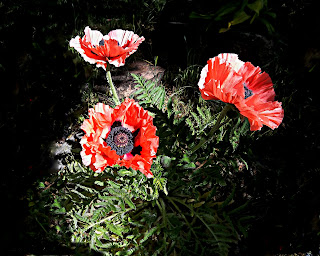 |
| Poppy photo, edited |
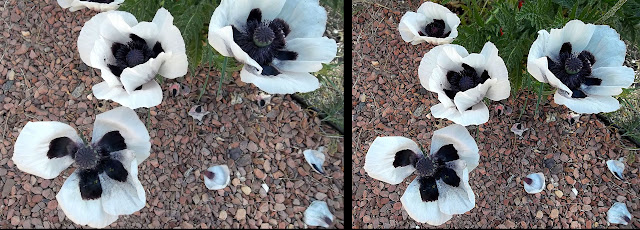
On the other hand, sometime a picture needs to be expanded. Look at these two pictures taken at the same time. See how much showing the full petals makes the picture more interesting? That is why taking multiple shots is valuable.
I do, however, want to show you how to modify an outline pattern so that it works more easily as a chart. The first thing to do is to transfer the pattern to quarter-inch graph paper. I use either dressmaker's carbon or a sheet of paper which I have colored heavily on the back with a graphite pencil. Aligning one major straight line in the design with a line on the graph paper, I transfer the design by going over the outline with a ball-point pen that has used up all its ink. Once the transfer is complete, I draw straight lines, square corners, and forward and backward diagonal lines to come as close as possible to the curved lines in the original design. The resulting new design, shown here in red, can then be enlarged or reduced to fit any size of graph paper. (It can also be simplified if you wish.)
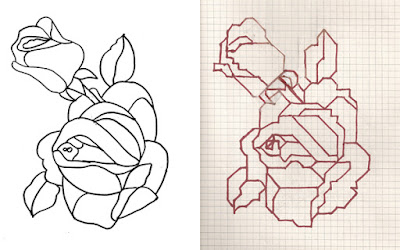 |
| Squaring off an outline |
Before I use or store the pattern, I trace it once again with a permanent marker. Some uses for this type of pattern include:
a counted cross-stitch design
a panel of ceramic tiles
a collage
a felt applique with cut-out pieces glued or sewn to a background
a wood carving
a needlepoint or quickpoint
an embossed piece of copper foil
tooled leather
the center panel for a patchwork quilt
a mosaic
an afghan put together from "granny squares"
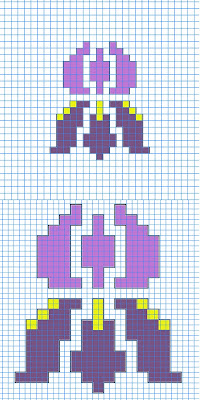 |
| Simple iris pattern graphed two ways |
Occasionally I enlarge a small or medium-sized design laid out on quarter-inch graph paper to a size suitable for making a latch-hook rug, a wall hanging, quilt blocks, etc. The easiest way to do this is to draw around a block of four squares of graph paper for each of the single squares in the smaller design. I tape a number of pages of quarter-inch graph paper together and lay them out on a large table. Beginning at the center of my design, I draw the 4-square block that represents the center square of the original design. I then work outward in all directions from that center square. I number or color the blocks as I go. The finished pattern will not match either #3.75 or #5 rug canvas exactly, but it will come very close. Count the number of horizontal and vertical squares on your pattern and mark the same number of squares on the canvas. Mark the center of the canvas and draw the outline of the entire design around it. When you cut the canvas, always allow an extra 4 or 5 squares of mesh on each side to turn under before you begin putting in the strands of rug yarn.
You can reverse the process, changing a graph to an outline drawing, but it is a bit more difficult. I suggest that you trace the squared outlines on another sheet of paper so that you don't damage the original. Then work very lightly in pencil, turning squared corners into curves. Stop often to review what you have done, erase where needed, and re-draw. Be patient and persistent.
Finally, let me leave you with a downloadable outline pattern that you can use in any way you like as it is, or modify it in any of the ways discussed here. You can multiply it or reverse it horizontally (or both horizontally and vertically) to make larger, more complex designs.
No matter what your purpose is for capturing the images of flowers, please take time to explore and enjoy their remarkable shapes, colors, textures and fragrances.

 After tracing several examples of both the inside and outside edges of the frame, I worked to get a sunflower center that would be in correct proportion for the ring of petals. These proportions differ between sunflower species, as we discovered from planting Central and South American species. I found a combination that I liked and filled in details of the center. I didn't attempt to put in all the seeds, just suggested them. Then I determined how many outer petals I could arrange around the center, making them similar but not identical. I shaded petals that were overlapped to indicate depth. At that point, I was ready to start on the actual project.



 This post by Annake's Garden is licensed under a Creative Commons Attribution-NonCommercial-ShareAlike 3.0 Unported License.


