Showing posts with label embroidery on checked gingham. Show all posts

Thursday, June 11, 2020

That's a Good Question!: Summer 2020 Q & A


working aids for senior crafters
Some of Annake's aids
Ordinarily I do seasonal Question and Answer posts, but I haven't kept to that schedule lately. I apologize for that. Having been through a bad flu epidemic when I was in graduate school many years ago, I got worried when the first news of sickness in China appeared in January. I feared that such a large and populous country with so many connections around the word would not be able to confine the epidemic, so we began making long-range plans immediately. When it became evident that the virus was spreading quickly from country to country, we redoubled our efforts. Because I am high-risk, I have been in self-quarantine for about two weeks longer than most of you. I thought that if isolation is difficult for me — when I work from home all the time —- it must be doubly difficult for those who are unused to it. So J.D. and I decided that, along with our planned posts we would create the EXTRAS section of the blog (see the tab on the menu bar above) and fill it with all sorts of things from photo essays to how-to articles and free patterns to teaching units. We have put up a number of these items and plan to do more until mid-summer. Since most of these questions center on topics in our recent post about easing eye and hand problems for older needleworkers, J.D. suggested that we show some of the devices (shown above) that I personally use.

Do you do quickpoint from charts, or on painted canvas?

Butterfly chart no.4
Click here to download
Either or both, plus other choices as well. I prefer to work from charts because I make my own. By the time I put symbols on graph paper, I have a pretty clear mental picture of what I hope to accomplish. If you are working from a chart in a needlework book or magazine, there are some things to consider. The chart was probably designed for a specific project with well-defined dimensions. If you are doing quickpoint, which is larger than tent stitch and regular cross-stitch, you will need to count squares carefully to figure out just how large your finished project will be. (I add an extra inch all the way around, just in case.)  Most of the charts I put into these posts are meant to be used for a large variety of sizes and colors. but let me give you one that is a little less variable. Because this is a specific butterfly rather than a generalized one, the colors need to be followed closely. You will still need to count squares as described above for the figure to work on the background you have selected.

Painted canvas of South American child
If you are working on a painted canvas, start in a corner and work a 10-stitch square of the stitch you plan to use  (be ready to take the stitches out if you need to) to see if you will be able to put in the smaller details of the design. 
I buy painted canvases when I can get a bargain, but I paint out the design and replace it with one of my own, either painted on the canvas or outlined on it. You need to examine the canvas carefully because some, especially ones made for kits,  are just starched cotton and don't hold up well.

Monk's cloth
Monk's cloth
If you are used to working on even-weave fabric like Aida, you can use several easier alternatives. One is monks' cloth, which has easy-on-the-eyes squares, but it requires a lot of preparation. It needs to be pre-shrunk. Then you need to bind the edges or at least put 2 rows of machine stitching around the edges. When I do use it, I back it with non-woven interfacing, which I work through, and use it for something that doesn't get a lot of wear. On the other hand, if you can find a good quality decorator burlap, you can use it just like Aida and get some lovely surface effects with crewel, tapestry, or novelty yarns.

What is wrong with using printed gingham?

Printed vs. woven gingham
I can show you with the two examples in the picture. The fabric on the left is printed gingham.  It is folded so that both the top surface and the bottom one are showing.  Notice how the design doesn't look the same on the wrong side?  There is no guarantee the cloth was printed so that each square wound up with the same thread count or that your cross-stitches will come out the same size. Now look at the woven gingham on the right. See how the squares are the same on both sides of the fabric? This is true whether you are using baby-check, standard quarter-inch check, or one of the  "jumbo" checks. Your stitches will be the same size and will line up properly both horizontally and vertically. The woven gingham is a little more expensive, but is well worth it.

Love the Bear and the Bee. Does it have a title? And are you going to make any more "Close Encounters" pictures?

The things that fit nicely into my typed scripts don't always fit as nicely when J.D. sets the format for publication. The title was too long for the caption, so he left it off. It is "What Kind of Flower Are You?"  The titles are designed to be said by either one of the pair of animals to the other. I try to do one a year, but — as with everything right now — I am running a bit behind. I am almost ready to do the color cartoon stage of the design. Did you know that the word "cartoon" originally meant the complicated chart for a tapestry weaving? I use the term for the stage when I make a full-sized color rendering to trace permanently on my canvas. I may also graph some of the finer details. Since you know how the titles are chosen, I will give you a hint about the two animals — one a mammal and the other not — coming up next.  The title is "Want to Race?"

You mentioned  'Window Wonders' when you were showing tracing a pattern against a sunny window. What are they and what do you do with them?

materials for making Window Wonders
Some materials for making Window Wonders
They aren't a form of needlework, but they are pretty and fun to do. I make them for craft shows, usually in three graduated parts, featuring a hummingbird, a butterfly, and a flower, but I have done colorful frogs, dragonflies, small tropical fish, and more. I draw my own pictures, but it is easy to trace them from photographs and drawings. You will need an embroidery hoop (wooden or plastic) with a screw adjustment for each individual picture. I usually make a set of three with a 3-inch, a 4-inch, and a 5-inch hoop, but that varies. I use both circular and oval hoops. You can paint the wooden ones if you like and the plastic ones come in colors. You will need permanent markers in a variety of colors. You will need a transparent or translucent fabric that is stiff when you stretch it across the hoop.  Sheer organdy is ideal.  You will also need a small, sharp pair of embroidery or manicure scissors.


Cut a square of the sheer fabric about an inch larger all around than your drawing.  Center the square over the design and trace the design with permanent markers. (Practice on a scrap first.) When the picture is dry, stretch it over the bottom of the hoop and push the top of the hoop down firmly. Pull the fabric until it is as firm as you can make it.  Turn the hoop over and carefully cut away all excess cloth. Fasten the hoops together as J.D. has shown you here.  I hang the 'wonders' surface-side-out in a sunny window. The design can be seen from outdoors and indoors. If you have a light-colored wall across from the window, you may get still another image on it.  Some people hang the item on screened-in porches or sheltered patios. I showed some outdoors in a 40-mph wind once and all survived beautifully. This is a craft that can be taught to children in elementary school. (For more on 'Window Wonders', see the article in our Extras section.)

You mentioned a kind of pattern-making that you didn't discuss because you said it would probably be hard to get the materials for it right now. My mother-in-law has a lot of materials that she lets me use, so she might have what I need. Would you tell me about that technique?

I'll be glad to — and show you as well. Also, I am so glad that you have a good relationship with your mother-in-law. I had one of the best in the world and I miss her greatly. Cherish that relationship. (And I'll bet she will be a wonderful grandma, too.)

I am going to teach you to make a simple hot-iron transfer. You will need the following materials:
    an ironing board
    an iron, preferably a steam/dry iron
    fabric to transfer the design to (cotton is best for beginners)
    a simple design
    a sheet of tracing paper larger than your design
    a transfer pencil (this is the tough one!)
    a pencil sharpener
    straight pins
    scissors

Downloadable owl outline
Click here to download
I do a lot of children's patterns, so I am going to give you a simple one. Or you may substitute a design of your own. Mine faces forward, so you don't have to worry about design reversal. If your design is facing to one side, it will be reversed in the finished pattern. If you are going to put words or names in the design, you will need to reverse them before they are added to the design or leave them out of the design and chart them separately.

Draw or trace your design on the tracing paper with a hot-iron transfer pencil.
These red pencils are made by several companies. I use Aunt Martha's™ (2 to a package for around $3.00.) Each pencil will make many transfers.  Keep the pencil point sharp and go over the lines firmly until they look dark. Set the transfer aside.

Finished blackwork owl
Finished blackwork owl - no red marks
Cut you fabric at least an inch larger all around than your paper pattern. Set your iron for the proper temperature for your fabric. Press your fabric. Fold it in half lengthwise and press a strong crease along the fold. Refold it in half crosswise and press another pleat. these should meet in the center of the fabric. At this point i like to stitch a row of bright-colored basting stitches down each pleat that I will pull out once the transfer to the fabric is complete. Stretch the fabric flat. Place the transfer penciled side down on the fabric and lift the center of the transfer up with the center of the fabric. Pin the pattern to the fabric all the way around. Set the iron no higher than cotton and put it on dry (no steam). Press the pattern in to the fabric, pressing hard and go back and forth several times, but don't scorch the paper. It takes at least 5 seconds of hard pressure on each line to get a good transfer. Unpin one corner and lift it carefully. Peek under it to see if your lines have been transferred. If not, re-pin it in the same place iron over it until they do. Turn off the iron and unpin the pattern from the fabric.  I gently pull the basting threads out of the fabric at this point. Work the pattern in any needlework style you choose. The red lines will wash out of the fabric with warm water and a good detergent (I like Dawn® dish detergent) when your project is finished.

I hope these clarifications have answered your questions. Keep creating!



Annake's 24" monitor
Annake's 24" monitor & soundbar - more help for aging senses


 Creative Commons LicenseThis post by Annake's Garden is licensed under a Creative Commons Attribution-NonCommercial-ShareAlike 3.0 Unported License.


Friday, December 20, 2019

Patterns, Pointers, and Practices: Fiber Arts Hacks

Three small needlepoint designs

Above you can see a group of small color patterns. One of them should look familiar to you because you saw a version of it turned into a larger all-over pattern on a table mat not long ago. With this post I want to emphasize several points that I have made over time about patterns — but that I have not before grouped together for emphasis.

Needlepoint placemat
Needlepoint placemat from our first post of 2019


Box of small needlework samples
Archive your small needlework samples!
First of all, I want to remind you of the value of working a small sample of a new pattern, whether it is geometric like these or more representational. This is especially important if you are planning to change the color scheme or other aspects of the pattern. I make many of my samples on durable plastic canvas in tent stitch, largely because I learned it early in life and use it as a kind of "shorthand". (If you want to learn about how I got started in the needle arts, follow this link: February 28, 2013 post) These samples are durable and easy to file in a convenient box for future reference. They may also have other uses, as you will see later in this post. If counted cross-stitch is easier for you, get a quarter yard of the small "baby check" gingham. That will make a number of samples that you can tape or staple on index cards and store in a larger box.

Ancient Pathways, framed needlepoint by Annake
"Ancient Pathways", framed needlepoint by Annake
We have worked with a few repeat patterns before, but now I want to show you how such a technique can work on a scale that is large enough to be suitable for framing or even larger projects. This one, like some of the smaller motifs on this post, was adapted from a Native American design. I call the resulting framed picture "Ancient Pathways", in honor of an ancestor who left the Appalachians and settled in the upper Midwest and all of the other Eastern Cherokees who settled there rather than follow the "Trail of Tears". Notice the alternation of colors at the edges of the motifs and the structure and strong diagonals of the turquoise background between the motifs. Negative spaces like backgrounds can contribute a lot to a design.

Graph of center design of three from first photo
Let's consider how one of these small patterns would work as a repeating design. Here is an enlarged graph of the middle design in the set at the top of this article. Decide how many horizontal and vertical repeats of the design you want on your selected canvas or fabric. I have left an empty row of squares all around the design so you can outline it if you prefer, rather than joining the design repeats directly together. If you don't want to border the motifs, simply trim that row of squares off the pattern or ignore it.  Check your canvas or fabric very carefully to make sure you have enough room for all of the repeats you want, plus an edge to turn under all around. Outline the spaces for the repeats with a running stitch (yes, even on canvas) in a bright or dark color that you are not using in the design, and pull those stitches out as you finish each motif. That is a little more work, but it will keep you from making disappointing mistakes.

Some of these small charts work well as linear designs. They can be expanded from one end or from both ends at the same time. See how the ends are each half of a design feature? Linear designs are great for belts, hatbands, straps of all kinds, etc. They make interesting picture frames. Or, if you like, they can simply be used to border a piece that is done in a solid color. The following chart shows the third design above repeated linearly.

Graph of 3rd design of top illustration repeated linearly
Graph of a simplified version of 3rd design at the top of post; choose your own color scheme.


Red hat with needlepoint band
I have a shady straw hat for the summer, a Stetson-like cowgirl hat, and a felt fedora for the winter — all of which can hold a series of changeable needlework hatbands. This has earned me the nickname of "The Lady in the Hat" at the local Farmers' Market (as in, "Ask the lady in the hat; she probably can tell you.")  For directions to center and join a hatband design, follow this link: post for Sept. 30, 2016. Ladies from a certain organization will understand the significance of the purple butterflies on the red hat.

If you look closely at the linear pattern, you will see that the top and bottom of the center of the motif are also halves of a feature, so this design can also be expanded upward and downward to make a 4-way design. Several others of these designs can be treated the same way.

Three more small needlepoint design samples


Pink & green diamond motif latch hook rug
These designs can be expanded for much larger articles like afghans and rugs, even tiled as flooring or back-splashes above kitchen counters. Here is a very simple design made into a rug. Notice that the changes in the shades of the selected colors creates an illusion that the designs are three-dimensional. This would be interesting on a needlepoint pillow, too. It also qualifies as an interesting optical illusion.

Simple optical illusion design in needlepoint
Optical illusions have been very popular with our readers and we have received requests for more of them. I promise to return to the subject in 2020 with more examples and patterns. I'm including a simple optical illusion in this group of sample patterns. Can you figure out how it is made? How might you use borders to make the design even more "dimensional? Think about it.

Those of you who have followed these posts for some time know that I like to start with a central design and "grow" it outward in all directions. We have worked with 4-way, 6-way, and 8-way designs. There will be new patterns in each category in 2020. When we do art and craft shows, we try to jot down notes about the questions and comments made by the people who stop by our booth. I base a lot of the next season's topics on those notes. We heard you "loud and clear"!

At the top of this post, I hinted that you might find some other uses for these small needlework samples besides practice pieces and reference. The most obvious ones are coasters from the square or diamond-shaped designs and bookmarks or luggage tags from the linear ones. I'm sure you can think of others (and we would like to hear about them). Each year I choose some of my favorite samples (often adding small decorative pins. buttons, or charms) and use them to decorate our holiday tree. Here are a few of our favorites.

Needlepoint tree ornaments


Season’s Greetings,


 Creative Commons LicenseThis post by Annake's Garden is licensed under a Creative Commons Attribution-NonCommercial-ShareAlike 3.0 Unported License.

Wednesday, October 30, 2019

Blackwork Revisited: Some New Patterns and Processes

Still life by Annake, blackwork stitching on Aida cloth
Still life by Annake, blackwork stitching on monk's cloth

Periodically, J.D. checks to see what topics readers are searching for in earlier posts. One that always seems popular is Spanish blackwork. It just so happens that there has been a good bit of interest in the subject lately. Also, I have gotten both a request for new blackwork patterns and a question about using them, so I am going to address those issues today.

First of all, I want to present some new blackwork patterns. These are designed primarily to fill larger areas of design than many of the ones we have shown previously. It takes several repeats of the design elements to really display the pattern properly. These would show up well on checked gingham, for example. If you want them to appear smaller and denser, you will need something like #14 needlepoint canvas or a comparable Aida fabric. I suggest you practice by drawing each design at least once on a piece of graph paper before you begin stitching it.  Then you will have the paper patterns for future reference.

Blackwork stitch pattern 1
This open-weave design not only covers large areas quickly, but also can give an optical illusion of depth. If I were doing this, I would stitch around all of the woven pieces first. Then I would put three or four closely packed upright stitches in to fill each square between them. This would look like a dark background some distance behind the lattice. If you don't want to create the illusion, then put an X, a plus sign, or an asterisk (made by combining the X and the plus} in each of the small squares to complete the pattern.

Blackwork stitch pattern 2
This next pattern is a true tiling pattern. If you draw the large squares with points, you will create the shapes between them without further drawing. Conversely, if you draw the in-between shapes correctly, you will create the squares without further drawing. The little asterisks in the squares just add texture to the design.

Blackwork stitch pattern 3


The last pattern is a large one that can be used alone as an all-over pattern for a pillow, baby carriage cover, or an even larger article. It can be made considerably smaller by using fabrics with a much higher thread count. Either way, it requires concentration. I really recommend that you work this one out on graph paper before you begin stitching. You may want to do it in two steps. Step 1 would be to draw in the long-stemmed Y shapes that form the North, East, South and West supports of the design. Add the X at the center of the design. Step 2 is to draw the  ‘petals’ at the four corners of the design. Step 3 puts in the small diamond shapes and the X-shapes between the motifs.  Notice that the arms of all the X-shapes extend through the motifs to make diamond shapes connecting the motifs. It is important that these lines be as straight as possible. To make this more visible, draw Steps 1 and 3 in a dark green pencil or pen, while you do the Step 2  ‘petals’ in a bright color.  This chart will help you even if you are going to do the whole design in black later. Used at a smaller size, the motifs create another type of illusion.  While you will only use straight stitches to construct the design, the illusion will form that you have used curved lines to make it.

Little Red Dragon, embroidery on checked gingham
"Little Red Dragon", embroidery on checked gingham
The question I got was: "Can I do blackwork patterns in other colors?" The answer is most emphatically "Yes!" There was a time when similar pattern stitching was done in red in countries like Russia, Poland, Lithuania, Latvia and Estonia. It came to be known as Russian Redwork. A friend who has traveled to Russia assures me that pieces adorned with this type of embroidery are still being sold at the Moscow airport. I do my own version of it, as you can see in my baby dragon.

Unicorn, embroidery on checked gingham
"Unicorn", embroidery on checked gingham
Scandinavian needle workers do exquisite surface embroidery — often combined with cut work — in white on both white and colored fabrics. Again, I do my own version, as you can see in my rampant unicorn. I did not do any cut work on this picture because it did not seem appropriate. I did use a heavy gold thread for the unicorn's horn and a lighter one on the mane, tail, hooves, nostril and around the eye.  I made the eye itself with a dark blue French knot.

Colorful Onion Domes
"Colorful Onion Domes", embroidery on monk's cloth


When the patterns are done in multicolor, the work is called Holbein embroidery. To be strictly legitimate, Holbein embroidery involves using a stitch that covers both sides of the fabric (see our August 20, 2014 post), but you can do a very good simulation using the traditional blackwork stitching. Here is my blackwork "Onion Domes" pattern done in multicolor.

If you think you may have missed some of our past blackwork patterns, simply go to our search engine ("SEARCH MY BLOG" in the sidebar), type in the words “blackwork pattern” and press Search. When you come to the bottom of the first set of posts, click on Next Posts and follow that procedure until you reach a point where there are no more posts with patterns. Not everything the search gives you will be pertinent: search engines can be rather erratic in their selections. But you should find some useful charts. If you are just starting to do blackwork, or if you are still deciding whether you like it, follow the same search procedure using the term “blackwork” alone to get all the tutorials and other useful tips.

hand drawn pattern in two colors
Hand-drawn draft of a complex pattern in two colors
Finally, here is another color technique I use when designing complex patterns that expand from a central design. The colors make it clear where each round of stitches begins and ends so that I don't produce a lop-sided, uneven pattern. Such a pattern, when completed, can be done as blackwork or in two or more colors.

In fact, I liked that idea so much that a did a new pattern for you in all the colors of the rainbow!
rainbow design
New stitch pattern in rainbow colors
Use your patterns to make something unique.


 Creative Commons LicenseThis post by Annake's Garden is licensed under a Creative Commons Attribution-NonCommercial-ShareAlike 3.0 Unported License.

Monday, October 2, 2017

Still Life in Needlework, Part III

Still life shapes
In Part II, I promised to show you a technique in which you could do a still life in black and white only. This is one of several related embroidery techniques which spread across parts of Europe after the Renaissance and eventually found their way to the Americas. It is called Spanish blackwork. Its patterns can be used in other styles of single-color embroidery, such as Russian redwork and Scandinavian whitework, as well as a multicolor style like Holbein embroidery. My choice of objects to portray is shown above in a photo that J.D. took at the beginning of the project.

I'm going to take you step-by-step through a still life picture in blackwork. The original 16th century blackwork was done in black silk and gold thread on white linen. I urge beginners in any of these monochromatic stitch techniques to begin with black floss on quarter-inch checked gingham because it is so much like graph paper. It is easy to work out the individual patterns (called diaper patterns) on graph paper and then repeat each individual line with a single stitch.

"Cat Nap," blackwork embroidery on 1/4" checked gingham

If you have done counted cross-stitch, you may want to work on the smaller “baby check” gingham to get more complex-looking patterns. I prefer pastel checks so the blackwork design stands out dramatically. If you are working on “baby check”, you may want to divide your floss and use only three strands instead of six. The stitch used for the patterns is a simple back-stitch.

Hot iron transfer for still life
In order to have a truly black and white (and gray) design, I'm going to work on white monks' cloth, where the squares are indicated by tiny spaces in the weave at each square's corners. I begin with a piece of monks' cloth that I have backed with interfacing and basted around the edges. I find the vertical and horizontal center lines of the fabric and mark them with a running stitch in a color other than black. This is to center my design; the colored stitches are pulled out after the design is worked. I made a hot-iron transfer of my design outline and transferred it to the fabric. (The transfer will reverse the design, so I studied mine carefully from the back against a bright light to make sure it worked well in reverse.) I chose the area to begin and used an embroidery hoop.

You will need a sharp-pointed crewel needle with an eye large enough to accommodate the floss and several skeins of black six-strand embroidery floss. I like to have several needles so I don't have to stop as often to thread my needle. I was working on monks' cloth, which is comparable to “baby check” gingham, I divided the floss to use three strands. Here is a picture of the first completed section, and close-up of the pattern used for it. Each line on the pattern is a single stitch. Stitches begin and end in the same spaces at the corners of squares.

Blackwork embroidery, Step 1: the Vase

Stitch pattern for the Vase
Tip #1: The Vase. When you are stitching a pattern over an object with a complicated shape, begin at the widest part of the object. Start at one side and work the pattern line to the other side. Then stitch the pattern lines in order both to the top and the bottom of the object.

The next series of pictures show each of the other sections as they were completed, accompanied by a close-up of the graph-paper pattern for each. The lighter I wanted the section to be, the simpler the pattern I used; the darker I wanted it to be, the more complex the pattern.

Blackwork embroidery, Step 2: the Pitcher

Stitches for the pitcher


TIP #2: The Pitcher. When you are stitching a radiating pattern like this one, find the exact center of the place you want it to be and mark it lightly with a pencil. Begin there at the center of the design; work outward, one step at a time.


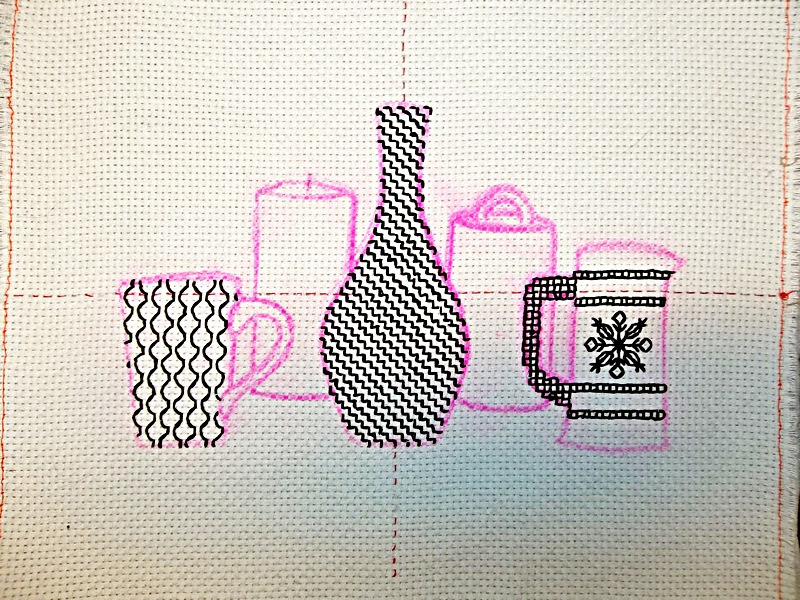
Blackwork embroidery, Step 3: the Cup

Stitch for the Cup
Stitch for the Cup
Tip #3: The Cup. As you reach the border lines of the section, make as much of the pattern stitches in each square as you can without crossing the border-line. When your outline of the shape is completed, there may be small gaps where the pattern doesn't quite reach the outline. Fill these in with tiny stitches.


In this project, I concentrated on shape, pattern, and perspective only. If objects of the same size are placed side by side, the one with the faintest outline will seem the furthest away. If you make the objects overlap, so that the more faintly drawn objects are partly covered, you have started the illusion that they are behind the darker figures and are farther away from the viewer. This is called “recession in space”. This illusion can be considerably increased by combining it with lighter outlines. Because I wanted to draw your attention to this visual device, I used gray floss for the two objects “behind” the front three. You will also notice that their bases appear to be on a higher plane. You can use all these devices in your own still life projects.

Blackwork embroidery, Step 4: the Birch Bark Box

Stitch for the Birch Bark Box
Tip #4: The Birch Bark Box. Instead of back-stitch for this pattern, I used a simple running stitch. The marks on the birch bark appear in clusters on the box, but I didn't think that would show up sufficiently so I used the stitches for the entire pattern. I left an empty space for the line indicating the bottom of the box lid.


Blackwork embroidery, Step 5: the Candle
Stitch for the Candle


Tip #5: The Candle. Here the back-stitch is used vertically. Be sure that your stitches are as straight as possible. To make the wick more visible, I stitched it in black instead of gray.


Finally, I covered the outlines with solid lines of stitching. I wanted a bold, modern feeling to the picture, along with many contrasts, so I used the full six strands of floss for the outlines. I chose chain stitch, but I could have used back-stitch, outline stitch, stem stitch or any of several other stitches. I outlined the gray objects with the same number of strands of floss that I had used for the black ones. You might prefer a more delicate treatment. J. D. has shown here how it would look outlined in three strands of floss in a back-stitch or outline stitch. I then removed the colored centering stitches. A quick hand-washing in the sink with dish-washing liquid removes the remnants of the iron-on pattern. Follow this by a rinse and pressing with an iron set on 'cotton', and it's done.

How the still life might look with narrow outline stitching

To make your own blackwork still life, start with a simple outline pattern. Follow the directions for preparing the material. Use the patterns I used, see additional patterns on the posts for October 6, 2013, October 18, 2013, February 21, 2014, and January 15, 2017 — or make up your own.

Now, you are ready to transfer those outlined areas of your design to your fabric. You can place your outline on a light-box or tape it to a sunny window-pane and trace it directly on your fabric., or you may want to use a hot-iron transfer. For directions to make one, go to the post for October 6, 2013. For more on monks' cloth, see see the post for April 30, 2014.

Go make something black, white, and beautiful!


Finished Blackwork Embroidery Still Life

Updated October 10, 2017, to replace all the illustrations Google Photo somehow lost :-p


 Creative Commons LicenseThis post by Annake's Garden is licensed under a Creative Commons Attribution-NonCommercial-ShareAlike 3.0 Unported License.

Contact Us

Name

Email *

Message *

Blog Archive