Showing posts with label design ideas. Show all posts

Saturday, October 10, 2020

Fun With Felt

Felt butterfly picture by Annake
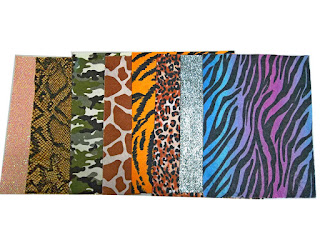
Felt is a versatile fabric with many uses. Because it does not need to be hemmed, it takes less time and work to make something from it. It comes in a wide variety of colors and a number of patterns like zebra or tiger skin,  "psychedelic" colors, and small repeated motifs.  Most of the felt pictures you will see today are done with fabric glue, but there is no reason you cannot stitch them down by hand or machine if you prefer. They will probably be more durable done that way, but if you are going to frame the design. sewing is probably not necessary.

Fancy felt assortment


Projects like this, whether backed, framed or hung with a fancy hanger, are good to fill narrow or awkward wall spaces, like beside or above a door, above or below a window, down the wall beside a staircase, or beside a set of shelves.

Simple pattern idea, adaptable to felt

They are great for children's rooms, unframed or framed without glass, because they are unbreakable. I make my own patterns, but you may not feel comfortable doing that. However, pictures for small children should be simple. Too much detail is confusing and makes it harder for them to identify and name things. There are patterns available online. Some of them are free; others have a fee. But you can use children's coloring books or trace pictures from children's picture books. Here is a design I adapted from one of my puppets.

 
Shopping bag with felt applique
 
Tools and materials
You will need;
     a felt rectangle for each color of your design
     fabric glue
     sharp scissors for the felt*
     another pair of scissors for paper patterns
       a pencil or marker
     paper for the pattern parts

* Please don't use your fabric scissors for anything but fabric. You would be amazed how much paper will blunt a blade edge. We have a gentleman who sharpens scissors here in our little town, but that sort of help can be hard to find and you can end up spending quite a bit for another good pair of scissors or shears.

Because shopping is so difficult this year, I am not going to recommend any brand names for materials. The felt pieces can usually be found at the big chains like Walmart or Target, fabric stores, or craft shops. Read the directions on the fabric glue carefully and follow the directions closely. If you are using a spray glue, which I don't recommend, try to use it outdoors or in a large space like a garage and wear a mask while dealing with it. Elmer's white glue will work for a piece that is meant to be temporary, but it is messier and may seep through.

Simple Iris pattern

When you are making a pattern for a felt picture, keep it as simple as possible. Once your sketch is finished, make a clean copy of it. Use paper about the weight of computer paper. I like to go around the outlines of the pattern pieces with a colored marker. That makes a thicker line than a pencil or a pen, so that I can more easily cut right down the center of the marker line. I find this gives me a better fit with adjacent pieces which share a common borderline.


Saved pattern pieces
Choose your background color. As each piece of the picture is cut out, remove that part of the pattern. write the name of that particular piece (for example "long leaf, upper right") and store the pattern piece in a business-sized envelope for future reference. Label the front of the envelope with an appropriate title and file it in a shoebox or similar container.

Finished felt iris picture
Arrange the pattern pieces on the background exactly where you want them to be in the finished composition. Carefully lift the pieces one at a time and apply the fabric glue as directed on the container. Carefully put each section in place and let the pieces dry completely. If you decide you need to press the piece, use a pressing cloth over the felt and a moderate temperature for the iron.


Easy hanger method
The finished composition can then be backed, framed without glass, framed under glass, or whatever you wish. If you want it to be a small wall hanging, stitch or glue a folded piece of another color of felt at the top of the picture so that it becomes a tube that will hold the hanger. Slide the rod of the hanger through the tube, close and fasten it.


Are you taking the advice I have seen and heard for having a candy "treasure hunt" around your house or apartment for your children, instead of the traditional "Trick or Treat" activity this year?  Here is an idea for something a little special for the dinner table before the treasure hunt. Make a special Halloween placemat for each child and cover it with clear plastic wrap or slip it into a clear plastic bag to prevent food spills. Then the child can have it for a keepsake, room decoration, or whatever they choose. I think everything we can do to make this very different celebration special for the children is worthwhile. (We are talking about felt today, but of course you can do this activity with colored papers; however, the mats will not last long and won't make very good keepsakes.) If you want another activity, make a draw-string bag for the collection of the candy. The child can use the bag for other purposes after the holiday.
 
You can do quite a bit with a simple design like this. For example, you can make any kind of jack-o'-lantern design on the pumpkin that you like — friendly or scary or silly.  You don't have to have a black cat coming out of the pumpkin. It could be a bat, a ghost, an owl, a pirate — anything you want.

Finished leopard "portrait"
For "portraits" of animals or storybook characters, just the head is necessary. I enlarge the heads of my puppets for such pictures. We have published several articles about puppets with color photographs and the occasional pattern. You can find those by using the "Search My Blog" feature at the side of this article. Just type in the word "puppet".  Incidentally, all the dog and cat puppets I do are outfitted with a collar and tag to remind people to do that for their pets. There is also an article about teaching with puppets in our EXTRAS section, listed at the top of this article.

An easy way to display a picture is to "frame" it with a wooden or plastic embroidery hoop. Plastic hoops come in a variety of colors. A wooden hoop can be left as it is, varnished, or painted. Choose a hoop that will display the amount of background that you want. Place the felt picture over the bottom part of the hoop. Adjust the upper part of the hoop so that the tension screw is directly above the center of the picture. Push the top part of the hoop gently down over the felt. Tighten the screw a little at a time, pulling the felt taut as you do so. When the picture is completely flat, turn it over and trim away the extra felt. The small space left under the screw is usually large enough for you to slip the screw over a "headless" nail for hanging.

Stuffed toy from puppet pattern


I stuff the heads of my puppets with fiberfill (you can use cotton), leaving just enough room for one or two fingers of the puppeteer. You can make a soft doll by stuffing the whole body and sewing the bottom edge securely closed.


Puppet used as treat bag
Or you can prepare it as a working puppet but fill the body with cellophane-wrapped hard candies, miniature candy bars, small trinkets, etc. Sew the bottom shut with easy to remove stitches so the child can pull them out to open the seam. Then he or she can enjoy the treats in the gift bag and still have the puppet to play with.


Felt scraps
Save your felt scraps in a bag or a large mailing envelope for use in future projects.  For, as my Grandma used to say:

"Use it up,
Wear it out,
Make it do,
Or do without."

I hope you have gotten some ideas from this article. I put the emphasis on fun because that is something we all need to get us through these challenging times.

Stay safe. Be well. Our best wishes go to all of you.


 Creative Commons LicenseThis post by Annake's Garden is licensed under a Creative Commons Attribution-NonCommercial-ShareAlike 3.0 Unported License.

Wednesday, August 5, 2020

New Geometric Patterns

Three small geometric patterns, graphed

A couple of years ago we began drawing some small, simple geometric patterns which could easily be repeated to make larger, more complex designs.  These were designs that could be adapted for many different crafts — not just needlecrafts.  Designs could be repeated a number of times just as they were in the picture, or they could be reversed, rotated, even taken apart and put together in new configurations.

First geometric pattern
Let's look at the three patterns at the top of the page. Here is the first one, a very simple design in a single color on white. In the larger version, the original pattern has been rotated to make a design of squares. This one can be continued outward as far as you want to go.

First geometric pattern, rotated
Now let's consider the pattern at the other end of the line. You may remember this one.  Later we showed you how to change the design from a square pattern to a rectangular one by elongating the internal squares either vertically or horizontally.

Third geometric pattern, rotated


Third pattern, vertical & horizontal  versions
Vertical & horizontal  versions
I was trying to make two points. First, that, since this was an all-over pattern, it was not necessary to start in the middle of the canvas. I started the piece on the left at the upper right-hand corner of the design and expanded it both horizontally and vertically as far as my canvas segment allowed. Second, the pattern can be worked to fit rectangular projects. They do not have to be square, as the 4-way bargello designs do need to be.  I suggested that viewers might want to do a sample using the 3-stitches-over-4-threads formula that I used for this sample, which elongates the squares into rectangles vertically. The third sample elongated the squares to rectangles horizontally. The result is definitely rectangular — and large. It is probably not a good design for a 4-way bargello unless you are using much smaller squares of canvas. It would probably work on # 14 needlepoint canvas, however.

Second pattern repeated, variation 1
The middle pattern can be repeated just as it is, of course, but I want to play with it a while. How you approach this pattern depends on whether you want to place the emphasis on the heavier "North/East/South/West" part of the square pattern or the more delicate diagonal components. I will start with the heavier aspects. Here is the result. You can change this from a square pattern to a horizontal one by simply adding another repeat of two of the smaller squares to any side of the original.

I returned to the design, this time concentrating on the slender lines that formed the diamond shapes inside the frames.

Second pattern repeated, variation 2

These designs made from the small corner squares have proven to be popular. For that reason, I am giving you some more of them to work with. In each case, the original square that was rotated is shown in its proper position and is emphasized by a black outline.
Three more corner patterns

Suppose you are ready to enlarge a design but are not sure how to proceed.

First corner pattern, expanded
Take a clean sheet of graph paper and mark its center both horizontally and vertically. Repeat your desired pattern (diagram above) on top of the horizontal line, starting just to the left of the vertical line. Now repeat your pattern in reverse to the right of the vertical line. Turn the paper upside-down. Repeat what you just did below the horizontal line above the horizontal line now. Now you have a 4-way starting pattern.  Each colored square represents a stitch or a square of stitches in your pattern. Empty squares can be worked in white, black, beige, etc. Work the four parts of your design in the center of your canvas, then decide how you want to "grow" your finished pattern.

Second corner pattern, expanded
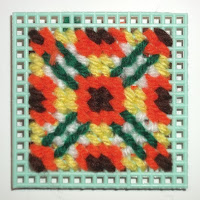
The samples I usually show on these posts are done on #7 plastic canvas. I recommend this for practice and to make pattern samples that are meant to be filed in a box for future reference. If you are working in tent stitch, this is the pattern square, with one stitch for each square of the pattern. It is also done on #7 canvas. These patterns are very versatile. If you do latch-hook, for example, you can use a pattern like this one by putting in a knot for each square of the pattern. This would work as both a four-way pattern, perhaps for a pillow, and an all-over one for a mat or rug. Beading and mosaics could also be done with such a pattern.

When working a multicolored pattern like this, I recommend using a separate needle for each color. This cuts down on the time spent in threading needles and decreases yarn waste. Secure each color often on the back of your canvas. Do not carry long strands of yarn across the back of your canvas while moving from one colored segment to the next.

Third corner pattern, expanded

This two-color pattern is suitable for an all-over design, but perhaps is not as good for a 4-way design.

A word of caution about colors. What I see on my screen in the office is not necessarily what J.D. sees on his screen in the workshop or what you will see on your device. And if you are printing something out, there are even more possible differences. Use your own color choices on any of these designs.

Before we leave the 12-square designs above, here are the three designs as I have expanded them to 16-square designs.

Three 16 square designs

The first one is done in the same way I changed the smaller squares to 12-squares. I took more liberties with the second one, repeating some parts of the design and modifying others. Bear in mind that none of my designs are the only way to "grow" the designs. You need to find your own ways to do that to make designs that please you. I have taken even more liberties with the third design, repeating none of either the dark or light elements exactly as I expanded the design, while keeping the "feel' of the design.

Letter chart
Letter chart
There is another way to record graphed designs, and this one can be done in any color combination that you desire.  Instead of filling in colors on a design sample that you like, put in alphabet letters for each of the colors that you used.  You can then experiment with different color combinations and record alphabetically the ones you want to keep. This diagram will show you what I mean.

Each of the little squares in the design could represent a single stitch on canvas or even-weave fabric, a square of upright gobelin, a much larger square of fabric, or even a floor tile. Let's revisit one of those designs. Instead of taking one of the little squares as the basis of our design, this time let's consider the entire three-inch square as a single, repeatable part of our design. I chose to make this design in analogous colors (colors next to each other on the color wheel) because I wanted to make some points about color combinations. Analogous colors reflect wavelengths of colored light that are closely related Since these colors are closely related, we are pretty well assured of a pleasant design. I chose blue-green, blue, and blue-violet for my color combination, but you need not use those colors if you want to try others. For a trio of warm. bright colors, you might choose red-orange/ orange/ yellow-orange (the exact opposite of the three I chose), for example.

Analogous color 12 square designs

Notice that I have used one light color, one medium color, and one dark color (a tint, a tone, and a shade) in each design. I do this to make it easier to place each color when I begin "growing" the design. Each color is in the same set of squares on all three versions of the design; only the intensity of the colors changes. As you can see, which color is emphasized most does alter the design — a fact you will need to consider not only when "growing" your design, but also before choosing the yarns, fabrics, paints or other materials for your final project. Changing the positions of the colors as well as the intensity will give you even more varied results. I "grew" all three of the blue-green/blue/blue-violet designs. Here are the expanded designs.

Analogous color designs, tiled


Annake at work
Annake at work
Somewhere in the midst of all this, J.D. slipped up behind me and snapped this picture of my worktable, with the designs in progress. (He says he wanted to show you how much work I do before I publish anything for my readers. I think he just wanted to show what a mess my worktable usually is!)

This design technique is called tiling. It is an ancient art form used originally for creating inlays and mosaics. It was used in Mediterranean civilizations long before those of the Greeks and Romans. The earliest known mosaics were made in Mesopotamia before 2,000 BC (BCE)  Just recently there was news of a remarkable mosaic discovered in the ancient city of Hippo.

Of course, I do a lot of preliminary work on the computer to save time.  One place where this comes in handy is in choosing the background color for a geometric center design.  What J.D. does is put up the center design on screen and then "flood" the background of the design with a variety of colors to see how they compare. J.D. did this electronically.  Here are the ones we liked best.

Same geometric pattern with 3 different background colors

We often show pieces of finished work without showing the design patterns.   Here are three that are suitable for tiling in one or more of the ways we have discussed in this article.

New tiking patterms


So far we have worked with patterns based on small squares or rectangles because they are so easy to duplicate on standard graph paper. When we return to this topic in the future, we will discuss other base shapes like triangles and hexagons.

Have fun with your design experiments.


 Creative Commons LicenseThis post by Annake's Garden is licensed under a Creative Commons Attribution-NonCommercial-ShareAlike 3.0 Unported License.

Friday, July 24, 2020

Designing Realistic Flowers for Projects

Daylily rug by Annake
Daylily rug, by Annake
I love flowers! That is why my business is called Annake's Garden and my blog is called  “Cuttings from Annake's Garden”. More of my work involves flowers than any other single subject. I am a great admirer of Georgia O'Keeffe's giant flowers and her determination to get people to really look  at flowers. While my individual flowers don't approach the size of her paintings, I do like to work larger than life. Actually, this goes back to a time when I was teaching fifth graders about Georgia O’Keeffe. I made several oversized flower pictures in various media to show the students, along with samples of O’Keeffe's work, before I asked them to make their own large flower pictures. Their favorite sample was a study in pastels and crayon of an orange daylily. Several students asked me to make computer copies of the picture for them. I did that, filed the picture, and essentially forgot about it.

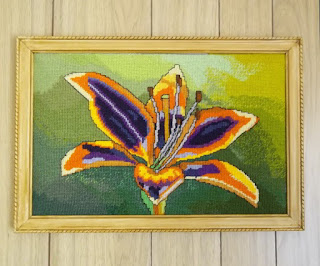
"Day-glo Daylily", needlepoint by Annake
After I retired, I cleaned out my files and came across the original drawing. I decided to make a rug, using the sketch as a basis for my design. It was the first rug I ever sold. Fortunately, J.D. had already been archiving photos of my work, so I can show you what that piece looked like (above).  I've also done a daylily as a large needlepoint (right). The colors came from my imagination; however, I see one in this year's catalogs that comes very close to my imaginary one.  Is art imitating life or is life imitating art?

greeting card pasteup
Sample card
In both cases, I was working on a scale considerably larger than life. Doing this frees you to include as many details as you like — whether or not those details existed in an actual flower. There are many instances, however, when this is either not possible, or when it not desirable. Sometimes less is really more. Sometimes it is simply a matter of space. Suppose you are making a series of greeting cards.  The entire card may be smaller than the flower you are depicting. Instead of cropping the flower to fit, why not do a depiction of the flower that fits the card and eliminate unnecessary details?


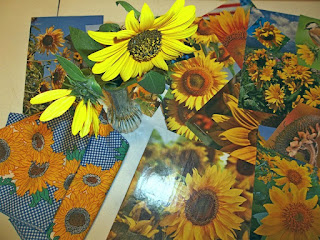
Sunflower project materials
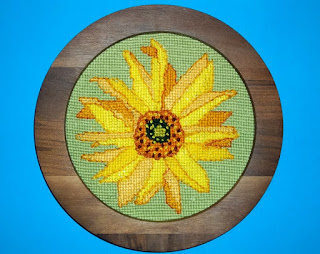
Once again the size of the finished project dictates what you can and cannot do.  Take, for example, a sunflower that I decided to do in needlepoint in a round frame that was only 9 inches in diameter. Now, I love sunflowers. They are large and complex. They are not dainty, shy blossoms. They are large, bright,  and kind of in-your-face. They never fail to cheer me.

Before I began working on the design, I collected pictures of sunflowers, fabric decorated with them, live flowers, all kinds of materials.

sunflower pencil sketch
After tracing several examples of both the inside and outside edges of the frame, I worked to get a sunflower center that would be in correct proportion for the ring of petals. These proportions differ between sunflower species, as we discovered from planting Central and South American species. I found a combination that I liked and filled in details of the center. I didn't attempt to put in all the seeds, just suggested them. Then I determined how many outer petals I could arrange around the center, making them similar but not identical.  I shaded petals that were overlapped to indicate depth. At that point, I was ready to start on the actual project.

Finished sunflower needlepoint
I prepared my needlepoint canvas (#14 white mono) and ran colored threads horizontally and vertically through the center. Then I centered the canvas over the drawing and traced it onto the canvas with a fine-lined permanent marker. Once it was dry, I rubbed the lines vigorously on both sides with a paper towel to pick up any bits of ink that might discolor the yarn and I pulled out the centering threads. With the color areas of the picture completed, I filled in the background in a neutral color. Finally, I began back-stitching around certain segments with a single strand of yarn. (This is traditionally done on counted cross-stitch pictures, sometimes using a single color for all the back-stitching.)  When I use it on needlepoint, I prefer to use lighter, darker, or grayer yarns to emphasize the features I'm outlining. Purists won't do this sort of surface stitching on conventional tent stitch. I'm not a purist. I'll not only use back-stitching, but also any surface embroidery that will enhance the canvas work and make it match my mental vision of the piece.

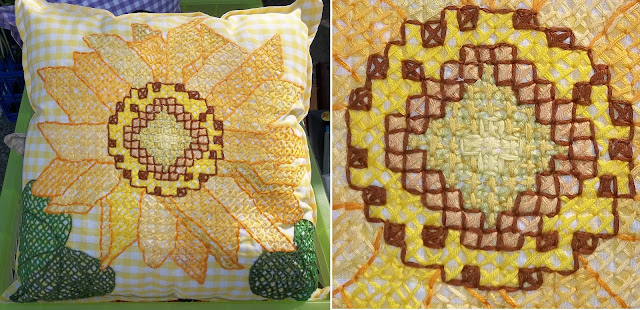
When making a pillow in folk embroidery on gingham, I made a less realistic sunflower, concentrating more on texture. Backstitching here gives the center a different appearance.

Sunflower pillow with detail


Sunflower center
Sunflower center
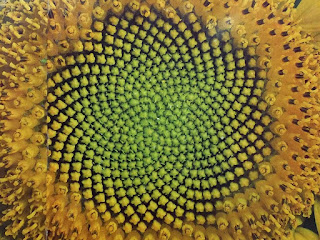
Incidentally, sunflowers should delight the readers who enjoyed our Roots, Leaves, and S.T.E.M. post (February 29, 2020), because they represent both Science and Mathematics.   A sunflower is not a single flower, but a composite of masses of two entirely different kinds of flowers. What we think of as petals are actually individual strap-shaped ray flowers whose bright colors attract pollinators. The central disc is made up of large numbers of disc flowers which, when pollinated, will produce seeds. These flowers are arranged in curved lines which follow the Fibonacci number sequence. The sequence is 1, 1,  2,  3,  5,  8, 13,  21, 34, 55, 89, and theoretically continues to infinity. Each number is the sum of the two previous numbers. The sequence is found many places in Nature — out to the structure and motion of spiral galaxies.

I do a lot more work from quick sketches and studies in pencil, watercolor, pastel. and marker and from handmade charts than I do from photos. However, I've done enough to offer some advice. If you are planning to sell your projects, be sure you have not used anyone's copyrighted material. I work from my own photos and those of J.D. and J.J. (with their permission, of course). If accuracy is important, take lots of photos from different angles, distances, and lighting effects. Be selective about the parts you use. Leave out anything that does not improve the composition. Let me show you what I mean.

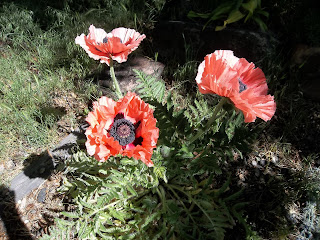
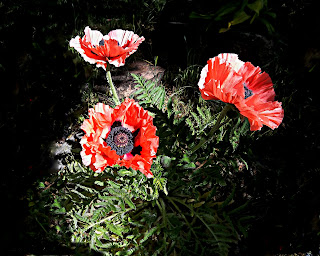
Poppy photo
Original photo
This photo of poppies has several things going for it. The lighting is interesting. The poppies show up well against the dark background. The red of the petals is complemented by the green stems. But look at the gray, dead leaves at the lower left. They do not help the composition at all. Now look at the picture after J. D. has modified it. Cropping and/or otherwise altering a photo can add a great deal to its appeal.

Poppy photo edited
Poppy photo, edited

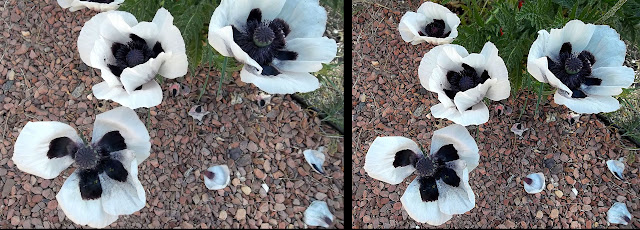
On the other hand, sometime a picture needs to be expanded. Look at these two pictures taken at the same time. See how much showing the full petals makes the picture more interesting? That is why taking multiple shots is valuable.

White poppies


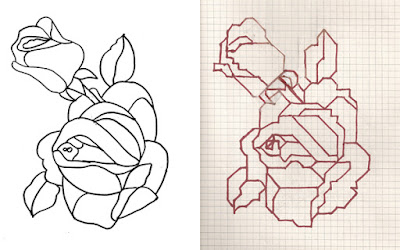
I do, however, want to show you how to modify an outline pattern so that it works more easily as a chart. The first thing to do is to transfer the pattern to quarter-inch graph paper. I use either dressmaker's carbon or a sheet of paper which I have colored heavily on the back with a graphite pencil. Aligning one major straight line in the design with a line on the graph paper, I transfer the design by going over the outline with a ball-point pen that has used up all its ink. Once the transfer is complete, I draw straight lines, square corners, and forward and backward diagonal lines to come as close as possible to the curved lines in the original design. The resulting new design, shown here in red, can then be enlarged or reduced to fit any size of graph paper. (It can also be simplified if you wish.)

Squaring off an outline
 
Before I use or store the pattern, I trace it once again with a permanent marker. Some uses for this type of pattern include:

    a counted cross-stitch design
    a panel of ceramic tiles
    a collage
    a felt applique with cut-out pieces glued or sewn to a background
    a wood carving
    a needlepoint or quickpoint   
    an embossed piece of copper foil
    tooled leather
    the center panel for a patchwork quilt
    a mosaic
    an afghan put together from "granny squares"

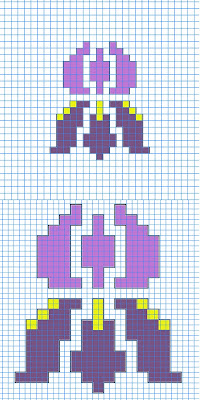
Simple iris pattern graphed two ways
Occasionally I enlarge a small or medium-sized design laid out on quarter-inch graph paper to a size suitable for making a latch-hook rug, a wall hanging, quilt blocks, etc. The easiest way to do this is to draw around a block of four squares of graph paper for each of the single squares in the smaller design. I tape a number of pages of quarter-inch graph paper together and lay them out on a large table. Beginning at the center of my design, I draw the 4-square block that represents the center square of the original design. I then work outward in all directions from that center square. I number or color the blocks as I go. The finished pattern will not match either #3.75 or #5 rug canvas exactly, but it will come very close. Count the number of horizontal and vertical squares on your pattern and mark the same number of squares on the canvas. Mark the center of the canvas and draw the outline of the entire design around it. When you cut the canvas, always allow an extra 4 or 5 squares of mesh on each side to turn under before you begin putting in the strands of rug yarn.

You can reverse the process, changing a graph to an outline drawing, but it is a bit more difficult. I suggest that you trace the squared outlines on another sheet of paper so that you don't damage the original. Then work very lightly in pencil, turning squared corners into curves. Stop often to review what you have done, erase where needed, and re-draw.  Be patient and persistent.

orchid outline
Click here to download
Finally, let me leave you with a downloadable outline pattern that you can use in any way you like as it is,  or modify it in any of the ways discussed here.  You can multiply it or reverse it horizontally (or both horizontally and vertically) to make larger, more complex designs.

No matter what your purpose is for capturing the images of flowers, please take time to explore and enjoy their remarkable shapes, colors, textures and fragrances.


 Creative Commons LicenseThis post by Annake's Garden is licensed under a Creative Commons Attribution-NonCommercial-ShareAlike 3.0 Unported License.

Contact Us

Name

Email *

Message *

Blog Archive