Showing posts with label felt. Show all posts

Saturday, October 10, 2020

Fun With Felt

Felt butterfly picture by Annake
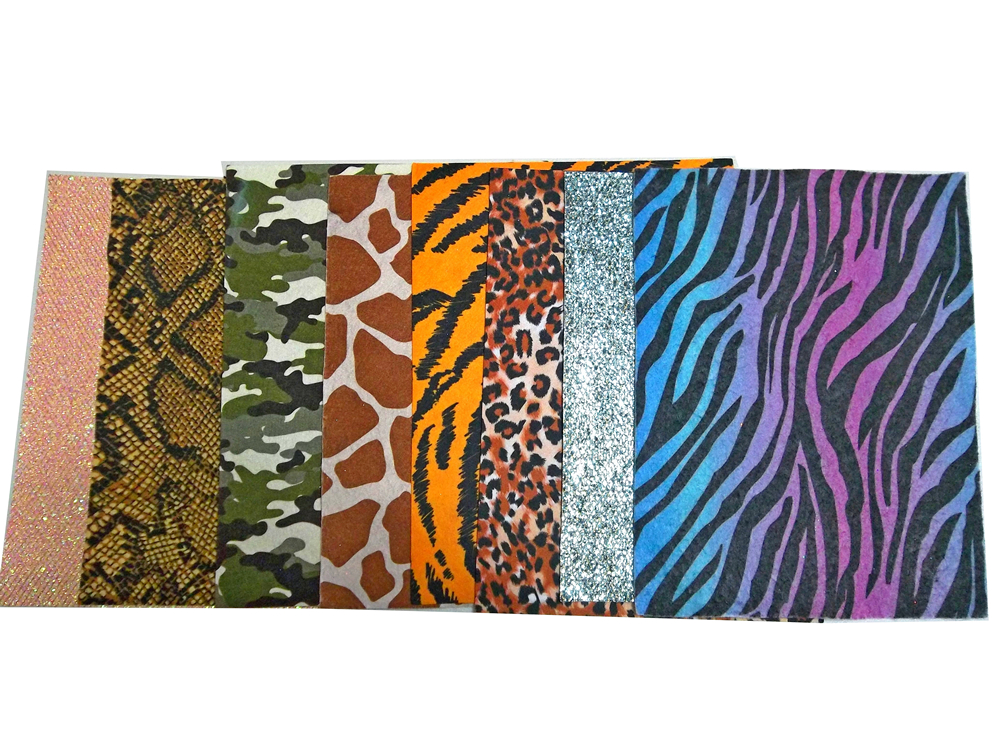
Felt is a versatile fabric with many uses. Because it does not need to be hemmed, it takes less time and work to make something from it. It comes in a wide variety of colors and a number of patterns like zebra or tiger skin,  "psychedelic" colors, and small repeated motifs.  Most of the felt pictures you will see today are done with fabric glue, but there is no reason you cannot stitch them down by hand or machine if you prefer. They will probably be more durable done that way, but if you are going to frame the design. sewing is probably not necessary.

Fancy felt assortment


Projects like this, whether backed, framed or hung with a fancy hanger, are good to fill narrow or awkward wall spaces, like beside or above a door, above or below a window, down the wall beside a staircase, or beside a set of shelves.

Simple pattern idea, adaptable to felt

They are great for children's rooms, unframed or framed without glass, because they are unbreakable. I make my own patterns, but you may not feel comfortable doing that. However, pictures for small children should be simple. Too much detail is confusing and makes it harder for them to identify and name things. There are patterns available online. Some of them are free; others have a fee. But you can use children's coloring books or trace pictures from children's picture books. Here is a design I adapted from one of my puppets.

 
Shopping bag with felt applique
 
Tools and materials
You will need;
     a felt rectangle for each color of your design
     fabric glue
     sharp scissors for the felt*
     another pair of scissors for paper patterns
       a pencil or marker
     paper for the pattern parts

* Please don't use your fabric scissors for anything but fabric. You would be amazed how much paper will blunt a blade edge. We have a gentleman who sharpens scissors here in our little town, but that sort of help can be hard to find and you can end up spending quite a bit for another good pair of scissors or shears.

Because shopping is so difficult this year, I am not going to recommend any brand names for materials. The felt pieces can usually be found at the big chains like Walmart or Target, fabric stores, or craft shops. Read the directions on the fabric glue carefully and follow the directions closely. If you are using a spray glue, which I don't recommend, try to use it outdoors or in a large space like a garage and wear a mask while dealing with it. Elmer's white glue will work for a piece that is meant to be temporary, but it is messier and may seep through.

Simple Iris pattern

When you are making a pattern for a felt picture, keep it as simple as possible. Once your sketch is finished, make a clean copy of it. Use paper about the weight of computer paper. I like to go around the outlines of the pattern pieces with a colored marker. That makes a thicker line than a pencil or a pen, so that I can more easily cut right down the center of the marker line. I find this gives me a better fit with adjacent pieces which share a common borderline.


Saved pattern pieces
Choose your background color. As each piece of the picture is cut out, remove that part of the pattern. write the name of that particular piece (for example "long leaf, upper right") and store the pattern piece in a business-sized envelope for future reference. Label the front of the envelope with an appropriate title and file it in a shoebox or similar container.

Finished felt iris picture
Arrange the pattern pieces on the background exactly where you want them to be in the finished composition. Carefully lift the pieces one at a time and apply the fabric glue as directed on the container. Carefully put each section in place and let the pieces dry completely. If you decide you need to press the piece, use a pressing cloth over the felt and a moderate temperature for the iron.


Easy hanger method
The finished composition can then be backed, framed without glass, framed under glass, or whatever you wish. If you want it to be a small wall hanging, stitch or glue a folded piece of another color of felt at the top of the picture so that it becomes a tube that will hold the hanger. Slide the rod of the hanger through the tube, close and fasten it.


Are you taking the advice I have seen and heard for having a candy "treasure hunt" around your house or apartment for your children, instead of the traditional "Trick or Treat" activity this year?  Here is an idea for something a little special for the dinner table before the treasure hunt. Make a special Halloween placemat for each child and cover it with clear plastic wrap or slip it into a clear plastic bag to prevent food spills. Then the child can have it for a keepsake, room decoration, or whatever they choose. I think everything we can do to make this very different celebration special for the children is worthwhile. (We are talking about felt today, but of course you can do this activity with colored papers; however, the mats will not last long and won't make very good keepsakes.) If you want another activity, make a draw-string bag for the collection of the candy. The child can use the bag for other purposes after the holiday.
 
You can do quite a bit with a simple design like this. For example, you can make any kind of jack-o'-lantern design on the pumpkin that you like — friendly or scary or silly.  You don't have to have a black cat coming out of the pumpkin. It could be a bat, a ghost, an owl, a pirate — anything you want.

Finished leopard "portrait"
For "portraits" of animals or storybook characters, just the head is necessary. I enlarge the heads of my puppets for such pictures. We have published several articles about puppets with color photographs and the occasional pattern. You can find those by using the "Search My Blog" feature at the side of this article. Just type in the word "puppet".  Incidentally, all the dog and cat puppets I do are outfitted with a collar and tag to remind people to do that for their pets. There is also an article about teaching with puppets in our EXTRAS section, listed at the top of this article.

An easy way to display a picture is to "frame" it with a wooden or plastic embroidery hoop. Plastic hoops come in a variety of colors. A wooden hoop can be left as it is, varnished, or painted. Choose a hoop that will display the amount of background that you want. Place the felt picture over the bottom part of the hoop. Adjust the upper part of the hoop so that the tension screw is directly above the center of the picture. Push the top part of the hoop gently down over the felt. Tighten the screw a little at a time, pulling the felt taut as you do so. When the picture is completely flat, turn it over and trim away the extra felt. The small space left under the screw is usually large enough for you to slip the screw over a "headless" nail for hanging.

Stuffed toy from puppet pattern


I stuff the heads of my puppets with fiberfill (you can use cotton), leaving just enough room for one or two fingers of the puppeteer. You can make a soft doll by stuffing the whole body and sewing the bottom edge securely closed.


Puppet used as treat bag
Or you can prepare it as a working puppet but fill the body with cellophane-wrapped hard candies, miniature candy bars, small trinkets, etc. Sew the bottom shut with easy to remove stitches so the child can pull them out to open the seam. Then he or she can enjoy the treats in the gift bag and still have the puppet to play with.


Felt scraps
Save your felt scraps in a bag or a large mailing envelope for use in future projects.  For, as my Grandma used to say:

"Use it up,
Wear it out,
Make it do,
Or do without."

I hope you have gotten some ideas from this article. I put the emphasis on fun because that is something we all need to get us through these challenging times.

Stay safe. Be well. Our best wishes go to all of you.



 Creative Commons LicenseThis post by Annake's Garden is licensed under a Creative Commons Attribution-NonCommercial-ShareAlike 3.0 Unported License.

Saturday, November 23, 2019

Postponed Projects, and Progress

Dustbowl Afternoon, mixed media by J.D.
"Dustbowl Afternoon", mixed media by J.D. - finally finished!
Today I am going to give a progress report on work that was set in motion before we became immersed in a busy art/craft show and charitable work season that is still keeping us quite busy.  I do not have the time I need to keep up with all my projects, but I have completed a couple and am making progress with others. J.D. gave you some idea of the activities we are involved with in an earlier post, so I am going to focus on specific pieces of work.  Part of this explanation will be in the form of questions and answers.

Are you featuring any more women artists at this time?

Yes, I am — in two ways.

Frida Kahlo, USPS stamp
First of all, we have another commemorative stamp. This one features Frida Kahlo.  Born in Mexico in 1902, she was involved in the post-revolutionary times when Mexico was trying to adjust and develop a real sense of its nationalism. She showed artistic talent at a very early age, suffered polio as a child, determined to study for the medical profession. Her dreams and her body were shattered in an automobile accident while in her late teens. Sadly, that was to leave her in constant pain for the rest of her too-short life.  She began painting again while confined to bed, using an apparatus that let her paint on a canvas directly above her.  Later she became very politically active, especially in affairs concerning both Mexican and Native peoples. She was an out-spoken feminist.  She married, divorced, and re-married famous painter Diego Rivera. Theirs was a stormy marriage.  Frida's many self-portraits show both her physical and her emotional pain, but also an extreme determination not to give in to that pain.

She was considered a surrealist painter — and Surrealism was very popular at that time — but she denied it, saying that she only painted HER OWN reality. She was strongly influenced by Folk Art and included many costumes and artifacts in her paintings. Today, I think she would probably be grouped with the Magic Realists. She died at the age of forty-seven.  She sold very few paintings during her life, although she painted portraits on commission. Today her paintings are worth a fortune.

Second, the way I am featuring contemporary artists is to show a project I have done that has been inspired by one of the artists I mentioned previously. This project was inspired by the African paintings and prints of British artist Tilly Willis.

Did you finish the project you designed of the Women's World Cup soccer players?

Soccer players, original sketch
It is still in progress on my work table. With shows every weekend, I'm running behind with some of my projects. but it is progressing when I have time to work on it. This has been  quite a challenge for me. Those of you who are familiar with my work know that I like to work on a fairly large scale and put in a lot of detail. It was quite a change to go to a small scale with simply shaped pieces. Also, while I am working constantly with felt in making my puppets, everything is hand-stitched. To do that on this project would have obliterated the finer details. I  have had no experience with fabric glues, so I still need to do  some experimenting to get the right combinations of fabric and glue. But it has been fun and informative so far and I will certainly try more of these in the future.

Fabric version of WWC soccer players, in progress


I can tell you had Tobin Heath in mind for the U.S. soccer player, but who was your model for the Dutch player?

I did indeed have Tobin in mind when I drew the U.S. player. After all, she went into this year's Cup with titles from more different competitions than any other player on the team. She has great form and I love her intensity.

Netherlands flag
Netherlands flag
The Dutch player doesn't represent any one player on the team, but rather is a composite. I didn't know as much about the team and only saw their last two games in their entirety. I must admit I had some mixed emotions watching the final. Of course I was cheering for the U.S. team, but I had to admire the Dutch team, too, and it was hard to see them lose.

Windmill embroidery design
By the quarter finals, I had ancestral roots in six of the countries of the teams involved and three other countries that did not get that far. But my deepest connections are with the Netherlands. I am "Double Dutch" — Frieslander on my father's side and mainland Dutch on my mother's.  Of my European ancestors (I also have Native American ancestry), the Dutch were the first to come to America.  They settled here in the late 1600's — influenced by Peter Stuyvesant — and remained for a long time, while New York was still New Amsterdam, before moving westward. When our family traveled in Europe many years ago, the Dutch people were the most welcoming and helpful of hosts, even bringing out family cradles — and once a beautiful Louis XV crib — for our youngest, who was just a baby. One hotel manager's wife volunteered to babysit all three children so my husband and I could have a special meal of foods from the former Dutch East Indies at a nearby restaurant.

************************

Original design with white background


Now let's consider the project I started on a post from last month. I mentioned that I wanted to "flood the background" of the design — which I had left white — with other colors to see how they compared. J.D. did this electronically.  Here are the ones we liked best:

Original design with various colored backgrounds
Original design with a variety of colored backgrounds


Needlepoint, early stages
I have completed the original design in tent stitch on #10 canvas, which made the design quite a bit smaller than the original sketch on quarter-inch graph paper. However, I think the closely stitched design shows up more vividly than the paper design. I had already added dark and bright red and bright and antique gold to the central design on the original pattern to balance all the blues, greens and violets.  Now I added a few stitches of red-violet and re-shaped the white "brackets" on the four sides.  I moved the corner designs to areas about three inches from the center of the canvas, connecting them with lines of the antique gold. I was dissatisfied with the open ends of the purple-&-aqua motifs on the sides of the central medallion, so I closed the ends with and arc of stitches and filled in the entire center of the shape I had created. At that point, I stopped working on the design itself and filled in the white areas of background out to the edges of the completed part of the design.

I am describing the colors as I see them on my canvas. It is virtually impossible to match yarn exactly to the colors of colored pencils and marking pens and get the identical visual effect. Furthermore, the colors you see on your screen are probably not exactly the same colors I see on my canvas. They are not even exactly the same colors J.D. gets on his camera images or his monitor. So I try to name the colors as I proceed so that you can make your own decisions about what you like and do not like.

Using a strong light to check stitching
Something that I do repeatedly when I do canvas work is to hold the canvas up to a strong light periodically as I stitch. This immediately tells me if I have missed a stitch anywhere. It also shows me of areas where stitches may look thin enough to let some light through. If these are just random stitches, I choose a needle with the appropriate color of yarn or floss and stitch over the thin stitches, pulling the doubled stitch down firmly.. Sometimes, however, a whole line of stitches looks thinner than those around it. Before you stitch over the whole row, try this. Run a strip of the yarn or floss under stitches on the back of the canvas, along-side the thinner stitches. Check them with the light again. Often this simple act will correct your problem. If you are working with heavy yarns or flosses, it may be a good idea to separate some strands and use them to fill in stitches, rather than to double its thickness — which may be more noticeable than the thinner stitches.

Needlepoint, later stages
Because I liked the symmetrical areas of white background, I moved the small 8-pointed motifs in bright gold farther out from the center, beyond the second array of motifs. I still wanted to use them, however, and to make them stand out against the white background. First I placed them symmetrically around the portion of the canvas that was already worked. (I left the corners open because I had not yet decided whether to extend the corner motifs.)  Then I edged each one with a row of stitches in the emerald green yarn used in the stripes at the sides of the central design. Still leaving the corners open, I filled in around the new motifs with the white background yarn. Then I did extend the antique gold rows of stitches to the corners of the completed area.

I made the ends of the antique gold lines into arrowhead-like points similar to those that complete the central square of the design. I then looked around at the collection of colorful yarns I had used in the design and decided to use them, one-at-a-time, for borders until I ran out of canvas. So that's what I did. As you can see, i have modified the original pattern considerably— but I did warn you that I probably would do so. If I were to use the pattern on a different kind of project, such as a rug, I would modify it in an entirely different way.

Finished needlepoint

Make something unique with your own color choices.


 Creative Commons LicenseThis post by Annake's Garden is licensed under a Creative Commons Attribution-NonCommercial-ShareAlike 3.0 Unported License.

Thursday, February 28, 2019

Return to Reverse Applique

Tropical Fish Wall Hanging
Tropical Fish Wall Hanging from June, 2016
As we promised, we are re-visiting a popular project and offering another pattern for the same technique. To the left is the completed reverse-applique of a tropical fish. (For extensive directions for doing this type of reverse applique, see the post for June 24, 2016.)

First, let me explain the changes I made from my original plans for this tropical fish. I decided to do a small wall hanging rather than a framed picture because I wanted all the textures in the piece to be visible and even touchable. For the background I chose a suede-like fabric in a medium teal color. After appliqueing the fish and its watery background to this material, I decided not to use the narrow black felt “frame” I had cut for it, substituting instead a glittering edging in blue and silver. I liked this much better than the felt and plan to use a similar fabric for the current project. A narrow pocket at the top of the teal fabric contains a small dowel, from which the hanging is suspended.

For the current project, here is a downloadable silhouette of a fantail goldfish. You may use the narrow frame or discard it and substitute your choice of trimming.

Downloadable Goldfish Outline
Downloadable Goldfish Outline (click here)

You will need the following materials:
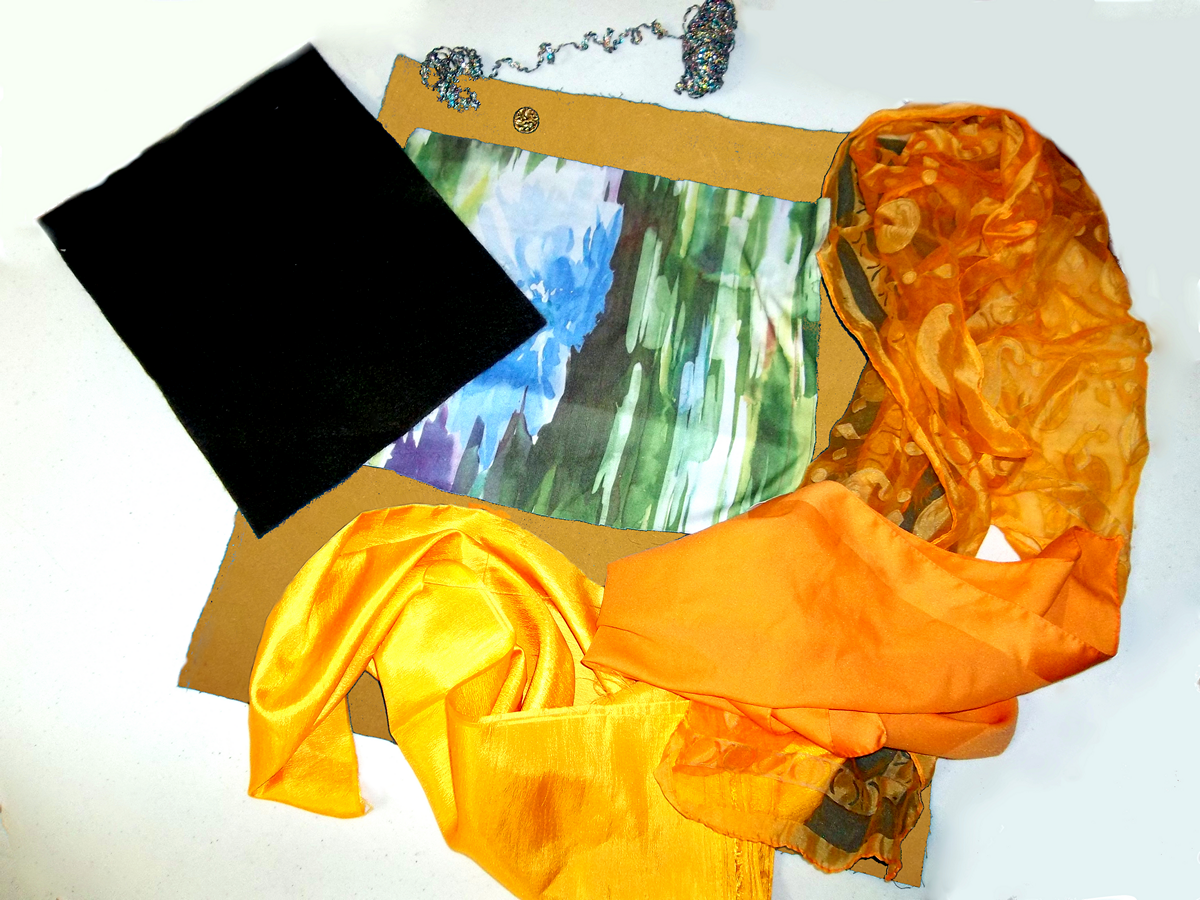
materials for project
Materials you will need
  •   a rectangle of black felt approximately 81/2 inches X 11 inches (22 cm X 31 cm)
  • a piece of silk or nylon crepe approximately 10 inches X 13 inches (26 cm X 33 cm) in a “watery” pattern
  • scraps of silk or nylon, from old scarves, in shades of yellow, gold, and orange
  • a glittery button for the eye
  • various trims
  • matching threads
  • heavier material for the backing fabric
  • a small dowel if you are making a wall hanging, and cord or wire to suspend it

You will need the following equipment:
equipment you will need
Equipment you will need
  • scissors or shears that are used only for fabric, yarn, or floss
  • small, sharp-pointed embroidery scissors
  • manicure scissors (optional)
  • a ruler or other measuring stick
  • straight pins
  • permanent markers in yellow, gold, and/or orange (optional)

You will also need access to an ironing board and a steam iron.

NOTE: In the original article, I showed the equipment I used to cut the silhouette. However, if you are not accustomed to using craft knives I recommend that you use scissors instead. Manicure scissors with their curved blades are useful for getting around small curves cleanly. And to teenagers or ‘tweens who may want to make one of these as an art project or for a Girl Scout badge, please do not use craft knives or razor blades unless an adult is present. Accidents can happen very quickly and can be serious.

The step-by-step procedure is similar to that for the tropical fish.

    1. Assemble your materials and equipment. Press your fabrics, being careful to use the right temperature setting for each one. Since I use so many kinds of delicate fabrics, I use a press cloth between the fabrics and the iron.
    2. Download the goldfish pattern and make a second copy, which will be cut apart. Pin one copy to the felt rectangle.       
    3. Cut around the outside of the fish. Make your cuts as clean and neat as possible. Then make a slit in the middle of each interior section of the fish and carefully remove both the paper and the felt.

Felt cut-out of goldfish outline

4. Lay out the fabric for the big fantail. (The curved top half of this section of the fish is indicated by the dotted line on the pattern.) I cut two pieces — one for the entire tail and one for just the curved top half. I pinned the two together with the smaller piece underneath, then pinned both underneath the black felt frame, trimming off any fabric that showed around the frame. I basted the fabric to the frame with a bright-colored thread so that the basting will be easy to remove later.

Step 4
Step 4

5. Repeat step 4 for the body, head, and three smaller fins.

Step 5
Step 5

6. Place the whole assembly on the “watery” background. Because goldfish are pond dwellers, I chose a fabric that suggested some plant material in the water and some sunlight reflections on the surface. Pin the assembly in place on the fabric, pinning both the outside and inside edges of the black felt.  Using black thread,  sew around the inside of each section. If you are sewing by hand, as I do, make your stitches as small and close together as you can. Remove the pins from the insides of the sections and make sure all pieces lie perfectly flat. Re-pin the outside edges as needed. Now sew around the outside edges of the felt. Remove all pins and basting threads and press the assembly lightly, using a press cloth over it.

At this point I chose to do some light shading with the markers I mentioned earlier and a small amount of embroidery. If you decide to use markers, practice on scrap materials first.  Use light, quick stokes and don't let the marker tip press into the fabric and make spots.

Step 7
Step 7
7. Since some of these fabrics are slippery, you may want to make a cardboard cutout to draw around. Cut the cardboard to the size you need. Turn the fabric over and place the cardboard cutout on the back of the fabric. Mark around the edges of the cardboard with a pencil. Remove the cardboard. Clip off a small triangle from each of the four corners of the material to be turned under. Turn under the raw edges of the “watery” fabric and baste them. Press again if necessary.

8. Cut your background fabric, hem it if necessary, and sew the pocket for the dowel if you are making a wall hanging. The background fabric should be enough larger than the applique to serve as a picture mat. If you are going to frame the piece, trim the outside to fit the frame you plan to use. Mark the place where the applique should go. If you plan to make a pillow, you will need double the amount of background fabric, plus a pillow form or stuffing.

9. Place the applique on the background fabric and pin it in place. Sew it to the background fabric. Sew the black felt “frame” or some decorative trimming over the seam where the applique is sewn to the background fabric. Place the button for the fish’s eye on the head and sew it through all layers of fabric so that it will not sag or droop when the piece is hung on the wall. I prefer shank buttons for eyes because they stand out from the fabric and cover the stitches used to sew them on.

Goldfish finished through Step 9
Reverse applique Fantail Goldfish, finished through Step 9

Downloadable blackwork goldfish pattern
Downloadable blackwork goldfish pattern (click here)
I never discard a pattern I like.  Here is the goldfish done as a pattern to be used in an entirely different kind of needlework! The pattern is yours to download and embroider in Spanish blackwork. If you are not familiar with Spanish blackwork, you may want to refer to these two previous blog posts (October 6, 2013 and October 18, 2013). The downloadable pattern for the tropical fish was given in the post for May 28, 2018. The two blackwork patterns may be used as a facing pair if you like. You will notice that the present chart has a number of new diaper patterns.

Keep watching for a second tropical fish, made as a companion piece to the first one, this summer. It will also have both a downloadable outline pattern for reverse applique and another downloadable pattern for a Spanish blackwork piece, with several more new diaper patterns.

Enjoy!


 Creative Commons LicenseThis post by Annake's Garden is licensed under a Creative Commons Attribution-NonCommercial-ShareAlike 3.0 Unported License.

Friday, June 24, 2016

Revisiting Reverse Applique

Little Bug mola
"Little Bug" mola
A few weeks ago (April 11, 2016), I wrote a post about reverse applique, inspired by the molas made by the Kuna Indian women of Panama. I promised you another, more advanced, project. But first, I want to show you a few more molas from my collection. The one at the top of this page is a small one of the type used to decorate the short sleeves of traditional blouses, while the larger ones were used on the fronts and backs of those blouses. Their costumes have changed considerably over the intervening decades. Now they wear blouses with almost elbow-length, bell-shaped sleeves, which do not appear to have any appliqued decoration. I don't know if the small sleeve molas are even made any more. I have always thought of this creature as some kind of bug, but I don't know what it really represents.

capricorn mola
"Capricorn" mola
Many of the designs relate to Cuna folklore. Others, however, derive from things their makers have seen in the urban centers of Panama. Some were faithfully executed product containers so exquisitely done that they rivaled Andy Warhol's Campbell's Soup can. Sometimes the objects in the design are taken out of context. I've wondered if this little fellow was the maker's version of the zodiac sign for Capricorn.

unicorn mola
"Unicorn" mola
The next full-sized applique might be an impression of a unicorn. The artist has added her own special interpretation to the design. Notice the large and small patches of color made by the pieces of cloth inserted between the cut-out outlines and the backing fabric, and then sewn in place from the top.


chicken mola
"Chicken" mola
Finally, here is one artist's depiction of some (to her) familiar birds. I'm not sure what bird the figure on the lower right represents, but the chicken is obvious. The black bird on the left is one of the hundreds of grackles that live in huge flocks around the isthmus. Our children called them “zeeps” because that is what their shrill call sounds like.


Our first reverse applique consisted of a black felt silhouette, a solid colored background, and scraps of two other colors of felt. I added small commercial appliques, metallic thread and small metal fasteners (snaps) to my version. For the directions to prepare the finished piece as the small wall hanging shown here, see the post for April 11, 2016. For our new project, you will need another piece of felt, a back panel, small sharp-pointed scissors (or an X-acto® knife or safety razor blade), a needle, black thread and scraps of fabric with interesting colors and textures. Think about satin, brocade, velvet, lace, ribbon, etc. Look for that silk scarf you never wear or a man's tie that has gone out of style. Collect all those small trimmings you couldn't bring yourself to throw away. If you don't have access to these fabrics, substitute brightly patterned cotton remnants. The colors do not need to be realistic. Let your imagination fly free!

Here are the steps to take in making the “TROPICAL FISH” project:

1. Assemble your materials. Press any pieces of fabrics that are wrinkled.

2. Download and print out the silhouette pattern. I suggest you make at least two copies, since you will be cutting up one of them.
3. There are two basic ways to cut out the silhouette. In both cases, you will need to pin the pattern securely to a rectangle of black felt, pinning the interiors of strips as well as the outer edges. In the first case, you will make a slit in the center of each white section inside the black outline and using small, very sharp scissors cut along the insides of the black lines. This will destroy the white paper sections, so that is why you need the second pattern. While the pattern is still pinned in place, cut around the outside of the entire fish without separating any of the sections.

tools
Some things you may need
In the second case, you would place the pattern on a hard surface that cannot be scratched by a sharp knife: a marble counter top, ceramic tile, smooth metal, etc. Cut out the interior parts of the silhouette with an X-acto® knife or a single-edged razor blade, saving the white sections to use as patterns. (I use a ceramic tile left over from my bathroom floor.) Cut the outer outline of the fish with scissors, separating it from the “frame” where it touches it at the top of the top fin and the bottom tip of the tail fin. Now that the fish is separated from the “frame”, set the “frame” aside to be added to the surface as the last step.

materials
Various fabrics and trim you might use
4. Lay out the fabrics you think you might want to use for your fish. After placing the silhouette over several fabrics, I selected a long silk scarf with markings that reminded me of water for the background. I chose a large, square nylon scarf for the fins and a man's wide satin tie with a pattern for the scaly body of the fish. I also collected a variety of small trimmings for details and a button for the fish's eye.


5. Sew or glue the fabric you chose to represent the water to the background fabric for the entire piece. Sew as closely as possible to the edge so that these stitches will be covered by the “frame.”

background fabric

6. Since I wanted all of the fish's flowing fins in the same color, I placed the fish silhouette on the nylon square and pinned it in place. I cut around the outline of the silhouette. (If you want fins of different colors, use the white paper pieces as patterns and cut about a quarter of an inch or 1.5 cm. outside the edges of the paper.) Using a bright-colored thread that would be easy to remove later, I basted the silhouette to the nylon material. With a permanent marker in a darker shade, I drew in details of the fins. This is optional.

fish silhouette

7. Place the fish silhouette with its inserted fins on your background fabric. Check its position with the black “frame”. Using black thread, stitch along both the outside and the inside of the black strips on all of the fins except the small one just behind the head. Do not stitch around the head or the scaly body. Stitch through the black outline, the inserted fabric, and the background fabric all at the same time. I hand-stitched these pieces, but you could machine- stitch them if you like, or even use fabric glue. Remove the basting thread.

silhouette stitched to background

8. At this point, I went back to my extra pattern and traced the head and scaly body of the fish, all in one piece, on tracing paper. I cut the seam of the tie and opened the fabric flat. I moved the traced shape around over the fabric until I found a design that really suited the fish shape. I pinned the pattern in place on the tie and cut it out about a quarter of an inch (or 1.5 cm.) larger than the pattern. Working one section at a time, I gently pushed the edges of the fabric underneath the edge of the felt outline until it lay flat. I pinned it in place. Then I sewed down the remaining felt edges with black thread, leaving the outline of the smallest fin free. A scrap of the red fabric filled in the small fin and was sewn down.

fish with body scales

9. Continue until all the inserts have been sewn down. Add any additional trimmings, sequins, buttons, surface embroidery or other decorations that you desire. I used a button for the fish's eye and some narrow trim to suggest the fish's mouth.

10. Add the “frame”, sewing through all layers.

I have shown you how I constructed my sample project. (We will show you the finished applique in a future post.) Now you are free to do yours in any way that you want.. Or make a flower, parrot, or colorful landscape. I'm happiest when no two of the projects I suggest look alike. I hope each of you will express your own individuality, and that you will be pleased with the result.

Enjoy,


 Creative Commons LicenseThis post by Annake's Garden is licensed under a Creative Commons Attribution-NonCommercial-ShareAlike 3.0 Unported License.

Contact Us

Name

Email *

Message *

Blog Archive