Showing posts with label felt hand puppets. Show all posts

Saturday, October 10, 2020

Fun With Felt

Felt butterfly picture by Annake
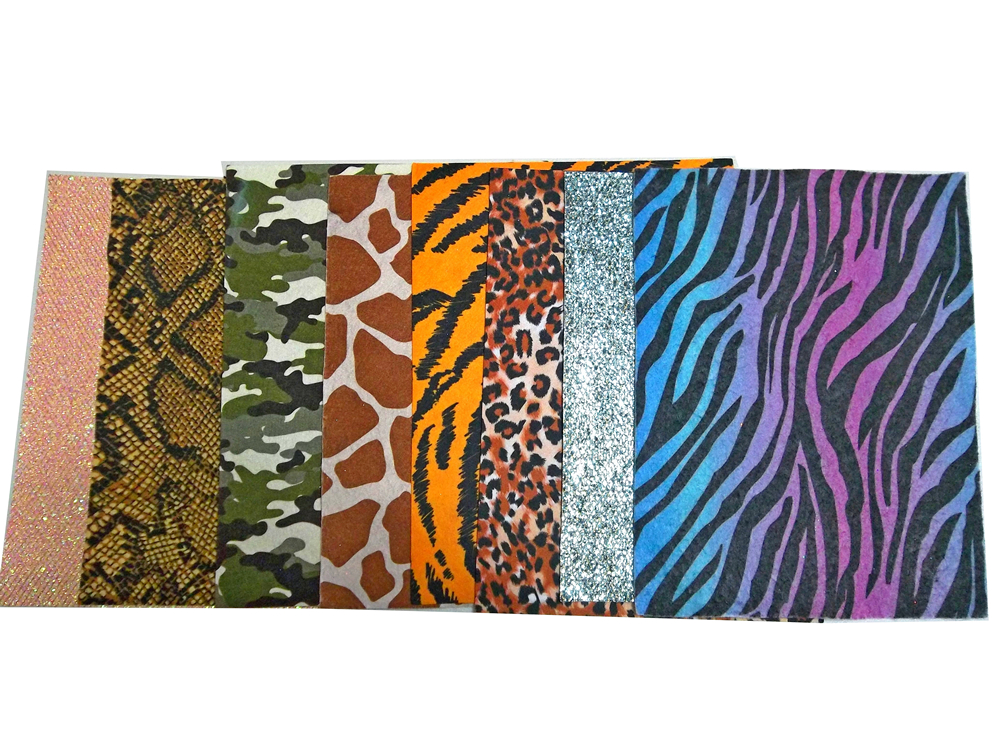
Felt is a versatile fabric with many uses. Because it does not need to be hemmed, it takes less time and work to make something from it. It comes in a wide variety of colors and a number of patterns like zebra or tiger skin,  "psychedelic" colors, and small repeated motifs.  Most of the felt pictures you will see today are done with fabric glue, but there is no reason you cannot stitch them down by hand or machine if you prefer. They will probably be more durable done that way, but if you are going to frame the design. sewing is probably not necessary.

Fancy felt assortment


Projects like this, whether backed, framed or hung with a fancy hanger, are good to fill narrow or awkward wall spaces, like beside or above a door, above or below a window, down the wall beside a staircase, or beside a set of shelves.

Simple pattern idea, adaptable to felt

They are great for children's rooms, unframed or framed without glass, because they are unbreakable. I make my own patterns, but you may not feel comfortable doing that. However, pictures for small children should be simple. Too much detail is confusing and makes it harder for them to identify and name things. There are patterns available online. Some of them are free; others have a fee. But you can use children's coloring books or trace pictures from children's picture books. Here is a design I adapted from one of my puppets.

 
Shopping bag with felt applique
 
Tools and materials
You will need;
     a felt rectangle for each color of your design
     fabric glue
     sharp scissors for the felt*
     another pair of scissors for paper patterns
       a pencil or marker
     paper for the pattern parts

* Please don't use your fabric scissors for anything but fabric. You would be amazed how much paper will blunt a blade edge. We have a gentleman who sharpens scissors here in our little town, but that sort of help can be hard to find and you can end up spending quite a bit for another good pair of scissors or shears.

Because shopping is so difficult this year, I am not going to recommend any brand names for materials. The felt pieces can usually be found at the big chains like Walmart or Target, fabric stores, or craft shops. Read the directions on the fabric glue carefully and follow the directions closely. If you are using a spray glue, which I don't recommend, try to use it outdoors or in a large space like a garage and wear a mask while dealing with it. Elmer's white glue will work for a piece that is meant to be temporary, but it is messier and may seep through.

Simple Iris pattern

When you are making a pattern for a felt picture, keep it as simple as possible. Once your sketch is finished, make a clean copy of it. Use paper about the weight of computer paper. I like to go around the outlines of the pattern pieces with a colored marker. That makes a thicker line than a pencil or a pen, so that I can more easily cut right down the center of the marker line. I find this gives me a better fit with adjacent pieces which share a common borderline.


Saved pattern pieces
Choose your background color. As each piece of the picture is cut out, remove that part of the pattern. write the name of that particular piece (for example "long leaf, upper right") and store the pattern piece in a business-sized envelope for future reference. Label the front of the envelope with an appropriate title and file it in a shoebox or similar container.

Finished felt iris picture
Arrange the pattern pieces on the background exactly where you want them to be in the finished composition. Carefully lift the pieces one at a time and apply the fabric glue as directed on the container. Carefully put each section in place and let the pieces dry completely. If you decide you need to press the piece, use a pressing cloth over the felt and a moderate temperature for the iron.


Easy hanger method
The finished composition can then be backed, framed without glass, framed under glass, or whatever you wish. If you want it to be a small wall hanging, stitch or glue a folded piece of another color of felt at the top of the picture so that it becomes a tube that will hold the hanger. Slide the rod of the hanger through the tube, close and fasten it.


Are you taking the advice I have seen and heard for having a candy "treasure hunt" around your house or apartment for your children, instead of the traditional "Trick or Treat" activity this year?  Here is an idea for something a little special for the dinner table before the treasure hunt. Make a special Halloween placemat for each child and cover it with clear plastic wrap or slip it into a clear plastic bag to prevent food spills. Then the child can have it for a keepsake, room decoration, or whatever they choose. I think everything we can do to make this very different celebration special for the children is worthwhile. (We are talking about felt today, but of course you can do this activity with colored papers; however, the mats will not last long and won't make very good keepsakes.) If you want another activity, make a draw-string bag for the collection of the candy. The child can use the bag for other purposes after the holiday.
 
You can do quite a bit with a simple design like this. For example, you can make any kind of jack-o'-lantern design on the pumpkin that you like — friendly or scary or silly.  You don't have to have a black cat coming out of the pumpkin. It could be a bat, a ghost, an owl, a pirate — anything you want.

Finished leopard "portrait"
For "portraits" of animals or storybook characters, just the head is necessary. I enlarge the heads of my puppets for such pictures. We have published several articles about puppets with color photographs and the occasional pattern. You can find those by using the "Search My Blog" feature at the side of this article. Just type in the word "puppet".  Incidentally, all the dog and cat puppets I do are outfitted with a collar and tag to remind people to do that for their pets. There is also an article about teaching with puppets in our EXTRAS section, listed at the top of this article.

An easy way to display a picture is to "frame" it with a wooden or plastic embroidery hoop. Plastic hoops come in a variety of colors. A wooden hoop can be left as it is, varnished, or painted. Choose a hoop that will display the amount of background that you want. Place the felt picture over the bottom part of the hoop. Adjust the upper part of the hoop so that the tension screw is directly above the center of the picture. Push the top part of the hoop gently down over the felt. Tighten the screw a little at a time, pulling the felt taut as you do so. When the picture is completely flat, turn it over and trim away the extra felt. The small space left under the screw is usually large enough for you to slip the screw over a "headless" nail for hanging.

Stuffed toy from puppet pattern


I stuff the heads of my puppets with fiberfill (you can use cotton), leaving just enough room for one or two fingers of the puppeteer. You can make a soft doll by stuffing the whole body and sewing the bottom edge securely closed.


Puppet used as treat bag
Or you can prepare it as a working puppet but fill the body with cellophane-wrapped hard candies, miniature candy bars, small trinkets, etc. Sew the bottom shut with easy to remove stitches so the child can pull them out to open the seam. Then he or she can enjoy the treats in the gift bag and still have the puppet to play with.


Felt scraps
Save your felt scraps in a bag or a large mailing envelope for use in future projects.  For, as my Grandma used to say:

"Use it up,
Wear it out,
Make it do,
Or do without."

I hope you have gotten some ideas from this article. I put the emphasis on fun because that is something we all need to get us through these challenging times.

Stay safe. Be well. Our best wishes go to all of you.



 Creative Commons LicenseThis post by Annake's Garden is licensed under a Creative Commons Attribution-NonCommercial-ShareAlike 3.0 Unported License.

Thursday, November 22, 2018

A Call for Holiday Help

Spruce tree in snow
'Tis the season...
I was planning to post a Q & A, with some of the questions I’ve gotten during the many shows we’ve done this fall, when the following arrived. This call for help came in a rather long letter that I have shortened considerably here. Since it seems to me to have broad application, not just to the questioner, but to readers in general, I'm going to address it today because it is time-sensitive.

"Annake, please help! I was married last spring, to a gentleman who had been a widower for some time, with a grown son and daughter. I met them at the wedding and they were very cordial. They are bringing their families here for Christmas. Each family has a daughter, one 10 years old and one 12. They will be here from several days before Christmas until New Year's Day, and I am not sure how to keep the girls occupied and entertained for so long:  I have never had children or ever worked with them! My husband has decreed this as "family time" and asked everyone to limit time spent watching TV or using electronic devices. The adults are eager to visit friends in the area while they are here. We are going to take them to see "The Nutcracker", and we have planned some activities for the girls, like sledding and caroling, but those will depend on the weather. Your blog has all kinds of interesting activities, but I don't have any idea which ones are appropriate or even possible for girls this age. Please give me some ideas! Please answer in a blog post but don't use my name; just sign me "Nervous Nellie"!

Well, Nellie, I was a first-and-only wife and mother, but I do understand your concerns. I had two sisters-in-law, and a family get-together included up to seven boys ranging from toddler to late teenager, and two girls about the same distance apart in age as your guests.

Assorted Christmas cards
First, some general suggestions. You don't mention harvesting, shopping for, or decorating the tree as activities for the girls, so I am assuming you plan to have a tree decorated before they arrive. Is there a small evergreen somewhere on your property which could be "their" tree to decorate and to cherish every time they come to visit? Or would the budget stretch to purchase a small live tree which could be planted after Christmas? If a live tree isn't possible, a small, undecorated artificial tree for each girl might be a possibility.  Let them decorate as they desire.

Crocheted Cookie Cutter Tree

Second, enlist their help with the festivities. Ask them to decorate placemats and/or place cards for all the members of the family for Christmas and New Year's breakfasts. You will need colored construction paper, a box of mixed greeting cards, white glue or rubber cement, scissors (they are old enough for sharp tips — don't insult them with kindergarten scissors), and a roll of clear contact paper to cover both sides of the finished work.

Invite them to help you make and decorate cookies, cupcakes, gelatin desserts or puddings. Don't expect perfection and do expect some mess, but include clean-up in the activities.

Crayon batik of an orchid
Here is a new activity they might enjoy. You will need two men's cotton handkerchiefs for each girl. Please wash and press them beforehand to remove any sizing. You will need a large box of good-quality wax crayons — not the ‘washable’ kind, which will come out. You will also need paper towels, an ironing board and iron, a sewing machine or needles and white thread, and a small bag of polyester pillow stuffing. They may want to outline parts of their pictures with permanent marker, so be sure to protect the work surface from ink that might come through the fabric. Let the girls decorate both handkerchiefs with the crayons. They should press hard and go over darker areas several times. Cover the ironing board with several layers of paper towels. Cover the tops of the pictures with paper towels. Set the iron on "Cotton" and iron over the paper towels, pressing firmly and replacing the towels as needed until the wax of the crayons is completely removed. Place the handkerchiefs with the picture sides together and sew them together by hand or machine, leaving a big enough opening for the girls to stuff their pillows with the polyester. Turn the pillows right-side-out, stuff, and sew the opening closed.

Work table with crayons

For the rest of these, you may have to bend the rule about Internet use a little:

Butterfly "Window Wonder"
Revisit my "Window Wonders" article (April 29, 2015) or type in window wonders on our Search Engine in the sidebar of this post. These sun-catchers are still popular, but have developed over time. Now we make graduated hangings of three pictures at a time, usually a #4, a #5, and a #6 hoop, held together with small lengths of aluminum chain, available at many hardware or craft stores. (Ask the men of the family to cut and fasten the chain lengths if you need to do so. There's no reason they should not take part in their daughters' activities!)  If chain is not available, sew or tie the hoops onto a strip of wide, flat ribbon. The rest of the directions from the original article still apply.

Another appropriate activity would be the paper designs some of my students made to look like the wonderful patterns made by Hawaiian quilt makers. The student designs shown on that blog post (January 1, 2018) were made by girls and boys in the 5th grade who were studying the state of Hawaii at the time. That is in the age range of your girls. All you would need is colored paper, scissors, and glue.

Four-way penguin design
You may want to look at that post and the one on four-way designs from Hawaiian quilts from March 21, 2017 before suggesting the activity.  Let the girls study the examples on the post before they begin their own designs. The paper to be cut out should be folded into four equal parts. If they draw their design on one square, starting at the center point and extending it to both sides of the square at one point, it should hold together when it is cut out and the paper is unfolded. You can turn the paper over so that the drawing does not show. A couple of "practice pieces” may be necessary.

Finally, I suggest that you and the girls type in the word puppets on our Search Engine. The girls might enjoy the story of the Little Pink Pig. It may even inspire them to do a project of their own when they get home: there is a downloadable pattern for the pig puppet. In addition, there are several other articles which show various puppets from both front and back to give the girls ideas for designs of their own. After seeing the performance of the Nutcracker, they may want to make a puppet for one of their favorite characters from that story. Here are a couple of puppets that I don't believe that we have shown before:

seasonal puppets
Some seasonal puppets

Relax, and enjoy! And, Nellie, keep thinking about those seven boys who are NOT coming for the holidays! Let me know how it works out.


 Creative Commons LicenseThis post by Annake's Garden is licensed under a Creative Commons Attribution-NonCommercial-ShareAlike 3.0 Unported License.

Friday, August 10, 2018

Projects, Pet Portraits, & Patterns: Summer Q & A, 2018

Blackwork butterflu on checked gingham
Blackwork butterfly on checked gingham
Are you still doing the Spanish blackwork?

Yes, indeed. Both the lion and the butterfly blocks are now completed. I was especially pleased with the butterfly.


Here is a picture of the chart for the fan-tailed goldfish, which is meant to be a facing companion piece to the tropical fish shown previously.

Downloadable blackwork goldfish pattern
Look for more pictures and patterns in our Autumn and Winter Questions and Answers.

You had a cute picture of mushrooms on one of your classroom posts. Are you going to do anything more with mushrooms?

That would be the January 16, 2018 post. I’m glad you liked it. Yes. I am working on a rather large piece in crewel embroidery that features several different kinds of mushrooms. Some of the sections have been shown before, but there are still a few to be completed. This is our busiest season, however, with farmers’ markets, art shows, and local events, so it will be some time in the autumn before the entire project will be ready to be shown in a post. Keep watching.

Are any of your embroideries done on a programmable sewing machine (asked at a recent show)?

None at all. All my work is handwork, done with a hook or a needle.

In a recent post you wrote about showing your classroom students how to get some special effects on pictures of their pets. Can you tell me more about those?

Iris needlepoint with light colored top stitching
Certainly. I first addressed the topic of how back-stitching around prominent features enhances a picture. This is true for pictures of plants and other subjects besides animals. Top-stitching need not be done with black yarn or floss, although that is traditional for counted cross-stitch. It can be done in a darker tone against a light feature or a lighter tint around a dark feature, and the two may be used in the same composition. Here is an example of a floral piece that I did recently.


Detail of Boston terrier pup's eyes
Next I talked about putting an accent in the animal’s eyes. Because eyeballs are round and moist, they reflect the source of light as a small bright spot, usually at the upper part of the eye. In needlework, this is commonly represented in close-up pictures by a single white stitch in each visible eye, often done over yarn with a silky or glossy floss for additional “shine”. If both eyes are looking forward, the reflection must be in the exact same position in both eyes, not as mirror images of each other. I always put the reflections in last because they really bring the animal’s — or person’s — face to life.

Detail of mouse puppet whiskers
Most mammals have whiskers of some sort. Nocturnal animals, including cats, and animals like seals that spend a lot of time underwater tend to have prominent whiskers, which give them information about their dark surroundings. Each whisker emerges from a slightly enlarged pore on the animal’s muzzle. I use a very fine-pointed pen or marker to indicate a few of these pores on the animal’s face, making them mirror images of each other. I do this even for puppets in many cases. If you prefer, you can replace these dots with tiny French knots.

Detail of raccoon puppet whiskers
Starting at each dot, I make a long stitch outward in a realistic length for a realistic picture or an exaggerated one for a toy or puppet. The whiskers fan out slightly to cover more area. Use a dark thread over a light muzzle and a white or colorless thread over a dark one. I like nylon thread or even extremely fine fishing line for the long stitches.

Detail showing shine on Boston terrier's nose
Finally I talked about putting some “shine” on an animal’s nose. A healthy pet will have a moist — or even wet — nose. In most cases the faces are small enough that the nose-shine will be on the same side of the nose as the eye-shine is on the eyes. Since skin does not reflect as much as the surface of the eyes, I don’t use white for this reflection, but rather a lighter gray or even blue for a few stitches on the animal’s nose.

I hope this expanded explanation has been helpful. Thank you very much for asking.

Have you made any more of the little squares with the animals on them (January 1, 2018)? My kids love them! I printed them out and we glued them on cardboard with magnets on the back so we could put them on the refrigerator. I hope that was all right. I guess we should have asked you first.

It is fine with me. After spending half a century as an educator, I’m delighted when something captures children’s imaginations and interests them in the natural world. I’ve been looking ahead to fall and working on this design of squirrels and oak leaves. It is still in progress and I haven’t added the colors for the squirrels, but perhaps your children might enjoy coloring the animals themselves.

Four-way squirrel design

Enjoy!


 Creative Commons LicenseThis post by Annake's Garden is licensed under a Creative Commons Attribution-NonCommercial-ShareAlike 3.0 Unported License.

Monday, February 29, 2016

Celebrating Our Third Anniversary

blog visitor's map
It is wonderful to see so much more color on our blog visitor's map this year. J.D. and I want to send a special thanks to those of you who visit our site regularly or occasionally. We also want to welcome visitors from the new nations we heard from this past year. They are (in alphabetical order): Armenia, Bahamas, British Virgin Islands, Dominican Republic, Finland, Honduras, Kazakhstan, Kenya, Morocco, Oman, Pakistan, and Suriname.

snowdrops
Snowdrops in bloom
Most of the heavy snow that we've been accumulating since early December has melted or is melting, although there are lighter snows in the weather forecast. I have no illusions that winter has finished with us. We usually get at least one heavy snow the last week in March, the first week in April, or both. Nevertheless, the retreating snow is revealing treasures — like this cluster of beautiful white snowdrops. Iris and poppy plants are appearing in all of the flower gardens. Strawberry plants are thriving. In one of our vegetable beds, a row of cress has been growing under the snow. I find myself humming my favorite Frank Sinatra song, “It Happens Every Spring”.

big red geranium
"Big Red"
More sunshine and longer days have led to more hours of work in the greenhouse. It is time to start flats of seedlings and hanging baskets of foliage plants and flowers. I'll be taking cuttings from plants like this geranium (which appears to have delusions of grandeur). It was nearly as tall as I am when we brought it into the greenhouse in the autumn. Now it is pushing up on the inside of the greenhouse ceiling! I've seen geraniums like this in sunny California, but not in the cold Colorado mountains. When it began its rapid growth last season, it produced balls of bright red flowers that were six inches (15.5 cm.) or more in diameter, and continued to do that all summer long.

Now that we have doubled our participation in farmers' and artisans' markets, you will be hearing more about plants and seeing pictures of them from time to time. That doesn't mean I'm going to neglect the handicrafts, however. For example, I have still been experimenting with my own crochet patterns. Here's an afghan, “Autumn Colors”, that I did recently ....
....and another one, “Winterwood”, that I did for this season. I have continued to do latch-hook and needlepoint projects and have several crewel embroideries in progress. I'm also embarking on new designs for the cross-stitch, blackwork, redwork, Assisi and Holbein types of embroidery.

Crocheted afghan, "Winterwood"

Currently I'm working on a large series of puppets for another Etsy artisan, a baker-confectioner, to include in her Easter baskets. Some of these chickens, ducks, and rabbits are new designs. I'll be adding them to the farm animal puppets on our shop site. New designs are developed frequently. Here are a few new ones. I'm also working on a series of puppets of endangered animals for Earth Day. I believe that puppets are a good way to encourage children to learn about and care about animals.
Most of the puppets can be easily made into soft toys. I stuff the entire body and make a seam at the bottom to close it. When I was a little girl living in the South, little children were given rag dolls or animals. These were often stuffed with raw cotton from the cotton gin at the end of the road. The older folks called them “loveys”, and that is what I call the ones I make today. Here's a picture of a rabbit “lovey”.

I've been re-reading all of the posts for this past year. While doing this, I discovered that I had mentioned several projects and techniques that I didn't follow up with articles and examples. I'll be concentrating on those in the upcoming posts for March and April. They include reverse applique, an introduction to Swedish weaving, and lettering as a technique for needlework design (as well as words as needlework motifs). I apologize for any concern that my delays may have caused. I will do my best to discuss everything that I overlooked last year. I will also have some summer and autumn patterns that you can download, so that you can get an early start on projects for those seasons.

Swedish Weaving Sample

I hope you will enjoy this, our fourth year, along with us.


 Creative Commons LicenseThis post by Annake's Garden is licensed under a Creative Commons Attribution-NonCommercial-ShareAlike 3.0 Unported License.

Tuesday, April 1, 2014

Those Popular Puppets

I'm delighted by the positive response my puppets have generated! I am asked lots of questions about them at shows, so I want to answer some of those before I offer a puppet pattern for you to download.

Backs of Raccoon, Cow, and Squirrel Puppets (showing tails)

I'm asked why I show tails and other features on the backs of my puppets. When I used to work with puppets to teach children about animals, I liked to have the puppets be as active as possible: hiding their faces shyly against my shoulder, climbing up my arm, scampering across my lap, wrestling with each other, and so forth. During these actions, a puppet is seen from all angles. I wanted them to be interesting --- and authentic --- from the back as well as the front. I wanted to show the animals' most distinguishing features so that the children would recognize them wherever they encountered them; in pictures, storybooks, television programs, movies, parks or zoos. That's why I also add hands, paws, hooves, or wings to the puppet arms.

Teddy Bear, Cat, and Rabbit Puppets
Teddy Bear, Cat, and Rabbit Puppets - notice the different eyes

Why don't I use the commercial plastic movable eyes, rather than making eyes with layers of felt? The answer is that I don't want to produce choking hazards. Children in the age group who like to play with puppets are not likely to chew on them. They may, however, have little brothers and sisters who would. Small children will put anything in their mouths! One of mine tried to swallow a handful of small change when his grandmother's attention wandered for a moment. Another reason is that I like to think my puppets' felt eyes are more individual and expressive than those plastic ones.

Puppy Puppet front and back pieces showing stitching
Puppy Puppet front (outside) and back (inside) pieces showing stitching

One interesting question was,”How do you get their heads to be so firm?” I stuff them, of course, preferably with fiberfill. But the real “secret” involves what I do to the “wrong”(reverse) sides of the heads before I put the fronts and backs together. First I sew the two halves of the heads to the respective parts of their bodies. Then I turn them over so that I can work on the insides of the heads. I sew the neck --- which extends well up into what will be the head cavity --- to the inside of the face, using very small overcast stitches that catch just the surface of the felt and do not show through to the other side. (This takes a little practice, so you may want to try it on felt scraps before you attempt it.) I do the same thing to the back of the head and also stitch down any other loose edges. For example, the top of the lamb's gray head is sewn to the back of the scalloped white “wool”. The extra stitching gives the head more strength and solidity, so that it does not sag or wrinkle. Remember when stuffing the heads to leave enough room for the puppeteer's fingers.

Reindeer, Walrus, and Polar Bear Puppets
Could you tell a story using these Reindeer, Walrus, and Polar Bear Puppets?

My favorite question came from a mother holding a beautiful baby girl about six months old. “It will be a long time before she is old enough to play with the puppets,” she said. “Is there some way she could enjoy them now?” I gave her several suggestions. Since the child will obviously be in a crib for some time yet, the most obvious thing would be to suspend the puppets from strings and hang them above her crib where she can see them easily. Another easy solution would be to pad a small bulletin board and cover it with felt, flannel, or fleece to hang near the child's crib or playpen. Small pieces of Velcro sewn or glued on the backs of the puppets will allow them to stick to the board. But they can also be detached and moved around the board to help the mother act out stories, rhymes, or songs. If longevity isn't an issue, the arms and bodies of the puppets can be stuffed with fiberfill, cotton, or fabric scraps and the bottoms sewn shut to make huggable soft toys. A little weight added inside the bottoms and they could even stand up by themselves. These were ideas that sprang immediately to mind. I'm sure you could all think of others.

Little Pink Pig Puppet with folded ears
Those of you who have been reading my blog posts for a while probably already know about the little pink pig puppet that started me designing and making puppets (April 17, 2013). I'm giving all of you a pattern (with instructions) that you can download to make your own little pink pig. (Click here to download.) The picture shows an alternate appearance for the pig. Just gently curl his ears forward and attach the tips to his face with a few tiny pink stitches. If you are doing a set of the Three Little Pigs, you might make one with upright ears, one with curled ears, and the third with one of each kind of ear.

Downloadable Pig Puppet Pattern
Pig Puppet Pattern (Click to download)
I'd like to express a caution about size. My hands are small. Most children of an age to enjoy playing with hand puppets can wear puppets patterned to my hand size, especially with a little stuffing in the ends of the puppet arms. If you are going to be the puppeteer yourself, check your hand size against the puppet body pattern before you cut out the pieces. If the pattern is too small for you, cut out the body pattern from a folded piece of plain paper. Cut it apart along the fold. Place the two halves on a plain sheet of paper and move them apart until they are big enough to fit you (including a quarter-inch seam allowance on each side). Tape the half-patterns to the paper and draw a straight line across the neck edge and the bottom edge. Cut out the new pattern piece and you are ready to pin it to felt. Check to see if the head still fits the body. If not, enlarge the head in the same way. To make the pieces smaller you can trim them off along the outsides or cut them as described above and overlap the two halves until they are the right size. You will probably have to shorten them at the bottom, as well.

Whether you have small children or grandchildren or not, why not make a little pig for some little person to love?

Annake


Creative Commons License This post by Annake's Garden is licensed under a Creative Commons Attribution-NonCommercial-ShareAlike 3.0 Unported License.

Contact Us

Name

Email *

Message *

Blog Archive