Showing posts with label free needle arts chart download. Show all posts

Monday, May 25, 2020

Easier on The Eyes: Needlework for Older Needlecrafters

Quickpoint picture by Annake of ferret and butterfly
Original quickpoint by Annake
Are you one of those people who once enjoyed needlework, but now find their eyes and hands do not respond as well as they once did? I belong to that group myself. Please don't give up an activity that you love. Find less physically demanding ways to work. I believe needlepointers and cross-stitchers together form the largest group of people doing stitchery today, so I will start with those pursuits.

Quickpoint is a form of needlework that I recommend to senior needlecrafters who are accustomed to doing counted cross-stitch or needlepoint. It is easy to do and the results are achieved quickly. Almost any kind of design can be adapted to the technique. Quickpoint is large and the canvas mesh is easy to see. The needles are large and have eyes that are easy to thread. The yarns are thick and cover the canvas quickly. Projects can be any size that is easy for you to hold. This wall hanging, "Are You Endangered, Too?", is done in quickpoint. The “point” part of quickpoint implies that it is only done in needlepoint. This is misleading. Although it is done on a canvas background, quickpoint is also lovely done in counted cross-stitch. The picture here is done in a combination of cross-stitch and tent stitch.

3.75 and 5 rug canvas
#3.75 (left) and #5 (right) rug canvas
Traditional quickpoint canvas has 4.5 stitches to the inch. I do not have a source for this canvas at the moment, so I cannot show it to you. I can, however, show you a larger-mesh and a smaller-mesh canvas, both of which work well for quickpoint. The canvas with the larger squares is #3.75 conventional latch-hook rug canvas. It can be worked in uncut rug yarn or one of many thick craft or novelty yarns. The canvas with the smaller mesh is also a rug canvas, but one which requires a special hook. It is #5 canvas. You can use two strands of knitting worsted yarn or several strands of crewel or tapestry yarn on this canvas. For the best results, do not double the yarn; instead, cut two or more separate strands the same length and thread all of them through the eye of the needle at the same time. Some of these materials can be hard to find. Good places to look for them are thrift stores, charity shops, and yard or garage sales. I know those are not available right now, but they will return.

“Let's Do Lunch”, quickpoint by Annake
Another of the "Close Encounter" series is “Let's Do Lunch”. It also has some star stitches in the more heavily textured areas. A star stitch is made by stitching a + (like a plus sign) over a completed cross-stitch. A conventional cross-stitch occupies four squares of mesh. A star stitch (which has many other names, including Double Cross and St. George and St. Andrew) occupies nine squares of mesh as you can see in the sample. As with cross-stitch, it does not matter which part of the ‘plus’ stitch you do first as long as you are consistent and do the stitch the same way every time.

Star stitch sample
Star stitch sample

If you are doing a framed picture or a wall hanging that you want to stay rigid and not sag, you need to work on jute canvas. To do a pillow or other soft object, you will need cotton canvas or a nylon mesh. Again, you may have to do some searching to find the appropriate materials.

Detail of cross-stitch butterfly wing
Here is another example of combined quickpoint. The butterfly was done in cross-stitch. The outlining is done in back-stitching with a single strand of crewel yarn, as are the “floating” lines that represent veins in the wings. The background is done in tent stitch. This is easier to see in the enlargement.


Butterfly, cross-stitch on canvas
Here is the completed butterfly framed under glass.  I had planned to go in with a single strand of yarn to cover the little white flecks left by stitches, but it seemed to me that they added some sparkle to the wing, like the butterflies' natural iridescence, so I left them there.

When I am planning a complicated piece with many different shades of color, I often make a detailed graph of the planned design before I begin stitching. On the “Close Encounter" pictures, I charted some features and simply outlined the rest. I did not chart the butterfly, just outlined it.

Bear and bee quickpoint by Annake
Original quickpoint by Annake
This quickpoint picture shows a bear in a field of sunflowers with a background of mountains and blue Colorado sky. The last step for the bear's head was to complete her features. The eyes, nose, and mouth were first done in tent stitch. Then some of the stitches were gone over in embroidery floss to give shine to the features. I tried to give the bear a startled expression. Tiny stitches show the reflections in her eyes. I exaggerated the size of the nose just a little because that is where the ‘close encounter’ will occur. I call these pictures “Close Encounters” because each shows a mammal encountering a very different kind of animal (in this case, a bee).

Waste canvas
Waste canvas
In order to add the bee to the picture I had to make smaller stitches than the quickpoint canvas would allow. I used a special canvas, called waste canvas. Its threads can easily be removed after the needlepoint (or cross-stitch) is complete. It can be used on fabric as well as on canvas or completed stitches. Let me show you how it is done, starting with a picture of the waste canvas, which can be worked as either mono canvas or penelope canvas. Since I planned to do the bee in tent stitch, I chose the mono option.

Closeup of bear and bee
I had to work out the bee design on graph paper. There are hundreds of species of wild bees in our western mountains. Some of them have bodies as large as as the last joint on my thumb! (This design does not represent any particular wild species.) Since I expected the thickness of the stitches on the bear's nose to present some problems, I first tried the pattern on waste canvas over a piece of heavy felt. I first cut a piece of waste canvas larger all around than the design to be stitched. If the design is very large, it is then pinned or basted to the background. I prefer basting because it is more secure. This one was so small that it didn't need to be basted. Then the stitches were put in just as they would be on regular mono needlepoint canvas. I didn't pull the stitches quite as tight as I would do ordinarily. The next picture shows the finished design with some of both the horizontal and vertical threads pulled out. A pair of small tweezers is useful for this. The last picture shows the design on the felt with all waste canvas removed.

Bee, waste canvas test sequence


Quickpoint can be used for geometric or stylized designs as well. Here is a pillow that I stitched in a pattern meant to represent evergreen trees and a canvas designed to represent our autumn aspens.

Quickpoint pillowtops


Cross-stitch rose on check gingham
When I start a class on counted cross-stitch, Spanish blackwork, or similar techniques, I start with a project on quarter-inch checked gingham because it closely resembles graph paper. This makes it easy for students to follow simple graphs and encourages them to try their own graphs. Graphs are very versatile. It is possible to do the same design in a multitude of sizes, from a covered button to a king-sized quilt. The same chart can be used for many different techniques: afghan stitch, beading, mosaic, latch-hook, piecework, etc. A chart like the one you can download today works for a whole rainbow of color schemes. Charts are easy to file for future reference and, laminated, long-lasting. Another advantage of the quarter-inch checked gingham is that it is easier on both the eyes and the hands than most canvases, Aida cloth, etc.

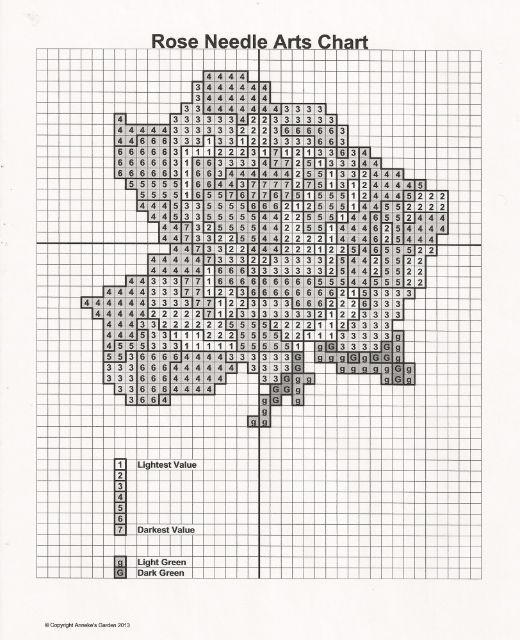
Let's say you want to do a rose in cross-stitch or needlepoint. Prepare your background, choosing the color carefully so it does not overpower the rose. Fabric should be backed with inter-facing. Canvas, except for plastic, should be taped on the edges. Find the center of your material. Run a row of basting stitches through the center, both vertically and horizontally, using a bold color that does not appear in your version of the rose. Now select the colors of your rose.  This pattern will work for most colors. You will need a range of 7 shades of your main color, plus two greens. Shades of the main color are represented by numbers on the chart, with 1 being the palest one and 7 the darkest one. Capital G represents the darker green and small g the lighter green. Lay your 7 materials out in front of you in light-to-dark order. Tag them with the numbers if you like. (I'll admit I'm greedy when it comes to needles; I used a separate needle for each shade.)

Downloadable rose chart
To download, click here
Here is the pattern for you to download. The pattern is a forgiving one. If you place an occasional stitch in the wrong square, it should not spoil your rose. Small differences are to be expected in handmade items. If you run out of a color, continue with the closest match you can find. The vertical and horizontal center rows on the chart are marked. Start stitching at the center and work outward. When the rose is complete, pull out the basting threads.

Patterned stitches such as Spanish blackwork, Russian redwork, Scandinavian whitework, Holbein embroidery and Assisi embroidery also work well on quarter-inch gingham. Be sure the gingham pattern is woven into the cloth, not printed on it. Choose your background color carefully so that it does not overwhelm your design. Here is a simple blackwork butterfly on quarter-inch gingham.

Blackwork butterfly on check gingham

"Heritage Rose", latch hooked rug
Years after I made the rose design, I enlarged and modified it for the center of a latch-hook rug.  Latch-hook is another technique that is easy on the eyes. I once taught the technique to a lady who was legally blind but could still distinguish colors. Latch-hook uses packs of pre-cut rug yarn. what is used in kits works well enough on on #5 canvas, but you may need to use 2 strands of some colors on #3.75 canvas to make good coverage. Commercial rug yarn packets work well on either mesh.

Upright gobelin stitch sample
Another technique that works well on canvas is one of long straight stitches of varying lengths (commonly called French longstitch). You can see these well in the portrait of the bighorn ram below. You can see the stitches used horizontally as well as vertically. There are even a few used diagonally. I did the background in tent stitch, but it could have easily been done in rows of straight up-and-down stitches. Don't leave any blank canvas; the bottom of one stitch shares a square of mesh with the top of the stitch in the next row.

"Bighorn", original needlepoint by Annake
I deliberately ended with the bighorn ram's 'portrait' because it was finished about this time last year. I have done a number of projects since and there are several in various stages of development. I have been doing needlework now for more than seven decades, so I know what I am talking about. I have made many changes and adaptations as I have aged, in order to keep doing the work I love so much; so I hope you will believe me when I say, "And you can do it, too!"

With love,


 Creative Commons LicenseThis post by Annake's Garden is licensed under a Creative Commons Attribution-NonCommercial-ShareAlike 3.0 Unported License.

Monday, April 27, 2020

Irises: Nature's Living Rainbows

Iris needlepoint by Annake
This has been a difficult time for Annake’s Garden, outdoors as well with staying indoors because of the pandemic. We have lost a beautiful 50-year old crab-apple tree. The late freezes have destroyed this year's daffodils and hyacinths and we are concerned about our fruit trees, grapevines, berries, rosebushes and other plants.  It is evident that we will not be able to work the Farmers' Markets the way we have done for the past several years. The art and craft shows will likely be canceled. Annake's Garden will definitely be starting over and much of that cannot be done until as late as this time next year. That is why I am so looking forward to the irises. They warm my heart.

Garden iris
Irises, which my mother used to call "poor man's orchids", are my favorite flowers. I would rather have an iris in a vase than an orchid pinned on my shoulder any day. Even my favorite perfume is Iris Noir, or "Black Iris". We have three versions of ‘black' irises here in the garden, one of which is truly black. Some of our favorites will be used to illustrate this post.


Rainbow (Public Domain photo)
In Greek mythology, Iris was the goddess of the rainbow. Her name means rainbow. Her father was a minor sea god and her mother was a cloud nymph. Iris was the messenger of the gods. The rainbow was a bridge that she used to carry messages back and forth. She was portrayed as a pretty girl with golden wings, a messenger's rod (sometimes also winged), and winged slippers. She is sometimes shown with a pitcher, and was believed to refill the clouds with water from the sea. She was always shown as good and helpful. We use her name in the word "iridescent", meaning giving off rainbow reflections, like butterfly wings and hummingbird feathers  — and iris petals.

Iris needlepoint in progress
I use irises frequently in needle arts. Now I am going to show you several examples of irises in those arts, while demonstrating the use of various pattern-making techniques that you can use at home — and you can even design your own patterns. Let's start with a charted pattern, which will probably be the one most familiar to you. You can download it here.

Iris needle arts chart
This is a charted iris that can be done in counted cross-stitch on checked gingham, monks' cloth, or Aida cloth in any size you like. It can be done in tent stitch on plastic canvas, conventional needlepoint canvas, quickpoint canvas or rug canvas. If you think of each square as a patchwork square, it could become a quilt. If each square were a ceramic tile, you could make a back-splash for a kitchen or bathroom sink..It is designed to be done as a bi-colored iris, but can also be done in a solid color. In fact, it can be done in any colors you like — even imaginary ones.  If you are doing a bi-colored iris, the standards should be in a light color, the falls in a dark color, the beards in yellow or orange and the stem, of course, in green.

Irises, latch hooked wall hanging
There are some things to remember when you work from a charted pattern. Each square on the chart represents a single stitch. Count the squares horizontally very carefully. The white squares on the pattern represent the background color. if you are going to use one. Do the same thing with the vertical rows. Make sure your canvas or fabric is going to be big enough for the finished picture, plus some space for turning over to hem or turning under around a cardboard spacer for framing, turning under for backing a rug, etc.  It is much better to have to trim off some fabric when you have finished the pattern than to find out at the last minute that you don't have enough background for all your work.

The next possible problem is that of losing your place in the pattern and working the wrong row.  There are a couple of simple techniques and devices to help you with this problem. It is certainly important to keep track of the line in the chart that corresponds with the line of stitches you are working, as well as to keep an accurate count of the number of stitches you have completed. Otherwise, your finished project may not look very much like the chart! It is a good idea to keep the chart on a flat surface where it is easy to see all of it from your working position. I use a clipboard to hold mine in place. I keep a pencil with it. If I'm interrupted or have to be away from my work for any length of time, I make a small pencil mark by my last completed stitch.

Iris needle arts chart with rulerIf you are primarily losing the horizontal line in the chart and are not concerned with losing count of your stitches, the simplest solution is to place a 12-inch ruler with its top edge just under the chart line you are following. If you need to add weight to the ruler to keep it in place, glue a couple of coins to the underneath side of the ruler, near the ends.

Iris needle arts chart with L tool
For an easy-to-make tool to mark both the horizontal and the vertical lines of your chart, cut two pieces of stiff cardboard about 2 inches (5 cm) wide and 6 inches (15 cm) long. Staple or glue them together so that they form an L-shape. Place the L on the chart so that the bottom part of the L is directly below the horizontal line of the chart that you are following, and the upright part of the L is just behind the first stitch you are going to count. Mentally remind yourself to move the upright part of the L every 5 or 10 stitches you complete. This takes some practice, but will soon become automatic. Slide the bottom of the L up (if you are working from the bottom of the chart) or down (if you are working from the top) one space at the end of every completed row of stitches.

Tracing pattern on canvas
The next type of pattern is one that you can make for yourself. Draw or trace your pattern on lightweight white paper. Tape it, design side toward you, on a sunny windowpane. Tape you canvas or a thin white fabric on the pane so that it overlaps the drawing.  Trace the design. Carefully re-trace the design onto the canvas or fabric. I use pencil on fabric because it will wash out. If you like, you can color the design lightly later with permanent markers that will not run. A semi-transparent fabric like organdy is excellent for this. Even if you don't embroider the design, you can trim the fabric away from the edges of the hoop and hang it in a sunny window. We call those "Window Wonders".

Partially worked needlepoint over marker on canvas
I use permanent marker on canvas because the stitches will cover it, as you can see in the picture on the right.

Wiping ink off canvas
I carefully wipe off any excess ink, as you can see me doing in the photo on the left.


The kind of needlework I am going to do on this pattern I call "stained-glass stitchery". I'm going to pause here and show you the steps I used to work the pattern of an iris in this technique.


Sequence for completing stained glass iris
1) Stitched iris  2) Background 'panes' added  3) All sections backstitched in black


Sweatshirt with needlework
Working an iris design on a dark sweatshirt requires a different technique.  First I draw the parts of my design on tracing paper or a good grade of tissue paper. I pin the pattern in place on the sweatshirt, being careful not to pin the front and back of the shirt together. Then I thread an 18 inch piece of white yarn, floss, or crochet cotton into a sharp-pointed needles. Working from the inside of the sweatshirt, I back-stitch all around the lines in the drawing. You cans see that I have started doing that in the picture below, on the left. The completed design outline is in the middle picture.  When the complete design has been stitched, I pull the paper away gently. A pair of small tweezers is good to have to pick out any tiny pieces of paper caught in the stitches. The embroidery work is shown in progress in the picture on the right. Once all the embroidery has been done, filling in the sections of the design, you can snip out the pieces of white yarn.  Or you can simply work over them as you fill in the sections of the design.

Steps in completing sweatshirt needlework


There is another kind of pattern transfer — hot-iron transfer. However, it must be done with a special kind of pencil. With the shops likely to carry such a pencil closed and you readers at home, perhaps it is best to leave that one for another day.

Assisi-style iris on canvas
This iris pattern represents an embroidery style called Assisi embroidery. I did this in needlepoint on canvas for a quick demonstration, but if you are doing authentic Assisi embroidery, you would do the stitches in cross-stitch and leave the iris petals empty so that the background fabric shows through. What appears as background here, along with the features of the iris which are  given are done in cross-stitch. I later filled in the iris with additional needlepoint so it could be framed.


Finished iris needlepoint


Graphing a needle arts chart
If you want to make your own graph patterns like the one we started with at the beginning of this article, you will need quarter-inch graph paper, erasable colored pencils, a small pencil sharpener, a good eraser (kneadable ones are the best), plain paper to draw your design, and a hard surface to work on (a clipboard will do if you don't have table space). Curved outlines will need to be "square off". This is easiest to do with a counted cross-stitch design, so I would recommend that you start with one of those. You can use half cross-stitches, either upper left to lower right corners of the square or upper right to lower left corners. I like to back-stitch around the major parts of a cross-stitch design to make them stand out. If you are doing that on your pattern, indicate it with solid lines.

We are going to leave you with a collection of J.D.'s favorite iris photos.

Enjoy,


Collage of garden irises


 Creative Commons LicenseThis post by Annake's Garden is licensed under a Creative Commons Attribution-NonCommercial-ShareAlike 3.0 Unported License.

Saturday, August 31, 2019

Inspiring Women Artists, Autumn Art, and A New 8-way

U.S. postage stamp of a Grandma Moses painting
Homage to an artist of the past
I have frequently advised you to look at the work of various artists, past and contemporary, to get inspiration for your needle art. I would like to  steer you to some very contemporary women painters. You can find their work online. I'll give you a brief analysis of how their work has inspired me to do some new pieces in different kinds of needlework. Look for the mention of more of these artists in future posts, along with my projects that they inspired. If you have other artists, past or present, whose work you think I should be looking at, please drop me a line at annakes_garden@yahoo.com.

Our first artist is Tilly Willis (www.tillywillis.com). She is a British citizen and a well-known portrait painter there. She has traveled extensively in Africa and done many studies of life in the countries she has visited. Her compositions have been made into color prints. Their style is quite different from the detailed work she does as a portrait artist. This pleased me greatly because i have always maintained that it was not necessary for an artist to be limited to a single style. Her pictures of people going about their daily tasks are made up of stylized two-dimensional flat shapes in vivid colors against a simple background, They are very expressive, both in outline and in gesture.

soccer players preliminary design sketch
Soccer players preliminary design layout
I plan to do something similar in simple tent stitches. I am going to plan my picture by cutting the simple shapes from colored construction paper that I can move around on my canvas until I have them placed just where I want them, like a collage. Then I can trace all the elements onto the canvas and begin to stitch. Considering the success of the U.S. Women's Soccer Team, I thought they would be a good subject for this project. The accompanying photograph will show you what I mean. I will show you the finished composition in a future post.

Untitled tissue paper collage by Annake
I realize that many of you do not think of collage as a major art form, but you would be mistaken. It is a major contemporary art form with large artwork and installations in both two and three dimensions. This is an art form where women probably outnumber men, but there are still many male collage artists. (Remember, Picasso and Braque introduced collage.) If you have become interested in this art form, I suggest you check out some of the many artists listed in Collage Artists of America online. There is a list of upcoming exhibitions. If you get a chance, try to see one of them. I think you will be impressed.


Autumnal Prophecy, collage by Roberta Bellofatto
"Autumnal Prophecy", collage by Roberta Bellofatto

A good area for collecting
A good area for collecting...
A different kind of collage is the "nature walk" collage — one of my favorites.   The idea is to go on a nature walk and collect leaves and flowers to press,  and small "found objects" like feathers, tiny seashells, etc., that can be glued to a prepared background. These are the perfect times to do one, when leaves are changing color and plants are producing seeds. Remember that you are not allowed to collect such things in most state and all national parks or on private property without permission. If you live in a city high-rise, you may not be close to places where such things can be collected. Or you may not feel safe taking your group for such a walk because of heavy traffic or other hazards. Sometimes just looking around familiar backyards or an uncut vacant lot will give you plenty of material.

Canvas boards
Canvas boards
Since the items you may collect are heavier and bulkier than those we have featured in earlier collage posts, you will need heavier back-ground material than poster board or cardboard, or else the picture will not lie flat when it is finished. Individual packs of 8" X 10" canvas boards are good for individual artworks, but you will need larger ones for small groups working together. Mat board and heavy corrugated cardboard are alternatives, especially if cost is a major concern. For a permanent installation, Masonite can be used. It is dark in color and should be painted before use.


collage tools and materials
Some collage tools and materials
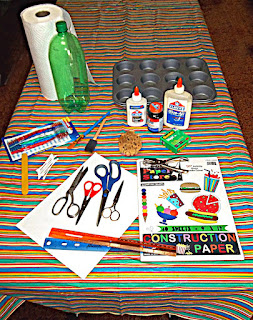
The boards can be used plain, pre-painted, or covered with one or more tissue paper sheets. If you have access to colored crepe paper, it can also be used, but be advised it "bleeds"  color into the composition, while tissue paper does little or no "bleeding". Check our earlier post for a list of materials that you will need. Have a pile of newspapers and paper towels for pressing the plant materials and general clean-up. Select your work area and assemble your materials in advance.

Found objects for collage use
The next step is an excursion to collect the grasses, leaves, seedpods, etc. for the compositions. Small children will need supervision and should be taught to ask an adult before collecting plants and other materials. Everyone should have a collecting bag, An adult should have a pair of pruning shears to detach small branches or cut tough stems. Delicate materials like feathers and fragile plant parts that should not be pressed may be stored in the crisper drawer of a refrigerator until used. Everything else should be placed between layers of newspaper on a flat surface and dried thoroughly before attaching them to the canvas. Canvases may be prepared in advance or on collection day, whichever works best for you.

At the beginning of this section is a picture of a completed collage to give you an idea of what can be done quite simply. Make sure materials are thoroughly dry. Use the white glue full-strength to secure the three-dimensional materials to the board and let them dry. Delicate materials should be attached with the half-and-half glue/water mixture. Brush the area of canvas first. Tweezers are useful for placing tiny stems and branches. Carefully place the delicate materials on that area and gently brush the mixture over them until they are covered completely. (The milky-looking glue mixture will dry clear.) Let that layer dry.

Brushing on the glue and water mixture

Add tissue paper over the top if you like, brushing it (both bottom and top surfaces) with the glue mixture to hold it in place. To get a glossy surface, you will need several all-over coats of the half-and-half mixture, dried between applications. A hand-held hair-dryer can speed up the drying, but it should be wielded by an adult and not held less than a foot away from the surface or the surface may buckle and warp. Spaced dryings are preferred. The finished picture should be hard and glossy to the touch. Now you are ready to frame the picture if you like.

Preliminary sketch for 8-way bargello
A few months ago (May 5, 2019) I did an article in which I showed some alternative ways to use a small all-over pattern to make different kinds of needlework. I expressed a desire to use it as a 4-way or an 8-way bargello project. One of the easiest ways to make an 8-way design is to superimpose one 4-way pattern on another 4-way pattern. That is essentially what I have done here. My idea was to "marry" a 4-pointed star design with a strong diagonal one without sacrificing either one. This design (see the end of this post) has more colors in it than any of my other designs.  I added some different colors to make it more varied, while retaining its autumnal feel. However, the colors you see on your monitor may not be the exact colors I see on mine. It would be best if you choose your own colors for your design.

unusual 4-way bargello by Annake
 An unusual 4-way bargello by Annake
It is designed to be a typical bargello pattern, but it is versatile enough to be used in a number of different techniques. It is important for you to decide which technique you want to use before you begin shopping for materials The simplest way to use this would be a tent stitch design. For this, count the squares in your design carefully. You will need a minimum of needlepoint or plastic canvas with one square of mesh for each square of the design, plus an extra vertical row because tent stitch is slanted. If you plan to surround the motif with a background larger than the one I have left blank on the pattern, add another row of canvas squares for each row of background. The next easiest technique would be latch-hook. Each square of the design would require one square of mesh. add additional rows for background, plus at least 3 rows on all sides to turn to the back of the finished work and secure.  Finally you could do the motif in cross-stitch on needlepoint or plastic canvas, monk's cloth or aida cloth, or checked gingham. You will need 2 rows of "holes” for each cross stitch or one printed square on the gingham.

In a 4-way or 8-way bargello, each square represents 4 upright stitches, each over 3 threads of needlepoint canvas. (Unless you can get plastic canvas by the yard, it will not be wide enough for this project). This pattern is not for beginners. If you have never done any bargello, I suggest you use our 'Search My Blog' gadget in the sidebar to look up past articles on bargello and choose a simpler design for your first project.  If you have done some bargello patterns, I still suggest having some scrap canvas at hand to work out any trouble spots that you may find before you have to take out a number of stitches.  And count and measure before you begin! Depending on the size of your canvas mesh, this can be a fairly large project. I'll show mine in a future post.

Downloadable 8-way pattern


Our latest Teachable Moments project, "Teachable Moments: The Moon", is now available on our Extras page (see the tabbed menu above this post.) While it was designed for use by teachers or parents, others may find it useful as a companion piece for our Skyscapes 3 post (July 11, 2019).


 Creative Commons LicenseThis post by Annake's Garden is licensed under a Creative Commons Attribution-NonCommercial-ShareAlike 3.0 Unported License.

Contact Us

Name

Email *

Message *

Blog Archive