Showing posts with label sunflower needlepoint. Show all posts

Friday, July 24, 2020

Designing Realistic Flowers for Projects

Daylily rug by Annake
Daylily rug, by Annake
I love flowers! That is why my business is called Annake's Garden and my blog is called  “Cuttings from Annake's Garden”. More of my work involves flowers than any other single subject. I am a great admirer of Georgia O'Keeffe's giant flowers and her determination to get people to really look  at flowers. While my individual flowers don't approach the size of her paintings, I do like to work larger than life. Actually, this goes back to a time when I was teaching fifth graders about Georgia O’Keeffe. I made several oversized flower pictures in various media to show the students, along with samples of O’Keeffe's work, before I asked them to make their own large flower pictures. Their favorite sample was a study in pastels and crayon of an orange daylily. Several students asked me to make computer copies of the picture for them. I did that, filed the picture, and essentially forgot about it.
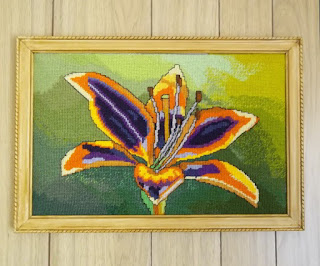
"Day-glo Daylily", needlepoint by Annake
After I retired, I cleaned out my files and came across the original drawing. I decided to make a rug, using the sketch as a basis for my design. It was the first rug I ever sold. Fortunately, J.D. had already been archiving photos of my work, so I can show you what that piece looked like (above).  I've also done a daylily as a large needlepoint (right). The colors came from my imagination; however, I see one in this year's catalogs that comes very close to my imaginary one.  Is art imitating life or is life imitating art?
greeting card pasteup
Sample card
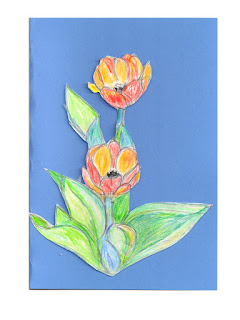
In both cases, I was working on a scale considerably larger than life. Doing this frees you to include as many details as you like — whether or not those details existed in an actual flower. There are many instances, however, when this is either not possible, or when it not desirable. Sometimes less is really more. Sometimes it is simply a matter of space. Suppose you are making a series of greeting cards.  The entire card may be smaller than the flower you are depicting. Instead of cropping the flower to fit, why not do a depiction of the flower that fits the card and eliminate unnecessary details?

Sunflower project materials
Once again the size of the finished project dictates what you can and cannot do.  Take, for example, a sunflower that I decided to do in needlepoint in a round frame that was only 9 inches in diameter. Now, I love sunflowers. They are large and complex. They are not dainty, shy blossoms. They are large, bright,  and kind of in-your-face. They never fail to cheer me.

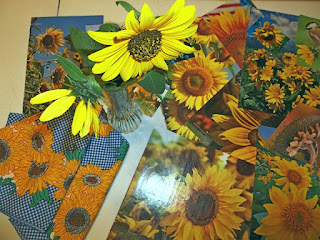
Before I began working on the design, I collected pictures of sunflowers, fabric decorated with them, live flowers, all kinds of materials.

sunflower pencil sketch
After tracing several examples of both the inside and outside edges of the frame, I worked to get a sunflower center that would be in correct proportion for the ring of petals. These proportions differ between sunflower species, as we discovered from planting Central and South American species. I found a combination that I liked and filled in details of the center. I didn't attempt to put in all the seeds, just suggested them. Then I determined how many outer petals I could arrange around the center, making them similar but not identical.  I shaded petals that were overlapped to indicate depth. At that point, I was ready to start on the actual project.
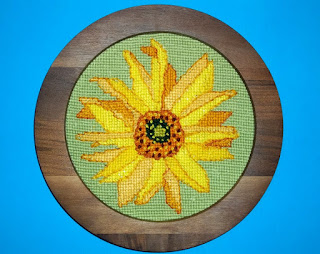
Finished sunflower needlepoint
I prepared my needlepoint canvas (#14 white mono) and ran colored threads horizontally and vertically through the center. Then I centered the canvas over the drawing and traced it onto the canvas with a fine-lined permanent marker. Once it was dry, I rubbed the lines vigorously on both sides with a paper towel to pick up any bits of ink that might discolor the yarn and I pulled out the centering threads. With the color areas of the picture completed, I filled in the background in a neutral color. Finally, I began back-stitching around certain segments with a single strand of yarn. (This is traditionally done on counted cross-stitch pictures, sometimes using a single color for all the back-stitching.)  When I use it on needlepoint, I prefer to use lighter, darker, or grayer yarns to emphasize the features I'm outlining. Purists won't do this sort of surface stitching on conventional tent stitch. I'm not a purist. I'll not only use back-stitching, but also any surface embroidery that will enhance the canvas work and make it match my mental vision of the piece.

When making a pillow in folk embroidery on gingham, I made a less realistic sunflower, concentrating more on texture. Backstitching here gives the center a different appearance.
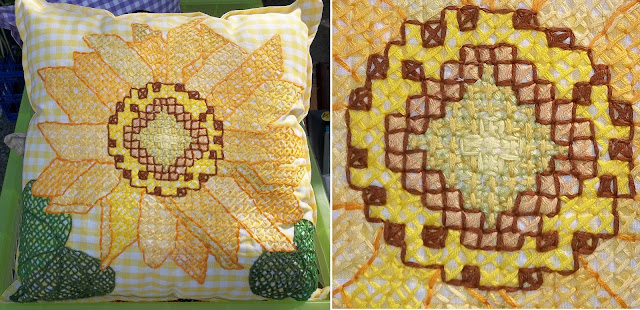
Sunflower pillow with detail


Sunflower center
Sunflower center
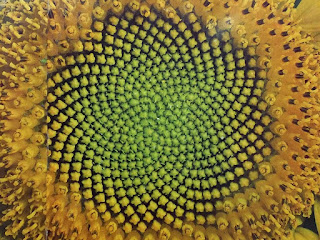
Incidentally, sunflowers should delight the readers who enjoyed our Roots, Leaves, and S.T.E.M. post (February 29, 2020), because they represent both Science and Mathematics.   A sunflower is not a single flower, but a composite of masses of two entirely different kinds of flowers. What we think of as petals are actually individual strap-shaped ray flowers whose bright colors attract pollinators. The central disc is made up of large numbers of disc flowers which, when pollinated, will produce seeds. These flowers are arranged in curved lines which follow the Fibonacci number sequence. The sequence is 1, 1,  2,  3,  5,  8, 13,  21, 34, 55, 89, and theoretically continues to infinity. Each number is the sum of the two previous numbers. The sequence is found many places in Nature — out to the structure and motion of spiral galaxies.

I do a lot more work from quick sketches and studies in pencil, watercolor, pastel. and marker and from handmade charts than I do from photos. However, I've done enough to offer some advice. If you are planning to sell your projects, be sure you have not used anyone's copyrighted material. I work from my own photos and those of J.D. and J.J. (with their permission, of course). If accuracy is important, take lots of photos from different angles, distances, and lighting effects. Be selective about the parts you use. Leave out anything that does not improve the composition. Let me show you what I mean.
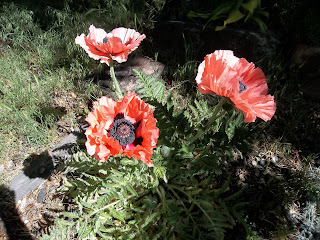
Poppy photo
Original photo
This photo of poppies has several things going for it. The lighting is interesting. The poppies show up well against the dark background. The red of the petals is complemented by the green stems. But look at the gray, dead leaves at the lower left. They do not help the composition at all. Now look at the picture after J. D. has modified it. Cropping and/or otherwise altering a photo can add a great deal to its appeal.
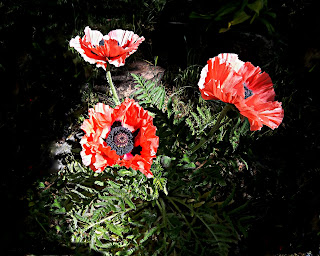
Poppy photo edited
Poppy photo, edited

On the other hand, sometime a picture needs to be expanded. Look at these two pictures taken at the same time. See how much showing the full petals makes the picture more interesting? That is why taking multiple shots is valuable.
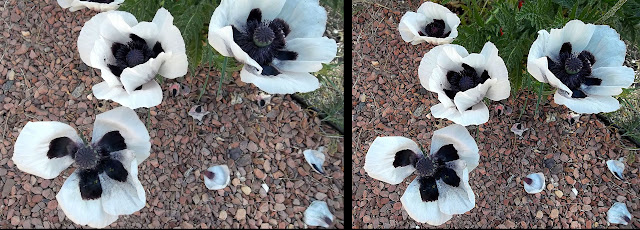
White poppies


I do, however, want to show you how to modify an outline pattern so that it works more easily as a chart. The first thing to do is to transfer the pattern to quarter-inch graph paper. I use either dressmaker's carbon or a sheet of paper which I have colored heavily on the back with a graphite pencil. Aligning one major straight line in the design with a line on the graph paper, I transfer the design by going over the outline with a ball-point pen that has used up all its ink. Once the transfer is complete, I draw straight lines, square corners, and forward and backward diagonal lines to come as close as possible to the curved lines in the original design. The resulting new design, shown here in red, can then be enlarged or reduced to fit any size of graph paper. (It can also be simplified if you wish.)
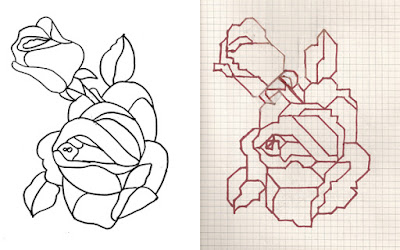
Squaring off an outline
 
Before I use or store the pattern, I trace it once again with a permanent marker. Some uses for this type of pattern include:

    a counted cross-stitch design
    a panel of ceramic tiles
    a collage
    a felt applique with cut-out pieces glued or sewn to a background
    a wood carving
    a needlepoint or quickpoint   
    an embossed piece of copper foil
    tooled leather
    the center panel for a patchwork quilt
    a mosaic
    an afghan put together from "granny squares"
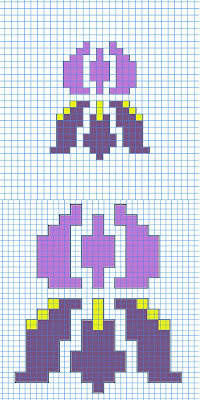
Simple iris pattern graphed two ways
Occasionally I enlarge a small or medium-sized design laid out on quarter-inch graph paper to a size suitable for making a latch-hook rug, a wall hanging, quilt blocks, etc. The easiest way to do this is to draw around a block of four squares of graph paper for each of the single squares in the smaller design. I tape a number of pages of quarter-inch graph paper together and lay them out on a large table. Beginning at the center of my design, I draw the 4-square block that represents the center square of the original design. I then work outward in all directions from that center square. I number or color the blocks as I go. The finished pattern will not match either #3.75 or #5 rug canvas exactly, but it will come very close. Count the number of horizontal and vertical squares on your pattern and mark the same number of squares on the canvas. Mark the center of the canvas and draw the outline of the entire design around it. When you cut the canvas, always allow an extra 4 or 5 squares of mesh on each side to turn under before you begin putting in the strands of rug yarn.

You can reverse the process, changing a graph to an outline drawing, but it is a bit more difficult. I suggest that you trace the squared outlines on another sheet of paper so that you don't damage the original. Then work very lightly in pencil, turning squared corners into curves. Stop often to review what you have done, erase where needed, and re-draw.  Be patient and persistent.

orchid outline
Click here to download
Finally, let me leave you with a downloadable outline pattern that you can use in any way you like as it is,  or modify it in any of the ways discussed here.  You can multiply it or reverse it horizontally (or both horizontally and vertically) to make larger, more complex designs.

No matter what your purpose is for capturing the images of flowers, please take time to explore and enjoy their remarkable shapes, colors, textures and fragrances.


 Creative Commons LicenseThis post by Annake's Garden is licensed under a Creative Commons Attribution-NonCommercial-ShareAlike 3.0 Unported License.

Sunday, May 7, 2017

A Quickpoint Project

Daffodils in the garden
Spring daffodils
Our project for today will be another picture in my “Close Encounters” series. I am working on #5 jute canvas, principally with acrylic and novelty yarns. Most of the work is done in continental (tent) stitch, but there are exceptions. I will discuss each of those as we come to it. To cover the canvas, I have used doubled strands of many of the yarns, giving the picture a homespun effect.

When I work on a picture, particularly if landscape is involved, I imagine that this is a real place and that I am am standing nearby observing it. (From behind a telephoto lens in this case, since a bear is involved!) I envision a sunny day in late spring or early summer. The highest mountains have not lost their snow cover, but the lower slopes are snow-free. The mountains slope away downward and toward the left, as do the lower layers in front of them. Although my approach to this picture is impressionistic, I will try not to break the rules of perspective and lighting.

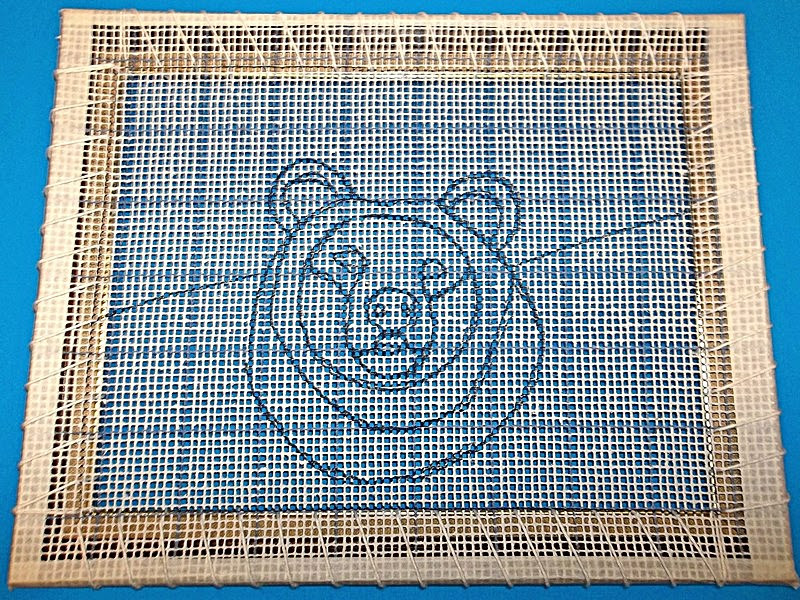
Bear outlined on canvas
You will notice that the canvas is printed with a pattern of 10-by-10 squares. That means that each blue square on the canvas encloses 100 empty squares. This type of canvas is especially good if you are going to do a detailed square-by-square pattern of your design before you begin stitching. This time, however, I am just going to indicate the major areas of my picture by drawing lines on the canvas with a permanent black marker. I go over the marks with a sheet of paper towel to remove any loose color that might come off on the yarn as I stitch. I am using minimal guidelines so that I can make changes as I work.

Canvas lashed to picture frame
Once I am satisfied with my design, J. D. laces the canvas to the top of the frame I plan to use for the finished project. When the canvas is firmly stabilized on the frame, he ties off the lacing and cuts it. I can then hold the frame with one hand and put stitches in firmly with the other. This gives me tension to make my stitches as even as possible. I highly recommend securing your canvas this way. If you do not pull your stitches too tight, you should not have much — if any — blocking to do on the finished canvas. A gentle steam pressing should be enough.

Small balls of yarn stored in egg cartons
Then I choose the colors and weights of the yarns I want to use. Since one of my major themes is saving money, I am going to use just what I have on hand. Some areas will need large amounts of yarn, while others will require only a few inches. I keep small balls of leftover yarn in egg cartons. I run the ends of the yarn through holes in the top of the carton so that I can see at a glance what yarns the carton contains. For each project, I fill one or more cartons with small quantities of the yarns I plan to use as small accents. Blunt-pointed tapestry needles with large eyes and a pair of sharp scissors complete my preparation.

Canvas with mountains stitched in
I prefer to work by natural window light. I decided to stitch over the white knitting worsted tent stitches, but not over the gray ones. This gave the snowy mountains more depth and resolution. I make decisions like these constantly as I work — and so should you. If your work doesn't please you, change it. Take out stitches and re-do them, stitch over them, change colors, blend colors, put in details or leave them out. If you don't make your work match your ideas, you may always be dissatisfied with the piece — no matter how much other people admire it.

Canvas with sky added
...and the sky added
The next step was to stitch the large area of the sky. I continued in tent stitch, graduating the blue colors from a very light blue just above the horizon to a deeper, darker blue at the top of the picture. The light is coming from above and to the left side of the picture, with the sun about ten o'clock high in the sky.


Bear needlepoint with middle background
Needlepoint with middle background added
Then I turned to the middle distance. Here I sketched the lower slopes of the mountains, showing slopes of rock, dark green patches of evergreen forest, and lighter green areas of mountain meadows. As I moved down behind the bear's head to the neck and shoulders, I put in a section representing broad-leaved trees along a watercourse that is implied, but not actually seen, in the picture. (The land has leveled off here, although it still moves a little farther into the distance on the left side of the picture than on the right side.) In the shade below these trees, I stitched a few rows of a dark green yarn that has tiny fleck of color in it. Using single strands of Persian tapestry yarn and a small crewel needle to make tiny random stitches on the surface of the dark green yarn, I suggested a variety of plants growing and flowering in the shade.

Needlepoint with bear's head begun
Beginning to stitch the bear's head
The next step was to begin stitching on the bear's head. I worked from the outer layers inward, beginning with the ears. The bear is standing in sunlight in a field of wild sunflowers. The sun is bringing our the red tones in her coat. (Yes, I said her coat. I decided from the very beginning that my bear would be a young female.) She has just turned her head and is looking almost straight at the viewer because something has attracted her attention. This shows a bit more of her neck, cheek and muzzle on the left side of the picture and a bit more of her shoulder and ruff on the right.

Bear with face and shoulders filled in
Filling in the face and shoulders
In this step, I completed much of the bear's face, neck and the tops of her shoulders. The eyes, nose, and mouth will not be stitched until much later. The shoulder is more prominent on the right. That shoulder is “bunched”, because it is carrying more of her weight. A dark shadow runs down that side of her body, which is not struck directly by the sun. I sketched three wild sunflower blossoms and a couple of leaves in marker below the bear's head, leaving the guidelines for her upper chest, since some of her body will be visible between the flowers and leaves when they are done. A different color background was used for this photograph so that the faint sketched lines would be more readily visible.

Bear with sunflowers added
Sunflowers added in the foreground
Now I filled in the flowers, leaves and the bear's shoulders and chest, including the parts of her body that show between the flowers and leaves. Wild sunflowers have much smaller centers than domesticated ones. The number of petals varies, and the petals may be irregular.


Bear and sunflowers with near background detail
More detail added in the near background
I continued to fill in the background. As it grew closer to the foreground, I made larger random stitches for the flowers and gave them increasing size, shape, and definition. Not all of them are facing forward; some are seen from the side or the back. Leaves and stems are suggested. (This kind of surface embroidery can also be done after the picture is removed from the frame.) I emphasized the divisions between the petals of the large flowers in the foreground and added veins to their leaves. Back-stitching — a lot of it — emphasized other features in the picture, such as the rocky cliffs in the mid-ground and the tall trees along the watercourse. I try to be conservative with outlining, but only you can decide when you have done enough on your picture. A good rule to consider, however, is: “Don't put anything in that you are not willing to take out if the effect doesn't work!”

Oh, my goodness! Look at the time! We are doing a Farmers' Market this weekend. I hate to leave you with unfinished business, but I need to be in the greenhouse NOW! I'll be back in a couple of weeks with the completion of this project and much, much more.

In haste,


Bear with background complete and some back-stitching
To be continued - please bear with us...

 Creative Commons LicenseThis post by Annake's Garden is licensed under a Creative Commons Attribution-NonCommercial-ShareAlike 3.0 Unported License.
Thursday, December 15, 2016

Unfinished Business

I hope all of you who live in cold regions are staying safe, warm, and dry this winter. We have fog this morning, but have missed most of the snow so far. It is very dry here and fire danger is still high. It is quite cold, so I'm happy to stay indoors and try to answer some of your questions.

sunflower needlepoint
Sunflower needlepoint, September 16, 2016 post
“This isn't a question about needlework. It's a question about flowers. When you did the article about making the needlepoint sunflower, you said something about it being a composite made up of two different kinds of flowers. I don't get that. Can you explain it to me?”

I can show you what I was talking about. Not all of the family of flowers called Composites have two kinds of flowers in each flower head. Many of the familiar ones, like sunflowers, daisies, asters and marigolds, however, do have this condition. Look at these three photographs, taken from the 2006 Easter Seals calendar (many thanks to that wonderful organization). See the ring of small flowers in each one? Those are the “ray” flowers. Each one is attached at its bottom to one of the showy strap-shaped or tongue-shaped parts that we call “petals”. The little flowers may be male and produce pollen, they may be female and receive pollen, or they may be sterile. Their major function in the flower is for the bright petal-parts to attract pollinators like bees and butterflies.


Composite flower photos from 2006 Easter Seals calendar
Composite flowers, © 2006 Easterseals


Now look at the center of each flower. There are masses of tiny tubular flowers. Those are the “disk” flowers. They produce pollen and nectar and receive pollen from other disk flowers. If you touch them with a fingertip, you will often find that they feel sticky. That stickiness catches and holds pollen carried by bees and butterflies that have visited other flowers of their kind. The disk flowers are the ones that produce the flower seeds, including the sunflower seeds I like salted and toasted.

If you look closely at a dandelion, on the other hand, it has only ray flowers. They are both male and female. The male ray flowers produce pollen. The female ray flowers receive pollen and make the seeds and the little “parachutes” that carry them far and wide. I hope this answers your question. To me, it is one of Nature's little miracles.

“Is the red sweatshirt with the flowers and butterflies a jacket? I can't tell from the picture, but it looks like it. If so, how did you make it?
Yes, it is a jacket. I can't take credit for it, however. It was a gift from teachers at the school where I worked before I retired. I never met the maker. I can tell you how I would make one like it.

1. Turn the sweatshirt inside-out and mark the center front from top to bottom. Pull the shirt over an ironing board. Iron on a lightweight backing material to cover several inches on both sides of the center line to reinforce it.

2. Turn the shirt right-side-out and replace it on the ironing board to give yourself a firm, flat surface to work on. Lay out your pre-cut appliques along the center line from the top of the collar to the bottom of the hem or cuff until you have an arrangement that pleases you. Leave a 1/8-inch space between appliques where they interlock so that you can later cut them apart without damaging them. You can then trim this more closely if you like.

3. Glue the appliques in place, one at a time, with a good fabric glue (or stitch them down by hand or machine). Let the glue dry thoroughly, preferably overnight.

daisy applique on red jacket
Detail of a daisy applique on the red jacket
4. Go over the edges of each applique with a good dimensional tube paint. You can use the paint to emphasize such features as flower centers and butterfly eyes and antennas. The close-up photo will show you how this looks when it is done. Let the paint dry thoroughly.

5. Cut very carefully between the appliques to separate the front sides of the jacket. Turn back the two sides and lay a bead of the dimensional paint along all the cut edges on the inside of the shirt. If you use a paint the color of the sweatshirt, it will hardly be noticeable.

6. Let everything dry and enjoy your new jacket.

FOR AN EASIER-TO-DO VERSION:  Make a straight cut down the center of the front and separate the sides. Hem or bind the raw edges. Place the cut-outs wherever you like and glue or sew them to the shirt. Trim them with paint, rick-rack, braid or embroidery.

What can we look for after New Years?

Revisiting old favorites like blackwork, Holbein embroidery, and Assisi embroidery. Designing with words. More eye-catching bargello designs. A companion piece for the reverse applique Siamese fighting fish. Beginning trapunto. More optical illusions. I also plan to begin a new series connecting styles of painting to art needlework, beginning with still life, where we will group simple objects in pleasing patterns to be done in counted cross-stitch, folk embroidery, applique, bargello and more. I'm eager to get back to work.

I hope you are, too.


past projects showing techniques coming in 2017
A sample of past projects showing techniques Annake will return to in 2017


 Creative Commons LicenseThis post by Annake's Garden is licensed under a Creative Commons Attribution-NonCommercial-ShareAlike 3.0 Unported License.

Friday, September 16, 2016

Sunflower Splendor

The Chinese poet Kao Ch'i (1336 – 1374) wrote of the sunflower:

sunflower

 “Its radiance bursts forth in summer's bright light,
Its clusters nestling against the dark green shade.
Evenings, it droops like the common hibiscus,
But blazes at noon with the pomegranate flowers.
A subtle scent spreads across our mat,
A fresh splendor shines upon our feast,
When all the other flowers have bid us farewell...”


I've loved the sturdy sunflowers since, as a child, I gathered wild ones with goldenrod and Queen Anne's lace along the country roads around our farm. Turning their bright faces to the sun, they pointed my way to the one-room country school; then, magically, they turned around to brighten my journey home at the end of the day. I still admire them for their familiarity, even though J.D. grows much more exotic ones today. (I will share some of those with you at the end of this post.)

I have used the sunflower as a subject before (August 26, 2013) in an embroidery on checked gingham., using basic cross-stitch, long-armed cross-stitch, star stitch, French knots and plain chain stitch. Here's a picture of the finished and framed project, along with a close-up of the center of the flower.

sunflower embroudery with detail
Having decided to use the sunflower as the subject of the “Autumn” picture in a Four Seasons series of needlepoints (May 16, 2013 and July 18, 2013), I gathered together the photographs J. D. had taken of our sunflowers, photographs from other sources, a live specimen, even a scarf with a printed sunflower motif. I traced several circles, the size of the opening in the frame I planned to use, on plain paper and began to make sketches of the flowers.

collection of sunflower examples


pencil sketch of sunflower


This is the sketch I decided to use. I shaded the petals and suggested the surface stitches that I planned to add to the completed needlepoint.


Marked canvas
I transferred the outlines onto #14 white mono needlepoint canvas, using a black fine-point permanent marker The very fine details were left out so that I could concentrate on the larger color areas when I started stitching. I rubbed the front and back surfaces of the canvas vigorously to remove any excess ink that might otherwise come off on the yarn.

Yarn selection for sunflower needlepoint
Then I selected tapestry and Persian yarns to match the colors of the sunflower as closely as possible.

I prefer to work with natural sunlight whenever possible, so I put the materials away until the next morning. I worked one color area at a time, beginning with the lightest yellow and working toward the darker tones Wherever possible, I used the basketweave stitch; otherwise, I used continental stitch. Once the color areas were completed, I put in the solid-colored background. I consulted my pencil sketch again to determine the finer details. Then I used thinner strands of yarn to outline the individual outer petals with backstitch. Moving on to the center of the flower, I used French knots in two sizes and colors to show the raised area of reproductive flowers. Steam-ironing the completed canvas was the last step before framing the picture

Finished sunflower needlepoint


Sunflowers belong to a very large variety of flowers called Composites (Compositae). They are actually made of two different kinds of flowers. The large, showy petals are actually individual flowers that serve to attract the insects and birds that pollinate the flowers. The very tiny raised flowers at the center of the blossom are the ones that produce the seeds. If you look closely at other Composites, like coneflowers and black-eyed Susans, you can see the two kinds of flowers clearly. We save the seeds from the best flowers for replanting and add the rest to our winter birdseed.

sunflower collage
Some exotic sunflowers in Annake's Garden

Have a wonderful season, whether it is Autumn or Spring where you are,


 Creative Commons LicenseThis post by Annake's Garden is licensed under a Creative Commons Attribution-NonCommercial-ShareAlike 3.0 Unported License.

Contact Us

Name

Email *

Message *

Blog Archive