Showing posts with label monk's cloth. Show all posts

Monday, October 2, 2017

Still Life in Needlework, Part III

Still life shapes
In Part II, I promised to show you a technique in which you could do a still life in black and white only. This is one of several related embroidery techniques which spread across parts of Europe after the Renaissance and eventually found their way to the Americas. It is called Spanish blackwork. Its patterns can be used in other styles of single-color embroidery, such as Russian redwork and Scandinavian whitework, as well as a multicolor style like Holbein embroidery. My choice of objects to portray is shown above in a photo that J.D. took at the beginning of the project.

I'm going to take you step-by-step through a still life picture in blackwork. The original 16th century blackwork was done in black silk and gold thread on white linen. I urge beginners in any of these monochromatic stitch techniques to begin with black floss on quarter-inch checked gingham because it is so much like graph paper. It is easy to work out the individual patterns (called diaper patterns) on graph paper and then repeat each individual line with a single stitch.

"Cat Nap," blackwork embroidery on 1/4" checked gingham

If you have done counted cross-stitch, you may want to work on the smaller “baby check” gingham to get more complex-looking patterns. I prefer pastel checks so the blackwork design stands out dramatically. If you are working on “baby check”, you may want to divide your floss and use only three strands instead of six. The stitch used for the patterns is a simple back-stitch.

Hot iron transfer for still life
In order to have a truly black and white (and gray) design, I'm going to work on white monks' cloth, where the squares are indicated by tiny spaces in the weave at each square's corners. I begin with a piece of monks' cloth that I have backed with interfacing and basted around the edges. I find the vertical and horizontal center lines of the fabric and mark them with a running stitch in a color other than black. This is to center my design; the colored stitches are pulled out after the design is worked. I made a hot-iron transfer of my design outline and transferred it to the fabric. (The transfer will reverse the design, so I studied mine carefully from the back against a bright light to make sure it worked well in reverse.) I chose the area to begin and used an embroidery hoop.

You will need a sharp-pointed crewel needle with an eye large enough to accommodate the floss and several skeins of black six-strand embroidery floss. I like to have several needles so I don't have to stop as often to thread my needle. I was working on monks' cloth, which is comparable to “baby check” gingham, I divided the floss to use three strands. Here is a picture of the first completed section, and close-up of the pattern used for it. Each line on the pattern is a single stitch. Stitches begin and end in the same spaces at the corners of squares.

Blackwork embroidery, Step 1: the Vase

Stitch pattern for the Vase
Tip #1: The Vase. When you are stitching a pattern over an object with a complicated shape, begin at the widest part of the object. Start at one side and work the pattern line to the other side. Then stitch the pattern lines in order both to the top and the bottom of the object.

The next series of pictures show each of the other sections as they were completed, accompanied by a close-up of the graph-paper pattern for each. The lighter I wanted the section to be, the simpler the pattern I used; the darker I wanted it to be, the more complex the pattern.

Blackwork embroidery, Step 2: the Pitcher

Stitches for the pitcher


TIP #2: The Pitcher. When you are stitching a radiating pattern like this one, find the exact center of the place you want it to be and mark it lightly with a pencil. Begin there at the center of the design; work outward, one step at a time.
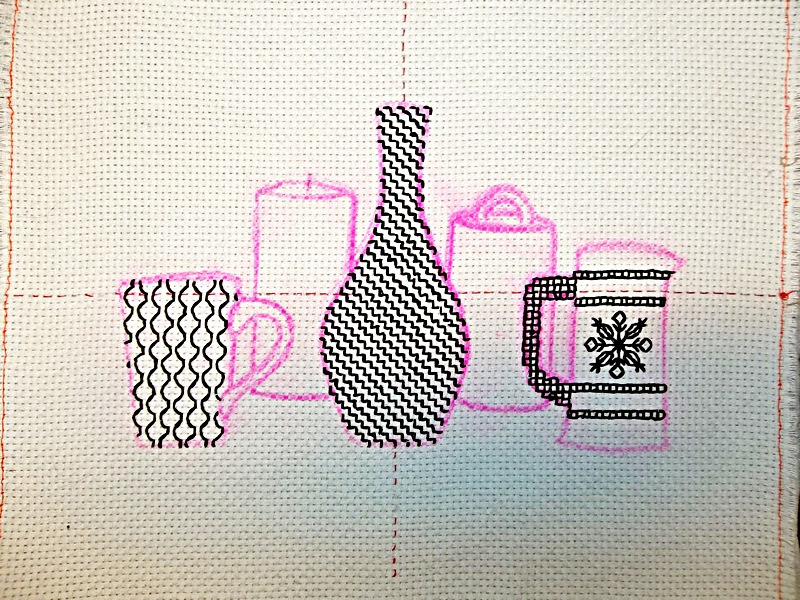

Blackwork embroidery, Step 3: the Cup

Stitch for the Cup
Stitch for the Cup
Tip #3: The Cup. As you reach the border lines of the section, make as much of the pattern stitches in each square as you can without crossing the border-line. When your outline of the shape is completed, there may be small gaps where the pattern doesn't quite reach the outline. Fill these in with tiny stitches.


In this project, I concentrated on shape, pattern, and perspective only. If objects of the same size are placed side by side, the one with the faintest outline will seem the furthest away. If you make the objects overlap, so that the more faintly drawn objects are partly covered, you have started the illusion that they are behind the darker figures and are farther away from the viewer. This is called “recession in space”. This illusion can be considerably increased by combining it with lighter outlines. Because I wanted to draw your attention to this visual device, I used gray floss for the two objects “behind” the front three. You will also notice that their bases appear to be on a higher plane. You can use all these devices in your own still life projects.

Blackwork embroidery, Step 4: the Birch Bark Box

Stitch for the Birch Bark Box
Tip #4: The Birch Bark Box. Instead of back-stitch for this pattern, I used a simple running stitch. The marks on the birch bark appear in clusters on the box, but I didn't think that would show up sufficiently so I used the stitches for the entire pattern. I left an empty space for the line indicating the bottom of the box lid.


Blackwork embroidery, Step 5: the Candle
Stitch for the Candle


Tip #5: The Candle. Here the back-stitch is used vertically. Be sure that your stitches are as straight as possible. To make the wick more visible, I stitched it in black instead of gray.


Finally, I covered the outlines with solid lines of stitching. I wanted a bold, modern feeling to the picture, along with many contrasts, so I used the full six strands of floss for the outlines. I chose chain stitch, but I could have used back-stitch, outline stitch, stem stitch or any of several other stitches. I outlined the gray objects with the same number of strands of floss that I had used for the black ones. You might prefer a more delicate treatment. J. D. has shown here how it would look outlined in three strands of floss in a back-stitch or outline stitch. I then removed the colored centering stitches. A quick hand-washing in the sink with dish-washing liquid removes the remnants of the iron-on pattern. Follow this by a rinse and pressing with an iron set on 'cotton', and it's done.

How the still life might look with narrow outline stitching

To make your own blackwork still life, start with a simple outline pattern. Follow the directions for preparing the material. Use the patterns I used, see additional patterns on the posts for October 6, 2013, October 18, 2013, February 21, 2014, and January 15, 2017 — or make up your own.

Now, you are ready to transfer those outlined areas of your design to your fabric. You can place your outline on a light-box or tape it to a sunny window-pane and trace it directly on your fabric., or you may want to use a hot-iron transfer. For directions to make one, go to the post for October 6, 2013. For more on monks' cloth, see see the post for April 30, 2014.

Go make something black, white, and beautiful!



Finished Blackwork Embroidery Still Life

Updated October 10, 2017, to replace all the illustrations Google Photo somehow lost :-p


 Creative Commons LicenseThis post by Annake's Garden is licensed under a Creative Commons Attribution-NonCommercial-ShareAlike 3.0 Unported License.

Monday, April 10, 2017

Early Spring Questions and Answers, 2017

Spring flowers in Annake's garden
I like your heart designs but I wouldn't want to do them just for Valentine's Day. What else do you suggest?

I'm glad you liked the hearts. One project I would recommend is memorializing weddings. In fact, if you are going to be a bridesmaid or a maid or matron of honor, and the date for the wedding has been set, you probably have time to make one of these as a thoughtful wedding gift. Depending on your skill, choose needlepoint canvas, monks' cloth, or Aida cloth. Choose a size that is appropriate for framing — 8 inches x 10 inches or 9 inches x 12 inches are good choices. Make a border of small hearts top and bottom or all around the background.

Small needlework hearts for borders

Or place larger hearts in the four corners. Use a pattern like the one shown below as both a chart and a sample. Rotate the pattern 90 degrees for each of the following three corners. If you put four of these together, stitched in green, you get a lucky four-leaf clover. Three of them and a stem give you a shamrock for St. Patrick's Day.

Chart and sample of corner heart
Then embroider or needlepoint a large heart shape that is open in the center. You might like to download and use the chart from the post of January 30, 2017. Add additional rows of stitches outside and inside to get the size of heart that you need. In the center of the open heart, embroider a message like the following:

Mary Jones and John Smith
February 14, 2017

Tip: Write or print the names and dates on lined paper. Cover with a smooth piece of white tissue paper. Carefully trace your message on the tissue paper. Pin the tissue paper to your fabric, carefully centering it in the heart. Embroider over the letters and numbers. Then carefully tear the tissue paper away and discard it.

These embroideries can be as simple or as elaborate as you choose. You might take a clue from the wedding announcements, if they have been chosen, to familiarize yourself with the couple's style. A white or gold frame, simple enough not to distract one from the embroidery, would be appropriate.
 
Mothers of the bride and groom should also appreciate one of these. If you want something more elaborate, you might enlarge and use parts of the intertwined heart design (January 31, 2016).
Line drawing of interlaced hearts

My second choice would be a similar, but perhaps smaller, birth announcement. You might embroider a blue one for a baby boy and a pink one for a baby girl or do the whole thing in a rainbow of colors. Grandmothers would treasure such a gift. I was discussing this with a dear friend and she suggested that those of you who like to embroider on perforated paper might want to do something like this in a size that would fit into an envelope.

Blue heart outline embroidered on monk's cloth

For a larger project, you might embroider a family tree. You may want to start with a fairly large background so that the next generation's spouses and children can be added to the tree at a later date.
 
When you are making the four-way designs on paper, does it matter whether you fold the paper horizontally and vertically or if you fold it diagonally? Also, how would you apply this technique to some kind of needlework besides quilting. I don't quilt.

Let me answer your second question first. Let's explore a simple project that anyone can do with two pieces of felt, scissors, and fabric glue or a needle and thread. Remember our reverse applique (April 11, 2016 and June 24, 2016)? Once you have followed the simple directions from this post and have a four-way silhouette cut out of paper, pin your pattern to a square of felt, carefully centering the design. Cut it out with small, sharp scissors or an X-acto knife. Glue or stitch it to a square of felt in a contrasting color. Decorate it in any way you like. Frame it, make it into a wall hanging, a small pillow, or a decorative mat.

In answer to your first question, there is some difference between the two techniques. I used the “square” technique with my students because it was easier for them to grasp and execute. Here is the tulip pattern, modified to make it more nearly symmetrical, shown as cut on the square and then on the diagonal. It is necessary to shorten the tulip pattern to fit the diagonal fold.

Picture of the two patterns opened out, side by side

Is it time for more recipes?

Any time is a good time for recipes. We have an extensive mint garden. Here are two popular mint recipes from the recipe sheets we give our customers.

Minted Melon Fruit Cocktails

1 cup white sugar                                                      1 cup water
3 tbsp chopped mint leaves          Juice of 1 lemon           Juice of 1 orange
1 cantaloupe or honeydew melon, scooped into balls or diced into cubes
Sprigs of whole mint leaves for garnish (optional)

Refrigerate the cut melon. Mix the orange and lemon juices together. Boil the sugar and water together for 5 minutes to make a good syrup. Keep it warm. Chop the mint. Pour the syrup over the chopped mint. Let the mint steep in the syrup until it cools completely. Strain the syrup and add it to the orange and lemon juices. Chill.

Divide the melon balls or cubes between 6 tall glasses. Pour the chilled syrup over the melon. Garnish each glass with sprigs of whole mint leaves if desired. Keep cold until serving. This works as both an appetizer before a meal or as a light dessert after a meal.

Two varieties of mint from Annake's garden

Lime-Mint Smoothie

1 cup fat-free vanilla frozen yogurt           ¼ cup fat-free or low-fat milk
¼ cup frozen limeade concentrate                 ¼ cup fresh mint leaves

Combine all four ingredients in a blender. Blend until smooth. Serve immediately. Serves two. Delicious, cooling, and low-calorie.

Enjoy!


 Creative Commons LicenseThis post by Annake's Garden is licensed under a Creative Commons Attribution-NonCommercial-ShareAlike 3.0 Unported License.

Friday, March 11, 2016

Introducing ... Swedish Weaving!

As Annake promised in our 3rd anniversary post, here is the first in a series of tutorials on Swedish weaving (huck embroidery)

Vintage Swedish weaving sample
This type of needlework (there is also a type of loom weaving with the same name) goes back at least as far as the 1600s. It was widespread in Europe, but probably is called "Swedish" because the best surviving samples of it may be found in Swedish museums. It has many names, including Nordic weaving, huck embroidery, and huck weaving — which is what it was called when I learned to do it. It was very popular in the 1920s and 1930s and has come back into fashion several times since then. The latest surge in popularity has been for monks' cloth afghans; but that is quite an undertaking for a beginner, so I'm going to focus on smaller projects like linens, pillows, framed decorations and decorative inserts for clothing.

The “huck” in huck weaving comes from huckaback, a type of linen woven with loose surface threads called ‘floats’. The embroidery is done on the surface of the work and does not go through to the back of the fabric. Huck toweling is still the best fabric for this kind of work. Unfortunately, it is not easy to find it and it is expensive. It customarily comes in white or cream color. Here is a close-up of huck toweling showing how a blunt-pointed needle (so you don't split the float threads) is used to lift the pairs of floats. Needles with long, narrow eyes are preferred, because they don't pull the floats out of shape in the way needles with rounder eyes do.

sample with blunt needle

Many other fabrics may be used, as long as you can count the threads and lift them with your blunt-pointed tapestry needle. One of the best is Aida cloth, which is available in several gauges from many sources, and comes in a wide variety of colors. Monks' cloth comes in a few gauges and is commonly available. It also comes in a wide variety of colors. However, it is loosely woven, so it must be pre-washed because it shrinks and pre-hemmed because it frays. Also, some of the dyed versions are garish and the dye is uneven; examine them carefully before you buy them. I have discussed monks' cloth in previous posts (see the posts for February 27, 2014 and April 30, 2014). If you have been practicing embroidery chain stitches with me, you may be able to use the same practice material for this weaving. Below is a sample of it done on decorator burlap.


There are a number of pattern books and teaching DVDs on this subject available in shops and online. These are expensive and many of the patterns are confusing. Check with your nearest library to see if you can check out the books or order them through inter-library loans before you purchase them. Also check the back issues of the library's needlework and craft magazines for useful illustrated articles. I'm assuming that you would prefer not to spend a large sum on a craft which you may decide you don't want to pursue, so I will suggest inexpensive alternatives. If you are a regular reader, you know that my intention is to show you basic stitches and patterns like the ones below and to encourage you to to go ahead to develop your own designs. If you decide you really like the technique, then is the time to invest in materials, books, DVDs, and so forth.

Sampler of traditional huck weaving stitches
A sampler of some traditional huck weaving stitches
The most basic stitches in this technique are straight horizontal and diagonal ones. You can make a number of patterns using these alone. Diagonal stitches can move either up or down and either backward or forward. Even the simplest lines of horizontal stitches make an attractive border if they are done in a pleasing arrangement of bright colors or graduated tones of the same color. Each line is identical to the one before it, so you can follow easily and the pattern develops quickly. The patterns are traditionally worked from right to left, but will work equally well from left to right for left-handed people. I often work one row one way and the next row the other way. Although I usually prefer to do embroidery with a hoop, these linear patterns are easier to do without a hoop. Click on the sample patterns below and enlarge them to make them easy to understand. Remember that your thread or yarn should lie lightly on top of your fabric. Do not pull your stitches tight and distort the material.

More simple huck weaving samples
More simple huck weaving samples on Aida cloth
Do you want an easy way to make your borders more interesting? Just double the pattern. Put in a pattern as you have practiced. If it starts with a baseline and reaches upward, turn your fabric 180 degrees. Repeat the pattern. You may want the two straight sides to join, or you may want to leave one or more unworked rows of thread in the middle, or to put in a row or two of running stitches in a contrasting color. If the pattern starts with a baseline and reaches downward, turn the fabric 180 degrees and do the pattern again, deciding whether to join the two halves together or to separate them with running stitches or a small amount of space. The examples below show how this is done. Experiment with other patterns you have learned.

simple stitch pattern repeated two different ways
A simple stitch pattern, repeated two different ways
We are going to concentrate on stitches and simple patterns for a while; later we will discuss preparing the materials, beginning and ending rows of stitching, estimating the amount of thread for a single row of stitches, finishing the edges of projects, etc. I will show you more patterns, done on Aida, monks’ cloth, decorator burlap, and so forth so you can compare them.

Be creative,


 Creative Commons LicenseThis post by Annake's Garden is licensed under a Creative Commons Attribution-NonCommercial-ShareAlike 3.0 Unported License.

Wednesday, May 21, 2014

Assisi Embroidery: A Different Way to Look at Design

arrow points to Assisi on map of Italy Assisi work is a very old form of counted-thread embroidery. Its first known use was in the late 13th or early 14th Century. The name comes from Assisi, Italy, the little town in Umbria made famous by its association with Saint Francis of Assisi. Many of the best examples, made by nuns in convents for use as altar cloths in cathedrals, have managed to survive. They were worked on white linen with single colors of silk thread. The colors used were red, blue, yellow, green and brown. Only the silhouettes of the subjects were outlined; the backgrounds were worked solidly. The subjects were primarily Biblical scenes, with some mythological subjects and stylized animals and plants. The technique remained popular in church circles throughout the 17th Century.

Marked area shows flowers implied by background stitching
Red square shows flowers implied by background stitching
By the 18th century, however, the embroidery work had passed from the nuns to the women of the town of Assisi, where it became a cottage industry for them. The subjects became more secular and they were then used on household linens. The motifs were outlined in one color (usually black), while the backgrounds were worked in a second color (often red or green). Some women began experimenting with less traditional color combinations, such as rose and blue or blue-gray and gold. Elements of the technique became incorporated with more widespread folk embroidery. If you look carefully at the enlargement of this counted-stitch embroidery on evenweave linen, you will see tiny flowers that are not embroidered, but simply suggested by the stitches around them.

Assisi-style butterfly in red on white monk's cloth
Assisi butterfly in red on white monk's cloth
Today you need not be limited by any of the traditional restrictions. Indeed, the simplest subjects need not be outlined at all; Their inner structure is shown by extending the background stitches inside their silhouettes. An example is this piece, first shown on the post for April 30, 2014. The colors used here are the traditional red-on-white, but it is perfectly possible to use any color (or colors) of thread on any other color of background –- even black. There are many ways in which you can use this simple and versatile style of embroidery to express your indiviual taste and personality.

Sampler for some Assisi background stitches
The most common background stitches are conventional (left-over-right, stitched in two different passes) cross-stitches, but other alternatives include two-sided cross-stitch (right-over-left, each stitch completed before the next is begun), zigzag stitch (cross-stitches with upright stitches between them), long-armed cross-stitch, four-sided stitch, and detached filling stitches like wheatear and French knot. Three of these stitches are shown on this sample, first in a single color and then with two colors used to make the stitch pattern clearer. (Top to bottom, long-armed cross-stitch, zigzag stitch, four-sided stitch.) There are several versions of long-armed cross-stitch; I've chosen a simple one. The four-sided stitch can be used as a detached filling stitch. Outlining is usually done in back-stitch or double-running stitch (sometimes called Holbein stitch). That doesn't mean you can't use outline stitch, stem stitch, chain stitch or even couching.

Assisi embroidered rose on monk's cloth
Nor do you need to use a linen background and silk thread. Cotton fabrics and cotton or rayon floss, craft threads, and crochet cotton are inexpensive, readily available, easy to use and come in a multitude of colors. Hardanger cloth and Aida are strong contenders for this type of work. I have a special fondness for linen thread and tapestry wool on coarser fabrics like hopsacking, wool, wool blends and decorator burlap. (Whatever you use, use something that will not cause discomfort to your eyes or hands.) The project shown here is a multiflora rose outlined in a single strand of J&P Coats™ craft thread. The background is worked in six-strand DMC™ floss on monks' cloth. Several closely-related shades of red were used.

Outline of "JOY" embroidery, ready for Assisi background
I like single words displayed in ways that make me stop and think about the meaning of the word. I decided to do an Assisi embroidery featuring the word JOY against a background of “joyous” rainbow colors. I had a frame I wanted to use for it, so that dictated the size of the project. After working out my design on graph paper, I prepared my fabric and backing with easy-to-remove basting and centering stitches. This time I decided to use the conventional black outline. I back-stitched around the three letters. Here is a picture of the project at that stage.

The yellow and green center stripes were measured so that each would fill exactly half of the space allotted for the letter “O”. The other stripes are slightly wider. I wanted the blue and orange stripes to encompass the majority of their letter spaces and the red and purple ones to cover the small parts left over. I decided to leave a margin of the unstitched background fabric at either end of the embroidery to set it off. This picture shows the project completed, hemmed, and ready to frame.

Finished Assisi embroidery project, "JOY"
 
Assisi embroidery of iris on needlepoint canvas
I had never seen Assisi work done on needlepoint canvas, but I could see no reason not to try it. I drew a simple outline of an iris bloom and a bit of stem and traced it with pencil onto #10 mono canvas. I worked the outlines of the design in continental stitch and the background in basketweave stitch. I decided it needed a bit of a second color, so I did the “stamens” in doubled six-strand floss. I like the result and am now planning a long horizontal panel with several flowers, done so the white canvas becomes the flower, each with a different color background. There may be a place for that little butterfly somewhere in the panel, too.

I believe my interest in Assisi work stems from my fascination with positive and negative shapes in design. If you want to see the work of a master of positive/negative design (and one of my two favorite artists of all time), look for pictures by Dutch artist M. C. Escher (Maurits Cornelis Escher, 1898–1972). They will exercise your mind and your imagination.

As for Assisi work --- try it. You'll like it!


 Creative Commons LicenseThis post by Annake's Garden is licensed under a Creative Commons Attribution-NonCommercial-ShareAlike 3.0 Unported License.

Wednesday, April 30, 2014

Finer Counted Cross-Stitch — Making the Transition

blue snowflake cross-stitched on white linen
Traditional counted cross-stitch on plain white linen
The cross-stitch is an ancient and venerable stitch. It can be traced back at least to the Byzantine Empire, founded about 300 AD (or CE, if you prefer). It probably spread northward from the Black Sea region along big rivers like the Dnieper, used both as a pattern stitch on its own and as a filling stitch with other forms of embroidery, such as white-work and pulled-thread work. It was used widely in western Russia, the countries that bordered Russia on the west, the Baltic republics, Germany, Holland and Scandinavia. It came early to colonial America, where it was used primarily for linens and in decorative samplers. Indeed, it is sometimes called “sampler stitch”. (For more on cross-stitch, see the post for Aug. 26, 2013.)

butterfly cross-stitch pattern in transfer pencil on graph paper
Our pattern done in transfer pencil on 1/4" graph paper
In the 20th Century, cross-stitch — which had always been done by counting threads in even-weave fabrics — became widespread when patterns that could be transferred by ironing them onto fabrics became readily available. There was no need to count threads; just stitch over the printed X's, which would disappear when the fabric was laundered. If you want to make this kind of pattern yourself, it's easy to do. Use a well-sharpened hot-iron transfer pencil to draw your design in red X's on graph paper. Go over each X a few times so it will transfer easily. Remember that the design will be reversed on the cloth once it is ironed on, so letters should be done in reverse on the graph paper. (For more on making iron-on transfers, see the post for Oct. 6, 2013.) This pattern would be a nice size for a pillowcase, table runner, or the back yoke of a blouse. Patterns can be used more than once; I file mine to use as charts for other projects.

orange rose cross-stitched on white monk's cloth
Orange rose cross-stitched on white monk's cloth
In the second half of the 20th century, counted cross-stitch once again became popular. Books of patterns that enabled stitchers to make detailed, realistic pictures were printed. New even-weave fabrics became available in a broad range of colors and thread-counts. (The larger the number on the fabric, the finer the weave and the smaller the stitches; the smaller the number, the larger the scale of the embroidery and the fewer stitches per square inch.) Today, counted cross-stitch is as popular as ever. This rose is cross-stitched on monks' cloth using the pattern from the Aug. 1, 2013 post.

closeup of natural colored mok's cloth
Natural colored monk's cloth
I believe those of you who are beginners, learning counted cross-stitch on gingham, as well as those of you who are experienced cross-stitchers who have never tried monk's cloth, are in for a treat. It is a sturdy cloth woven so that it appears as all-over small squares of woven thread, each with a tiny opening at its corners. Since you use these little holes to space your stitches, just as you did with the corners of the squares of gingham, it makes the transition to plain fabrics very easy. If you have given up on cross-stitch because Aida cloth or even-weave fabrics are too difficult to see easily, you should find that projects on monk's cloth are easier to see and quick and easy to stitch. If you have only used white, ecru, or natural monk's cloth, you will be pleased to know that it is now available in as wide a range of colors as Aida cloth. (For more about monk's cloth, see the blackwork blog post of Feb. 27, 2014.)

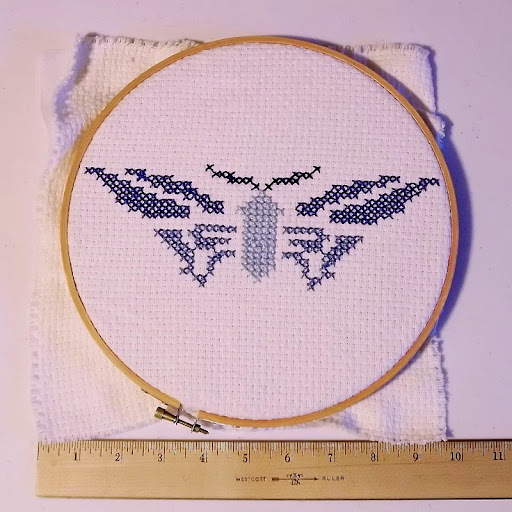
butterfly cross-stitched in blues on white monk's cloth
Our "butterfly" cross-stitched in blues on white monk's cloth
Cross-stitch designs may be worked on monk's cloth in either tapestry yarn or embroidery floss (rayon, linen, cotton or silk). Monk's cloth has approximately 7 stitches per inch (49 stitches per square inch), so you may need to separate the strands of yarn or floss. Experiment on a scrap of fabric to see how many strands give you the coverage and appearance that you desire. I find that one or two strands of tapestry yarn and three to six strands of most kinds of floss work well for me at this scale, but you must find what works best for you. The preparation of the fabric and the technique of the stitching are just the same as for any other cross-stitch project. Here is the pattern above, worked in four shades of blue on monks' cloth using a single strand of J&P Coats™ craft thread.

Aida cloth in different colors and thread counts
Once you have some experience with monk's cloth, you may want to move on to Aida cloth. The technique is the same, for there are still little openings at the corners of the squares. The big difference is one of scale. The most popular gauge of Aida is #14. This is readily available and comes in many colors, including black. The scale is comparable to #14 mono needlepoint canvas. The stitches will be much smaller than the ones you used on the monk's cloth (nearly 200 per square inch, as compared to about 50.) The finished motif, worked from identical charts, will be much smaller on the Aida as well. For this reason, you will be able to produce very fine details. From #14, the weave and the scale get finer and finer: #16, #18, # 20, etc. Eventually the fabric gets so fine that only a single strand of thread can be used. 

butterfly stitched on #11 flax Aida cloth
Butterfly stitched on #11 flax Aida cloth
My local variety store also carries #11 Aida. This is my favorite because it works up much like #10 mono needlepoint canvas, which I use all the time. Therefore, I can easily visualize the finished project before I begin stitching. There is an Aida #11 flax in a lovely natural tan. It is firm and pleasant to work on. The edges fray very little and it does not require a backing fabric. The finished embroidery requires little or no blocking. It can be hand-washed gently in warm, soapy water, with no bleach, rinsed, and pressed on the reverse side with a warm iron. It works especially well as a background for embroidering plants or animals. Here's our little flier again, worked in a single color on # 11 Aida flax, using three strands of six-strand embroidery floss.

butterfly in multiple colors on #14 cream Aida cloth
Our pattern in multiple colors on #14 cream Aida cloth
I worked the next sample on a cream-colored piece of #14 Aida. I worked in several colors, using two strands of six-strand embroidery floss and a single strand of craft thread for the light lines on the body. Once I had made the complete pattern used in the other two samples, I filled in the rest of the outline with a darker color of floss. Although the pattern was not designed to represent any living species, I think the little creature looks pretty realistic. At this scale, many people have reached the bottom limit of their vision, where they can discern individual cross-stitches as X's with their naked eyes. It is this use of tiny, closely packed stitches which makes realistic renderings possible. Aida cloth is not inexpensive. I recommend that beginners purchase a small packaged piece in white, antique white, ivory or a pastel. It is easier to see the open spaces in the fabric and your stitches show up well.

butterfly embroidery samples shown together
Today's butterfly embroidery samples shown together for comparison
Have fun!


butterfly on monk's cloth in Assisi technique
Butterfly on monk's cloth in Assisi technique: subject of a future blog!

 Creative Commons LicenseThis post by Annake's Garden is licensed under a Creative Commons Attribution-NonCommercial-ShareAlike 3.0 Unported License.

Contact Us

Name

Email *

Message *

Blog Archive