Showing posts with label free needlepoint rose pattern. Show all posts

Thursday, June 29, 2017

More Needlework Tips, Tricks, and Hacks

Paul Scarlett rose in Annake's garden
I made a needlepoint from your rose chart (August 26, 2013). I know roses don't come in blue, but it is my favorite color, so I made the rose in shades from baby blue to navy and I love it! Now I'm ready to do the background and I don't want just a plain color. How can I make the background really interesting without making my rose disappear?

Rose Needle Arts Chart
Rose Needle Arts Chart from August 26, 2013 post

Bravo to you for choosing your own colors! It sounds lovely. I'm going to suggest you try a patterned background (and learn a new type of canvas work at the same time). First, look at this rose (“our” rose) done in continental stitch in tones of baby pink to burgundy. The background is a bargello pattern. Bargello is an old form of tapestry work — stitched on needlepoint canvas to provide an inexpensive fabric that looked like the much more expensive woven tapestries of the late Middle Ages. It is done in straight up-and-down stitches over a varied number of canvas threads. It is done with yarn and a tapestry needle, just like continental stitch. As you can see, the pattern did not overwhelm my rose. Blue is a cool color, so I don't recommend using the warm browns that I used for this rose. A silvery gray (you will need a light, a medium, and a darker shade) or perhaps a lavender might be a good choice. Take your rose with you so you can see the colors side by side before you buy the yarns.


Rose needlepoint with bargello background
Rose needlepoint with bargello background, made from chart

I'm going to take you through the stitch process with pictures. Outline the shape of a frame on your canvas in pencil, centering your rose. You are going to begin in the upper right-hand corner of the frame, but leave an empty row of canvas squares at the top, just under the frame line, and another empty row down the right-hand side, just inside the frame line. Begin with the medium shade of your chosen color. Don't use a strand longer than 18 inches. Bring your needle up from the back in the row to the left of the empty row on the side and two rows down from the empty top row. Stitch over the thread just above where your needle entered and immediately push your needle to the back again. You have made a stitch over 1 thread. Now make a stitch that passes over the thread below your stitch, your stitch, and the thread above your stitch (3 threads in all). Moving left, make another stitch over 1 thread. You have made a design that looks like a plus mark (+). Moving left, leave an empty row, then make another plus. Continue in this pattern across the frame. If you cannot make a whole plus at the end of the row, make as much of it as you can. Your first row should look like this:

1 row of plus stitches

Working from either the left or the right, put a plus (or a partial plus) directly underneath each plus (or partial plus) in row 1. The tops of the second row of long stitches share the same “holes” as the bottoms of the long stitches in the first row. Rows 1 and 2 should look like this:

2 rows of plus stitches

End your medium-colored yarn for the time being and run the end under the backs of established stitches. Thread your needle with the darkest shade of yarn. Secure the ends under the backs of some of your plus stitches. Remember those empty spaces between the horizontal arms of your pluses? Now you are going to fill them with stitches over one thread. Your first two rows should now look like this (I have used plastic canvas so that the individual stitches are easy to see): 
 
2 rows of plus stitches with gaps filled in

Finally, fill in the remaining spaces with upright stitches in your lightest color. Each stitch covers 2 threads. No empty canvas shows between the stitches when you are using the size of yarn or floss appropriate for that canvas. Your completed rows should now look like this:

2 rows of plus stitches with gaps and spaces filled in


Detail of needlepoint rose and background
Detail of needlepoint rose and background interface
As you come to the edges of your rose, do as much of each pattern stitch as the space allows. I did all the plus stitches first, to establish the vertical rows of the pattern all over the canvas. Then I did the dark stitches to establish the horizontal rows. Finally, I filled in the light stitches. You, however, may prefer to work just one row of stitches at a time. Here is an enlarged picture of an area where the background pattern meets the edge of the rose. Don't forget to fill in the empty top and side rows.

The “plus” stitch you just learned is called Hungarian stitch. I hope this project has given you an interest in bargello stitching. If so, go to the post for April 10, 2014 or use the terms “bargello” or “Hungarian stitch” in our search engine for much, much more.


I have trouble with doing needlework from charts. I keep losing my place. Any suggestions to help me?

It is certainly important to keep track of the line in the chart that corresponds with the line of stitches you are working, as well as to keep an accurate count of the number of stitches you have completed. Otherwise, your finished project may not look very much like the chart! It is a good idea to keep the chart on a flat surface where it is easy to see all of it from your working position. I use a clipboard to hold mine in place. I keep a pencil with it. If I'm interrupted or have to be away from my work for any length of time, I make a small pencil mark by my last completed stitch.

If you are primarily losing the horizontal line in the chart and are not concerned with losing count of your stitches, the simplest solution is to place a 12-inch ruler with its top edge just under the chart line you are following. If you need to add weight to the ruler to keep it in place, glue a couple of coins to the underneath side of the ruler, near the ends.

Chart and ruler
Chart and ruler

For an easy-to-make tool to mark both the horizontal and the vertical lines in your chart, cut two pieces of stiff cardboard about 2 inches (5 cm) wide and 6 inches (15 cm) long. Staple or glue them together so that they form an L-shape. Place the L on the chart so that the bottom part of the L is directly below the horizontal line of the chart that you are following, and the upright part of the L is just behind the first stitch you are going to count. Mentally remind yourself to move the upright part of the L every 5 or 10 stitches you complete. This takes some practice, but will soon become automatic. Slide the bottom of the L up (if you are working from the bottom of the chart) or down (if you are working from the top) one space at the end of every completed row of stitches.

Chart and cardboard "tool"

When I am doing latch-hook, I place my (much larger) chart above my canvas. I always start my rug or wall hanging at the bottom. At the end of each row, I turn that row of the chart under, crease it, and secure the ends with clips. I hope these suggestions make reading a chart easier.

Thanks so much for the article on counted cross-stitch (June 12, 2017). I used to do a lot of that but I haven't done any for years. Now I look forward to doing it again. Could you help me with a problem that I have always had? My floss gets twisted and I end up cutting a lot of it off and wasting it.

I'm so happy that you are going to start cross-stitching again! Encouraging people to do activities that they enjoy is one of the main aims of this blog.

First of all, I would suggest using shorter lengths of floss. I don't use anything longer than 18 inches (45 cm), whether I'm using floss or yarn. I tend to use shorter pieces of floss because the strands can separate and fray. Twelve inches (30 cm) often works better for floss. There are two ways to handle the twisting problem. The first is to hold the floss away from your work so that the needle hangs straight down. The floss should start un-twisting. Stop it before it begins to re-twist and smooth the floss between your fingertips before you begin stitching again. The second method is to put the fabric down and hold the loose end of the floss in one hand and the needle between your thumb and forefinger on the other hand. Gently slide the needle up and down the length of floss until the twists straighten out. Be careful not to fray the strands in the process. These techniques should save you both floss and frustration. Good luck!

Happy stitching.



Iris Needle Arts Chart
Iris Needle Arts Chart; download from our June 18, 2015 post


 Creative Commons LicenseThis post by Annake's Garden is licensed under a Creative Commons Attribution-NonCommercial-ShareAlike 3.0 Unported License.

Wednesday, April 30, 2014

Finer Counted Cross-Stitch — Making the Transition

blue snowflake cross-stitched on white linen
Traditional counted cross-stitch on plain white linen
The cross-stitch is an ancient and venerable stitch. It can be traced back at least to the Byzantine Empire, founded about 300 AD (or CE, if you prefer). It probably spread northward from the Black Sea region along big rivers like the Dnieper, used both as a pattern stitch on its own and as a filling stitch with other forms of embroidery, such as white-work and pulled-thread work. It was used widely in western Russia, the countries that bordered Russia on the west, the Baltic republics, Germany, Holland and Scandinavia. It came early to colonial America, where it was used primarily for linens and in decorative samplers. Indeed, it is sometimes called “sampler stitch”. (For more on cross-stitch, see the post for Aug. 26, 2013.)

butterfly cross-stitch pattern in transfer pencil on graph paper
Our pattern done in transfer pencil on 1/4" graph paper
In the 20th Century, cross-stitch — which had always been done by counting threads in even-weave fabrics — became widespread when patterns that could be transferred by ironing them onto fabrics became readily available. There was no need to count threads; just stitch over the printed X's, which would disappear when the fabric was laundered. If you want to make this kind of pattern yourself, it's easy to do. Use a well-sharpened hot-iron transfer pencil to draw your design in red X's on graph paper. Go over each X a few times so it will transfer easily. Remember that the design will be reversed on the cloth once it is ironed on, so letters should be done in reverse on the graph paper. (For more on making iron-on transfers, see the post for Oct. 6, 2013.) This pattern would be a nice size for a pillowcase, table runner, or the back yoke of a blouse. Patterns can be used more than once; I file mine to use as charts for other projects.

orange rose cross-stitched on white monk's cloth
Orange rose cross-stitched on white monk's cloth
In the second half of the 20th century, counted cross-stitch once again became popular. Books of patterns that enabled stitchers to make detailed, realistic pictures were printed. New even-weave fabrics became available in a broad range of colors and thread-counts. (The larger the number on the fabric, the finer the weave and the smaller the stitches; the smaller the number, the larger the scale of the embroidery and the fewer stitches per square inch.) Today, counted cross-stitch is as popular as ever. This rose is cross-stitched on monks' cloth using the pattern from the Aug. 1, 2013 post.

closeup of natural colored mok's cloth
Natural colored monk's cloth
I believe those of you who are beginners, learning counted cross-stitch on gingham, as well as those of you who are experienced cross-stitchers who have never tried monk's cloth, are in for a treat. It is a sturdy cloth woven so that it appears as all-over small squares of woven thread, each with a tiny opening at its corners. Since you use these little holes to space your stitches, just as you did with the corners of the squares of gingham, it makes the transition to plain fabrics very easy. If you have given up on cross-stitch because Aida cloth or even-weave fabrics are too difficult to see easily, you should find that projects on monk's cloth are easier to see and quick and easy to stitch. If you have only used white, ecru, or natural monk's cloth, you will be pleased to know that it is now available in as wide a range of colors as Aida cloth. (For more about monk's cloth, see the blackwork blog post of Feb. 27, 2014.)

butterfly cross-stitched in blues on white monk's cloth
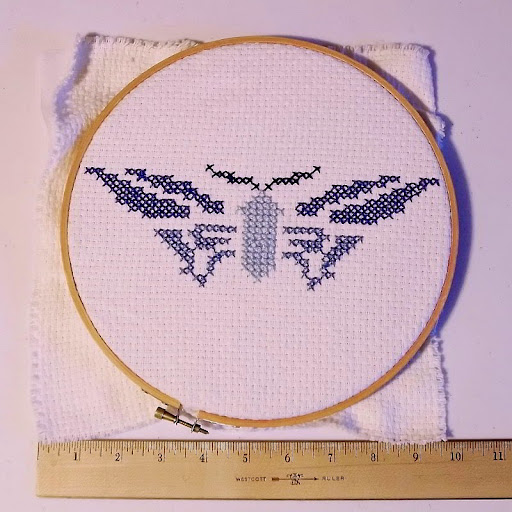
Our "butterfly" cross-stitched in blues on white monk's cloth
Cross-stitch designs may be worked on monk's cloth in either tapestry yarn or embroidery floss (rayon, linen, cotton or silk). Monk's cloth has approximately 7 stitches per inch (49 stitches per square inch), so you may need to separate the strands of yarn or floss. Experiment on a scrap of fabric to see how many strands give you the coverage and appearance that you desire. I find that one or two strands of tapestry yarn and three to six strands of most kinds of floss work well for me at this scale, but you must find what works best for you. The preparation of the fabric and the technique of the stitching are just the same as for any other cross-stitch project. Here is the pattern above, worked in four shades of blue on monks' cloth using a single strand of J&P Coats™ craft thread.

Aida cloth in different colors and thread counts
Once you have some experience with monk's cloth, you may want to move on to Aida cloth. The technique is the same, for there are still little openings at the corners of the squares. The big difference is one of scale. The most popular gauge of Aida is #14. This is readily available and comes in many colors, including black. The scale is comparable to #14 mono needlepoint canvas. The stitches will be much smaller than the ones you used on the monk's cloth (nearly 200 per square inch, as compared to about 50.) The finished motif, worked from identical charts, will be much smaller on the Aida as well. For this reason, you will be able to produce very fine details. From #14, the weave and the scale get finer and finer: #16, #18, # 20, etc. Eventually the fabric gets so fine that only a single strand of thread can be used. 

butterfly stitched on #11 flax Aida cloth
Butterfly stitched on #11 flax Aida cloth
My local variety store also carries #11 Aida. This is my favorite because it works up much like #10 mono needlepoint canvas, which I use all the time. Therefore, I can easily visualize the finished project before I begin stitching. There is an Aida #11 flax in a lovely natural tan. It is firm and pleasant to work on. The edges fray very little and it does not require a backing fabric. The finished embroidery requires little or no blocking. It can be hand-washed gently in warm, soapy water, with no bleach, rinsed, and pressed on the reverse side with a warm iron. It works especially well as a background for embroidering plants or animals. Here's our little flier again, worked in a single color on # 11 Aida flax, using three strands of six-strand embroidery floss.

butterfly in multiple colors on #14 cream Aida cloth
Our pattern in multiple colors on #14 cream Aida cloth
I worked the next sample on a cream-colored piece of #14 Aida. I worked in several colors, using two strands of six-strand embroidery floss and a single strand of craft thread for the light lines on the body. Once I had made the complete pattern used in the other two samples, I filled in the rest of the outline with a darker color of floss. Although the pattern was not designed to represent any living species, I think the little creature looks pretty realistic. At this scale, many people have reached the bottom limit of their vision, where they can discern individual cross-stitches as X's with their naked eyes. It is this use of tiny, closely packed stitches which makes realistic renderings possible. Aida cloth is not inexpensive. I recommend that beginners purchase a small packaged piece in white, antique white, ivory or a pastel. It is easier to see the open spaces in the fabric and your stitches show up well.

butterfly embroidery samples shown together
Today's butterfly embroidery samples shown together for comparison
Have fun!


butterfly on monk's cloth in Assisi technique
Butterfly on monk's cloth in Assisi technique: subject of a future blog!

 Creative Commons LicenseThis post by Annake's Garden is licensed under a Creative Commons Attribution-NonCommercial-ShareAlike 3.0 Unported License.

Thursday, August 1, 2013

A Rose is a Rose, Part 2 - One Chart for Many Projects

Cross-stitched Rose Quilt Square
Original rose pattern, cross-stitched on beige gingham
When I teach someone to do cross-stitch, folk embroidery, Spanish blackwork, Assisi work, etc., I start with a project on quarter-inch checked gingham because it closely resembles graph paper. This makes it easy for students to follow simple graphs and encourages them to try their own graphs. Graphs are very versatile. It is possible to do the same design in a multitude of sizes, from a covered button to a king-sized quilt. The same chart can be used for many different techniques: afghan stitch, beading, mosaic, latch-hook, piecework, etc. A chart like the one you can download for free today works for a whole rainbow of color schemes. Charts are easy to file for future reference and, laminated, long-lasting.

"Heritage Rose" Latch Hook Rug
"Heritage Rose," a latch hooked rug available in our Etsy shop
I never ask students to do a project unless I do one right along with them; as a result, I accumulate samples. The pink cross-stitch rose on beige checked gingham is one of those. I liked the beige back-ground because it made the colors of the students' roses show up well. Years after I made and filed this sample, I enlarged and modified the same design for the center of a latch-hook rug.

Yellow Rose Needlepoint, Finished
Finished yellow rose needlepoint
 The yellow rose needlepoint I've done for this blog is in tent stitch on plastic canvas. The canvas has 7 stitches to the inch (49 stitches per square inch), as compared with the checked gingham's 4 stitches per inch (16 stitches per square inch), so you can see the needlepoint rose will be considerably smaller than the cross-stitch one. The chart can be scaled either up or down. For instance, imagine that each square on the chart represents a 2-inch-square finished quilt piece. The rose would then be 68 inches at its widest point and 66 inches from top to bottom. With plain squares of background fabric added, that would make an impressive quilt center. Or imagine that the squares are 6-inch ceramic tiles for a floor or wall. Conversely, the rose could be much smaller. In beading, a row of these roses would make a handsome belt. Cross-stitched on fine Aida cloth, it might decorate a collar or a napkin. In petit point, it could be a pendant or brooch.

Plastic canvas with center lines basted
Let's say you want to do a rose in cross-stitch or needlepoint. Prepare your background, choosing the color carefully so it does not overpower the rose. Fabric should be backed with inter-facing. Canvas, except for plastic, should be taped on the edges. Find the center of your material. Run a row of basting stitches through the center, both vertically and horizontally, using a bold color that does not appear in your version of the rose.

Yarn for the yellow rose needlepoint
Yarn palette for the yellow rose needlepoint
Now select the colors of your yarn or floss. The pattern will work easily for most colors. A white rose is a bit of a challenge, but can be done with off-whites, cream, ivory, ecru, etc. I've never tried a black rose, but it should be possible with a range of grays, blues, or purples. You will need a range of 7 shades of your main color, plus two greens. Shades of the main color are represented by numbers on the chart, with 1 being the palest one and 7 the darkest one. Capital G represents the darker green and small g the lighter green. Lay your 7 materials out in front of you in light-to-dark order. Tag them with the numbers if you like. (I'll admit I'm a spendthrift when it comes to needles: I threaded a separate needle with each shade of yellow!) Start stitching at the center and work outward. When the rose is complete, pull out the basting threads.

Yellow rose needlepoint closeup
Yellow rose needlepoint closeup, showing back stitching
Because the yellows were not high-contrast, I did a limited amount of back stitching in a dark yellow on the needlepoint. You may not want to do any back-stitching at all. Or you may want to back-stitch all the outlines shown on the chart, as I would probably have done if I had chosen to do a pale yellow rose in counted cross-stitch on a white or light background. I will leave that decision up to you. The more choices you make, the more completely the rose will belong to you.
Rose Needle Arts Chart JPEG
Picture of the downloadable rose chart

The pattern is a “forgiving” one. If you place an occasional stitch in the wrong square, it should not spoil your rose. Small differences are to be expected in handmade items. If you run out of a color, continue with the closest match you can find. The vertical and horizontal center rows on the chart are marked.

Next time, I'll tell everyone how to submit a photograph of whatever project they make from this chart, and I'll show the most interesting results on a future blog.

To download the free chart (in PDF format), just click this link.

Now my rose is your rose. May all of your roses be beautiful.
Annake

 Creative Commons LicenseThis post by Annake's Garden is licensed under a Creative Commons Attribution-NonCommercial-ShareAlike 3.0 Unported License.

Contact Us

Name

Email *

Message *

Blog Archive