Showing posts with label yellow rose needlepoint. Show all posts

Monday, July 7, 2014

A Big Bouquet of Roses

scarlet rose bush
The background photo for our summer posts is of a lovely old scarlet rambler which overhangs three paths in our perennial garden, as well as a rustic bench where we can sit and admire it. When we bought this home thirty-five years ago, there was a dying tea rose at this spot in the garden. I found that it was grafted onto another root. (I recognized it because I had grafted young fruit trees with my dad.) I cut away the dying rose and decided to leave the grafted rootstock to see what it might be. Every summer since I have been rewarded with this beautiful and fragrant display. The flowers dry easily once they are past blooming and make a great base for potpourri.

In the post for August 1, 2013, we offered a free rose pattern for you to download. I did samples in counted cross-stitch, conventional tent stitch, and latch-hook. Since then, I have done the same pattern in these media at different scales. The basic pattern has remained the same, while materials and color schemes have varied. All of the projects to date will be shown in this post. My purpose is two-fold: a) to show the results of widespread differences in scale; b) to show the versatility of a pattern that can be adapted for a wide variety of uses. The pattern was not always followed exactly, so you will see some differences in the finished works. Additional rose designs, not derived from the pattern, will also be shown, as well as photographs of some of the roses that were my inspirations. For those of you who missed the original pattern, you can download it by clicking on this link:  Rose Pattern Download.

cross-stitch rose on gingham
This sample was designed for an 18-inch (about 46-centimeter) square quilt block, but was destined to become a pillow top instead. It was done in counted cross-stitch with embroidery floss on quarter-inch checked gingham.

yellow needlepoint rose
The second sample from that post was this yellow rose done in tent stitch on #10 mono canvas with tapestry wool. The finished needlepoint is 9 inches x 11 inches (about 23 centimeters x 28 centimeters). A black, dark blue, or dark green background will enhance most rose designs.
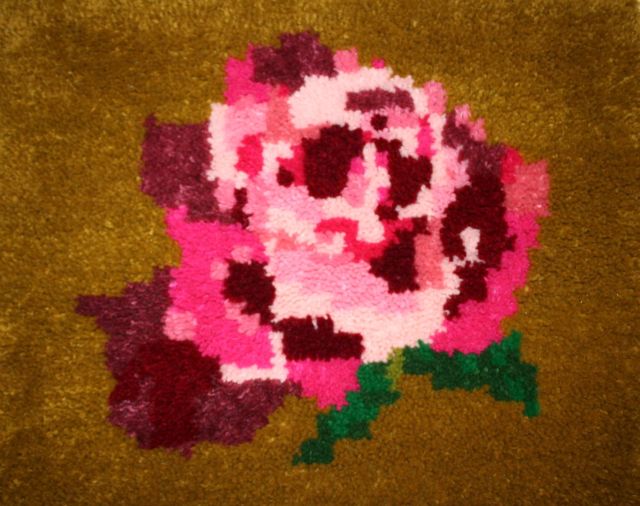
Heritage rose rug
Also seen in that post was our Heritage Rose rug, a latch-hook rug with a central design based on the original pattern, but with each square in the original design represented by approximately four latch-hook knots. This was done on conventional rug canvas.

orange rose on monk's cloth
This picture shows an orange rose done in counted cross-stitch on monk's cloth with embroidery floss. The motif is 7 inches (18 centimeters) in diameter, not counting the frame. The off-white background works well with this vivid rose, but might not be as good for a paler one. This one made its debut in the post for April 30, 2014.

latch hook rose on quickpoint canvas
Here is another latch-hook rose (shown as a work-in-progress). This one is done on #5 quickpoint canvas. Each square on the pattern has a corresponding latch-hook knot. As shown here, the motif --- destined to become the center of a pillow top --- is currently 8 inches (about 20 centimeters) square. As you can see, the same pattern can be used in projects of various sizes, color schemes, and stitching techniques.

variegated needlepoint rose
This floribunda rose, first shown on July 15, 2013, was done in tent stitch on #14 canvas and then embellished with surface stitching. It is in the same size frame used for the orange rose above. We showed it along with the rose from our garden which inspired it, and the tutorial illustrated the steps I take when I convert one of J.D.'s or J.J.'s photos into an embroidery design. One of J.J.'s rose photos was featured on our last post, worked as a latch-hook pillow top on grospoint canvas (June 15, 2014).

framed assisi rose
Here is another floribunda rose done as Assisi work. The rose was outlined with gold craft thread, letting the monk's cloth background represent the petals. Then the background was filled in solidly with cross-stitches in red embroidery floss. It is 7 inches (18 centimeters) x 9 inches (23 centimeters). For more on Assisi work, see the post for May 21, 2014.

longstitch rose in progress
The final rose in our 'bouquet” is another work-in-progress. (Yes, there are a lot of those around my workshop!) It is a French long-stitch rose based on the newest hybrid tea rose in our garden. This one is named after singer Barbra Streisand and is a marvelous combination of purple, lavender, and pink. It is very pretty, even as it fades. Long-stitch is is a satin stitch technique, done with yarn on needlepoint canvas. The stitches may be made horizontally, vertically, or diagonally, and all three may be combined in the same piece of work. For more about long-stitch, see the post for November 3, 2013.

We will leave you with some of J.D.'s roses. We hope you enjoy this bouquet, sent to you with our compliments.



garden rose collage


 Creative Commons LicenseThis post by Annake's Garden is licensed under a Creative Commons Attribution-NonCommercial-ShareAlike 3.0 Unported License.

Tuesday, September 24, 2013

More Questions and Answers

First, I want to thank you readers for a very special birthday gift. That day I recorded the one thousandth page view of this blog. I appreciate all of you who take the time to visit this blog site and hope you will return often. The first week in October I'll be posting the first of several articles about types of needlework which -- while they may be unfamiliar -- are great fun to do. We will revisit cross-stitch and bargello this season, too, with new techniques, materials, and pattern ideas. Also watch for more interviews with other artisans of the Annake's Garden group. Today I'm answering some questions raised by the last few blogs.

What hook did the jewelry lady use to make the wire bracelet? (An Interview with Our Jewelry Artisan,  July 1, 2013)

She used a European #19, which she says is about the same size as a G hook. It is an aluminum hook. She prefers aluminum to plastic because it is smoother and does not warp out of shape with use. We thought you would like to see a photo of a necklace she made with the same hook. She is now experimenting with crocheted ring designs.

Crocheted copper wire necklace with copper beads

Why is the rose picture in needlepoint so much smaller than the rose picture in cross-stitch when they are made from the same chart? (A Rose is a Rose, Part 2,  August 1, 2013)

The gingham for the cross-stitch has 4 squares to the inch in both horizontal and vertical lines, so it has 16 squares per square inch. The needlepoint picture is done on #7 canvas. That means it has 7 squares of mesh (think of them as square holes if you like) to the inch each way --- or 49 stitches per square inch. There are approximately 3 times as many stitches on a square inch of the #7 canvas than there are on a square inch of gingham (3 x 16 = 48). The more stitches per square inch, the more squares of the pattern you can squeeze into a single square inch. So the needlepoint rose is only about 1/3 as large as the cross-stitch rose. The larger the number of stitches per inch, the smaller the scale of the finished motif. These comparisons are approximate, because the gingham varies slightly from one manufacturer to another and the bars on the plastic canvas are thicker than either cloth or canvas threads.

Gingham check size comparison
1/4" Check Gingham (blue) vs. Baby Check Gingham (pink)
Let me give you another example. “Baby check” gingham is also about 7 squares to the inch, or 49 squares per square inch. Imagine that you do a cross-stitch in each square, following the rose chart. You would make 49 cross-stitches on a single square inch of gingham. 16 goes into 49 about 3 times, so the cross-stitch rose on quarter-inch check (16 stitches per square inch) would be about 3 times as large as the same rose done on the “baby check”. While the first rose is large enough for a pillow, the second one would be perfect for the bodice of a little girl's dress or the pocket of a party apron.

Stitch size comparison for different fabrics
A pattern on 1/4" gingham, monks cloth, baby check, #12 aida
Monk's cloth is another embroidery fabric with approximately 7 stitches to the inch, so a design on plastic canvas would be roughly equivalent in size to the same design on “baby check” gingham or monk's cloth. The same design on #14 needlepoint canvas or #14 Aida cloth (196 stitches per square inch) would be considerably smaller. The photo will give you an idea of the differences in scale among four non-canvas fabrics.

I still don't understand what a “quillow” is. (An Interview with Our Quiltmaker,  August 16, 2013)

A quillow is a small quilt or throw with an appliqued pillowcase attached to one edge. The quilted part folds up neatly and slips into the pillowcase to make a pillow. Nice for naps, travel, a child's quiet time, etc. See the photo-montage below for the proper way to fold a quillow. Neat, isn't it?
Quillow folding photo-montage
Folding up a "quillow"

Fabric yo-yo
A Fabric Yo-yo
What is a fabric yo-yo?
(An Interview with Our Quiltmaker,  August 16, 2013)

A yo-yo starts out as a circle of plain or patterned fabric. I use a 4-inch embroidery hoop to draw my patterns around, but any small circular object in the 3- to 4-inch range would do. Turn under a quarter-inch all around and stitch it down with small running stitches and a gathering thread. Pull the thread until you have a small purse-like object with a little puckered “mouth” in the center. You have made a yo-yo.

Yo-yo Christmas tree shape
Yo-yos sewn into Christmas tree shape
They are usually used (often over a lining) to make throws, vests, tote bags, etc. They are sewn together edge-to-edge only where they touch. Sometimes the centers are embellished by sewing a button or a ball of ball fringe inside the “mouth”. (See the Christmas tree shape made with yo-yos.)

Our quiltmaker, however, made somewhat larger yo-yos which she appliqued onto her quilt. Don't they look like flowers? The whole quilt reminds me of a garden in a painting by Monet or Renoir. Yo-yos are a good way to use odds and ends of leftover fabric.

Yo-yo quilt
Yo-yo Quilt

What is a waste knot? (Easy Cross-stitch on Checked Gingham,  August 26, 2013)

Ordinarily we don't knot our embroidery threads. When starting a piece of stitchery, however, we need to secure the first strand so that it doesn't simply pull through the fabric and out again. So we knot this thread. Push the needle down through the fabric some distance from where you plan to begin stitching. Pull the thread through the fabric so that the knot stays on top of the work. When you have used all but about two inches of the thread, end that strand by running it under the stitches you have just made, whipping it around them, or weaving it back and forth from one stitch to another. Then snip off the waste knot, pull the strand to the back of the work, thread it into a needle and secure it in the same way. All other strands are started and ended under existing stitches, so no other knots are necessary.

Do you ever sell the samples you use to illustrate your blogs?

Yes, indeed. A few of the photos are from our archives and the pieces have already been sold, but others are on our Etsy shop site, or will be added soon. Some photos were of works in progress which now are in the process of being framed, quilted, made into pillows, etc. We are constantly adding new items to the shop. Just keep checking for them. If there is an item shown on a blog post that particularly interests you, and you don't see it on the shop site, just ask us about it (see our “Contact Us” page). We will be happy to tell you if it is available.

Thank you for asking!
Annake

Yellow rose needlepoint

 Creative Commons LicenseThis post by Annake's Garden is licensed under a Creative Commons Attribution-NonCommercial-ShareAlike 3.0 Unported License.

Thursday, August 1, 2013

A Rose is a Rose, Part 2 - One Chart for Many Projects

Cross-stitched Rose Quilt Square
Original rose pattern, cross-stitched on beige gingham
When I teach someone to do cross-stitch, folk embroidery, Spanish blackwork, Assisi work, etc., I start with a project on quarter-inch checked gingham because it closely resembles graph paper. This makes it easy for students to follow simple graphs and encourages them to try their own graphs. Graphs are very versatile. It is possible to do the same design in a multitude of sizes, from a covered button to a king-sized quilt. The same chart can be used for many different techniques: afghan stitch, beading, mosaic, latch-hook, piecework, etc. A chart like the one you can download for free today works for a whole rainbow of color schemes. Charts are easy to file for future reference and, laminated, long-lasting.

"Heritage Rose" Latch Hook Rug
"Heritage Rose," a latch hooked rug available in our Etsy shop
I never ask students to do a project unless I do one right along with them; as a result, I accumulate samples. The pink cross-stitch rose on beige checked gingham is one of those. I liked the beige back-ground because it made the colors of the students' roses show up well. Years after I made and filed this sample, I enlarged and modified the same design for the center of a latch-hook rug.

Yellow Rose Needlepoint, Finished
Finished yellow rose needlepoint
 The yellow rose needlepoint I've done for this blog is in tent stitch on plastic canvas. The canvas has 7 stitches to the inch (49 stitches per square inch), as compared with the checked gingham's 4 stitches per inch (16 stitches per square inch), so you can see the needlepoint rose will be considerably smaller than the cross-stitch one. The chart can be scaled either up or down. For instance, imagine that each square on the chart represents a 2-inch-square finished quilt piece. The rose would then be 68 inches at its widest point and 66 inches from top to bottom. With plain squares of background fabric added, that would make an impressive quilt center. Or imagine that the squares are 6-inch ceramic tiles for a floor or wall. Conversely, the rose could be much smaller. In beading, a row of these roses would make a handsome belt. Cross-stitched on fine Aida cloth, it might decorate a collar or a napkin. In petit point, it could be a pendant or brooch.

Plastic canvas with center lines basted
Let's say you want to do a rose in cross-stitch or needlepoint. Prepare your background, choosing the color carefully so it does not overpower the rose. Fabric should be backed with inter-facing. Canvas, except for plastic, should be taped on the edges. Find the center of your material. Run a row of basting stitches through the center, both vertically and horizontally, using a bold color that does not appear in your version of the rose.

Yarn for the yellow rose needlepoint
Yarn palette for the yellow rose needlepoint
Now select the colors of your yarn or floss. The pattern will work easily for most colors. A white rose is a bit of a challenge, but can be done with off-whites, cream, ivory, ecru, etc. I've never tried a black rose, but it should be possible with a range of grays, blues, or purples. You will need a range of 7 shades of your main color, plus two greens. Shades of the main color are represented by numbers on the chart, with 1 being the palest one and 7 the darkest one. Capital G represents the darker green and small g the lighter green. Lay your 7 materials out in front of you in light-to-dark order. Tag them with the numbers if you like. (I'll admit I'm a spendthrift when it comes to needles: I threaded a separate needle with each shade of yellow!) Start stitching at the center and work outward. When the rose is complete, pull out the basting threads.

Yellow rose needlepoint closeup
Yellow rose needlepoint closeup, showing back stitching
Because the yellows were not high-contrast, I did a limited amount of back stitching in a dark yellow on the needlepoint. You may not want to do any back-stitching at all. Or you may want to back-stitch all the outlines shown on the chart, as I would probably have done if I had chosen to do a pale yellow rose in counted cross-stitch on a white or light background. I will leave that decision up to you. The more choices you make, the more completely the rose will belong to you.
Rose Needle Arts Chart JPEG
Picture of the downloadable rose chart

The pattern is a “forgiving” one. If you place an occasional stitch in the wrong square, it should not spoil your rose. Small differences are to be expected in handmade items. If you run out of a color, continue with the closest match you can find. The vertical and horizontal center rows on the chart are marked.

Next time, I'll tell everyone how to submit a photograph of whatever project they make from this chart, and I'll show the most interesting results on a future blog.

To download the free chart (in PDF format), just click this link.

Now my rose is your rose. May all of your roses be beautiful.
Annake

 Creative Commons LicenseThis post by Annake's Garden is licensed under a Creative Commons Attribution-NonCommercial-ShareAlike 3.0 Unported License.

Contact Us

Name

Email *

Message *

Blog Archive