Showing posts with label latchhook. Show all posts

Saturday, May 21, 2016

BUTTERFLIES, BUTTERFLIES, BUTTERFLIES!

latch hooked butterfly wall hanging
A reader recently wrote: “I love butterflies! Your wall hanging is so pretty! Thank you for the pattern. How do you go about designing and how do you make charts from your designs?”

I love butterflies, too! Thank you for the compliment, and you're most welcome for the pattern (March 21, 2016). It can be used for several types of needlework. You have asked about one of my favorite subjects — designing. Before I get started on a new design, I do research. I look at photographs of my subject, as well as scientific illustrations (if it is a living thing), paintings, even cartoons. Each photographer or artist sees and emphasizes something different in his or her pictures, so I get more details from looking at many sources. This photograph shows some of the things I looked at while I was considering butterflies.

butterfly samples pictured


I wanted butterflies of three different shapes and sizes for the wall hanging. Once I made my choices, I made enlarged cutouts of their shapes. To make the butterfly shapes show up even more, I glued them to sheets of dark blue paper.

butterfly silhouette on blue paper

Before I did that, however, I traced the butterfly outlines onto pieces of quarter-inch graph paper.

butterfly silhouette on graph paper

Then I made the squares of graph paper match the curves of the designs as well as I could — sometimes stopping just inside the butterfly outline, sometimes drawing just outside it. I marked the squares with letters or symbols representing the colors of the butterflies. Then I made a little “key” for each butterfly, telling what each letter or symbol represented.

butterfly pencil chart on graph paper

I then filled in a second graph paper silhouette for each with the colors of the butterfly, making small adjustments as needed. I used markers because the colors are more vivid, but colored pencils are easier to erase, so you may choose to use them. 

butterfly chart colored in

Then I used my paper patterns to make the latch-hook pictures. I chose colors of cut rug yarn that were the closest color matches for the marker shades. If I wanted to do the same designs in counted cross-stitch, I would start with graph paper that had much smaller squares so I could get much finer details into the picture.

latch hooked section done from colored chart

When we get a little time, I’ll ask J.D. to work his magic and turn my simple chart into a professional color-coded chart that you can download. Look for it in a future post.

Another reader commented:”You mentioned sewing tabs on the reverse applique butterfly (April 10, 2016). Can you show me what you meant?”

Certainly. Here is a  pictures of the finished butterfly ready for framing or to be prepared for hanging. I decided to make it a small wall hanging. The first thing I did was to cover the back of the entire rectangle with another piece of felt. This made it feel solid and caused it to hang straight and flat.

butterfly reverse applique

I then cut straight strips of the darkest color of felt, folded them in half, and sewed them to the back of the rectangle. I planned to glue wooden beads to a small-diameter wooden dowel and slip the beaded dowel through the felt tabs. Once I had it centered, I would have inserted a screw-in hanger into the top center of the dowel and it would have been ready to hang on the wall. However, I purchased a black wire hanger on sale from Herrschners.com that seemed just right for the butterfly. You can see the finished project below.

butterfly reverse applique with tabs and hanger
As you can see, this butterfly is not like any living species! Butterflies and moths have such intricate patterns that they stimulate the imagination. It is easy to dream of fantastic ones.


butterfly pillow top
Here is a picture of a fantasy butterfly made in French longstitch with back-stitched outlines, against a striped “sky” done in tent stitch. For more information about French longstitch, see the post for March 8, 2015. The piece was designed for a pillow top.
.

butterfly transparency in hoop
And for a butterfly that can really “fly” in an open window or doorway when there is a breeze, look at this little “Window Wonder”. For the directions to make one like it, see the post for April 29, 2015.

And, finally, a picture of a real, live butterfly, courtesy of J.D.'s sister, J.J., who is also an enthusiastic photographer.

Best wishes to butterflies and butterfly lovers everywhere,



colorful butterfly photo by jljardine

 Creative Commons LicenseThis post by Annake's Garden is licensed under a Creative Commons Attribution-NonCommercial-ShareAlike 3.0 Unported License.

Monday, March 21, 2016

Latch Hooked Butterflies for Summer, and a Pattern for You

Iris Wall Hanging
Iris Wall Hanging
Those of you who follow these posts regularly know that I like the theme of the Four Seasons. I have previously shown a latch-hooked snowflake wall hanging for Winter and provided a pattern for you to follow if you like (January 28, 2015). For Spring, I did a hanging with three iris flowers and gave you an iris pattern to do in colors of your choice (June 18, 2015). My choice for Summer was to do pictures of three butterflies. All are different species, so I have put a pattern for a ‘generic’ butterfly for you at the end of this article. The black or dark brown border is given and you can the fill in the wings with any colors you prefer.

First Latch-hooked Butterfly
First Latch-hooked Butterfly (bottom)
I have discussed latch-hooking before (June 16, 2013), and you may want to look at that post. On re-reading it, however, I thought of a number of suggestions and/or cautions that I would like to pass along to you. I have done so in this post. The best canvas for most latch-hook projects is a jute canvas. I have used the nylon mesh for soft projects like pillows and for items that have to be washed, but it is too fragile for rugs and most wall hangings. The best jute canvas is marked off with horizontal and vertical lines so that areas are outlined that contain 100 squares of mesh (10 squares x 10 squares). If you must use unmarked canvas, take the time to use a yardstick or meter stick and a permanent marker to put these lines on the canvas. It will make the placement of your designs much easier. The canvas is very sturdy, but it is also very rough on the surface. To protect my hands from this roughness, I wear crafting gloves with the ends of the glove fingers cut off. If you don't have such gloves, you may want to wear adhesive bandages (such as Band-Aid®) on the parts of your hands that come into contact with the canvas.

Second Latch-hooked Butterfly
Second Latch-hooked Butterfly (middle)
I begin my work at the bottom of the canvas and work upward one row at a time. As I make a row of knots, I examine each knot to make sure the two cut ends of the knot are even. If they are not, I pull gently on the shorter end until they are the same length. Sometimes I need to remove a knot. To do so, I press the cut ends upward against the unworked canvas and pull the loop of yarn at the bottom gradually until the knot releases. If the yarn is undamaged, I use it to re-make the knot; if it is damaged, I discard it. Once a row is complete, I use the back of my hook to press all the knots downward evenly. This gives me another opportunity to look for and correct imperfect knots. As the project grows long enough to come close to my knees, I want to protect it from any lint, dust, hair from the shop cat, etc., that might brush off of my clothing. For a wall hanging, I tape an open pillowcase or plastic trash bag to the edge of the work surface and slip the work in progress into it. When I'm working on a rug, I can keep a clean tablecloth spread across my knees.

Third Latch-hooked Butterfly
Third Latch-hooked Butterfly (top)
Once a section with a butterfly was completed, I took the time to put away the pattern for that butterfly and any yarns that I would not use again, I discarded damaged yarn. I brushed the loose fibers from the surface of the butterfly. To do this, I use the side of my hand or a soft hairbrush. I begin at the top center of the work and brush the surface of the work in long strokes to the edge of the canvas and off onto the worktable. I work my way to the bottom of the panel a few rows of knots at a time. Then I repeat the process from the center to the opposite edge. I'm always surprised by the amount of “fuzz” I need to remove! Then I clean the tabletop and check the floor for stray yarn. Finally, I put out the next pattern and the colors of yarn I will need to use for it. This keeps the table relatively uncluttered and puts everything within reach.

Back of First Butterfly
Once the design was completed, I turned the work over and examined the back of the canvas. I was looking for knots I might have missed or put into the wrong place in the pattern, damaged ones, and anything else that needed to be corrected. The tops and bottoms of wall hangings have the most stress on them. I fold these edges under for several rows of mesh and make the knots of yarn through both layers. You may do this with the sides, too, but it isn't really necessary. The raw edges can be turned under and sewn to the back of the finished knots. I back the finished hangings with felt, leaving enough of it at the top to make a pocket for a dowel or other type of hanger. J.D. then completes the hanger.
Now, here is a butterfly pattern that you can download for free and work in any colors. The pattern will also work for cross-stitch, tent stitch, blackwork and a number of other techniques. The outlined squares should be worked in black or very dark brown, unless you are doing a fantasy butterfly (in which case you should use your imagination). The bodies, marked with an X are usually some shade of brown or gray, but black also works well. The row of dotted squares indicates where the wings meet or overlap. If you are doing a solid-colored butterfly, you may want to do this row in black or dark brown to match your outline. If you are using different colors for the upper and lower wings, chose one or the other to do this row. (In Nature, the upper wing is the one more likely to overlap.)

May your summer be bright with butterflies,


Finished Butterfly Wall Hanging


 Creative Commons LicenseThis post by Annake's Garden is licensed under a Creative Commons Attribution-NonCommercial-ShareAlike 3.0 Unported License.

Thursday, June 18, 2015

An Iris Bouquet

group of bicolor irises
Last year we offered you A Big Bouquet of Roses (July 2, 2014). This year's “bouquet” is of irises, my favorite flowers. My mother used to call them “the poor man's orchids”. I have loved them since childhood and often make them the subject of my art and craft work. An example is this pink iris rug, shown below in a picture from our Gallery, from a few seasons ago. The design for the rug was based on a paper collage I did as a sample for fifth-grade students who were studying the work of the artist Georgia O'Keeffe. Following it are some more contemporary examples. We hope you enjoy them all.

iris latchhook rug
Iris latch hooked rug, after Georgia O'Keefe
Our second iris was done as an example of Assisi embroidery (May 21, 2014). The sample languished in our workshop for a while. Eventually the center area was filled in to make a conventional needlepoint picture, mounted and framed. Here are the two examples for comparison.

two versions of assisi iris design


iris needle arts chart
 Downloadable Iris Needle Arts Chart
 I liked the stencil effect in the first example; it became the inspiration for three irises on a latch-hook wall hanging. The pattern is a simple one, which could be used to represent any bi-color iris color combination. I used the number “2” to indicate the darker “falls” or lower petals of the iris flower and the number “1” to indicate the lighter “standards” or upright petals. There are irises, however, in which the standards are darker than the falls. This is just as easy to arrange without changing the pattern. You can even “invent” color combinations that don't exist in nature –- at least not yet. The number “3” represents the “beards” on the petals; these are usually yellow or orange. The number “4” represents a short segment of the iris stem and may be done in any shade of green. The open squares on the graph represent the background color. The pattern can be used for counted cross-stitch or needlepoint as well as for latch-hook. You can probably think of other uses as well. To download the pattern, just click on the picture's caption.

iris latch hook wall hanging
"Spring"
I used a medium green background. When the piece was finished, I didn't think the flowers showed well enough. I carefully removed a row of background knots from around all the petals. I outlined the lower petals of each flower with the color of the upper petals and the upper ones with the color of the lower ones. This made the flowers larger and they were more noticeable. If you plan to do this, it is a good idea to mark your pattern to show the changes before you begin the work. You may remember that, when I showed the snowflake design of the Winter wall hanging (January 28, 2015), I promised that a Spring wall hanging was in the process of development. Here it is, featuring three bright bi-color irises. Incidentally, the Summer piece in this Four Seasons collection is in the design phase now.

stained glass stitchery iris
Our feature on “stained glass” stitchery (March 8, 2015) produced two new projects. The first was a picture, shown in step-by-step photos as it was completed, of a blue iris done in the style of a stained-glass window panel. Here is the finished picture, mounted and framed.


The second project developed from a demonstration for transferring a design to dark fabric by stitching with white yarn or floss through a paper pattern (March 26, 2015). In this way, an iris design was transferred onto the front of a dark plum-colored sweatshirt. The original purpose was to show a simple method of transference with materials already present, rather than with commercial products. Once started, however, the outline just “begged” to be filled with stitches. J.D. calls this my “Cubist” iris. It isn't Cubist, of course, but I admit that it is rather abstract. Here is the decorated sweatshirt.


iris embroidered sweatshirt, with detail
Iris embroidered sweatshirt, with detail closeup

Last of all, here are two conventional needlepoint pictures featuring bi-color irises. By now you have probably decided that bi-colors are my favorites. You're correct! The round picture is from our first season of this blog (February 12, 2013 and May 16, 2013). The other one is currently a work in progress. I painted the picture onto needlepoint canvas before stitching it. A future blog post will be devoted to the subject of painting your own pictures onto canvases. I'm experimenting with a novelty yarn in the background of the picture which adds a “pebbled” texture to it.
 
Needlepoint irises

Now I will turn this post over to J.D. so that he can show you some of his favorite iris blossoms. I hope they will inspire you to use flowers in art or needlecraft projects of your own.

Remember to stop and smell the flowers,


photo collage of irises no.1

photo collage of irises no.2


 Creative Commons LicenseThis post by Annake's Garden is licensed under a Creative Commons Attribution-NonCommercial-ShareAlike 3.0 Unported License.

Wednesday, January 28, 2015

Let It Snow! -- Enjoy Snowflakes Indoors

Native American design latch hook wall hanging
Native American design wall hanging
When I make a latch-hook rug, I often have a strip of canvas left over that is not wide enough to make a pillow top but is too large for someone as frugal as I am to discard. I like to make these strips into small wall hangings like this Native American design that hangs in my living room. First, I work out my design in color on graph paper. I find the center of the canvas and mark the edges of what will be the finished design with a permanent marker. The raw edges of the canvas are covered with masking tape. Once the design is worked in latch-hook knots, the tape is removed and the raw edges are turned under. I overcast them to the back of the finished canvas, mitering the corners. Then I back the canvas with a strip of felt that matches one of the colors in the design, leaving enough felt at the top to make a pocket for a piece of wooden lattice or a dowel. The wood is cut to fit the pocket exactly and the ends are sanded. Finally, a small decorative metal hanger is screwed into the top center of the wood.

Latchhooked Snowflakes wall hanging
To make the snowflake hanging, I used a strip of canvas approximately 27 and 1/2 inches (70 centimeters) long and 11 inches (28 centimeters) wide. The design was worked in three continuous square panels. The top and bottom panels feature white snowflakes on a dark blue background, while the center panel has a dark blue snowflake on a white background. Each panel is 33 knots long and 33 knots wide, so the entire hanging is 33 knots by 99 knots. It required 9 packs (320 pieces each) of pre-cut white rug yarn and 7 packs of dark blue. (Quite a few pieces will be left over from the last blue pack.) The piece is backed with white felt, which is overcast to the turned-under edges of the rug canvas with buttonhole twist or another very strong thread.


Latchhook Snowflake Pattern
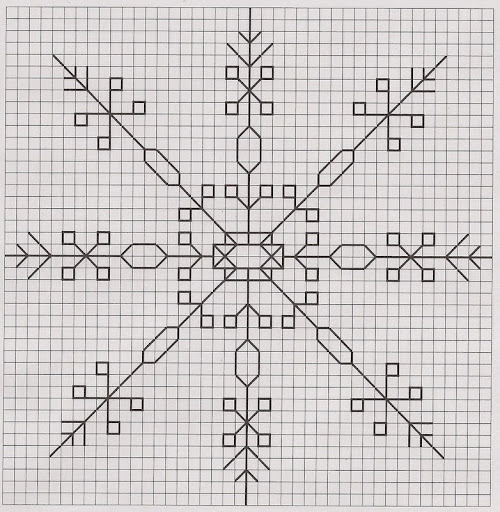
All three panels are worked from the same pattern. To download the pattern, just click on the picture titled “Latchhook Snowflake Pattern.” On this chart, the X's represent the snowflake and edging color, while the O's represent the background color. I have filled in the O's with color to make the design more visible, but remember that the colors reverse in the center panel. If you want to use the pattern to make a pillow top, you will need to make the border larger, put more rows of background between the snowflake and the border, or both. I recommend doing both. To make a small rug, repeat the pattern squares as in the diagram below. You might want to use another color (or colors) instead of the dark blue. Red, green, or violet would be just as attractive. Or you might make a three-panel hanging with white snowflakes on all three panels, but different colors in the backgrounds. The variations are limited only by your imagination.

Embroidered Snowflake centerpiece
Here is another way to bring snowflakes indoors without letting in any cold. This embroidered centerpiece is stitched in white floss on aqua and white checked gingham. The embroidery is done in blackwork patterned stitches done with white embroidery floss. This does not qualify as traditional “whitework,” because it does not involve drawn-thread work, pulled-thread work or cut-work, as our Scandinavian friends will be quick to point out. It is, however, a refreshing variation on conventional blackwork.

Embroidered Snowflake Pattern
Here's the pattern for the snowflake. To download it, just click on the picture titled “Embroidered Snowflake Pattern.” For the best effect, use an embroidery floss that has a high gloss or sheen. I backed the gingham with white interfacing, and stitched through both layers. This helps the piece hold its shape through many washings. Then a piece of plain white cotton fabric was placed face down on top of the finished embroidery and the embroidery and backing were stitched together, leaving a small opening through which the embroidered side was turned to the outside. The opening was sewn closed. If you want to add a lace edging to the piece, baste the lace to the backing with the lace face-up and turned toward the center of the backing. Leave a quarter-inch seam allowance. Stitch the layers together by hand or machine. When the embroidered side is turned to the outside, the lace will stand out all around. Close the opening, steam-press the centerpiece, and your work is done.

I gave one of the snowflake hangings (a slightly different one, entitled “Winter”) to my grand-daughter for Christmas. She liked it and hinted rather strongly that it would be nice if I would design “Spring”, “Summer” and “Autumn” hangings to go with it! I have begun the “Spring” one already, so you can expect a pattern and directions for it in a few weeks.

Enjoy your indoor snowflakes,

Annake signature


Closeup of one panel of Snowflakes wall hanging


 Creative Commons LicenseThis post by Annake's Garden is licensed under a Creative Commons Attribution-NonCommercial-ShareAlike 3.0 Unported License.

Monday, July 7, 2014

A Big Bouquet of Roses

scarlet rose bush
The background photo for our summer posts is of a lovely old scarlet rambler which overhangs three paths in our perennial garden, as well as a rustic bench where we can sit and admire it. When we bought this home thirty-five years ago, there was a dying tea rose at this spot in the garden. I found that it was grafted onto another root. (I recognized it because I had grafted young fruit trees with my dad.) I cut away the dying rose and decided to leave the grafted rootstock to see what it might be. Every summer since I have been rewarded with this beautiful and fragrant display. The flowers dry easily once they are past blooming and make a great base for potpourri.

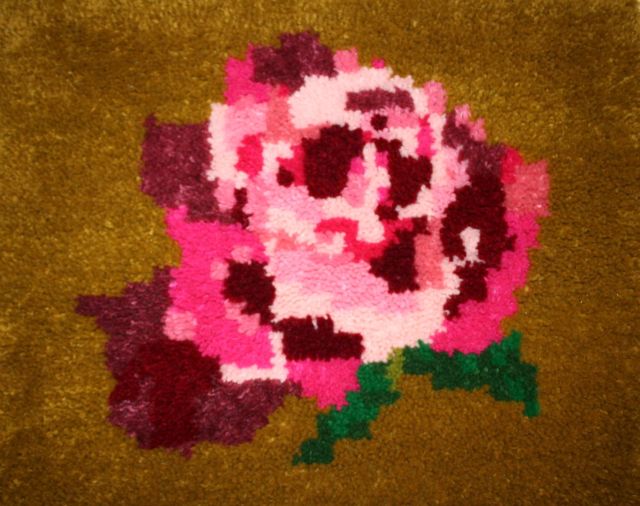
In the post for August 1, 2013, we offered a free rose pattern for you to download. I did samples in counted cross-stitch, conventional tent stitch, and latch-hook. Since then, I have done the same pattern in these media at different scales. The basic pattern has remained the same, while materials and color schemes have varied. All of the projects to date will be shown in this post. My purpose is two-fold: a) to show the results of widespread differences in scale; b) to show the versatility of a pattern that can be adapted for a wide variety of uses. The pattern was not always followed exactly, so you will see some differences in the finished works. Additional rose designs, not derived from the pattern, will also be shown, as well as photographs of some of the roses that were my inspirations. For those of you who missed the original pattern, you can download it by clicking on this link:  Rose Pattern Download.

cross-stitch rose on gingham
This sample was designed for an 18-inch (about 46-centimeter) square quilt block, but was destined to become a pillow top instead. It was done in counted cross-stitch with embroidery floss on quarter-inch checked gingham.

yellow needlepoint rose
The second sample from that post was this yellow rose done in tent stitch on #10 mono canvas with tapestry wool. The finished needlepoint is 9 inches x 11 inches (about 23 centimeters x 28 centimeters). A black, dark blue, or dark green background will enhance most rose designs.

Heritage rose rug
Also seen in that post was our Heritage Rose rug, a latch-hook rug with a central design based on the original pattern, but with each square in the original design represented by approximately four latch-hook knots. This was done on conventional rug canvas.

orange rose on monk's cloth
This picture shows an orange rose done in counted cross-stitch on monk's cloth with embroidery floss. The motif is 7 inches (18 centimeters) in diameter, not counting the frame. The off-white background works well with this vivid rose, but might not be as good for a paler one. This one made its debut in the post for April 30, 2014.

latch hook rose on quickpoint canvas
Here is another latch-hook rose (shown as a work-in-progress). This one is done on #5 quickpoint canvas. Each square on the pattern has a corresponding latch-hook knot. As shown here, the motif --- destined to become the center of a pillow top --- is currently 8 inches (about 20 centimeters) square. As you can see, the same pattern can be used in projects of various sizes, color schemes, and stitching techniques.

variegated needlepoint rose
This floribunda rose, first shown on July 15, 2013, was done in tent stitch on #14 canvas and then embellished with surface stitching. It is in the same size frame used for the orange rose above. We showed it along with the rose from our garden which inspired it, and the tutorial illustrated the steps I take when I convert one of J.D.'s or J.J.'s photos into an embroidery design. One of J.J.'s rose photos was featured on our last post, worked as a latch-hook pillow top on grospoint canvas (June 15, 2014).

framed assisi rose
Here is another floribunda rose done as Assisi work. The rose was outlined with gold craft thread, letting the monk's cloth background represent the petals. Then the background was filled in solidly with cross-stitches in red embroidery floss. It is 7 inches (18 centimeters) x 9 inches (23 centimeters). For more on Assisi work, see the post for May 21, 2014.

longstitch rose in progress
The final rose in our 'bouquet” is another work-in-progress. (Yes, there are a lot of those around my workshop!) It is a French long-stitch rose based on the newest hybrid tea rose in our garden. This one is named after singer Barbra Streisand and is a marvelous combination of purple, lavender, and pink. It is very pretty, even as it fades. Long-stitch is is a satin stitch technique, done with yarn on needlepoint canvas. The stitches may be made horizontally, vertically, or diagonally, and all three may be combined in the same piece of work. For more about long-stitch, see the post for November 3, 2013.

We will leave you with some of J.D.'s roses. We hope you enjoy this bouquet, sent to you with our compliments.


garden rose collage


 Creative Commons LicenseThis post by Annake's Garden is licensed under a Creative Commons Attribution-NonCommercial-ShareAlike 3.0 Unported License.

Contact Us

Name

Email *

Message *

Blog Archive