Showing posts with label snowflake. Show all posts

Monday, June 12, 2017

Conversations About Cross-stitch

Antique Lithuanian tablecloth, blue cross-stitch on white linen
Last week, I was standing by a table covered with needlework books and materials at a sale, and got involved in conversations with several ladies who were looking at the items on the table. I was surprised at how many questions and requests for advice were about cross-stitch. It reminded me that I hadn't discussed the technique in these posts for quite some time. Today I hope to remedy that situation. I have combined and reworded some of the questions, putting them in italics. But first, a little background information.

Assisi work butterfly on monks' cloth
Cross-stitch is a very old form of embroidery, probably used for more than 2,000 years. It is practically impossible to determine where and when it was first used because fabrics seldom survive for long periods. The stitch seems to have been “invented” a number of times, because it is present in ethnic embroideries almost worldwide. By medieval times, it was used in nearly every part of Europe, but also in Africa, Asia, the Near East and South America. Churches used it liberally for their linens and vestments, and royal courts used it for heraldic designs. It wasn't long before the technique spread to the village housewives, who used whatever fabrics and threads were available to them — even human hair. It was called “cushion work” in medieval times because of its widespread use in durable covers for chair seats, footstools, and kneeling mats. Here, in colonial times, it was so popular in ladies' samplers of their handiwork that it was known as “sampler stitch”. It combines nicely with other embroidery stitches and is particularly attractive in blackwork, redwork, whitework, Holbein embroidery and Assisi work.

Why do the stitches have to be done the same way?

It is a matter of light. Light strikes the upper and lower halves of the cross-stitch in different ways. This is most important when you are using glossy floss or metallic threads, but it is noticeable even with crewel wool or acrylic knitting worsted. When stitches are not all done the same way, the surface doesn't look even. People will probably not know why this is so, but they will notice it and think “Something just doesn't look right about that.” Besides, as my grandmother used to say, “Anything worth doing is worth doing well.” So take the trouble to cross all your stitches the same way. Perhaps the easiest way to do this is to put in all your bottom stitches in an area and then go back and put in all the top stitches, rather than making one cross-stitch at a time.

Does it matter which way you cross the stitches?

The English way to do this is to make the bottom half of the stitch from lower right to top left and the top half from bottom left to top right. The American and European way is to do the bottom half of the stitch from the bottom left to the top right and the top stitch from bottom right to top left. I work both ways, depending on where I start in the design. Left-handed stitchers may have a stronger preference for one way than right-handed stitchers. Try both ways and use whichever is mot comfortable for you. I don't think it makes any difference — so long as you do the same thing consistently throughout the whole piece of work!

Samples of two styles of cross-stitching

I have done a lot of cross-stitch, but sometimes I do areas I don't like. I've never been brave enough to take the stitches out and do them over. What is the best way to do that?

If there are a lot of stitches to remove, use very small, sharp scissors to clip each stitch on the right side of the fabric. Then use small tweezers to gently pull out the threads. Make a small pad of cellophane tape by wrapping it around your hand, sticky side out. To remove any “fuzz” from the area where the stitches were removed, pat the area gently with the pad of sticky tape. Turn the fabric over and do the same thing to that side in order to pick up any stray threads or fuzz. Then you should be ready to start over.

So far I have just done counted cross-stitch on things where the little X's are stamped on the fabric. Now I'd like to work from charts, but I don't know how to get started. What do you suggest?

Rose cross-stitched on 1/4 inch gigham


I like to see beginners start on one of two fabrics. The first is ¼-inch checked gingham because it is so much like graph paper and it is easy to match the checks to the squares in the charts. Also, by stitching into the four corners of each “check”, you will make equally-sized and equally-spaced cross-stitches.


Monks' Cloth
Monks' Cloth
The other fabric is monks’ cloth, which has evenly-spaced holes for the ends of your stitches. Either one should be backed with non-woven interfacing, muslin, even a man's handkerchief. This will support your stitches and help keep you from leaving them too loose or pulling them too tight. (Too loose leaves the stitches easily snagged; too tight pulls the whole design out of shape.)


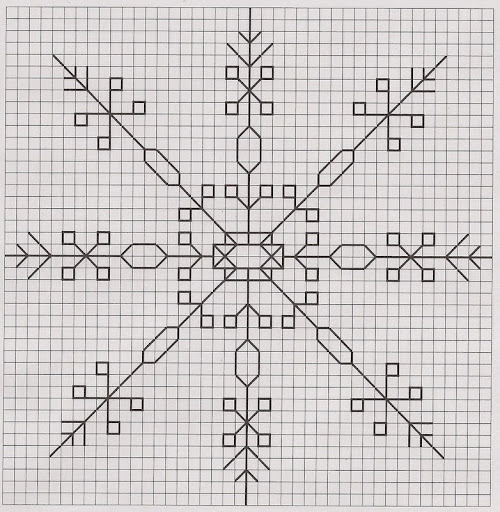
Downloadable cross-stitch snowflake pattern
Choose a simple pattern with only a few colors to begin with. Remember it will be larger on either the gingham or the monks' cloth than it would be on the even-weave fabric the pattern was probably designed for. Try it all in one color first, so that you only have to be concerned with the placement of the stitches. If you like the result, then work the design again in colors of your choice. Here's a simple pattern of mine that you may use in any way you choose. You can find others on these past blog posts: August 26, 2013, June 18, 2015, March 21, 2016 and January 1, 2017; or, use "Search My Blog" in the right hand column to find these and other downloads.

Is it harder to do needlepoint than cross-stitch (indicating a piece done in tent stitch)? I already know how to do cross- stitch. And can I do cross-stitch on needlepoint canvas?

It is actually easier to do the tent stitch because you only do half a cross stitch each time! I work in continental stitch. I consider the half-cross stitch used in most commercial kits an inferior stitch for several reasons. (Don't get me started!) But, if you use a better stitch when working with a commercial kit, you will run out of yarn halfway through the project.
Gros-point butterfly with tent stitch background
You can certainly do conventional cross-stitch on any even-weave canvas, including rug canvas. When you do this, it is called “gros-point”. You just have to remember that, instead of using the two “holes” in the canvas that you used in doing tent stitches, you need to allow for four “holes” for the top and bottom cross-stitches. This is a good technique both for beginners and for older women whose hands and eyes are not as good as they once were.

Do you have suggestions about working from patterns in books?

Here are a few:

a) Purchase a little more background fabric than the pattern calls for. You may eventually decide to use your finished project for a pillow top, quilt block, applique, etc. which requires seam allowances or margins to turn under. If you are using a different gauge of fabric than what they suggest, carefully count all the horizontal and vertical stitches to determine how much fabric you will need for the design and then add margins.

b) Buy an extra skein of floss or tapestry yarn in the most often used colors in the pattern — just in case you have to take out stitches — so you don't run out.

c) If you change colors or shades from those called for in the pattern, write the names or numbers of the ones you actually plan to use (lightly in pencil) on the pattern beside the ones you are replacing.

d) If you have trouble following a pattern, color the stitch squares in with colored pencils before you begin. That saves a lot of time and frustration!

colorful onion domes
Holbein embroidery featuring cross-stitch with other straight stitches
Stitch away!


 Creative Commons LicenseThis post by Annake's Garden is licensed under a Creative Commons Attribution-NonCommercial-ShareAlike 3.0 Unported License.

Tuesday, February 14, 2017

Winter Questions and Answers, 2017

snowflake cross-stitch pattern
A 'doodle' becomes a snowflake cross-stitch pattern
How do you develop complicated patterns like the A-B-C-D-E-F progression on the “Serendipity” post (January 15, 2017)?

I like to “doodle”; that is, to draw designs and little pictures while I take a coffee break, talk on the telephone, or watch television. A lot of people do that. The difference is that I like to do my drawing on a pad of graph paper, rather than on plain paper. I draw randomly until a combination of lines or shapes appeals to me. Then I start repeating that motif in different combinations. A geometric pattern just grows out from its center, as you saw in the example you mentioned. Curved designs are harder, as are realistic pictures, and may need to be be moved to plain paper for further development. I keep a lot of my “doodles” — even the ones that didn't turn out the way that I wanted them to do. I can always return to them, revise them, and improve them. If you are a “doodler” too, get a pad of graph paper and start working on patterns of your own. In the meantime, here is another progression (what a good name for it) that you might like. Instead of showing the steps separately, I have shown the steps in different colors, starting with a simple ‘X’ in a square.

Can the border at the top of the Serendipity blog be done in Swedish weaving?

I'm glad you asked that because it is something I hadn't thought about. It can't be duplicated exactly, and the pattern will not be as bold because it is done with floss instead of yarn, but a very similar pattern can be done and the positions and placements of the colors can certainly be duplicated. The needlepoint stitches are all slanted, while the weaving stitches may be straight stitches in any direction; they may even be looped stitches. The white background on the needlepoint must be filled with stitches. This is not necessary with the weaving, where the fabric background provides the white spacing. Finally, the weaving is done entirely on the surface of the fabric, while the needlepoint covers both the front and back of the canvas. You can see my pattern below. I really like the result. It would be attractive as a border or as repeated stripes on something like an afghan. I hope you like it as much as I do. Since you asked about Swedish weaving, I assume you are familiar with the technique and have probably used it. If not, you might want to read the posts for March 11, 2016; March 31, 2016; and October 31, 2016.

Swedish weaving sample
Swedish weaving sample, after the needlepoint from the "Serendipity" post


For those of you who like step-by-step directions for this pattern, those will be in a post in early March, after our annual anniversary post. We have had so many good questions and requests for additional help that we will need to do a special “Question and Answer” post to cover all of them. I'm so pleased when I can give additional help. Just keep watching for it.

I like the little animals at the bottom of the Serendipity article, but I don't understand how I am supposed to embroider them??? HELP!

Little animal cross-stitch patterns
First, let me “translate” them into cross-stitch patterns with back-stitch borders. Each square in the original design represents a cross-stitch (X) or a half cross-stitch (/ or \). A quarter cross-stitch extends from a corner to the middle of the stitch area. Because white pencil does not scan well, the white stitches are drawn in standard pencil. Refer to the original pictures for more information. Work all full, half, and quarter cross-stitches — including ones in black — before beginning the back-stitch outlines, which are done in black. If you embroider the designs on monks' cloth, Aida, or any even-weave fabric, they will be smaller than they appear on these charts. The smaller they are, the fewer strands of floss should be used.

Tip: The eyes of the owl are done in horizontal stitches or satin stitch. The beak may also be done in satin stitch. The nostrils are tiny French knots. The cat is shown in gray, but could just as easily be white, black, orange, yellow, or brown. Whiskers might be added in single strands of black or white thread.

For those of you who wanted additional help with doing the animals in needlepoint, that will be given in the March post also.

Do four-way designs have to be geometric designs?

The short answer is: Certainly not! The long answer is: an upcoming blog post for mid-March! I hope quilters and those of you who do pencil-and-paper art will enjoy this one as much as needlepointers and embroiderers. There is a "teaser" below.

Stitch away,


penguin 4-way design
A distinctly non-geometric four-way design

 Creative Commons LicenseThis post by Annake's Garden is licensed under a Creative Commons Attribution-NonCommercial-ShareAlike 3.0 Unported License.

Wednesday, January 28, 2015

Let It Snow! -- Enjoy Snowflakes Indoors

Native American design latch hook wall hanging
Native American design wall hanging
When I make a latch-hook rug, I often have a strip of canvas left over that is not wide enough to make a pillow top but is too large for someone as frugal as I am to discard. I like to make these strips into small wall hangings like this Native American design that hangs in my living room. First, I work out my design in color on graph paper. I find the center of the canvas and mark the edges of what will be the finished design with a permanent marker. The raw edges of the canvas are covered with masking tape. Once the design is worked in latch-hook knots, the tape is removed and the raw edges are turned under. I overcast them to the back of the finished canvas, mitering the corners. Then I back the canvas with a strip of felt that matches one of the colors in the design, leaving enough felt at the top to make a pocket for a piece of wooden lattice or a dowel. The wood is cut to fit the pocket exactly and the ends are sanded. Finally, a small decorative metal hanger is screwed into the top center of the wood.

Latchhooked Snowflakes wall hanging
To make the snowflake hanging, I used a strip of canvas approximately 27 and 1/2 inches (70 centimeters) long and 11 inches (28 centimeters) wide. The design was worked in three continuous square panels. The top and bottom panels feature white snowflakes on a dark blue background, while the center panel has a dark blue snowflake on a white background. Each panel is 33 knots long and 33 knots wide, so the entire hanging is 33 knots by 99 knots. It required 9 packs (320 pieces each) of pre-cut white rug yarn and 7 packs of dark blue. (Quite a few pieces will be left over from the last blue pack.) The piece is backed with white felt, which is overcast to the turned-under edges of the rug canvas with buttonhole twist or another very strong thread.


Latchhook Snowflake Pattern
All three panels are worked from the same pattern. To download the pattern, just click on the picture titled “Latchhook Snowflake Pattern.” On this chart, the X's represent the snowflake and edging color, while the O's represent the background color. I have filled in the O's with color to make the design more visible, but remember that the colors reverse in the center panel. If you want to use the pattern to make a pillow top, you will need to make the border larger, put more rows of background between the snowflake and the border, or both. I recommend doing both. To make a small rug, repeat the pattern squares as in the diagram below. You might want to use another color (or colors) instead of the dark blue. Red, green, or violet would be just as attractive. Or you might make a three-panel hanging with white snowflakes on all three panels, but different colors in the backgrounds. The variations are limited only by your imagination.

Embroidered Snowflake centerpiece
Here is another way to bring snowflakes indoors without letting in any cold. This embroidered centerpiece is stitched in white floss on aqua and white checked gingham. The embroidery is done in blackwork patterned stitches done with white embroidery floss. This does not qualify as traditional “whitework,” because it does not involve drawn-thread work, pulled-thread work or cut-work, as our Scandinavian friends will be quick to point out. It is, however, a refreshing variation on conventional blackwork.

Embroidered Snowflake Pattern
Here's the pattern for the snowflake. To download it, just click on the picture titled “Embroidered Snowflake Pattern.” For the best effect, use an embroidery floss that has a high gloss or sheen. I backed the gingham with white interfacing, and stitched through both layers. This helps the piece hold its shape through many washings. Then a piece of plain white cotton fabric was placed face down on top of the finished embroidery and the embroidery and backing were stitched together, leaving a small opening through which the embroidered side was turned to the outside. The opening was sewn closed. If you want to add a lace edging to the piece, baste the lace to the backing with the lace face-up and turned toward the center of the backing. Leave a quarter-inch seam allowance. Stitch the layers together by hand or machine. When the embroidered side is turned to the outside, the lace will stand out all around. Close the opening, steam-press the centerpiece, and your work is done.

I gave one of the snowflake hangings (a slightly different one, entitled “Winter”) to my grand-daughter for Christmas. She liked it and hinted rather strongly that it would be nice if I would design “Spring”, “Summer” and “Autumn” hangings to go with it! I have begun the “Spring” one already, so you can expect a pattern and directions for it in a few weeks.

Enjoy your indoor snowflakes,

Annake signature


Closeup of one panel of Snowflakes wall hanging


 Creative Commons LicenseThis post by Annake's Garden is licensed under a Creative Commons Attribution-NonCommercial-ShareAlike 3.0 Unported License.

Contact Us

Name

Email *

Message *

Blog Archive