 |
| Native American design wall hanging |
When I make a latch-hook rug, I often have a strip of canvas left over that is not wide enough to make a pillow top but is too large for someone as frugal as I am to discard. I like to make these strips into small wall hangings like this Native American design that hangs in my living room. First, I work out my design in color on graph paper. I find the center of the canvas and mark the edges of what will be the finished design with a permanent marker. The raw edges of the canvas are covered with masking tape. Once the design is worked in latch-hook knots, the tape is removed and the raw edges are turned under. I overcast them to the back of the finished canvas, mitering the corners. Then I back the canvas with a strip of felt that matches one of the colors in the design, leaving enough felt at the top to make a pocket for a piece of wooden lattice or a dowel. The wood is cut to fit the pocket exactly and the ends are sanded. Finally, a small decorative metal hanger is screwed into the top center of the wood.
 |
| Latchhooked Snowflakes wall hanging |
To make the snowflake hanging, I used a strip of canvas approximately 27 and 1/2 inches (70 centimeters) long and 11 inches (28 centimeters) wide. The design was worked in three continuous square panels. The top and bottom panels feature white snowflakes on a dark blue background, while the center panel has a dark blue snowflake on a white background. Each panel is 33 knots long and 33 knots wide, so the entire hanging is 33 knots by 99 knots. It required 9 packs (320 pieces each) of pre-cut white rug yarn and 7 packs of dark blue. (Quite a few pieces will be left over from the last blue pack.) The piece is backed with white felt, which is overcast to the turned-under edges of the rug canvas with buttonhole twist or another very strong thread.
All three panels are worked from the same pattern. To download the pattern, just click on the picture titled “Latchhook Snowflake Pattern.” On this chart, the X's represent the snowflake and edging color, while the O's represent the background color. I have filled in the O's with color to make the design more visible, but remember that the colors reverse in the center panel. If you want to use the pattern to make a pillow top, you will need to make the border larger, put more rows of background between the snowflake and the border, or both. I recommend doing both. To make a small rug, repeat the pattern squares as in the diagram below. You might want to use another color (or colors) instead of the dark blue. Red, green, or violet would be just as attractive. Or you might make a three-panel hanging with white snowflakes on all three panels, but different colors in the backgrounds. The variations are limited only by your imagination.
 |
| Embroidered Snowflake centerpiece |
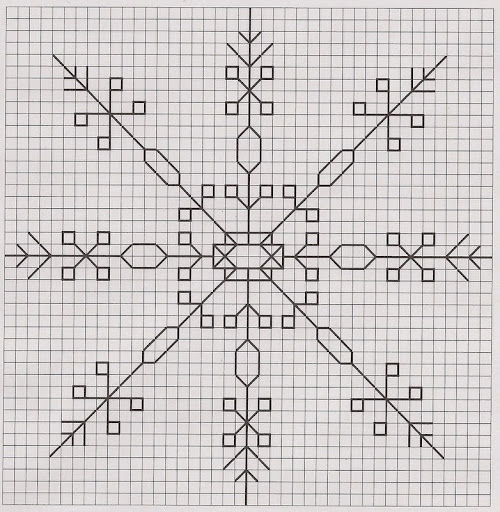
Here is another way to bring snowflakes indoors without letting in any cold. This embroidered centerpiece is stitched in white floss on aqua and white checked gingham. The embroidery is done in blackwork patterned stitches done with white embroidery floss. This does not qualify as traditional “whitework,” because it does not involve drawn-thread work, pulled-thread work or cut-work, as our Scandinavian friends will be quick to point out. It is, however, a refreshing variation on conventional blackwork.
Here's the pattern for the snowflake. To download it, just click on the picture titled “Embroidered Snowflake Pattern.” For the best effect, use an embroidery floss that has a high gloss or sheen. I backed the gingham with white interfacing, and stitched through both layers. This helps the piece hold its shape through many washings. Then a piece of plain white cotton fabric was placed face down on top of the finished embroidery and the embroidery and backing were stitched together, leaving a small opening through which the embroidered side was turned to the outside. The opening was sewn closed. If you want to add a lace edging to the piece, baste the lace to the backing with the lace face-up and turned toward the center of the backing. Leave a quarter-inch seam allowance. Stitch the layers together by hand or machine. When the embroidered side is turned to the outside, the lace will stand out all around. Close the opening, steam-press the centerpiece, and your work is done.
I gave one of the snowflake hangings (a slightly different one, entitled “Winter”) to my grand-daughter for Christmas. She liked it and hinted rather strongly that it would be nice if I would design “Spring”, “Summer” and “Autumn” hangings to go with it! I have begun the “Spring” one already, so you can expect a pattern and directions for it in a few weeks.
Enjoy your indoor snowflakes,

 |
| Closeup of one panel of Snowflakes wall hanging |
 This post by Annake's Garden is licensed under a Creative Commons Attribution-NonCommercial-ShareAlike 3.0 Unported License.


No comments :
Post a Comment
Post a New Comment Below -- We Love Feedback !!!