Showing posts with label Aida cloth. Show all posts

Thursday, March 31, 2016

Swedish Weaving: Part II

Swedish weaving example
Vintage Swedish weaving example
Here is another example of Swedish weaving or huck embroidery. It is worked selvage-to-selvage on pale pink huck toweling in red and shades of violet embroidery floss. It could easily have been done with other materials, such as cotton crochet thread or fine acrylic yarn. As you can see, the patterns of spires are worked alternately in both directions. A square this size is suitable for a decorative pillow top.


Below are more patterns done on huck toweling. Some are linear, while others are all-over designs. You can repeat elements of a design indefinitely to make wider borders or cover larger pieces of fabric. You can also combine elements of two or more designs to make a more intricate design. Try several. Who knows? You may come up with a unique design of your own.

Swedish weaving on huck
Sampler, Swedish weaving on huck


If you don't have appropriate fabric on which to practice your stitches, try doing them on plastic canvas. Look closely at the samples of pattern darning shown below. See how the two exposed bars of plastic resemble the two “floats” on the huck fabric? Note how this very simple design changes when you do it in one, two, or three colors. You can practice many linear designs on plastic canvas. Your samples will be durable and easy to file for future reference. Also, it is easy to pull the yarn out if you make a mistake. Diagonal designs are more difficult, but many can be done with a little practice.

Simulating Swedish weaving on plastic canvas


Swedish weaving on Aida cloth
Sampler, Swedish weaving on Aida cloth
In the first post of this series, I mentioned in the introduction that this type of embroidery could be done on a number of fabrics other than huck toweling. My first choice for this would be Aida cloth. The fabric seen here is #14 Aida, the most popular and readily available kind. It comes in a large range of colors. It is most commonly used for counted cross-stitch, but is useful for a number of other techniques. The set of stitch patterns on this piece of gold Aida were adapted from samples used in describing Holbein embroidery. Be careful with the pattern done in orange: it is more difficult than it seems.

Needle technique on Aida cloth
To make the stitches, run the tip of your needle under the small squares made by the weave of the Aida cloth, just as you would under the “floats” of the huck. Some needleworkers recommend that you pick up only the center pair of threads in each square, to make it more like picking up the huck “floats”. You may want to try this for yourself. At this small scale, I prefer to pick up the entire square of four threads. The fabric is double-layered, allowing you to keep all your stitches on the surface of the fabric as you do with huck. It takes some practice, however, to pick up only the top layer of threads, leaving the bottom layer undisturbed. It is important to keep your stitches level as you do repeat motifs like the stepped diamonds done in green on the gold Aida. Because the squares on the Aida cloth are so small, it is easy to accidentally move up or down and stitch in the wrong row. I use my needle as a “pointer” to check that my stitches are in their correct row. I check both horizontally and vertically. Now I would like to revisit two of the patterns from the first post in this series.

Swedish weaving pattern with large open spaces
Patterns like this, which leave part of the background exposed, are very useful for adding monograms or names to towels, linens, inserts for clothing, etc. Just embroider a single letter in each open space, using your choice of embroidery stitches. Words, too, can be decorative — particularly when framed. Some years ago it was quite popular to place colorful and decorative signs everywhere, encouraging everyone to “THINK!” Perhaps that is an idea whose time has come again. Why not do it in embroidery? A future post will be on the subject of the decorative possibilities of words.

Here is another simple open-work pattern which can be adjusted to the size you desire simply by adding or subtracting stitches. It could be used for words, phrases, or even entire signs. Place punctuation marks in the same spaces with the letter they precede or follow. Another use for this type of space is to frame tiny cross-stitch or other embroidery motifs (like the Holbein “doodles” you can download from the August 20, 2014 post).

Simple pattern for framing
Simple pattern to use for "framing"

Stitch away!


 Creative Commons LicenseThis post by Annake's Garden is licensed under a Creative Commons Attribution-NonCommercial-ShareAlike 3.0 Unported License.

Friday, March 11, 2016

Introducing ... Swedish Weaving!

As Annake promised in our 3rd anniversary post, here is the first in a series of tutorials on Swedish weaving (huck embroidery)

Vintage Swedish weaving sample
This type of needlework (there is also a type of loom weaving with the same name) goes back at least as far as the 1600s. It was widespread in Europe, but probably is called "Swedish" because the best surviving samples of it may be found in Swedish museums. It has many names, including Nordic weaving, huck embroidery, and huck weaving — which is what it was called when I learned to do it. It was very popular in the 1920s and 1930s and has come back into fashion several times since then. The latest surge in popularity has been for monks' cloth afghans; but that is quite an undertaking for a beginner, so I'm going to focus on smaller projects like linens, pillows, framed decorations and decorative inserts for clothing.

The “huck” in huck weaving comes from huckaback, a type of linen woven with loose surface threads called ‘floats’. The embroidery is done on the surface of the work and does not go through to the back of the fabric. Huck toweling is still the best fabric for this kind of work. Unfortunately, it is not easy to find it and it is expensive. It customarily comes in white or cream color. Here is a close-up of huck toweling showing how a blunt-pointed needle (so you don't split the float threads) is used to lift the pairs of floats. Needles with long, narrow eyes are preferred, because they don't pull the floats out of shape in the way needles with rounder eyes do.

sample with blunt needle

Many other fabrics may be used, as long as you can count the threads and lift them with your blunt-pointed tapestry needle. One of the best is Aida cloth, which is available in several gauges from many sources, and comes in a wide variety of colors. Monks' cloth comes in a few gauges and is commonly available. It also comes in a wide variety of colors. However, it is loosely woven, so it must be pre-washed because it shrinks and pre-hemmed because it frays. Also, some of the dyed versions are garish and the dye is uneven; examine them carefully before you buy them. I have discussed monks' cloth in previous posts (see the posts for February 27, 2014 and April 30, 2014). If you have been practicing embroidery chain stitches with me, you may be able to use the same practice material for this weaving. Below is a sample of it done on decorator burlap.


There are a number of pattern books and teaching DVDs on this subject available in shops and online. These are expensive and many of the patterns are confusing. Check with your nearest library to see if you can check out the books or order them through inter-library loans before you purchase them. Also check the back issues of the library's needlework and craft magazines for useful illustrated articles. I'm assuming that you would prefer not to spend a large sum on a craft which you may decide you don't want to pursue, so I will suggest inexpensive alternatives. If you are a regular reader, you know that my intention is to show you basic stitches and patterns like the ones below and to encourage you to to go ahead to develop your own designs. If you decide you really like the technique, then is the time to invest in materials, books, DVDs, and so forth.

Sampler of traditional huck weaving stitches
A sampler of some traditional huck weaving stitches
The most basic stitches in this technique are straight horizontal and diagonal ones. You can make a number of patterns using these alone. Diagonal stitches can move either up or down and either backward or forward. Even the simplest lines of horizontal stitches make an attractive border if they are done in a pleasing arrangement of bright colors or graduated tones of the same color. Each line is identical to the one before it, so you can follow easily and the pattern develops quickly. The patterns are traditionally worked from right to left, but will work equally well from left to right for left-handed people. I often work one row one way and the next row the other way. Although I usually prefer to do embroidery with a hoop, these linear patterns are easier to do without a hoop. Click on the sample patterns below and enlarge them to make them easy to understand. Remember that your thread or yarn should lie lightly on top of your fabric. Do not pull your stitches tight and distort the material.

More simple huck weaving samples
More simple huck weaving samples on Aida cloth
Do you want an easy way to make your borders more interesting? Just double the pattern. Put in a pattern as you have practiced. If it starts with a baseline and reaches upward, turn your fabric 180 degrees. Repeat the pattern. You may want the two straight sides to join, or you may want to leave one or more unworked rows of thread in the middle, or to put in a row or two of running stitches in a contrasting color. If the pattern starts with a baseline and reaches downward, turn the fabric 180 degrees and do the pattern again, deciding whether to join the two halves together or to separate them with running stitches or a small amount of space. The examples below show how this is done. Experiment with other patterns you have learned.

simple stitch pattern repeated two different ways
A simple stitch pattern, repeated two different ways
We are going to concentrate on stitches and simple patterns for a while; later we will discuss preparing the materials, beginning and ending rows of stitching, estimating the amount of thread for a single row of stitches, finishing the edges of projects, etc. I will show you more patterns, done on Aida, monks’ cloth, decorator burlap, and so forth so you can compare them.

Be creative,


 Creative Commons LicenseThis post by Annake's Garden is licensed under a Creative Commons Attribution-NonCommercial-ShareAlike 3.0 Unported License.

Wednesday, April 30, 2014

Finer Counted Cross-Stitch — Making the Transition

blue snowflake cross-stitched on white linen
Traditional counted cross-stitch on plain white linen
The cross-stitch is an ancient and venerable stitch. It can be traced back at least to the Byzantine Empire, founded about 300 AD (or CE, if you prefer). It probably spread northward from the Black Sea region along big rivers like the Dnieper, used both as a pattern stitch on its own and as a filling stitch with other forms of embroidery, such as white-work and pulled-thread work. It was used widely in western Russia, the countries that bordered Russia on the west, the Baltic republics, Germany, Holland and Scandinavia. It came early to colonial America, where it was used primarily for linens and in decorative samplers. Indeed, it is sometimes called “sampler stitch”. (For more on cross-stitch, see the post for Aug. 26, 2013.)

butterfly cross-stitch pattern in transfer pencil on graph paper
Our pattern done in transfer pencil on 1/4" graph paper
In the 20th Century, cross-stitch — which had always been done by counting threads in even-weave fabrics — became widespread when patterns that could be transferred by ironing them onto fabrics became readily available. There was no need to count threads; just stitch over the printed X's, which would disappear when the fabric was laundered. If you want to make this kind of pattern yourself, it's easy to do. Use a well-sharpened hot-iron transfer pencil to draw your design in red X's on graph paper. Go over each X a few times so it will transfer easily. Remember that the design will be reversed on the cloth once it is ironed on, so letters should be done in reverse on the graph paper. (For more on making iron-on transfers, see the post for Oct. 6, 2013.) This pattern would be a nice size for a pillowcase, table runner, or the back yoke of a blouse. Patterns can be used more than once; I file mine to use as charts for other projects.

orange rose cross-stitched on white monk's cloth
Orange rose cross-stitched on white monk's cloth
In the second half of the 20th century, counted cross-stitch once again became popular. Books of patterns that enabled stitchers to make detailed, realistic pictures were printed. New even-weave fabrics became available in a broad range of colors and thread-counts. (The larger the number on the fabric, the finer the weave and the smaller the stitches; the smaller the number, the larger the scale of the embroidery and the fewer stitches per square inch.) Today, counted cross-stitch is as popular as ever. This rose is cross-stitched on monks' cloth using the pattern from the Aug. 1, 2013 post.

closeup of natural colored mok's cloth
Natural colored monk's cloth
I believe those of you who are beginners, learning counted cross-stitch on gingham, as well as those of you who are experienced cross-stitchers who have never tried monk's cloth, are in for a treat. It is a sturdy cloth woven so that it appears as all-over small squares of woven thread, each with a tiny opening at its corners. Since you use these little holes to space your stitches, just as you did with the corners of the squares of gingham, it makes the transition to plain fabrics very easy. If you have given up on cross-stitch because Aida cloth or even-weave fabrics are too difficult to see easily, you should find that projects on monk's cloth are easier to see and quick and easy to stitch. If you have only used white, ecru, or natural monk's cloth, you will be pleased to know that it is now available in as wide a range of colors as Aida cloth. (For more about monk's cloth, see the blackwork blog post of Feb. 27, 2014.)

butterfly cross-stitched in blues on white monk's cloth
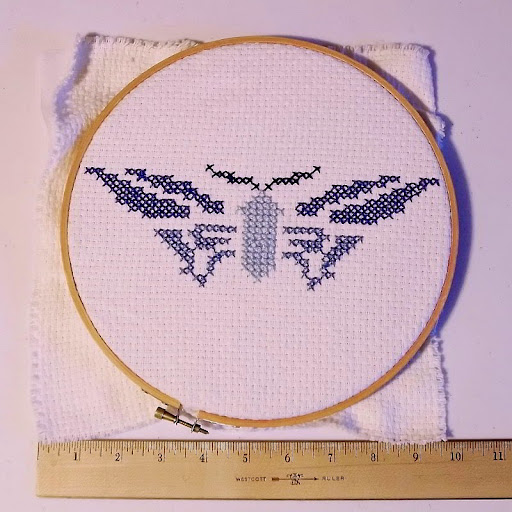
Our "butterfly" cross-stitched in blues on white monk's cloth
Cross-stitch designs may be worked on monk's cloth in either tapestry yarn or embroidery floss (rayon, linen, cotton or silk). Monk's cloth has approximately 7 stitches per inch (49 stitches per square inch), so you may need to separate the strands of yarn or floss. Experiment on a scrap of fabric to see how many strands give you the coverage and appearance that you desire. I find that one or two strands of tapestry yarn and three to six strands of most kinds of floss work well for me at this scale, but you must find what works best for you. The preparation of the fabric and the technique of the stitching are just the same as for any other cross-stitch project. Here is the pattern above, worked in four shades of blue on monks' cloth using a single strand of J&P Coats™ craft thread.

Aida cloth in different colors and thread counts
Once you have some experience with monk's cloth, you may want to move on to Aida cloth. The technique is the same, for there are still little openings at the corners of the squares. The big difference is one of scale. The most popular gauge of Aida is #14. This is readily available and comes in many colors, including black. The scale is comparable to #14 mono needlepoint canvas. The stitches will be much smaller than the ones you used on the monk's cloth (nearly 200 per square inch, as compared to about 50.) The finished motif, worked from identical charts, will be much smaller on the Aida as well. For this reason, you will be able to produce very fine details. From #14, the weave and the scale get finer and finer: #16, #18, # 20, etc. Eventually the fabric gets so fine that only a single strand of thread can be used. 

butterfly stitched on #11 flax Aida cloth
Butterfly stitched on #11 flax Aida cloth
My local variety store also carries #11 Aida. This is my favorite because it works up much like #10 mono needlepoint canvas, which I use all the time. Therefore, I can easily visualize the finished project before I begin stitching. There is an Aida #11 flax in a lovely natural tan. It is firm and pleasant to work on. The edges fray very little and it does not require a backing fabric. The finished embroidery requires little or no blocking. It can be hand-washed gently in warm, soapy water, with no bleach, rinsed, and pressed on the reverse side with a warm iron. It works especially well as a background for embroidering plants or animals. Here's our little flier again, worked in a single color on # 11 Aida flax, using three strands of six-strand embroidery floss.

butterfly in multiple colors on #14 cream Aida cloth
Our pattern in multiple colors on #14 cream Aida cloth
I worked the next sample on a cream-colored piece of #14 Aida. I worked in several colors, using two strands of six-strand embroidery floss and a single strand of craft thread for the light lines on the body. Once I had made the complete pattern used in the other two samples, I filled in the rest of the outline with a darker color of floss. Although the pattern was not designed to represent any living species, I think the little creature looks pretty realistic. At this scale, many people have reached the bottom limit of their vision, where they can discern individual cross-stitches as X's with their naked eyes. It is this use of tiny, closely packed stitches which makes realistic renderings possible. Aida cloth is not inexpensive. I recommend that beginners purchase a small packaged piece in white, antique white, ivory or a pastel. It is easier to see the open spaces in the fabric and your stitches show up well.

butterfly embroidery samples shown together
Today's butterfly embroidery samples shown together for comparison
Have fun!


butterfly on monk's cloth in Assisi technique
Butterfly on monk's cloth in Assisi technique: subject of a future blog!

 Creative Commons LicenseThis post by Annake's Garden is licensed under a Creative Commons Attribution-NonCommercial-ShareAlike 3.0 Unported License.

Contact Us

Name

Email *

Message *

Blog Archive