Showing posts with label landscapes. Show all posts

Thursday, May 14, 2020

Trees in Art and Design

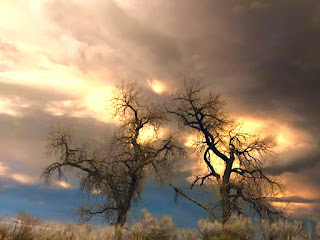
Bare trees against stormy sky
"Incoming Storm," photo by J.J.
Many trees change form drastically as they mature and age, sculpted by wind and weather.  A dwarfed, twisted tree at timberline can give real drama to a mountain scene. Some trees define the seasons. Last autumn we were in the high country, photographing the glorious colors of aspens and scrub oaks against the darker evergreens.

I like to study deciduous trees in the winter when their basic skeletal structure is most evident. Then I revisit the trees in the other seasons, sketching or photographing them to understand how that skeleton supports the masses of their leaves. Fruit trees are especially interesting because they have a flowering stage — often before any leaves have formed — and provide attractive backgrounds when the fruit is ripe. If I understand the way a tree is growing, I can anticipate where the masses of foliage are going to be once they develop.
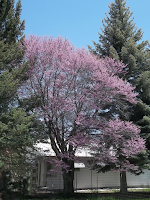
Fruit tree in bloom
Ornamental fruit tree in bloom
Trees are, of course, vital to many landscape compositions in graphic arts and needle arts, but they can compliment many other types of composition. For example, they can contribute in many ways to photography: to enhance an outdoor wedding or family picnic, as backgrounds for pictures of animals that use them for food and shelter, to soften the lines of street scenes or individual buildings, etc. One way to change a potential landscape or a picture with houses, for example, is to move the surrounding trees into different positions.


Click here to Download
Here is a quick watercolor study of a palm tree that I made many years ago in Panama. Imagine that you can "borrow" my palm tree. What do you see beneath it? An abandoned beach ball? A picnic lunch? A sunbather stretched out on a blanket? An animal digging in the sand for turtle eggs? See how a single tree can stimulate your imagination? Download the tree. Make a sketch of what you would include or look for a photograph that you could adapt.

Here are some things to consider when looking at trees. Study the patterns created by the direction of the light. If the sun shines directly on the tree from the front, which parts of the tree are darkest and lightest? What sorts of patterns are created around the tree? Where do the shadows fall? How do these things change when the trees are lit by light coming from behind them? (Sometimes it helps to half-close your eyes to really distinguish the masses of dark and light.)  If you are sketching the tree, put in the masses of middle value first. Then concentrate on the lighter and darker masses. Trees do not grow out of the ground like fence posts. Include the roots and the spread of the tree toward the roots in your study (sketch) of the tree. If you are doing a picture that includes a group of trees, remember that distance tends to add gray to more distant objects and try to make the farthest trees less distinct than those in the foreground.
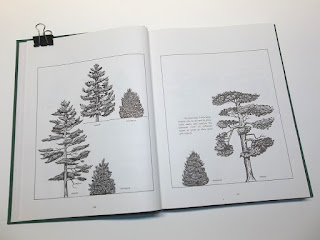
Landscaping tree book
I have, as a prized possession, a book written in 1983 specifically for landscape architects and nurserymen. It shows detailed drawings of trees and shrubs commonly used for those purposes. The pictures are all drawn to the same scale, so that you can make combined groupings and be sure that they would look natural together (in a park or garden, for example). It is also possible to enlarge a tree — or even part of a tree — to show how it would look beside or behind a building. You can also enlarge foreground trees and reduce background ones to show realistic perspective. Remember that distance not only makes trees look smaller. It also makes them look paler.
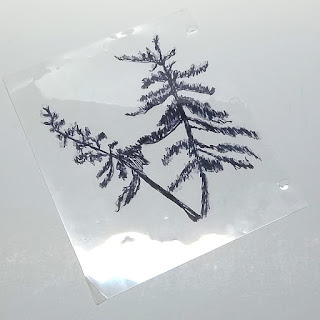
Transparency of an  evergreen
One of Annake's transparencies
Finally, the trees can be copied on clear overlays,  and be superimposed one on another. Although my book is probably long out of print, comparable photographs or drawings can be found in library books or online. Look for such topics as Forestry, Trees of <insert your country, region, continent, or the World>, Landscaping, or Ornamental Trees.

Here is a simple way to determine whether a tree might enhance your picture. When you have your photograph or sketch well organized, place a clear plastic overlay of the tree shape you are considering on top of it. This doesn’t have to be a detailed picture of the tree, just its general shape and growth pattern. You would be surprised, for example, how many shapes different kinds of evergreens can take. I have built up a collection of such overlays that I keep in a file folder. Because they are transparent, I can move them into any position I want on top of my sketch, reverse them, show only a portion of the tree, etc. Move a tree that blocks the view of a building to behind the building. You will still have its shape as a point of interest in the composition, but it will no longer overshadow the building or hide interesting architectural features. Even a single branch can have a big impact as you can see in this  needlepoint picture.
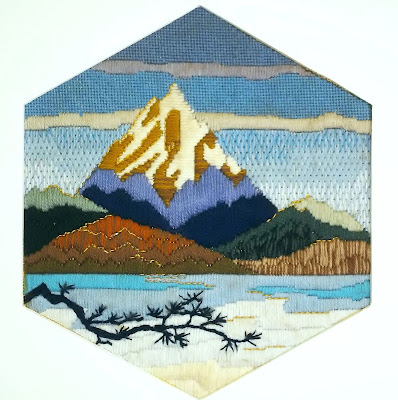
Cascades needlepoint by Annake
"Cascades," needlepoint by Annake

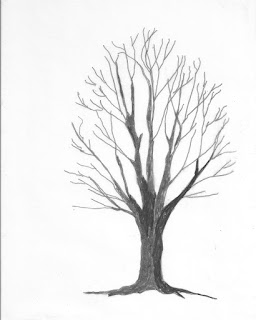
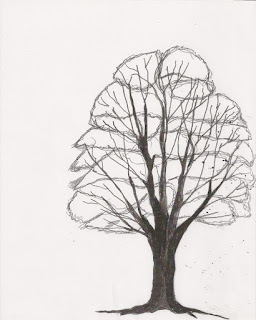
sketch of bare trunk and llmbs
Trunk and limbs
Let's go step-by-step through a tree sketch. I am going to use a simple #2 pencil because it is the one you are most likely to have available. I recommend you do this exercise in late spring or summer, when trees are usually in their best condition. It is neither necessary nor desirable to draw, paint, or embroider the majority of tree branches.  Get the larger ones and enough of smaller ones to show the directions in which the tree is growing. I like to think of the limbs as gesturing in these directions.  After all, when you portray a tree you are making an image of a living, growing creature, constantly adapting to its environment. Its growth is dictated by the amount of sunlight it gets and the directions and angles of that light. It responds to the winds and the amount and kind of moisture it gets — rain, fog, snow, etc.  Its form may be changed at various stages of its life by the presence of obstacles like large rocks, fences, buildings and other trees.  Try to see these influences in the living tree and indicate them in your sketch. And don't forget to show some roots in your sketch to connect the tree with the ground. When I am satisfied with my sketch, I move on to the next step.
sketch of trunk and llmbs with foliage blocked in
Foliage blocked in
Just as it is not necessary to show all the tree limbs, it is not necessary to show all the foliage. If you look at a single tree, you will see the foliage is arranged in large clusters with parts of the trunk and limbs showing through between them. Look at the clusters. Which ones seem to be pointing — or gesturing — toward you? Which ones are pointing away from you, out to the sides, or up at the sky?  Treat them like separate pieces in a jig-saw puzzle. Sketch the general shapes of the most important ones. You don't need all of the clusters to make the tree look real. Make some little irregularities in the outlines of the shapes for realism. Indicate the larger limbs and parts of the trunk that show between the masses of leaves and where they may be seen in "holes" in the foliage. Carefully erase any of the trunk or limbs that you don't want to have showing in the finished design. (Pencil erasers tend to smudge, so it is a good idea to have a piece of sandpaper to remove the surface of the eraser as it starts to darken. A kneadable eraser is a good thing to have.)
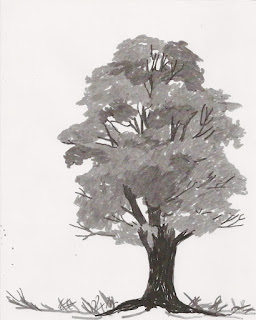
tree sketch in greyscale
Values
Now it is time to consider the values of the masses of foliage. Value refers to the relative lightness or darkness of objects or areas. (We are not going to consider color at this stage.)  Which cluster is the lightest and brightest in the tree? Leave it nearly as white as your drawing paper. Check to see if there are any areas that are almost as bright.  Fill them in as lightly as possible with your pencil. Now find the darkest cluster. Consider it carefully. Is it darker than the tree trunk and limbs? About the same? Lighter? Fill it in very solidly, pressing hard with the tip and side of your pencil point. Go over it as many times as you need to give it the value you want.  Continue working alternately with the next lightest and next darkest clusters until all of them have a value. Check the whole composition against the real tree for accuracy. Do you need to further darken any limbs or parts of the tree's trunk?

If you have easy access to the tree, this may be a good place to stop sketching and leave color decisions to another day. Put your sketch away and don't overwork it. If you can get a couple of photographs of the tree, that is an excellent idea. It might rain tomorrow.

Summer colors or autumn?


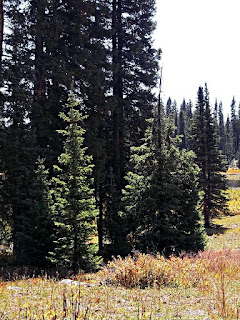
Evergreens photo by J.D.
Evergreens
So far we have only discussed broad-leaved trees. Evergreens present different problems and possibilities.  Because so many conifers have a generalized triangular shape, many people never try to learn the differences between the species and assign them cookie-cutter appearances. We have a number of different species close by. I love to look at them just before sunrise.  They do start out as very simple silhouettes, but, as the light begins to filter through them, you see that they grow in very different ways. Some of them reach for the sky with tiers of V-shaped branches. Others are less dense and produce their branches at much wider angles with their trunks. Still others have branches that curve or angle downward, sometimes touching the ground.  And there are ground-hugging evergreens which don't take a tree form at all.  They are all worth study and are particularly beautiful in winter.
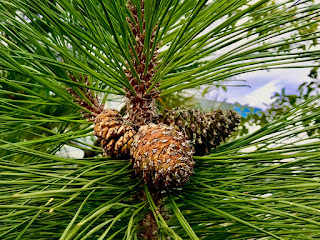
Pine cones, photo by J.J.
Trees that lose their leaves in autumn are known as broad-leafed trees. Evergreens have needles or scales instead of leaves. They lose these gradually all year long. You can usually find a pile of them underneath the tree.  A number of evergreen trees bear cones and are classified as conifers. A photograph or sketch simply featuring cones and needles can be very decorative.  If you are not familiar with the evergreen trees in your locality,  consult a tree guide book or have a talk with someone from a local nursery.

I often use trees to design needlework projects. Some of them are highly stylized like the evergreens and aspens in the two end photos, while others are more naturalistic like the design in the center.

Needleworks with trees

Simple tree silhouettes, particularly of evergreens, make nice border designs for illustrations, needlework borders or all-over patterns, photo mats, etc.
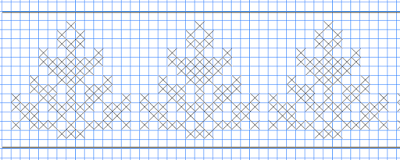
Chart for cross-stitched border
Chart for cross-stitched border of evergreen silhouettes

It is often useful to study how artists have represented trees in their works. For a long time trees were simply backdrops and not done with particular attention to detail. It wasn't until about the middle of the 19th Century that, particularly in France, they became viewed as subjects worthy of painting for their own sake. Jean Baptiste Camille Corot led the field in this respect. He strongly influenced the Impressionist painters. They, in turn, influenced whole schools of contemporary and Post-Impressionist artists. Pointillist painter Paul Signac also did beautiful trees. Look at paintings by your favorite painters to see how they handled the subject of trees.

If you missed our recent Arbor Day post, follow this link. For more information about trees, check our Extras section for "Teachable Moments" activities and a Self-Teaching Unit for teens.  And, if you can, plant a tree!

Now, as our favorite tree-house builder loves to say: "To the trees!"


 Creative Commons LicenseThis post by Annake's Garden is licensed under a Creative Commons Attribution-NonCommercial-ShareAlike 3.0 Unported License.

Tuesday, December 31, 2019

Reviews & Previews: Topics and Projects for the New Year

Mushrooms, crewel embroidery by Annake
Crewel embroidery by Annake (in progress)

Now that the art shows and craft shows are over for a while and we have caught up with most family and charitable events, we have time to look toward our plans for next year. While we work the shows, we try to jot down notes about questions we are asked by customers and comments made by people who just stop by the booth to look and chat. We try to show several kinds of artwork and photography when we do art shows and many kinds of needle arts and other handicrafts when we work craft shows. We base a lot of our plans for future articles and activities on our notes and the reflections that they generate.
Original crewel embroidery by Annake
For example, a sweet young lady bought a framed piece of crewel embroidery. She asked me what kind of embroidery it was. She had never heard of crewel.  I explained that it was done on fabric, not canvas, with fine wool yarn rather than embroidery floss — although I do sometimes do surface crewel embellishments on top of finished canvas work.  (There are good acrylic yarns that can be substituted if a person has an allergy to wool or doesn't want to pay the prices for wool). Some of the stitches used for floss embroidery are used for crewel (and most can be), but there are other stitches that are more popular for crewel than for other techniques like counted cross-stitch. We gave her our business card and told her how to use  the search engine on this blog to locate past articles on crewel and on stitch "families".

Heirloom crewel pillowslip from Annake's collection

Tracing a drawing with transfer pencil
Later a lovely white-haired lady complained that it was so hard to find stamped patterns for crewel embroidery. I told her that I make my own patterns, so I had not been aware of how serious the shortage had become. I suggested that she might find some at thrift or charity shops, as people might donate them rather than discard them.

By this time I had concluded that it was high time for me to revisit the way to make iron-on patterns for all kinds of embroidery, and I plan to re-visit crewel embroidery and demonstrate more of the "families" of stitches that are most appropriate for it. So you can look for those articles to appear early in 2020.

Assisi embroidery rose by Annake
Another type of needlework that got quite a bit of attention was Assisi work. This is something that should be fun for counted-cross-stitch fanciers who are looking for something new (although the art is very old). It can also be done in canvas work if you have a nice white or tinted canvas to use for a background. Look for an article on the subject, its origins, how it was initially used,  along with illustrations, directions for a modern version of it,  and a pattern or two early next year.


Star pillow, original design by Annake
Another young lady bought a pillow with a central motif of a starburst. She asked if the design was done in flame stitch. I assured her it was and was privately delighted that she knew the term (a common name for a particular kind of bargello stitchery). She was surprised and pleased that it could be used for working out from a center in different directions. she left with business cards for herself and a friend. I promised her some new articles on bargello with emphasis on linear designs and designs radiating out from a center, like 4-way, 6-way, and 8-way designs. So look for those as well.

I will be continuing the series on Color in the New Year, starting with an article tentatively titled "The Non-Colors: Black, White, Grays and Metallics".   J.D. also has some topics he wants to pursue.

We also pay attention to comments and questions from our readers, as you can see in our seasonal Question and Answer segments. We are very gratified by the questions addressed directly to this blog and try to answer as many as we can, sometimes combining questions from more than one reader. Here are some recent examples

What special project are you currently working on?

I am currently working on a project suggested by the work of Erin Henson, California landscape artist, who has done an entire gallery show in paintings done primarily in the color orange. I couldn't pass up that kind of challenging project! She also does beautiful renditions of scenes in U.S. parks and monuments.  Those are subjects I really like, as you can see in these needlework pictures:

Cascades and Monterey Cyprus, needlepoint landscapes
"Cascades" and "Monterey Cyprus", needlepoint landscapes by Annake

and in this latch-hook rug.

Delicate Arch latch hooked rug by Annake
"Delicate Arch", latch hooked rug by Annake
However, my real love is doing pictures of animals. I am currently working on a mixed media piece involving both a color rendering and collage elements. I'm going to use many shades of orange (remember that brown is considered in the orange family) along with white, black, and grays. I will show a photo of the new project as soon as it is completed (or perhaps in stages of development).

Did the soccer players finally get their heads?

Yes, after having been lost temporarily in the flood of fall and winter projects. the fabric collage looks very like the original sketch, but I will show it at some future time.

Are we going to get more blackwork patterns soon?

In the previous post I promised more Spanish blackwork patterns and more optical illusions, so I'd better get busy designing and stitching!

Wishing you a safe and happy New Year,


 Creative Commons LicenseThis post by Annake's Garden is licensed under a Creative Commons Attribution-NonCommercial-ShareAlike 3.0 Unported License.

Tuesday, February 12, 2019

A Little Eye Candy: Our 6th Anniversary Issue*

Hard Winter, photo by J.J.
"Hard Winter", photo by J.J.
Greetings, readers old and new. We are currently winding up our 6th year of this blog, and gearing up for Year Number 7. J.D. has a lot to show you and tell you, so I will turn this post over to him. I’ll be back to introduce some of the topics you can expect to see in the coming months.

Hello, all;  J.D.,  Annake’s Garden Gnome here.
 
First, a special welcome to last year’s new visitors from Andorra, Bangladesh, Cote d’Ivoire, El Salvador, the Republic of Georgia, and Mozambique. We have now had visitors from at least 121 of the 197 countries recognized by the UN.  I say at least, because Google Analytics classifies a growing segment of our visitors as ‘Not Set’,  so any of you who has never seen your country mentioned — blame Google!
 
Last year’s most popular new posts were the five parts of our series on ‘Landscapes in the Needle Arts’, followed by the post ‘Back to Blackwork’, and (surprisingly) our periodic Question & Answer posts. I don’t know whether we are doing a better job of promoting those posts, or more of our readers have figured out that they are full of juicy bits of new information;  we’re just glad to see them getting more attention. And, since many of you first come to this blog searching for material in our archived past posts, I’ll note that cumulative visits since we launched are still highest for tutorials on various bargello topics, blackwork embroidery, Holbein and Assisi embroidery, and cross-stitch; but last year, Swedish weaving and the posts on optical illusions started to catch up.

Lion art print
Now available for download in our Etsy shop
And now, a major addition to our Etsy shop: by the time you read this, the first downloadable prints of some of Annake’s work will be available for you to buy, for a very reasonable price. We’ve shown a few of these in recent past posts — remember the wolf and bear prints? These and many more will be in our Etsy store. Initially, what will be available is going to be limited in size and scope; but, as we figure more of this process out, you can expect to see many more subjects, colors, and sizes that you can download immediately and print at home, or take to a print shop to have your own high quality example of Annake’s work. This includes our international readers — no hassles with expensive shipping, customs forms, or currency exchanges:  just download from the Internet!

So — why this, now? Doesn’t Annake mostly do needle artwork? Where is all this coming from?

Well, the prints are being offered as a result of a number of converging headaches, needs, and trends, which I will tell you all about in a much longer post later this spring. For now, a quick example:

Black-maned lion needlepoint


Remember this black-maned lion needlepoint (we showed it, still unframed, in this post)? Annake came across her original sketch while digging through files looking for something else. (We do a LOT of that!) 

Damaged original working sketch for lion needlepoint
Damaged original working sketch


You can see that it was in pretty rough shape, so I said, “Let me scan it into the computer; I can clean it up, and then you’ll have it when you need it, and we can print it out in any size you want.” So I did — the result is below.


Edited scan of lion sketch
Annake said, “Hmmmm… print me a copy, I’ll put in some shading to indicate what I had in mind for stitching, then you can scan that in for future reference.” So she did — and by the time I had scanned and cleaned it up, it looked pretty darned good. We decided to sign it, put it into a high-quality print file, and — you can see the result above at the beginning of this section.  And, you can now download and print your own.

Look for lots more prints to come over the next several months… as well as printable downloads of some of my photos, and some of J.J.’s — all in our revamped Etsy shop.

Back to you, Annake...


Here are some of the topics you can look for this year:
  • Our next issue will feature a new reverse applique with step-by-step photographs and a pattern to download.
  • Then watch for Seascapes IV and V and at least one issue on skyscapes.
  • I’m going to revisit Folk Embroidery and feature several new “families” of stitches.
  • There will be a new series on color, starting this spring. I think you will get some new ideas from it that will be fun.
  • Expect features on collage and scratchboard plus more optical illusions.
  • There will be new bargello patterns for 4-way and all-over designs, plus new “diaper” patterns for Spanish blackwork, Russian redwork, and Scandinavian whitework.
  • I’ve been looking at landscapes again from a new perspective that I want to share with you.
collage of photos from future posts
Photos from some future posts...

Don’t forget out Question and Answer issues where I try to answer your questions and provide additional information.

I’m really looking forward to starting the next year of blog posts with you.

Take care of yourselves. Stay safe, come back often.


* If you're wondering about the title of this post, candy is a traditional 6th anniversary gift.

 Creative Commons LicenseThis post by Annake's Garden is licensed under a Creative Commons Attribution-NonCommercial-ShareAlike 3.0 Unported License.

Tuesday, May 8, 2018

Landscapes In Needlework, Part III

Miguel Hermoso Cuesta, Fresco fontana piccola 05, CC BY-SA 4.0
Landscape fresco in Pompeii (Wikimedia)
People have been painting on walls for a very long time. Cro-Magnons painted wonderful animals on cave walls. The Egyptians painted on the walls of their tombs. Other ancient civilizations produced paintings and mosaics featuring conquerors and their armies, gods and heroes and, from the Greeks, athletes. But any attempts at landscapes were just sketchy backdrops for the figures. We have to go back to doomed Pompeii and Herculaneum to see landscapes painted for their own sake around 2,000 years ago. Today, even more of these murals are being uncovered as new excavations and restorations are done there. The cities were destroyed in 79 AD (CE). Buried so long in the ashes of Vesuvius, these murals are remarkably well-preserved.

Tuscan landscape
Tuscan landscape, not too different than it would have appeared in Roman times
Mountain landscape photo by J.D.
Detail and color fade with distance
We will probably never know the names of the artists or whether they were Romans or Greeks or people brought in from some other part of the Empire. They painted villas, hills, groves, mountains, seashores, farms, bridges, people, domestic animals, gardens, vineyards, boats, temples, rock formations, even small wildlife realistically. They had mastered atmospheric perspective, making distant objects proportionately smaller than those in the foreground and slightly graying colors near the horizon. They used trompe l’oeil (“fool the eye”) so effectively that viewers must have reached out to touch features of the paintings, believing that they were real. The artists sought to portray the peaceful and pleasant life of people living close to, and caring for, the land. The free, fluid brushstrokes and delicate colors would not appear again in Western art until the time of the Impressionists — more than eighteen centuries later! This photograph shows how background features become smaller and grayer.

Mountain panorama, photo by J.J.
In the 11th Century, landscape painting began to flourish in China. Painters studied rock formations, trees and grasses, flowering plants, birds and insects, and drew them expertly. They portrayed the changing of the seasons with great delicacy. Despite their attention to detail, however, their landscapes do not represent specific places. Instead they represented the artist’s spiritual journey to connect with Nature in a perpetual search for enlightenment. These “journey” paintings are meant to be experienced by the viewer moving from right to left across them. This is probably because many paintings were done on scrolls, which were held in the right hand (and sometimes re-rolled), while the left hand unrolled the scroll, revealing a small area at a time.

Rustic cabin, photo by J.D.
I really like the proportions of the Chinese paintings. I have never been thrilled with the Golden Mean, which dictates our conventional frame sizes of 5 in. x 7 in., 8 in. x 10 in., 9 in x 12 in., 11 in. x 14 in., and so on. Whether vertical or horizontal, their pictures are more than twice as high as they are wide, or more than twice as long as they are deep. That is one reason that I like to do wall hangings. The eye cannot take them in at a glance, and so is drawn to look at one section at a time as the gaze travels the length of the work. Spring Thaw, for example, (3/11/2018) is meant to be viewed as it was stitched, from bottom to top. Here is one of J.D.’s ‘painterly’ photographs with similar proportions and lines that draw the eye from bottom to top.

Yucca Before the Storm, watercolor sketch by Annake
Watercolor sketch by Annake
This is a picture of one of my paintings that eventually became “translated” into a wall hanging. The picture was painted from memory some years after the experience, but I can still remember many of the sensations. We had pulled our van over to the side of the road, parking by a large cluster of yucca plants, to watch a spectacular sunset. The yucca flowers were glowing, reminding me why one of their names is “Candelas del Dios”. A storm was moving in swiftly from the northwest. Thunder rumbled. Lightning flashed. I remember the smell of the dust blowing in the wind. Still we lingered, watching the afterglow as the yuccas became dark silhouettes against it. Then the storm was upon us. I may have mentioned that I love storms; my companions, however, were not as fond. We closed the windows and fled before the storm.

Yucca Sunset, latch hook wall hanging by Annake


Later, I made a latch-hook wall hanging as a kind of abstraction of the painting. Both of them are also intended to be “read” from bottom to top, from earth to sky. J. D peeled and polished the branch that holds the hanging, and secured it with leather thongs.


 Horses, photo by J.J.
Horses, photo by J.J.

For several centuries after the fall of the Roman Empire, landscapes were primarily backdrops for religious themes. In the late 15th Century, a well-known Flemish painter, Joachim Patinir, broke from this tradition. While his paintings bear the names of saints and martyrs (who do appear somewhere in the pictures), the viewer is much more likely to be impressed by the stunning landscapes which dominate the paintings. The artist used very high horizons and filled the foreground and middle ground, as well as the background, with an astonishing collection of landscape features. He included examples of human enterprise among the many natural features in his paintings. Human eyes could not have been able to distinguish in reality all the area included in a single canvas, no matter what their vantage point was.

 Storm Reflections, photo by J.J.
Storm Reflections, photo by J.J.
By the 16th Century, Spanish artists were moving away from strictly religious painting, embracing court paintings and portraits, and experimenting with still lifes and genre paintings. A man from the island of Crete went to Spain looking for a patron and found one in the city of Toledo. His name was Domenokos Theotokopoulos. Apparently that was too much of a mouthful for the Spanish people, who called him “El Greco” (“The Greek”). Although most of his paintings were religious scenes or portraits of church notables, he is probably best known for his View of Toledo, in which he captures the onset of a violent storm and the eerie light that sometimes precedes such a storm. Here is one of J.J.’s photos that has also captured that light. Notice how much darker the clouds are when reflected in the water.

Mountain lake, unattributed picture from a calendar
Landscape with no sign of humans
Landscapes, with or without structures and/or figures, became an important new painting category in Northern Europe after the Reformation. While Flanders remained Catholic, Holland, Germany, and some other northern countries did not. Many of the Dutch painters turned to painting sunny interiors or elaborate still lifes, but others preferred to paint their local landscapes. German artists tended to emphasize, even romanticize, landscapes. Even the great Albrecht Durer, best known for his woodcuts and meticulous engravings, painted rather “dreamy” watercolors of the Alps, which he passed through on his way to and from studying in Italy. (The artist is rather special to J.D., who was born on Durer’s birthday.) Another German artist, Albrecht Altdorfer, achieved fame for his paintings of the Danube River Valley. He occasionally included buildings and people, but the landscape clearly dominated his paintings.

You may wonder why I have put so much emphasis on photos in this chapter. If you are at home with a new baby or toddlers; if you are a caretaker for a loved one; if you work from home; if your movement is limited by physical or financial conditions; if transportation is an issue or you live in a neighborhood where it is not safe to wander around, photos may be your best source for landscapes. In my long life, I have faced all of those situations. Some of them still apply to me. I have a large collection of sketches, my own and family photographs, art prints, etc., to draw upon for my work, but I still look for and collect drawings, logos, and pictures that attract my eye for some reason. If you are serious about doing needle art, I suggest that you start a collection of your own. Really look at everything you can see. Ask yourself questions like:”What colors can I see here?” and “What kind of stitches would it take to look like that texture?” As you learn — or invent — new stitches and stitch patterns, keep samples for future reference. A shoebox can hold a whole library of stitches.

Delicate Arch, unattributed photo from calendar
Delicate Arch, unattributed photo from a calendar
Speaking of photos, I came across one in a calendar that really makes my point about how few places there are at Delicate Arch to sketch or photograph. This photographer stood a few feet to the right and a few feet closer to the drop-off in the right foreground than where I made sketches for the rug in Landscapes in Needlework, Part I. Unfortunately, no information was given about the photographer who took this beautiful winter sunset.


Train your eyes!


Photo Credits:
Roman fresco: Miguel Hermoso Cuesta, Fresco fontana piccola 05, CC BY-SA 4.0
Tuscan landscape, Mountain lake, Delicate Arch are all unattributed from calendars with no publisher or manufacturers information: if you see your work or that of someone you know, please contact us so that we can give credit where due.
All other photos, copyright Annake's Garden

 Creative Commons LicenseThis post by Annake's Garden is licensed under a Creative Commons Attribution-NonCommercial-ShareAlike 3.0 Unported License.

Contact Us

Name

Email *

Message *

Blog Archive