 |
| All-over pattern worked from a "corner" design |
A phone call from a friend alerted me to an error in the December 5th post. She called to say she had accidentally reversed the numbers in the sample she was doing of the multicolored 4-way bargello pattern. Instead of making her stitch squares 3 stitches over 4 threads, she had made 4 stitches over 3 threads and wondered if she should take the completed stitches out and start over. This puzzled me because when making stitch squares, I recommend 4 stitches over 4 threads. I suggested that she do another sample with those numbers and keep the original one to see how they differed. She agreed. Then I went back to the blog post to see what went wrong.
What happened was that sometime before posting J.D. had told me the post was too long and something needed to be cut from it. I took out a section about using this design as an all-over design, along with a completed sample. Somehow the stitch directions given for this change got detached and the stitch count I had recommended for that exercise got attached to a place it did not belong. My apologies if this has confused anyone. J.D. doesn't do needlework, so he wouldn't have caught the error. I should have caught it, but didn't. The error has now been corrected in the initial post.
I was trying to make two points with that segment of text. First, that, since this was an all-over pattern, it was not necessary to start in the middle of the canvas. I started the piece pictured at the top of this page at the upper right-hand corner of the design and expanded it both horizontally and vertically as far as my canvas segment allowed. Second, the pattern can be worked to fit rectangular projects. They do not have to be square, as the 4-way ones do need to be. I suggested that viewers might want to do a sample using the 3 stitches over 4 threads formula that I used for this sample, which elongates the squares into rectangles vertically. (That's where the text error occurred.) The pattern stitch my friend was using elongated the squares to rectangles horizontally. Here is an example of what that would look like done on the same canvas as mine and beginning in the same corner of the design. The result is definitely rectangular — and large. It is probably not a good design for a 4-way, unless you are using much smaller squares of canvas. It would probably work on #14 needlepoint canvas.
The samples I usually show on these posts are done on #7 plastic canvas. I recommend this for practice and to make pattern samples that are meant to be filed for future reference. But before we leave this pattern, I would like to show you one more variation. This is the pattern square done in conventional tent stitch, with one stitch for each square of the pattern. It is also done on #7 canvas, so you can imagine how small it would be on a canvas with more squares to the inch! These patterns are very versatile. If you do latch-hook, for example, you can use a pattern like this one by putting in a knot for each square of the pattern. This would work as both a four-way pattern, perhaps for a pillow, and an all-over one for a mat or rug. Beading and mosaics could also be done with such a pattern.
When working a multicolor pattern like this, I recommend using a separate needle for each color. This cuts down on the time spent in threading needles and decreases yarn waste. Secure each color often on the back of your canvas. Do not carry long strands of yarn across the back of your canvas while moving from one colored segment to the next.
The designs made from the small corner squares have proven to be popular. For that reason, I am giving you some more of them to work with. In each case, the original square that was rotated is shown in its proper position and is emphasized by a black outline. The two-color pattern is suitable for an all-over design, but perhaps is not as good for a 4-way design.
We have a new 8-way bargello to show you. Because some stitches are horizontal or vertical, while others are slanted on the canvas, some segments of the eight do not reflect the light in the same way that others do. This gives a feeling of movement to the composition. I don't know how well this will show up in a photograph, but I hope you can see the effect. I also hope you enjoy the new design.
We have used plain backgrounds behind bargello patterns a great deal. Only once, when we emphasized the use of a bargello pattern behind the capital A in the original Annake's Garden's logo, have we discussed the use of bargello as a background for other kinds of stitchery. Here is a picture of a screaming eagle that we use to decorate our table when we are doing an event on or near a patriotic holiday. The background is made up of strips of bargello patterns in red, white, and blue combinations. Doing slanted designs like this requires some planning. I recommend drawing a few diagonal lines lightly in pencil on your background canvas to guide your stitches. I worked the eagle first in conventional tent stitch, then ran the last stitches of each pattern under the edges of the eagle's feathers.
I urge you to try making some of your own new designs. All you will need is some graph paper and colored pencils, pens, or crayons. Often what looks like a very simple pattern on a 6-part square turns out to be unusual and beautiful when fully rotated. Then you will want to see it done in yarn. Keep your small samples in a container of some kind (any thing from a shoebox to an expandable portfolio), so that you can return to them whenever you like. Also, when you have a pattern you really like, try it in several different color combinations.
Have fun - and a wonderful new year!
What happened was that sometime before posting J.D. had told me the post was too long and something needed to be cut from it. I took out a section about using this design as an all-over design, along with a completed sample. Somehow the stitch directions given for this change got detached and the stitch count I had recommended for that exercise got attached to a place it did not belong. My apologies if this has confused anyone. J.D. doesn't do needlework, so he wouldn't have caught the error. I should have caught it, but didn't. The error has now been corrected in the initial post.
I was trying to make two points with that segment of text. First, that, since this was an all-over pattern, it was not necessary to start in the middle of the canvas. I started the piece pictured at the top of this page at the upper right-hand corner of the design and expanded it both horizontally and vertically as far as my canvas segment allowed. Second, the pattern can be worked to fit rectangular projects. They do not have to be square, as the 4-way ones do need to be. I suggested that viewers might want to do a sample using the 3 stitches over 4 threads formula that I used for this sample, which elongates the squares into rectangles vertically. (That's where the text error occurred.) The pattern stitch my friend was using elongated the squares to rectangles horizontally. Here is an example of what that would look like done on the same canvas as mine and beginning in the same corner of the design. The result is definitely rectangular — and large. It is probably not a good design for a 4-way, unless you are using much smaller squares of canvas. It would probably work on #14 needlepoint canvas.
 |
| Pattern resulting from error in directions |
 |
| Same pattern done as tent stitch, 1 stitch per square |
When working a multicolor pattern like this, I recommend using a separate needle for each color. This cuts down on the time spent in threading needles and decreases yarn waste. Secure each color often on the back of your canvas. Do not carry long strands of yarn across the back of your canvas while moving from one colored segment to the next.
The designs made from the small corner squares have proven to be popular. For that reason, I am giving you some more of them to work with. In each case, the original square that was rotated is shown in its proper position and is emphasized by a black outline. The two-color pattern is suitable for an all-over design, but perhaps is not as good for a 4-way design.
 |
| 3 patterns based on different corner patterns |
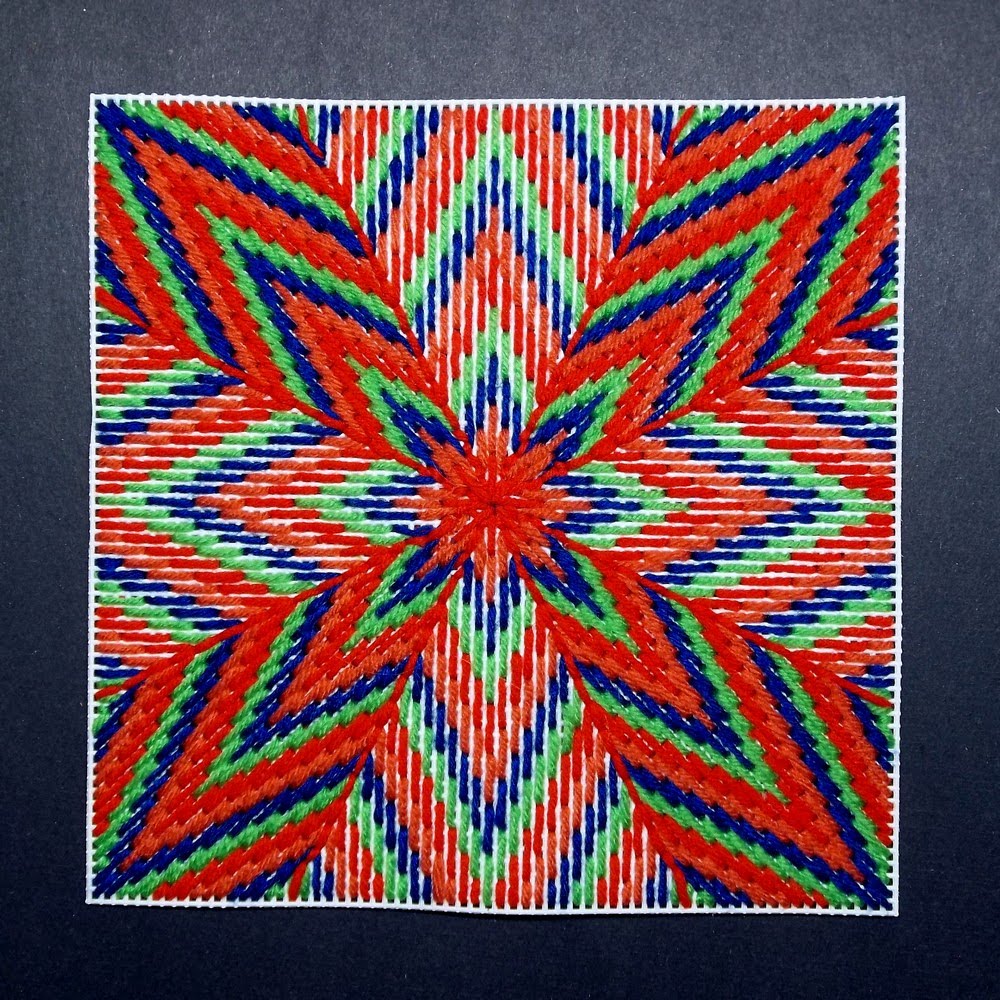 |
| New 8 way bargello design |
We have used plain backgrounds behind bargello patterns a great deal. Only once, when we emphasized the use of a bargello pattern behind the capital A in the original Annake's Garden's logo, have we discussed the use of bargello as a background for other kinds of stitchery. Here is a picture of a screaming eagle that we use to decorate our table when we are doing an event on or near a patriotic holiday. The background is made up of strips of bargello patterns in red, white, and blue combinations. Doing slanted designs like this requires some planning. I recommend drawing a few diagonal lines lightly in pencil on your background canvas to guide your stitches. I worked the eagle first in conventional tent stitch, then ran the last stitches of each pattern under the edges of the eagle's feathers.
 |
| Screaming eagle with bargello stitch background |
Have fun - and a wonderful new year!

 This post by Annake's Garden is licensed under a Creative Commons Attribution-NonCommercial-ShareAlike 3.0 Unported License.


