Showing posts with label bargello pictures. Show all posts

Sunday, April 14, 2019

Creatures of Sea and Shore: Seascapes, Part V

Pelicans 3, photo by jljardine
Pelicans 3, photo by J.J.
Probably nothing increases the interest of a seascape design more than adding the image of a live sea creature to it. This may be something small like the seagull and fish I showed you in my tongue-in-cheek picture called "Seafood Surprise". It may even be as elementary as a few seabirds, each indicated by a vaguely V-shaped line. On the other hand, the animal may dominate the design, using the sea simply as background. Think of a hump-backed whale rising out of the water. In this issue, we will be featuring marine life in needle arts, art prints, and photographs, beginning with this photograph by J.J.  While these pelicans do not live in the sea, they certainly depend upon it for their survival. Their species has been sustaining itself this way for a very long time and their bodies have been modified to do so in the most efficient manner.

Tropical fish needlepoint by Annake

Fish, of course are the elemental sea creatures and come in a seemingly endless variety of shapes and colors.  The fish that live around coral reefs are especially colorful. Some, like seahorses and sea dragons, are so surprising and unlikely-looking that they seem to have been designed by Walt Disney! Others are so well camouflaged that you hardly notice them at all. If you would rather portray living animals than true seascapes, you can't go wrong with fish. They can carry a composition by themselves, with just a watery background to set the stage.


Colorful fish design for upcoming projects
Colorful fish design for upcoming needle arts projects
Many fish are sleek and streamlined. These inspire me to do stylized and even semi-abstract designs.  This one made me think of doing a project in reverse applique because of its black over-all shape and vivid areas of color. I still intend to use the design in that way, but decided to sketch it on canvas and do it in continental stitch first. Sometime later I will cut the outline out of black felt and applique the colored areas from the back (a technique called reverse applique) vivid scraps of silk and satin. Then I will applique the whole construction onto a watery-looking fabric and frame it or make it into a pillow or wall hanging. Use these links to see a pair of these finished fish designs. [Links to the fighting fish and goldfish] We will show both styles of needlework in future posts.

Fish photo by jljardine
Photo by J.J.
Fish are not easy to photograph in the water, but J.J. was patient and  "caught" this one lurking just under the surface.  It would be relatively easy to add one like it to either a saltwater scene or a lake shore composition.

It is easy to be interested in — and even concerned about — animals like dolphins and cuddly sea otters, but J.D. was adamant that I include some of the creatures who are far less like us, but just as interesting and beautiful in their own ways.  J.J. was able to creep up behind this little fellow while his stalked eyes were looking the other way.  Just look at the intricate construction of his body and the delicacy of his coloring. Isn't he wonderful?

Crab photo by jljardine
Crab photo by J.J.


Sea turtle print by Annake
Here is a sketch of a sea turtle that I made long ago in the tropics and which we have made into a print. Sadly, all sea turtles are endangered now. I always thought of this one as a male, swimming through a bed of kelp and sea grass.
From the day they hatch, the males spend their entire lives at sea. The mature females travel huge distances and undergo great physical struggles to return to the beaches where they hatched and lay their eggs.

J.J. found this shy little octopus hiding in a very shallow tide pool, waiting patiently for the next tide. They can remain out of water for a surprisingly long time and even travel over land for short distances. They are very intelligent and can solve puzzles. As anyone who has tried to keep one in an aquarium can tell you, they are "escape artists" who make Harry Houdini look like an amateur!

Octopus photo by jljardine
Octopus photo by J.J.


Sea otter print by Annake
Sea Otter
Now let's look at some of those warm-blooded sea mammals that we respond to more readily. Here are three who spend most of their time in the ocean, but come on shore occasionally to rest or to deliver and care for their babies. Who doesn't like a cuddly-looking sea otter?


Sea lion drawing by Annake
Galapagos Sea Lions
This is a mother sea lion with her pup. You can tell that they are not seals because they have small external ears, while seals do not.  I wanted to use this print to make a point about horizons. When a horizon is very low, as this one is, it makes any figure in front of it — whether person, animal, or rock — look larger and more imposing. In this picture, the sea, while important to the setting, can be very simple and understated. The sea lions have very streamlined bodies and are a good choice if you are just starting to draw animals for your compositions.  Or you can easily cut out their shapes from a photograph if you prefer.

Walrus print by Annake
Walrus
All right, so he was grumpy and probably didn't want to pose for his portrait. Not even animals in zoos or wildlife sanctuaries always enjoy close attention from we strange two-legged creatures who want to sketch or photograph them.  Fortunately a good long lens allows one to get a good image without getting too close to the grumpy ones. I think he shows a lot of character, impressive teeth (the Inuit call walruses "tooth-walkers" because they use their tusks to haul themselves out of the water and up steep slopes), and a really great mustache!

We hope you have enjoyed this post as much as we three enjoyed putting it together for you.

This is the last article in the Seascape series, at least for now. We may ‘re-visit’ it from time to time. Look for an article on Skyscapes sometime in May.


J.D., J.J., and


 Creative Commons LicenseThis post by Annake's Garden is licensed under a Creative Commons Attribution-NonCommercial-ShareAlike 3.0 Unported License.

Sunday, August 26, 2018

Seascapes in Needlework, Part I

Simple beach scene by J.J.
If you live in a land-locked area far from the sea, as we do, you may feel little inclination to try doing a seascape. However, no landscape is as changeable as the sea and few are as expressive of mood and emotion. I became familiar with both the Atlantic and Pacific Oceans when we lived in Panama, where the two are just a few miles apart. J.J. travels to Florida frequently and takes many photographs as she walks along its beaches. J.D. is addicted to fishing programs on television and is currently following one on deep-sea sport fishing. I check the National Weather Service on my computer at least daily, where I frequently find film clips of marine action which I can watch over and over until I am familiar with a particular aspect of the ocean in motion.

Northeaster by Winslow Homer 1895 [Public domain], via Wikimedia Commons
"Northeaster" by Winslow Homer, 1895
You also have access to such information. Your first resource is your memory. If you have ever been on the ocean or at seaside, what do you remember about it? How did you feel about the experience? Jot down notes about your reactions. They don’t need to be complete sentences just words and phrases. Do you have pictures from that time, or might a relative have some? Moving pictures from television or electronic devices are your second resource. Check the National Geographic Channel for programs about the Earth. Other sources are travel films, series devoted to animals, and the aforementioned fishing shows. Finally, there are still pictures, whether modern photographs or paintings by masters like Winslow Homer.

Apollo 17 Image Of Earth From Space By NASA [Public domain], via Wikimedia Commons
Apollo 17 Image Of Earth From Space
The oceans are vast. I recently heard an astronaut describe how much of an orbit is over water. Even large continents like South America and Africa, he said, take little time to observe and then you are over water again. The oceans contribute greatly to the fact that Earth becomes the “Blue Planet” (sometimes referred to as the “Big Blue Marble”) when viewed from space. The oceans are also deep, so deep that it is hard to imagine descending to the bottom of one. They are subject to enormous physical forces the gravitational forces of the planet and its moon, the planet’s spin, the movement of the tectonic plates, tides, currents, tsunamis, storms, seasonal temperature changes. Therefore, they are constantly changing.

Beach sunset by J.J.
The time of day you choose is important. Sunsets and sunrises at low tide are especially interesting because the water reflects the colors of the sky. There will be little blue in the water unless it is reflected blue from the sky. This may be darkened to a degree by the marine blue of the water, but the overall effect will be that of the sky colors. The white of surf and spray also picks up color from the sky. The sun itself creates a prominent path in the water. It colors low clouds and reflects on the undersides of higher ones. Seaside buildings may show color in their planes and shadows, although they do not reflect with the same intensity as the surface of the water. The shadows below the crests of waves appear very dark and there is more violet in the blues. However, the shadows become paler and grayer the further they are from the shore and the waves themselves appear smaller. Wavelets striking the land may appear as distinct bands across the surface where the water is shallow.

directional gesture diagram
Arrows show the four different 'gestures'
There are four lines of directional movement, often referred to as gestures, in a composition. These are horizontal, vertical, diagonal, and curvilinear. While it is desirable to get all four into the design, an eloquent picture can be made with fewer than that number. The panoramic photograph below shows three of the four plainly. The sea’s horizons are almost always strong horizontals, as they are here. This is counterbalanced by the vertical lines provided by the two figures and their shadows. Curvilinear lines of direction come from the gentle wave forms. It would be possible to add a diagonal line with a cloud or by a sailboat on the water, but I don’t believe it would improve the composition, which so beautifully shows the powerful influence of the ocean and the solitary presence of two people who appear to have the world to themselves.

Two Against the Tide by J.J.
"Two Against the Tide" by J.J.


Let me show you what I mean by directional “gestures’. First is what you see in the panorama above. There is the horizontal line for the horizon. Below that are the curved lines of the waves against the beach. Off to the left are two short vertical lines for the two people, which are doubled in length by their shadows. The various lines need not be of the same length or number to give unity and balance o a composition. Diagonal lines are found both in nature, as in the branching of trees, and in man-made forms like a sailboat, the roof of a building, a construction crane, etc.

Silohuettes at sunrise by J.J.
Photo by J.J.
Sunrises usually have gentler colors pink, apricot, aqua, pale blues. The water reflects less of these colors. Before the sun clears the horizon, structures both far and near may appear only as black silhouettes. This can make a striking picture if the objects that are silhouetted have varied and interesting shapes. The rising sun (small circle at the far right of the photograph) appears largely white, lacking the vivid yellows of the setting sun, and makes a white path of reflection on the water. Colors, diluted by this white glow, gradually appear along the sides and on the tops of the shadowed forms as they emerge out of the darkness. Distant forms may remain backlit longer than nearer ones facing the sun. The sunrise colors fade faster than sunset colors and the overhead sky turns a distinct blue before they entirely disappear. There are a number of diagonals in this picture.

Winslow Homer - On a Lee Shore [Public domain], via Wikimedia Commons
Winslow Homer - "On a Lee Shore"
The open ocean is a deep blue-green. As it approaches land and grows shallower, it becomes duller and other colors are incorporated: the yellow-green of seaweed, browns and grays from underwater rocks and sand, the stark white of wave crests and the off-white of spray where surging water strikes as it meets the shore. Many painted seascapes that I have seen make the sea look almost uniformly dark blue. That is inaccurate and makes the picture less interesting. You can add color to your seascape by blending yellow, green, and brown strands of yarn or floss with the blue and turquoise ones you use for the sea. Try several browns because they create different effects. If you choose to do a sunlit scene. add occasional small stitches of pastel colors to spray, where bursting bubbles make tiny rainbow twinkles.

"Safe Harbor", Nordic stitch needlepoint
A seascape need not be a complicated project. This one is a color version of the logo of a Scandinavian company that attracted me many years ago and meant enough for me to save it. Although the sail has a more modern shape, the hull reminded me of the shallow-draft Viking coastal vessels like the ones both my husband’s and my Frisian ancestors sailed in, centuries ago. I made this color version for him, with the ship at safe harbor in a fjord as the sun is going down.


Sample of Nordic stitch in vertical and horizontal directions
Sample of Nordic stitch in both directions
The stitch, called Nordic stitch, is a very simple one. It is made up of blocks of four horizontal or vertical stitches, each over four threads, so that they are of uniform size. This is useful for creating simple designs like these silhouettes and can easily be combined with other canvas stitches, such as upright gobelin or tent stitches. Since the individual blocks of stitches are square, Nordic stitch patterns can easily be converted to counted cross-stitch patterns. Or the squares could be larger squares cut from fabric and pieced together to form a patchwork panel, or tiles glued to a wood or Masonite background.

Blue wave bargello pillow top
In Landscapes, Part IV, we promised you another of my “Bargello Plus” pictures, which featured bargello patterns plus realistic elements done in tent stitch. This particular one began with a pattern that represented rolling ocean waves. This was a traditional bargello pattern that I lengthened and extended to make larger “waves”. I used the design to make the pillow top seen here.

I left a space above the waves to represent the sky, where I embroidered a seagull in tent stitch. Then I left a space between two of the big waves for a fish, also worked in tent stitch. The composition was entitled “Seafood Surprise”. I will leave it up to you to decide which creature gets the greater surprise.


"Seafood Surprise", Bargello Plus picture

Now it is time for you to design a simple seascape of your own,


Photo credits: Winslow Homer's "Northeaster" and "On a Lee Shore", and the Apollo 17 image of Earth are in the Public Domain, via Wikimedia Commons. All other photos are copyright Annake's Garden.

 Creative Commons LicenseThis post by Annake's Garden is licensed under a Creative Commons Attribution-NonCommercial-ShareAlike 3.0 Unported License.

Tuesday, June 12, 2018

Landscapes in Needlework, Part IV

abstract Martian landscape
"Early Frost, Olympus Mons"  ??
Since the dawn of the Space Age we have learned a great deal about other “scapes” — “moonscapes”, “planetscapes” and “spacescapes”. These, whether real or imaginary, can also be part of your artistic vocabulary. Consider this picture of the mighty Martian mountain. Was it photographed during a Voyager flyby, by the Hubble telescope, or by a Mars rover? Or is it an artist’s interpretation based on one of those? If so, is it realistic or abstract? This time we are going to talk a little about geometric and abstract design as it might apply to landscapes.

Flame stitch sample in many colors
Flame stitch for Persian-inspired bargello pillow
After completing several large projects, I reward myself with time to “play” with some of my favorite kinds of needlework. One of these is bargello.  Bargello is the “family name” for geometrically patterned counted-stitch tapestry work. It is usually made with simple upright stitches on canvas or evenweave fabrics. The name comes from the Bargello Museum in Florence, Italy, where many beautiful examples are stored. It is also known as Florentine embroidery, Hungarian point, and flame stitch. Why am I so attracted to bargello? Because it is fun! I love to adapt old patterns for new purposes and to invent new ones. The possible combinations and permutations are endless. They unroll beneath my needles like magic carpets. There is no boredom involved in bargello.

I had just completed a series of pillows and pillow tops in bargello patterns. I decided it would be fun to do some small landscapes based on the bargello patterns combined with other tapestry stitches, each with a whimsical detail done realistically in conventional tent stitch. I call this technique “Bargello Plus”. Below is a picture of my first effort, along with the pillow that inspired it.

Bargello landscape with matching pillow
 After viewing the pair, our resident computer guru remarked that I had encompassed several centuries of stitchery history and half a globe of geography in one small project. What a wonderful idea! First the tent stitch was invented, probably in the Middle East. Then came a variety of tapestry stitches out of Eastern Europe, possibly due to the elegant embroideries of the Byzantine Empire,  including the Hungarian stitch that I used for the sky. These stitches were combined into elaborate patterns in Florentine embroidery when Florence was a major European art center.  The patterns, especially variations of flame stitch, came early to the American colonies, where they were used in upholstery.  Now here I am in the Rocky Mountains, using all of those techniques. I have added to the timeline by using 20th and 21st Century materials: gridded, quickpoint, and plastic canvas, and acrylic, craft, and novelty yarns.

Framed Bargello Plus landscape
"Firs & Feathers," framed needlepoint landscape
I chose Hungarian stitch for the sky above the forest because its double diagonals echo the sloping profiles of the trees, the subtle slant of the tent stitches, and the strong shape formed by the eagle’s wings. The eagle’s design was charted separately for tent stitch and added to the sky later. Traditional bargello uses closely related hues from the same color family, as you can see in the shading of the evergreen trees and the aspen tress of the next pattern, but you may use any colors that you like. You might want to use the colors of your favorite sports team in a composition, for example. I have done a number of items in the colors of the Denver Broncos, Colorado Avalanche, and Colorado Rapids, as well as school and flag colors. Mild or wild, the patterns are appealing.


Annake stitching a needlepoint pillowtop
Both the triangular “evergreen” pattern and the rounded tree designs inspired by our native aspens (seen here in progress) are adapted from 1970’s designs. The aspen “trees” were originally shorter, rounder apple trees. I elongated the designs by changing the lengths and positions of various stitches, and used colors appropriate for our autumn aspens. You can see that I have attached my canvas to a wooden picture frame. It is a square frame of a size that is great for making pillow tops. It is much more comfortable for me to work with a frame like this because the canvas stays stretched taut. When it is completed, the canvas requires very little blocking. There are frames especially made for this purpose, but I am naturally thrifty, and I find this inexpensive frame bought at a thrift shop perfectly suited to my needs.

Framed needlepoint of aspen with bear
"Bearly There,'"  framed needlepoint
Next, I combined the aspen tree pattern with a tent stitch picture of a black bear. The title is “Bearly There”. I chose the bear because his rounded shape fit so nicely into the space created by omitting one of the aspen trees. Other tapestry stitches used in this landscape include brick stitch and Parisian stitch. You will see another of these combination landscapes in a chapter on seascapes. (And others may pop up from time to time.)

If you found the large flame stitch pattern at the beginning of this article a little intimidating, here are two much simpler patterns you may like better. The first is a simple center line pattern done in upright Gobelin over four threads of canvas or fabric. If you place it at the center of your design, you can work the same pattern in other colors both above and below it until you have covered as much area as you desire. Remember that the color sequence below this pattern line is in the reverse order to the one for the stitches above it.

Simple flame stitch sample
A simple flame stitch sample

The second pattern is a simple repeat pattern done in three colors, although you may use as many as you wish. Follow either the yellow or the golden orange line to get the complete pattern. Again, this is upright Gobelin over four threads. If I were doing a larger pattern rather than this border, I would make my center line in the bright red yarn for greatest visibility. Where you do not have room for a complete pattern line, do as much of it as you can.

Multi-colored flame stitch sample
          
While I usually do realistic pictures, every once in a while I venture into the abstract. That was the case with this next project. I had begin a very stylized picture, working free-hand; that is, I was working completely without a pattern. After I had finished a few rows, J. D. looked over my shoulder and suggested I do it as a mirror image. I liked the idea. Indeed, the picture is a double mirror image, since it mirrors from side-to-side, as well as top-to-bottom. The picture is done in upright Gobelin stitch on # 14 needlepoint canvas.  This is another stitch from at least as far back as the Renaissance. It is customarily used vertically over four canvas threads, but it can be used horizontally and the thread count over which it is stitched may vary. Because this canvas has a fairly small mesh, I chose to stitch it over four threads, except where the design itself is being modified. Stitches over four strands of this canvas are not very long, especially when the acrylic yarn I used covers the canvas so well. Here is a picture of the project with the pattern shown horizontally.

Mirrror image Gobelin stitch needlepoint

Seen this way, it is simply a geometric design. “That’s not a landscape!” you may say.  “What is that? A Native American Indian design, perhaps?” But look what happens when the design is rotated 90 degrees and shown vertically.  Now it is a stylized representation of the fields and forests, mesas and mountains of western Colorado, with a tranquil lake to reflect it. I don’t usually create a design from Nature that comes this close to the abstract, but this one was fun.

Mirrror image Gobelin stitch needlepoint rotated 90 degrees
The same needlepoint rotated 90 degrees - now a landscape!

About that Martian landscape:  it was made right here on Earth — by the Earth itself. This is a piece of cut and polished landscape agate (actual size, about 3" x 1 1/2" or 76mm x 39mm). If you are viewing this post on a device that will rotate the picture, turn it 180 degrees. You will find an entirely different “landscape”.
Landscape agate cabochon
Landscape agate cabochon (polished flat)
If you enjoyed this chapter, try coming up with some composite picture ideas of your own.



 Creative Commons LicenseThis post by Annake's Garden is licensed under a Creative Commons Attribution-NonCommercial-ShareAlike 3.0 Unported License.

Sunday, May 21, 2017

Quickpoint: Unfinished Business

Bear picture from previous post
Where we left off...
I want to apologize for dashing off last time and leaving you with an unfinished project. Things can get very hectic at Annake's Garden this time of year. We were doing a quickpoint project which was destined to be a new addition to my series of whimsical needlepoint pictures that I call ‘Close Encounters’. This quickpoint picture features a bear in a field of sunflowers and a background of snowy mountains and Colorado blue sky. When I left you, the picture was complete except for the bear's features and one more finishing touch...

Detail of bear's face
The last step for the bear's head was to complete her features. The eyes, nose, and mouth were first done in tent stitch. Then some of the stitches were gone over in embroidery floss to give shine to the features. I tried to give the bear a startled expression. Tiny stitches show the reflections in her eyes. I exaggerated the size of the nose just a little because that is where the “close encounter” will occur.

Then it was time to remove the picture from the frame and gently steam-press its surface. J.D. then polished the frame and got it ready to receive the finished picture.

Bear quickpoint with one step left
Just one step left...


Waste canvas
Waste canvas
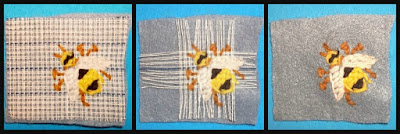
I call these pictures ‘Close Encounters’ because each shows a mammal encountering a very different kind of animal (in this case, a bee.) In order to add the bee to the picture I had to make smaller stitches than the quickpoint canvas would allow. I used a special canvas, called waste canvas. Its threads can easily be removed after the needlepoint (or cross-stitch) is complete. It can be used on fabric as well as canvas or completed stitches. Let me show you how it is done, starting with a picture of the waste canvas, which can be worked as either mono canvas or penelope canvas. Since I planned to do the bee in tent stitch, I chose the mono option.

I had to work out the bee design on graph paper. There are hundreds of species of wild bees in our western mountains. Some of them have bodies as large as as the last joint on my thumb! This design does not represent any particular wild species. Since I expected the thickness of the stitches on the bear's nose to present some problems, I first tried the pattern on waste canvas over a piece of heavy felt.

Steps in creating the bee on felt using waste canvas
First a piece of waste canvas larger all around than the design to be stitched was cut out. If the design is very large, it is then pinned or basted to the background. (I prefer basting because it is more secure.) This one was so small that it didn't need to be basted. Then the stitches were put in just as they would be on regular mono needlepoint canvas. (I don't pull the stitches quite as tight as I would do ordinarily.) The next picture shows the finished design with some of both the horizontal and vertical threads pulled out. (A pair of small tweezers is useful for this.) The last picture shows the design on the felt with all waste canvas removed

The remaining steps were to repeat the design on the bear's nose and to turn the piece over to J.D. for framing. Now this ‘Close Encounter’ (title as yet undetermined – suggestions?) is complete. The meetings, so far, have been friendly. I hope this one will be, too.

Finished quickpoint picture of bear and bee

Now I want to mention a use of quickpoint that I neglected to discuss in the previous post about quickpoint (March 31, 2017): quickpoint bargello.

Quickpoint bargello pillow top "Aspen Trees"
Unlike tent stitch and the other traditional needlepoint stitches, bargello stitches are not short, slanted stitches. They are long, straight stitches. The lengths may differ, but a common stitch covers four strands of canvas thread. Two stitches share a square of canvas where one stitch begins and the other one ends. If you are working on #5 canvas, as I did in today's project, each of those straight stitches covers a lot of canvas, so you want to use a yarn that is going to cover that space under each stitch. You can see these long stitches put together in the “Aspen Trees” canvas here.

Quickpoint bargello pillow "Ocean Waves"


This type of bargello works up really quickly and is not hard for older eyes and hands. Here are some other examples of quickpoint bargello from the post for May 1, 2013. If you have never tried bargello, quickpoint is a good way to get started. The first one is called “Ocean Waves” for obvious reasons.

Bargello pillow and picture using the same stitch


The second pillow is called “Evergreens” and features a strong all-over bargello pattern. The picture on the wall is entitled “Firs and Feathers”. It is done in a technique that I call ‘Bargello Plus’. This combines a large area of a bargello pattern with an area of conventional tent stitch to give a realistic addition, like the eagle in the picture.


Bargello picture "Bear-ly There"
"Bear-ly There", available in our Etsy shop


Here is another example of 'Bargello Plus', entitled “Bearly There”. It combines the bargello pattern used in “Aspen Trees” with a realistic figure of a bear.


Finally, here is a picture which uses the “Ocean Waves” bargello design with tent stitch inserts of a fish and a seagull. I called it “Seafood Surprise”. You can decide for yourself which creature is going to get the biggest surprise!

Bargello Plus picture "Seafood Surprise"

Finally, a question from a reader: Did you ever find a source for standard quickpoint canvas?

JoAnn's online site shows some simple quickpoint kits designed for children. They are inexpensive. You could re-purpose them to do any picture you want to do. Otherwise, I think your best sources are the “gently used” shops, yard sales, and garage sales. If you have a weekly shopping flier, you might put an ad in the “Wanted” section. Contacting needlework and craft shops online is another possibility. If you find a good source, please let me know, and I will pass the information along.

Have fun!


 Creative Commons LicenseThis post by Annake's Garden is licensed under a Creative Commons Attribution-NonCommercial-ShareAlike 3.0 Unported License.

Contact Us

Name

Email *

Message *

Blog Archive