Showing posts with label projects for children. Show all posts

Saturday, September 5, 2020

Using Annake's Garden's "Extras"

J. D. and I originally started our "Extras" section (see tab in the menu above) to encourage older people to learn how to keep doing art and crafts even though their eyes and hands, like mine, have lost some clarity and dexterity, and also to encourage newcomers to try new techniques. Then came the pandemic. We found ourselves adding suggestions for dealing with small children, guiding the "’tweens" to learn things at their own pace and look for more, and devising self-teaching units for teens who like to learn on their own or with a group they choose as co-learners. Some of you have already taken advantage of what we have posted and we intend to keep adding to the "Extras" and organizing them to make them readily available.

We realize that there are many of you who will find yourself staying home and supervising children of all ages over the coming weeks and months. This will be new territory for many of you, especially dads, grandpas, and older brothers who may be taking courses of their own. Using our most recent previous post, we are using this current post to demonstrate teaching a topic at many levels, starting with small children. Please bear with us and follow through the age-level examples. You cannot teach a three-year-old the way you coached that after-school soccer team.

If you read our Extras, you probably have noticed that I often suggest teaching children of various ages with simple themes and equipment.  We just did a post about butterflies and moths. That set me to thinking about various things that could be taught to children at various levels of development, starting with teaching very young children with the aid of paper butterflies. The butterflies use simple materials and are easy to make. I have included some outline patterns at the end of this section to get you started. You can begin with very young children and progress to teach more complex ideas as the children grow older. At the end of this discussion I will make some suggestions for older children and also suggest how teens can turn the subject into a self-teaching unit for science, creative writing, etc.


TEACHING WITH PAPER BUTTERFLIES

Prepare yourself:

Make a note of the facts you know about butterflies and do a search for additional information. Children will ask questions — lots and lots of questions. Treat them seriously because they are serious to the children. If you don't know the answer, tell them so and promise to find out. Keep your promise. Breaking promises to children is destructive to your relationship with them. Don't worry that they will think you don't know everything about everything. They will come to that conclusion on their own. And a few years from now, they will conclude that you don't know anything about anything that they are passionate about.

Prepare your materials:

You will need:
    a pencil
    paper (Colored construction paper, gift wrap, colorful magazine  pictures)
    scissors (sharp-pointed for you, put away afterward; blunt-pointed for them)
    tape, paste, or glue
    popsicle or ice cream bar sticks
    patterns for several butterflies
Nice to have:
    a pipe cleaner for each butterfly (cut them in half if you like)
    glitter (Yes, gentlemen, you need to master glitter as well)
    a hole-punch to make holes in the wings or make "dots" to glue on
    clear plastic if you want clear or partially-clear wings

Don't worry. You will need this stuff again and again. Have a place to store it and make participating in clean-up a part of each lesson.

 What to do
:

Click here to download
Cut out two butterfly shapes the same size. For older children, make sure the two shapes are from different papers so that you can demonstrate how the wings look different when the butterflies are flying and when they are at rest.

To make antennae, use two small pieces of paper or bend a pipe cleaner in half. curl the ends of the pipe cleaner so there are no sharp ends.

Decorate the butterfly wings.

If you want wings that are partially clear, cut "windows" in the same place on both sets of wings. Glue clear plastic on the backs of the butterflies.
Cut off any plastic that shows past the edges of the butterflies.

Glue the butterfly bodies to the popsicle stick. You may want to do this one at a time and let them dry completely before you attach the other side. If you are using antennae, glue them to the back of the top butterfly before you attach it to the popsicle stick.

When a butterfly is dry, wave the stick through the air to make sure everything is firmly attached.

Teaching with your butterflies:

Start with simple ideas. Butterflies are very small animals. We should not touch them because we could hurt them. If one comes and sits on us, we should be very quiet and not move until the butterfly flies away. Butterflies fly by flapping their wings.  (Put your hands up, thumbs together and demonstrate flapping. Have the children try to copy you.) When the butterfly needs to rest or sleep, it sits on a plant and holds its wings together. (Hands up, palms together, children copy.) With your paper butterflies, show that the butterflies fronts and backs are different. Let each child choose a butterfly and name it. Let the children "fly" their butterflies around the room for a few minutes, then bring them to be put away. Go through the routine of flapping the next session. Ask the children questions to see if they remember what they learned before. Then teach a couple of new concepts.  It is nice to have a story as follow-up.

If your local library is currently open, find out what children's picture books and storybooks about butterflies and caterpillars are available or can be ordered for you. If you have more than two children, who can sit on either side of you while you read, have them sit in a semicircle in front of you. Show them the cover of the book and then tell them the title. After you read each page, turn it so that all the children can see it and give them time to look. Children will have favorites and want to hear them over and over. Don't show how bored you may be, and don't ‘cheat’ by leaving out parts. They will know! And if you do it again, you will lose a little bit of their trust.

There are literally thousands of pictures of butterflies and short videos about them on line. If it is winter or you are in an area where the children are not likely to see butterflies, these are a good alternative.

You can teach any simple idea with some version of this technique. Don't try to teach too many new things in one day and remember that repetition is the way small children learn. Praise progress; correct gently. Correct quietly, but firmly if the child is doing something dangerous or destructive. You are now officially on your own.  Good luck. There is always the next time to do better.
  
The "’Tweens" —  Grades 4 Through 8

Starting at about 4th grade, children will, if encouraged, begin to find out things on their own. Competition plays a part in this. Timed quizzes and JEOPARDY-type games become popular, especially if grades are not involved. Continuing with our butterfly theme, here are some suggestions for further study, both in and out of class. The work can be individual or group-oriented. The complexity of the questions and the language for the suggested topics can be adjusted to the age level.

1. Butterflies are insects. In the next 5 minutes, write down a list of as many insects as you can think of. (Students make their lists. Teacher writes them on a poster or chalkboard.) Were there any that weren't insects? Cross them off. Ask the students to choose 3 insects from the list and find out 3 unusual or startling facts about them by (give a time limit.) Some students will go much further than the assignment. Share all information.

2. Over millions of years, many flowering plants have formed a partnership with butterflies and other animals. A butterfly visits a flower. It unrolls its long proboscis, a tube-like mouth-part, to drink a sweet, sugary fluid called nectar from the flower. This does not hurt the flower. The flower made the nectar for just this purpose. Often there are lines or spots on the flower to show the butterfly how to find the nectar. While the butterfly moves around, it picks up pollen which sticks to its body. When it flies to another flower, some of the pollen rubs off. This helps the flower.

Research to find the answers to these questions:
    What is pollen and why does the flower need it moved to another flower?
    What kind of light can the butterfly see that we cannot?
    How do flowers make sure that the butterfly picks up some pollen?
    What other animals pollinate flowers? Name one that is not an insect.
    What is cross-pollination and why is it important?

3. Butterflies and moths go through 4 different stages in their lives. They are egg, caterpillar (also called larva), pupa and adult. The process is called metamorphosis, which means "changing shape process". A 4-stage process of change is called complete metamorphosis. Fewer than 4 stages are sometimes called incomplete metamorphosis. For example, a frog goes through 3 stages: egg, tadpole, frog. The caterpillar hatches out of the egg, eats as much as it can, grows so much that it has to shed its skin several times (a process called molting). Then it hangs its body, usually by the tail, on a twig or branch and appears to go to sleep. Its body hardens as a stiff covering forms over it. A moth usually spins a tough silk covering, called a cocoon, for itself and often does this underground. But in either case the body changes completely, so that, when it comes out of the little shell or cocoon it leaves behind, it is a butterfly or a moth. Read about butterfly or moth metamorphosis and draw a picture of the 4 stages.

4. You may want to know why animals and plants have those strange looking scientific names. Think of it this way: the common name "butterfly" is not the same in many other languages — 300 of them to be exact!  Here are just a few of those names for butterfly and their countries: sommerfugl (Denmark), papillion (France), psyche (Greece), chouchou (Japan), farfalla (Italy), lubalaba (West Africa), mariposa (Spain), parpar (Israel). Imagine trying to translate the name of the Tiger Swallowtail butterfly into 300 different languages!  When an animal or plant has one scientific name, scientists from every one of those countries will recognize it and be able to write or talk to scientists in other countries about it. Just for fun, why don't you write a new name for "butterfly" and share it with the class?

5. Teach students the form for writing a haiku. Have them cut a butterfly shape from paper and write or print their haiku on it. Then have them incorporate their butterfly into a poster, paper sculpture, mobile or other art form.  Make a display of all the projects.

6. More ideas:

    Silk thread is made by silkworm moth caterpillars. This is a huge industry. Some older students may want to research it. CAUTION: They may not like what they find.

    The Painted Lady butterfly is found on all the continents except South America and Antarctica. Some students may like the Painted Lady Migration Project. Potential for map studies and figuring large distances.

     Moths have been around for about 200 million years. What do fossils tell us about the Earth at that time? Butterflies appeared about 50 million years ago. What might have been happening to make them become active in daylight?

     Many butterflies and moths are endangered by climate change, deforestation, loss of habitat and loss of food plants. Some may have already become extinct. What can we do to help protect them?

How Teens Can Do a Self-Teaching Unit That They Won't get In School

Teens:  self-teaching units are completely directed by you. There is nothing to be turned in and there are no grades. The units provide information on a subject and suggest activities, but you are in control of which ones you find interesting and challenging. You work at your own speed and select what is most interesting to you. You may work alone or contact friends or fellow students who might like to join you in the study, in person or online. The results of your research can be converted into essays, term papers, speeches, 3-dimensional constructions or other projects if those interest you and further your traditional education.

Currently there are two complete units in our Extras — a botany unit on the history of trees, and one on being an archaeologist. I'm going to "walk you through" a zoology unit suggested by our previous post. There is also a series of our posts on Color, combining several sciences and visual art. Below are the first four in the series, which you can find in our Archives. The fifth installment, which concerns the appearance and development of eyes over millions of years and the impact of color on living organisms today, is slated for late September.

August 14, 2019: Spectral Light And Structural Light; All About Color, Part I
September 24, 2019: Pigments And Palettes; All About Color, Part II
February 10, 2020: The Non-Colors And Metallics; All About Color, Part III
June 28, 2020: The "Escenses" of Color; All about Color, Part VI

In order to make our previous post the basis of a self-teaching unit, first read the directions for the 'Tweens above, and write down investigations that you could carry much further, making note of any scientific terms for follow-up. Then go to the bottom of this page and select "Older Posts". The first one will be our article: "Butterflies, Moths, and Words: Entomology & Etymology". Read it and consider how you would proceed if you chose to study that subject. We will continue to add more units on sciences and the arts as time permits, so check back occasionally. J.D. and I wish you the very best of luck in your studies.



 Creative Commons LicenseThis post by Annake's Garden is licensed under a Creative Commons Attribution-NonCommercial-ShareAlike 3.0 Unported License.

Saturday, April 18, 2020

Arbor Day 2020

*** NEW MATERIALS ON OUR EXTRAS PAGE  ***
See more info at end of this post.

Aspens  (photo by J.D.)
Aspens  (photo by J.D.)
National Arbor Day is celebrated on the last Friday in April in the United States, where the idea was first proposed by Julius Sterling Morton in the 1870's. Morton was a Nebraska newspaper editor, a very successful farmer, and a statesman. He was very respected as an agriculturist. Morton loved trees, but Nebraska was not really rich in native trees, so he planted many trees on his estate. He came up with the idea for an Arbor Celebration and got the backing of other influential people. The first Arbor Day was celebrated in Nebraska on April 10, 1872. Morton's followers planted an estimated one million trees in Nebraska.

"Other holidays repose upon the past; Arbor Day proposes for the future."
J. Sterling Morton

The day became a Nebraska state holiday in 1885, the date changed to April 22 to honor Morton’s birthday. By the 1920's, each state had also passed a law establishing a state Arbor Day. These are celebrated on different days in each state. Trees are planted for these celebrations, so the dates depend on the climate in each state. In 1970, President Richard Nixon proclaimed a national Arbor Day on the last Friday of April each year. This year National Arbor Day falls on April 24th. Morton's former estate and lodge are now Arbor Lodge State Historical Park. Nebraska's state tree is the Cottonwood.

Blue spruce (public domain photo)
Blue spruce


All of the states in the United States have a State Tree (some have more than one).  In addition to State Trees, the U.S. National Tree is the mighty Oak and the District of Columbia claims the Scarlet Oak. Our Colorado's State Tree is the Colorado Blue Spruce.


What Is Deforestation?


Landscape photo by J.J.
Deforestation is the cutting down of forests to make way for farmland, pastureland, building cities, logging for lumber, and mining. It also happens when fires in the forest get out of control, or when there is an infestation of insects or diseases from some other part of the world for which the forest has no immunity.

Here are some disturbing facts about deforestation:
  • Forests currently cover about 30% of the land, but scientists fear that 100 years from now there will be none left!
  • One and a half acres of forest worldwide is cut down every second!
  • That means 90 acres are cut down every minute. That's 20 football fields! Multiply that 90 acres by 60 and you get 5,400 acres per hour. Multiply that number by 24 to see how much forest is lost every day
    Weathered stump, photo by J.J.
  • Deforestation contributes heavily to excess carbon dioxide in the atmosphere. That is because trees absorb carbon dioxide to make their food and to grow. In return, they produce oxygen and release it into the air. Carbon dioxide is a dangerous "greenhouse gas" and adding it to the atmosphere raises temperatures worldwide. The concentration of carbon dioxide in the air today is higher than it has been in 3 million years.
    Weathered tree roots, photo by Anname
  • Trees help to clear the air of pollution. People in large cities were wearing masks outdoors to protect themselves from pollution for years before the coronavirus epidemics began.
  • Deforestation also contributes to soil erosion because tree roots keep soil from eroding. Loss of trees has made floods more devastating because so much topsoil is washed away. That also means that substances like fertilizer are washed into coastal waters, poisoning ocean plants and animals.
    Endangered lowland gorilla, photo by J.J.
    Endangered lowland gorilla, photo by J.J.
  • The majority of Earth's endangered animals live wholly or partially in forests.
  • The tropical rain forests were once called "the lungs of the Earth" because of all the carbon dioxide they kept out of the atmosphere and all of the oxygen they produced. But rain forests are disappearing faster than other forests.
  • Many life-saving medicines, including cancer-fighting drugs, have come from species found in rain forests. Many more remain to be found — if they don't disappear before they are discovered. As many as 28,000 species will disappear at current rates worldwide by the year 2045.
    And a Corby in a Pine Tree, photo by J.J.
    "And a Corby in a Pine Tree",  by J.J.
  • Bird species here in North America are declining in alarming numbers. That means both numbers of birds and numbers of bird species.  Climate change is driving species to find cooler climates in order to survive. That may mean moving further north on the globe or moving to ever higher, cooler elevations. In either case, they may find these new habitats don't have good supplies of their natural foods. They may not find sufficient nesting materials to build nests that protect their eggs and baby birds. They may run into new predators. The fact that they have left their natural habitats may well mean that those habitats will suffer from increases in the populations of harmful insects and their larvae. We need to preserve existing trees and replant ones that have been lost.


What are some things that trees do for us besides affect air quality and climate change?


Maple syrup, public domain photo
Do you like to put maple syrup on your pancakes and waffles? Maple syrup is made from the sap of sugar maple trees in the Spring during a time when the trees have come out of their winter dormancy and started producing fresh sap to carry nutrients throughout the tree. Read the labels carefully; there are a lot of "maple-flavored' syrups out there which cannot compare with the real thing!

Tree fruits, photo by J.D.
Many of the fruits that we eat grow on trees. That is something you can teach small children when you serve any of these fresh, canned, or frozen: apple, apricot, avocado, cherry, date, fig, kumquat, lemon, lime, mango, olive, orange, papaya, peach, pear, plum, quince, tangelo, tangerine. Many other fruits are available and popular in other parts of the world.

Tree nuts, photo by J.D.
The same thing is true of nuts, which are the seeds of many trees. These include: almonds, Brazil nuts, cashews, chestnuts, coconuts, hickory nuts, macadamia nuts, pecans, pinon and other pine nuts, and walnuts (both black and English).  But the list does not contain peanuts, which are not nuts and don't grow on trees. Coconuts and almonds produce a good substitute for milk that lasts much longer in the refrigerator than cow's milk.

As I mentioned before, many medicines have been derived from trees and tree products, particularly those from the rain forests.

Interior design with wood features, public domain photo
A major use of cut trees is for lumber and plywood.  Woods with particularly nice colors and/or patterns are used for furniture and decorative moldings. Most of the latter are hardwoods, rather than the softer evergreens. If you have some of these, take good care of them. They will become increasingly rare and far more expensive.


What can we do about some of these problems?


Forest's Edge, photo by J.J.
The obvious answers are 1) cause fewer trees to be cut down and 2) plant new trees. Let's look at both of those activities. A huge amount of wood is used to make paper. That is something we can do something about. Going paperless as much as possible can help. Recycling paper will definitely help.

Cloth shopping bags, photo by J.D.
Cloth shopping bags
Using cloth shopping bags and not choosing to buy items with a lot of unnecessary packaging are large steps in the right direction.

Try to set up a book and magazine exchange with friends and don't duplicate subscriptions. Let the children draw and color on the backs of paper that is printed on one side only.  Ask companies that send unwanted catalogs to you to remove your name from their mailing lists. Encourage your children to make art and craft projects with paper and cardboard.  Reuse cardboard boxes for mailing or compact storage. Crumpled or shredded paper is better packing material from an environmental standpoint than "packing peanuts" or plastic airbags.  Use greeting cards and pretty wrapping paper again for decoupage and collage projects.

Planting a tree. public domain photo (USDA)
Planting a tree
Now, about planting trees.  The best trees to plant are those which are native to your area or which have been bred to do well in your soil, water, and climate conditions.  Check out your state tree, for example. Our state tree is the Colorado blue spruce and it is available here — baby ones are even free from the Arbor Day Foundation.  But you might want something that is more multi-purpose. Consider fruit trees. They don't take up as much space as shade trees, they grow fast, they provide you with valuable food, and the leftovers will make birds and squirrels happy.  In either case, read planting and care directions carefully and follow them.  You can also volunteer to plant trees in state and national parks or in areas where trees have been destroyed by wildfires or flash floods.  Check with the authorities about opportunities and regulations.

Here are some other things you can do:
  1. Learn about prospective legislation that involves forests, parks and other public lands. Make your opinions clear and vote on the side of conservation and reclamation.
  2. Vote for candidates for office who share your views. Talk to someone on your town or city council or attend some of their meetings. Ask questions about the possibilities for conservation and reclamation locally and make suggestions for improvements where possible.
  3. Learn more about trees — they can be fascinating.
  4. Teach your children to love and respect trees.
  5. Don't carve your initials or words into tree bark. It can damage the growing layers underneath and let in harmful insects or diseases that will eventually kill the tree.
  6. Watch an episode of Pete Nelson's Treehouse Masters on the Animal Channel™. Pete's a man who doesn't hesitate to hug a tree! See how carefully the crew cuts floors and decks so the trees can move naturally in the winds common to their environment. Those trees are meant to live for many decades.
  7. If you cannot plant a tree,  give a donation to a group replanting areas ravaged by fires, floods, tornadoes or avalanches. Bring back the trees.

For more about trees, check our Extras page for:
Teachable Moments: Trees for Children
Teachable Moments: Trees for "Tweens" (Ages 9 to 12)


*** Our  "Extras"  page (the last tab on the top menu) has PDF files of extra materials related to the subjects in our blog posts, mostly aimed towards young people, their parents and teachers. Due to the current pandemic resrictions, we intend to expand this section greatly over the next two months. Check back every week for new files.
J.D., Annake's Garden Gnome

 Creative Commons LicenseThis post by Annake's Garden is licensed under a Creative Commons Attribution-NonCommercial-ShareAlike 3.0 Unported License.
Tuesday, March 31, 2020

What Is Earth Day?

*** NEW MATERIALS ON OUR EXTRAS PAGE  ***
See more info at end of this post.
Earthrise, Apollo 8 (Public Domain photo)
Earthrise, photo graphed from Apollo 8
ANNAKE: Those of you who read our post on Earth Day 2019 know that I worked on a project which in 1967 made the Earth Sciences (Astronomy, Geology, Meteorology, Oceanography) mandatory parts of the science curriculum for grades 1-12 in all 50 states. We did a tremendous amount of research while we were trying to determine what scientific principles should be taught at each level. Things that we learned in climatology (a branch of meteorology) and oceanography alarmed us, and we were also made aware of the mass extinctions of much of our planet's animal and plant life. Most of us had also read Rachel Carson's book, Silent Spring, published in 1962.

Not long ago we held a yard sale in which I included a number of outdated science books, including some that had been sent to me by publishers after the new science curriculum was established. One gentleman was very excited by the books and asked me about them. I explained about our efforts in 1967. He thanked me profusely for our efforts. He said he had never known there was such a thing as geology until he read about it in a new textbook. He was "hooked for life". He majored in geology in college and had spent his life as a geologist until the previous year, when he retired.

Grand Canyom (Public Domain photo)
The Grand Canyom, a geologist's playground

Earth Science textbook
But, while we got the courses into the textbooks, we did not get the emphasis on those disturbing trends highlighted as we thought they should be.  When we received the textbooks from various publishers the following year, very little, if anything, was said about these issues. We felt that no one was listening to us. We wrote letters to teachers in other states, members of state and national government, science magazines, etc. and spoke to our students in detail about environmental issues. Some very important people were listening to us — our students — but they were not really in a position to make much of a difference yet.

One member of Congress shared our concerns — Gaylord Nelson, U.S. Senator from Wisconsin. He was alarmed by the air pollution that was prevalent in large cities and disastrous oil spills like the one in the ocean off California in 1969. He set out to promote what he described to the media as a "natural teach-in" about environmental issues. On April 22, 1970, 30 million Americans — many of them college students and other youths —  from coast to coast attended conferences and rallies on environmental issues. That was the first Earth Day. In that same year the Environmental Protection Agency was created. Many environmental projects were supported by both Republican and Democratic members of Congress. (Yes, that can happen!)  Important legislation was implemented, including the Clean Air Act, Clean Water Act, and Environmental Protection Act. Earth Day was, and still is, celebrated on April 22nd every year.

River Rapids (Public Domain photo)
Clean air, clean water, clean shores - the American Dream?

For some years, this was an American project, growing in strength and numbers every year. But in 1990 Earth Day went global. It reached 200 million people in 141 countries. President Clinton presented Senator Nelson with the Presidential Medal of Freedom (the highest honor a civilian can receive in the U.S.
"It was a gamble, but it worked."  — Senator Gaylord Nelson
The theme for Earth Day 2020, on its 50th  anniversary, is Climate Control, because this is a major issue which affects everyone and must be dealt with now.

J.D.: For about the last 25 years, it has become popular in certain circles to deny that climate change is happening at all; or, if it is happening, that it is just a temporary statistical anomaly or a slow, gradual natural process that we can easily adapt to. For whatever reason — greed, shame, an attempt to avoid blame, belief in massive global conspiracies, ignorance, or just inertia — some cling to this belief despite the overwhelming evidence right before their eyes. Like this:

  • The concentration of carbon dioxide in the atmosphere is the highest it has been for 3 million years.
  • The 20 warmest years on record have been in the past 22 years.
  • In the year 2019, almost 400 all-time high temperatures were set in the Northern Hemisphere.
  • The continent of Australia suffered extreme drought, enormous wildfires, and the loss huge numbers of endangered species.
Hubbard ice wall (Public Domain photo)
Melting glacier
  • Greenland and Antarctica are losing ice six times faster than they did just 20 years ago. The amount of ice lost by their ice sheets last year would cover the entire state of Texas with a layer of ice 30 feet deep.
  • Permafrost, the layer of soil in the arctic that has been frozen for centuries, is melting. This is releasing methane gas gas which was trapped there. Methane is one of the most serious greenhouse gases contributing to global warming. NASA has equipped planes with highly sensitive methane detectors. They have flown over 11,583 square miles (30,000 square kilometers) of Arctic tundra in North America, Asia, and Northern Europe, so far detecting 2 million of these methane "hotspots".
  • But there is something else disturbing about the thawing of permafrost. People have been buried in shallow graves in this layer for a very long time. Scientists have already encountered viable samples of the virus which killed so many people in what was called the "Spanish flu" pandemic in 1918. They are now concerned about finding scarlet fever. And it is possible that smallpox — which was declared eradicated in 1980 — may make a reappearance. People have not been vaccinated for that deadly disease for four decades.
  • Famine is another danger; in just the past few weeks, countries in Africa and the Near East have lost — and are still losing — huge amounts of their food supplies to hordes of locusts.

Flood (Public Domain photo)
Flood
  • Hurricane season is expanding at both ends.
  • In 2019 Hurricane Dorian tied the 84-year record for having the strongest winds at landfall and became the 5th strongest Atlantic hurricane to make landfall in terms of atmospheric pressure.
  • Since 1995 there have been 17 above-normal hurricane seasons.
  • Now 800 million people are already vulnerable to climate change impacts such as droughts, floods, heat waves, extreme weather events, sea level rise and health issues.
That number goes up daily.

It’s bad, folks, and getting worse. If anyone wants to argue how we got here or why, or who is to blame, save it for another time and place; right now, we all need to do whatever we can to improve the situation. More importantly, we need to STOP doing anything that might make things even worse: when your house is on fire, you don’t solve the problem by throwing gasoline on it.

A climate agreement was signed by 195 nations in 2016, agreeing to limit global warming, adapt to climate change, and protect Nature. The United States is not currently one of them.

Endangered Lemur (Photo by J.J.)
ANNAKE: You probably know that those of us here at Annake's Garden are crusaders for the protection of endangered species. Recently the Weather Channel ™ did a nice interview with National Geographic photographer Joel Sartore. Some years ago, while Sartore was photographing a small, rather insignificant-looking sparrow called the grasshopper sparrow,  in Florida, he became interested in species — like that little bird — that were threatened with extinction. After his photo of the bird appeared on the cover of a national magazine, the Florida Fish and Wildlife Service devoted resources to ensure its survival.

Now Sartore is devoting his life to photographing, to the best of his ability, every endangered species while it is still here. He thinks it will take him another fifteen years to complete his project, called The Photo Ark. He films mostly in studios and in protected places like zoos and aquariums.  Most of the animals are photographed against a solid black or white background so that the focus is entirely on the animal.

Sartore says that when people look at one of his animal photographs, they are drawn to its eyes. There they see beauty, curiosity, determination, and other characteristics the we, ourselves, possess. All the photos are the same size, so that a little mouse is just as important in its portrait as an elephant is in its portrait. Each one plays a part in the ecology of the Earth and every one is important to all of us.

Cheetah print by Annake
Cheetah, print by Annake
I really identify with that idea. When I do an animal "portrait",  I look at dozens — sometimes hundreds — of photographs, paintings, even cartoons.  But I don't want to portray just AN animal; I want to show THE animal. The last part of the picture that I put in is the animal's eyes. It is only then that I know the animal — in a way and at a level that I cannot truly explain.


Cougar eyes from needlepoint by Annake

Sartore says that an iconic photograph, which stands the test of time, can long outlive the photographer.  It tells a story. Photographs and photographic projects like The Photo Ark can illuminate the problem and save many endangered animals, if we care enough to help.

For examples of things that young people (and even those of us not so young) can do to help this coming Earth Day — and every day — check out these documents under our Extras tab:


*** Our  "Extras"  page (the last tab on the top menu) has PDF files of extra materials related to the subjects in our blog posts, mostly aimed towards young people, their parents and teachers. Due to the current pandemic resrictions, we intend to expand this section greatly over the next two months. Check back every week for new files.
J.D., Annake's Garden Gnome


 Creative Commons LicenseThis post by Annake's Garden is licensed under a Creative Commons Attribution-NonCommercial-ShareAlike 3.0 Unported License.

Thursday, May 16, 2019

Painting with Paper

Autumn Cityscape, collage by Annake
A few days ago we posted our Spring Question and Answer article. The second half of it was devoted to answering a grandmother's plea for art activities for her grandchildren over summer vacation from school. You may want to read it either before or after today's post — or both. This activity is good for group projects, senior citizens, and people rehabilitating from strokes or arm injuries, as well as for children and teenagers.

Today's topic is collage.  The name comes from a French word meaning "to glue".  This is a legitimate art form. Most people associate it with Picasso and Braque at the beginning of the 20th Century, but it is much older. About the year 1200 (C.E.), Japanese artists were making albums of poetry and decorating them with woodcuts and delicate paper collages.  A number of 20th century and contemporary artists have made collages from various materials — some even large enough to qualify as sculptures.

I am going to take you step by step through a simple tissue paper collage.  Because I keep my samples as teaching tools, I will use 8-inch by 10-inch canvas boards, not construction paper or poster board for backgrounds. I use a half-and-half mixture of white glue (Elmer's Glue-All®) and water to attach the paper.

Tissue paper collage step 1
Gluing om the background
I use a small flat brush, but you will find a number of alternatives in the post mentioned above. The tissue paper comes in large packages of several different colors or patterns from an everything-for-a-dollar store. I paint a section of the canvas board completely with the glue mixture. Then I lay a torn strip of tissue paper on the glued section and brush the surface of it with the glue until it lies flat. Overlapping the strips gives the collage texture and mixes colors to make new ones. I continue until I have covered the board completely. (Because I am using canvas board, I turn the loose ends of the paper to the back of the board and glue them down.)

Tissue paper collage step 2
Tearing tissue paper pieces
I let it dry while I tear pieces of the other colors of tissue which I plan to use for my "paper painting". Tearing the paper with a twisting motion gives me some concave edges and some convex ones. This takes a little practice, but don't discard any pieces that don't have curves. You can use them all. If I am planning to overlap colors, I often tear two layers together. Today I am overlapping red paper pieces and it saves time to tear two layers at once. I use a plastic cookie container to hold a variety of colors. (This can be filled in advance.)  These irregular pieces can also be used instead of strips to make the entire background.

Conquistador collage
Let me show you a piece made many years ago by an adult student who has become a lifelong friend. She first put down a layer of pink tissue pieces. Then she started to cover this with a red layer, working from the outer edges toward the center.  She found that she had enclosed a shape that made her think of a picture she had seen of a Spanish conquistador.  After consulting references, she drew the outlines of this figure on the background and went over the picture in detail with black ink. (Today she would use a fine-line marker.) This is one of many ways to enhance a torn-paper collage. The fact that this picture has hung on walls for several decades demonstrates that these collages are very durable.

I practice the placement of my red pieces until I get the arrangement I want, then glue a few pieces down at a time. Now I have most of the petals of my flower and can use smaller pieces and other colors to make the center.  Notice that there has not been any drawing involved in making the picture.  Once the center is complete, I can apply the remainder of the petals.  Some overlapped pieces of blue and green tissue suggest a stem and leaves. A longer stem supports a just-opening bud. This time I let the entire collage dry overnight. (You may not be able to do this if you are working with a group, but try to do it if at all possible, even if it means a delay until the following week.) Place the remaining glue and water mixture in a jar with a tight-fitting lid.  Wash whatever you have used for brushes thoroughly or discard and replace them.

If the surface of the collage is completely dry when you press on it, give it a substantial coat of the glue mixture. When that is completely dry, it should be firm and shiny and make a small sound when you tap it with a fingernail. It should not be sticky or soft in places.  If you wish, you can further decorate the surface with permanent black or colored markers. The finished collage can be mounted for display.  Mount it on white, black, or colored poster board, with margins of about two inches, wider at the bottom than at the top and sides. Your artists may want to put a label on the bottom margin with the title of their picture and their name.  (If you have used canvas board or another heavy material as the base of the collage, poster board may not be strong enough and you may need a heavier material.)  Children in fourth grade and beyond can do this kind of collage if they have the opportunity to study live flowers, good artificial flowers, or good photographs.

finished poppy collage
Finished poppy collage, labeled and mounted


lighthouse collage
Lighthouse collage
Our next kind of collage is a cut-paper collage. As the name suggests, the paper is cut with scissors rather than torn. Torn-paper and cut-paper techniques can be combined, as they are in this picture of a lighthouse and the cityscape at the top of this article. The torn paper is used primarily as a background and the cut paper is used to define important shapes. In this picture the clouds and rocks are torn paper and the lighthouse and other features are made with cut paper.  Some outlining has been done with very fine lines in some places and heavy ones in others. In the city collage, the entire background was done with torn tissue paper, overlaid with cut paper. All the building shapes and the straight-line shapes were cut out, using a more opaque paper for the darkest shapes.

Another kind of collage that is popular with teenagers and adults is the theme collage. This one can be done on construction paper, but I prefer poster board. The collage is made with pictures cut from newspapers and magazines. It is usually based on a single word cut from a publication or spelled out with alphabet letters that have been glued to the background. It is good to have some words that have been cut out in advance, but the artists may choose to make their own. (You may need to set some "ground rules" about what words are and are not appropriate.)  Pictures may be used whole or cut into pieces. If you are using poster board, small objects like buttons, coins, or charms can be glued on for further decoration.  If you have used construction paper for the collage, you may want to mount it on a piece of poster board as described above.

Space themed collage

Tear, cut, and glue!


* For a somewhat different approach to collage, you might want to look at Annake's work in our March 27, 2019 post.       - J.D., Annake's Garden Gnome

 Creative Commons LicenseThis post by Annake's Garden is licensed under a Creative Commons Attribution-NonCommercial-ShareAlike 3.0 Unported License.

Sunday, May 5, 2019

Patterns and Preparations: Spring Q & A, 2019

Are you going to give us a copy of that pretty geometric pattern you showed us at the bottom of your anniversary post or was that just a tease?
Geometric needle arts chart
Geometric pattern - click here to download

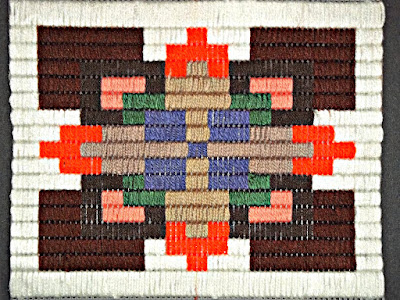
That wasn't a tease! It was a promise of something to come! It may take me a while, but I always try to keep my promises. Yes, there is a downloadable copy of the square. Here it is. It is a versatile little pattern, not only for the canvas work shown here, but for latch-hook, counted cross-stitch, quilt piecing, tiling and more.  Feel free to substitute any colors that you wish.

Now I am going to show you a couple of ways the pattern appears in use and make a few suggestions for ways to use it. First of all is this Nordic stitch piece. That stitch consists of four identical upright stitches, each over three strands of mesh or three bars of plastic canvas for each square on the graph. The blocks of stitches are just about as square as you can get on this scale of canvas. The design can be adapted to monks' cloth or Aida, but you will have to do a little experimenting to get the right sizes of yarn or floss that will cover the background completely. This sample is done on #7 plastic canvas.

Geometric pattern done in Nordic stitch


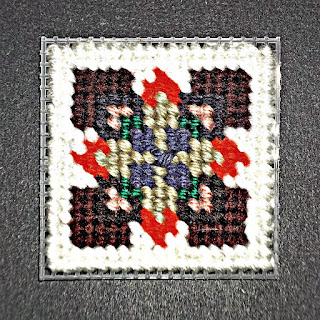
Geometric pattern done in continental stitch
The same pattern done in continental stitch
In contrast, here is the same pattern in tent stitch on the same size canvas. this time each square on the pattern represents one stitch, preferably a continental stitch. (Using different kinds of yarn for the samples, I was not always able to duplicate the colors of the pattern.) The only change I made was to do a cross stitch on the center square.

Now suppose that you have done this much of the pattern on the center of a larger block of material. Where are you going to go from here?  If you want to use the pattern for a larger object, consider one of these alternatives:
  1. Start by working the block in the exact center of the canvas or fabric you plan to use. Once it is worked, use a solid color to work the background or use concentric squares of more than one color.
  2. Make an all-over design of the pattern squares in one of these ways: 
    • Repeat the square, exactly as shown, above, below, and to each side of the original square and continue to make whole or partial squares until the background is filled.
    • Work as above, but omit the outer row of white stitches. This will make a similar, but "tighter" design. 
    • Omit both white rows so that brown connects with brown, white connects with white, and orange connects with orange. This will change the design quite a bit, so you might want to practice it on one side of the square with the intention of removing it if the change does not please you.
The more I looked at the pattern, the more I wanted it to be a true 4-way design. So I am going back to the graph paper to make that pattern happen. It will be available in a future post. That's not a tease; that's a promise!

Are you going to share the pattern for the black fish with the rainbow colored spots when you get done with it?

Fish design, original crayon resist & new background
Fish design, original crayon resist & on new background
Of course. That little fish has an interesting history. It started as a demonstration of crayon resist art for 4th and 5th grade students. I recently found it in a file drawer with a lot of other samples. I didn't care for the background, so I cut out the fish and put it into a folder with other "fishy" ideas. Later, while organizing materials for collages, I found some "watery" paper that went well with the fish. I glued the fish to the background and taped it to a wall in my studio for further consideration.  As I studied it, I could see the possibilities for a needlepoint picture and another in my series of reverse appliques.


fish stencil for download
Fish stencil - Click here to download
I'm not going to make you wait for the pattern. Here it is to download. I have made some modifications, including the change in the pectoral (chest) fin, which I think improve the pattern; I also enlarged it to make it easier to cut out, which is why the orientation is unusual.  You may think of ways to use it that I haven't even considered. You also may finish yours before I do mine!  The pattern is to the left. If you would like to share yours with us and have them shown on a future post,  J.D. will tell you how to do that. J.D?

If you would like to submit a picture for inclusion in a future post, please do NOT use the Comments section or our Contact form — they have no way to accept attachments. Instead, send an email (with attachment) to: annakes_garden@yahoo.com or to annakesgnome@gmail.com.   -J.D.

Around Christmas you had some ideas for art projects that visiting grandchildren could do when they couldn't go outside or didn't have events to go to. Do you have some summer ideas for when school is out?

I certainly do! In my next post, there will be a long tutorial about collage and related art activities that are simple and interesting for both children and teenagers. These activities are also good for leaders of summer programs, Scouts,  senior citizens, even people working to regain dexterity after an injury or stroke. And they are fun for anyone who likes art or crafts. Here are some things you can do now to prepare for them. This advice is especially for those of you working with children and teenagers, but it has wider applications.

Well-lighted workspace
Start with a well-lighted workspace
1) Plan the place for the activity. You may want to put away some things to make room for it. Art can be messy. An old plastic shower curtain or tablecloth will save spills on tables. They are good for floors, too, but strategically-placed pads of newspapers work, too. Check to see how much light is available at various times of day and if an additional light source will be needed. Plan in advance for a place where the young artists can display their work (That is important!) Some of these activities can be done outdoors, but wind, heat, glare, insects, noise and other factors can make the activity more difficult (and give the complainers more to complain about). If the area must be cleared for other purposes, a clock or timer is good to have handy so that you can plan plenty of time for finishing, clearing, and clean-up (a group responsibility — make that plain). Have a safe place to store their unfinished projects.

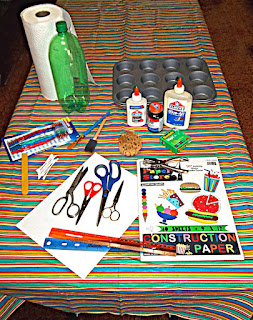
Gathered tools, materials, & containers
Gather tools, materials, & containers...
2) Start now collecting the things you will need that can be found around the house or acquired from family and friends. (Don't panic; you will probably not need a large amount of any of these for any one project, nor will you need everything on these lists for a whole summer of projects.)  Start with all kinds of disposable containers like food trays, muffin tins, paper coffee filters, egg cartons, a large plastic soft drink bottle with a tight fitting lid to hold water, and similar items.  A number of things can serve as brushes. (Glue sticks are probably better for younger children, but they will limit what can be attached.) The smallest of the soft foam paintbrushes sold at hardware stores, toothbrushes, popsicle or craft sticks all work. If you are using paintbrushes, get the wide, flat ones, not the round ones. Cotton swabs (Q-tips) are nice for adding fine details.

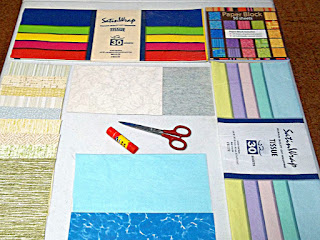
collection of papers for collage
... a collection of papers for collage...
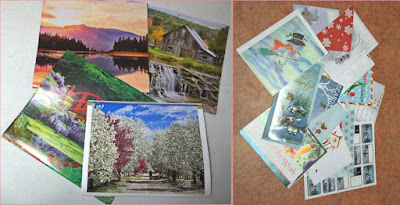
3) Collect pictorial materials like greeting cards, calendars, catalogs and magazines with colored pictures, but be sure to go through them and delete anything you find inappropriate or questionable for your age group. Fabric scraps and trimmings, and buttons without shanks are always useful, as are toothpicks, jigsaw-puzzle pieces, stickers, and small charms. Collect as many different kinds and sizes of scissors as are appropriate for the ages and abilities of your artists. Collect colored stationery, gift wrap, wallpaper samples, paint samples, etc. Store the items in one or more boxes, labeled, or in a plastic storage tub. Have a lined wastebasket ready for scraps.

pictorial materials to be cut up
...& some pictures you don't mind cutting up.

4) Add any of these that you don't have on hand to your shopping list:
  • a BIG roll of paper towels 
  • glue sticks for younger children 
  • a large squeeze-bottle of white glue or a small one each for older children. teens, or adults 
  • a pack of colored construction paper a pack of colored tissue paper
5) Things that are nice to have:
  • a hand-held hair dryer for faster drying 
  • wax paper to place between painted projects that are not yet dry 
  • colored and black markers for writing or drawing on the finished surfaces 
  • poster board to make more durable mountings for finished art

Be prepared ... to have fun!


 Creative Commons LicenseThis post by Annake's Garden is licensed under a Creative Commons Attribution-NonCommercial-ShareAlike 3.0 Unported License.

Contact Us

Name

Email *

Message *

Blog Archive