Showing posts with label applique. Show all posts

Sunday, March 10, 2019

Ships at Harbor: Seascapes in Needle Arts, Part IV

Claude Monet,  fishing boat at anchor at Rouen
Claude Monet,  fishing boat at anchor at Rouen
A painting, whether super-realistic or abstract is made up of shapes. To be interesting, the shapes should have rhythm, variety, and an element of surprise or unpredictability. That's quite a balancing act!  Rhythm implies repetition; too much repetition is boring and the viewer loses interest.  Variety suggests a collection of differing shapes, but this may be confusing or even irritating to the viewer.  (Haven't you ever seen clothing or upholstery material that you felt was too ‘busy’ for your taste or been in a room that was so cluttered that you didn't feel comfortable in it?)  Surprise means something unexpected introduced into the scene, but it probably should not be something so incongruous that it takes a viewer's mind completely away from the picture as a whole.
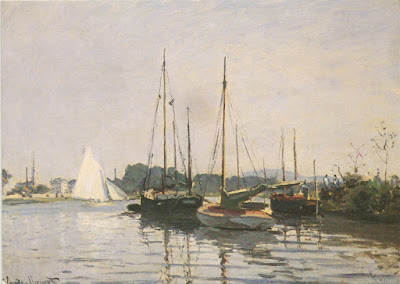
Claude Monet, sailboats
Look at the harbor scene above and notice how well the artist has used his shapes.  See how the strong vertical shapes of the masts and the fainter diagonals of the rigging rhythmically break up the horizontal areas of the water, the line of trees, and the passive sky with its barely suggested clouds. The shapes and colors of the boats' hulls add variety, as do the ripples that break up the mass of the water and provide a second area of rhythm.  The bright white sails of the boat in the background give us that element of difference and focus our attention.  The artist was Claude Monet, leader of the Impressionist movement. Although he is not known primarily for marine paintings, he did a number of them. (Another one of his is shown at the top of this article.) He was fascinated by the effects of light on water and continued to use them in his paintings throughout his entire career.
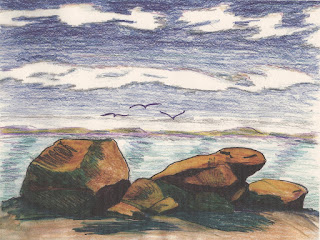
Sketch of an approaching storm by Annake
Sketch of an approaching storm, by Annake
There are some generalizations that we can make about shapes and areas in a composition (always remembering that rules are made to be broken.)  The large horizontal areas of sea and sky are generally considered as negative spaces and passive shapes unless something active, like a storm, plays out against them. In the preliminary sketch to the right, the clouds and the wavelets beginning to form on the surface of the water are active, carrying the energy of the fast-approaching storm. Vertical and diagonal shapes are generally considered to be active and positive.  Something like a tree is more "active" than a nearby boulder.  If a scene is dominated by horizontal areas and vertical shapes or lines, diagonal shapes like the white sails on the boat are often added to the scene for contrast. Curved shapes like rolling hills are more passive; turbulent curved waves or breakers are very active.  Too many passive shapes can make a composition seem dull, even though it is attractive in other ways.
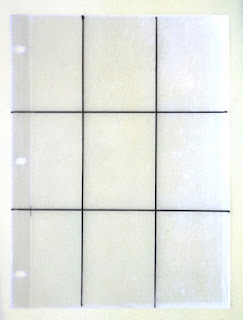
Rule of Thirds grid tool
An arc can be a powerful shape in a composition, particularly if it is at the edge of a point of interest, such as one of the focal points where the "Rule of Thirds" applies.  This plastic overlay, which we showed first in Part V of the Landscape series, works just as well for seascapes as it does for landscapes. We show it here the portrait position (in contrast to the landscape position we presented the first time). If you have not yet made this handy tool, now is a good time to do so.  You only need a sheet of clear plastic, a ruler or other straight edge, and a marking pen. Divide the plastic sheet into thirds, both vertically and horizontally, and mark the four points of intersection. Your primary point of interest in a composition should be at or near one of these points.  A secondary point of interest, if you include one, should be at or near the point diagonally across from the primary one.
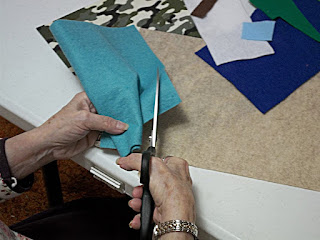
Cutting felt shapes
A shape that may be interesting by itself can get lost in, and be neutralized by, other shapes unless it is supported by color and contrast.  If a shape that you are using is distracting from, or not contributing to, your composition, try moving it. If that doesn't work, remove it. This is especially true if you are doing a composition in applique. Before you stitch anything to a background,  be sure that the shapes that you have chosen to cut out are really contributing to the design.  When you are satisfied with the arrangement, pin it in place and check it one more time before you begin to stitch. View it from a distance as well as at close range. If you decide that a piece isn't right after you have sewn it in place you may be unwilling to remove it, even though it weakens the design.

I know that some of you are concentrating on lakeside or riverside scenes, rather than true seascapes. You can certainly put sailboats, motorboats, rowboats — even rafts and inflatables — into those compositions to give variety and points of interest that counterbalance the landscape and water.
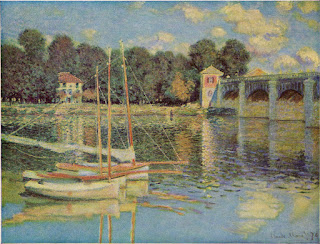
Claude Monet, "The Bridge at Argenteuil"
Here is another Monet painting, obviously portraying an inland waterway, which may give you some ideas. Notice how the boats cover the primary point of interest at the lower left (when the plastic overlay is in the horizontal position), while the towers on the bridge are close to the secondary point of interest, diagonally at the upper right. The bridge itself moves away in a slightly diagonal line, and the arches and reflections introduce another rhythm. A more passive rhythm is created by the variety of shade trees in the background.  The other building in the scene occupies a place close to the point of interest on the upper left, but is less "positive" than the other two.

It is all too easy to get so interested in the smaller positive or "active" features of your composition that  you neglect the larger negative or "passive" parts of it. But they are equally important to the success of your design. You have just seen me making shapes and I have emphasized the importance of their arrangement for applique projects. They are also important for embroidery projects where the background fabric(s) will show between the areas of embroidery.  In my tapestry work I often do three-dimensional, even padded, stitching on top of a background of tent stitch or other essentially flat stitches, so I'm always planning my backgrounds first. Here is a simple technique that I use when I am working on an unpainted canvas. I have used it successfully as a teaching technique with school-age children as well as older students.
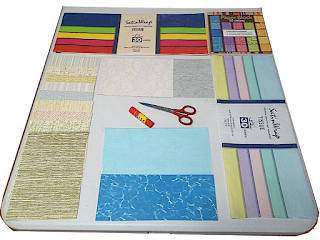
Examples of materials needed for the exercise
First collect all the colored paper that you can find: stationery, poster paper, wrapping paper, tissue paper, colored newspaper advertisements, etc. You will need scissors and a glue stick or other adhesive. Cut a piece of heavy paper, poster board, or cardboard in the size and shape that you want for your final design. Work first with the two large ares of your seascape. Will the sky be light blue, bright blue, dark blue, light gray, dark gray, or sunset colors? Cover the area you have designated as sky with the appropriate colored paper. Do the same thing with the part of the picture that you have reserved for the sea. When you are satisfied with the proportions of these two areas, glue them to the background.

Think about ways that might make these areas more interesting. Can you put in tall, impressive clouds or sweeping, diagonal ones? Is there an island or headland in the area where sea and sky meet? Is it rocky, with hard shapes, or soft and rounded? Is it grass-covered or does it have trees?  Are the tress broad-leaved trees, evergreens, or palms (each has a different outline)? What is at the bottom of your picture? Rocks, a sandy beach, a jetty? Cut pieces of paper in the shapes and colors of the appropriate features and place them on your background, but do not glue them to the background.
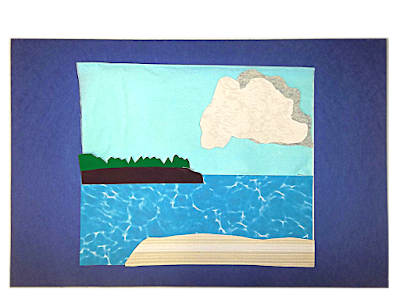
Mock-up of a background using cut shapes

Now cut out the positive, active features that you planned your composition around. Position your pieces where you think they will be most effective.  Again, do not glue them to the paper. Then reconsider the shapes you put in during the second stage of this process.  If the pieces do not contribute to the design, move them. If they still don't help, remove them. Glue in place the features of this group that you want to keep. Now reconsider the entire composition.  Are your positive pieces completing the design the way you intended? When they are doing that, glue them in place.

Congratulations! Now you have a good "working model" and are ready to begin creating with your choice of materials.

Keep up the good work!


Claude Monet, Regatta in Argenteuil

 Creative Commons LicenseThis post by Annake's Garden is licensed under a Creative Commons Attribution-NonCommercial-ShareAlike 3.0 Unported License.

Monday, February 27, 2017

Our Fourth Anniversary Edition

cake with four candles
It is time for our annual anniversary post. How time does fly! It hardly seems possible that we are beginning the fifth year of this blog! First of all, I want to welcome the new nations that joined our readers this past year. They are, in alphabetical order: China, Ecuador, Egypt, Estonia, Guatemala, and Swaziland. We are so happy you have chosen to “visit” us. The little blue maps that we used previously were not doing justice to lovely small countries like Luxembourg. (I have fond memories of my visit there.) So we have put a large world map on the wall by my desk. I mark each country with a paper dot.

photo of world map from Annake's office
Photo of world map from Annake's office


Lemon balm growing in Annake's Garden
As Spring draws closer, we are getting ready to plant vegetables and herbs for the seasonal Farmers' Markets. Annake's Garden is earning a good reputation for its fresh herbs. One of the things that we do is to supply a sheet of simple recipes and tips for using each herb to first-time buyers of that herb. We would also like to share some of these recipes with you. One of the most popular herbs we introduced last year was a favorite of mine — lemon balm (Melissa officinalis). These two easy recipes got great reviews. Look for more recipes during the coming year.


Lemon Balm Simple Syrup

1 C. sugar                  1 C. water             3 C. chopped lemon balm leaves

Boil water and sugar until sugar dissolves. Add lemon balm. Simmer another 5 to 8 minutes. Remove from heat. Let cool for 30 minutes. Strain syrup, discard leaves.* Refrigerate in a tightly-closed container.

* Leaves can make a second batch of syrup if used right away.


Lemon Balm Coolers

¼ C. lemon balm syrup                                              1 tsp. Lemon extract
½ can lime juice concentrate                                     5 ounces club soda
2 C. crushed ice

Combine the ingredients in a blender and blend until smooth, Serve in chilled glasses. Garnish with lemon balm sprigs if desired.


parsnips
Parsnips
I don't know if you follow health food news, but one of my favorite vegetables is getting very favorable mention for its nutritional value. That vegetable is the parsnip. (Brassica rapa) It is one I use a lot, especially in slow cooker (crockpot) recipes. With our demanding schedule, we depend on having this kind of hot meal waiting for us at the end of the day. You can use parsnips in recipes that call for carrots, turnips, or other root vegetables. If you haven't tried them yet, I hope you will do so soon. Look for more about herbs and/or other food plants later this year.


Applique on sweatshirt
Applique on one of the sweatshirts in our Etsy shop
I am always pleased when new needlework or art topics get a good response. I was gratified by the interest in Swedish weaving, optical illusion needlework, and reverse applique. There will be more information and patterns this year for all of those topics. Another thing I hope to begin this year is a series of articles relating the characteristics of kinds of art work to their applications in needlework, starting with still life. Sometimes I am pleasantly surprised by the interest in a particular post. That was the case with the one about decorated sweatshirts and the follow-up post about jackets made from sweatshirts (November 30, 2016 and December 15, 2016). I will try to include more information about clothing decoration in future needlework posts.

I really appreciate the questions I get from readers because they allow me to give additional explanations and instructions that time and space did not allow me to give in the original posts. I was especially delighted with the variety of questions based on the 'Serendipity' post (January 15, 2017), which generated so much follow-up that it will take two whole posts to cover all of it (February 14, 2017, and the first post in March 2017).

Keep those questions coming,


upcoming project collage
Some upcoming project topics...


 Creative Commons LicenseThis post by Annake's Garden is licensed under a Creative Commons Attribution-NonCommercial-ShareAlike 3.0 Unported License.

Sunday, November 20, 2016

Stylish Seasonal Sweatshirts


Decorated jacket from sweatshirt
Here in the high country it is possible to wear sweatshirts for at least part of three of the four seasons. The garments are sturdy, economical, machine washable and colorfast. I buy them whenever I find them on sale. Be aware that they are on sale for a reason. Check carefully for flaws before you buy. Another thing that you should be aware of is that the sizes are not always accurate. I have five now that are all marked “Large” — and no two are the same size! Hold them up at arm's length to get a better idea of their real size. Decorated sweatshirts are durable. To illustrate that fact, here is a shirt I decorated and have worn regularly for the past ten years. It has been laundered scores of times.

apple applique sweatshirt

print fabric panelYou can buy ready-printed panels for applique, although these are more often intended for use as pillows, table linens, etc. These are usually sold as a separate unit, rather than by the yard. Many of them need to be trimmed down in size the be used as appliques for sweatshirts. You can make your own panels from calico prints or the kind of illustrated fabric usually classified as “Country” (i. e., rural or pastoral scenes, farm animals, people in old-fashioned costumes, etc.); that's what I did with the apple design above.


sweatshirt with raglan sleeves
Look carefully at the sleeves of your chosen sweatshirt before you choose a panel or make a pattern. Most sweatshirts have set-in sleeves that curve slightly toward the center of the shirt above a straight up-and-down side seam. But other shirts have raglan sleeves. These sleeves slant upward at an angle, joining the shoulder seam much closer to the collar. This narrows the area available for applique. You may find that a circular. diamond-shaped, or free-form design will fit a raglan-sleeved shirt better than a square or rectangular one.


I mark what part of the fabric I need for the applique with tailors' chalk and then add a 3/8 to ½-inch (1 to 1.5 cm.) border all around that will be turned under, leaving a smooth edge. After turning it under, I press the piece, making sure the edge is flat and straight. Then I am ready to pin the applique in place on the sweatshirt (using lots of pins). I baste the piece in place, remove the pins, and sew the applique to the shirt either by hand or by machine. If I like, I then edge the applique with rick-rack, braid, or cotton lace.

Green sweatshirt with large applique
Green sweatshirt with large applique. Note the lack of raglan seams.

Red sweatshirt with round appliques

Even small pieces of patterned fabric can be used effectively. Here is a finished shirt with a seasonal theme. I decorated it with three circular pieces cut from the same fabric and arranged in a triangular pattern. Each circle was then edged with gold trim. Small motifs like this can be arranged horizontally, vertically, diagonally, or in squares, diamonds, circles, etc. Try pinning the pieces in several different arrangements and choose the one you like best.


Embroidered sweatshirts are a little more complicated, especially if you are decorating a dark-colored shirt. If you are working on a light-colored shirt, you can use a commercial iron-on transfer (following the directions on the envelope) or make your own hot-iron transfer (see the post for May 12, 2016). For dark-colored shirts, I usually draw my design on thin tissue paper and pin it to the inside of the shirt front. Then I back-stitch along the pattern lines with white thread, floss, or yarn. This gives me an easy-to-follow outline on the right side of the shirt. I remove the tissue paper and discard it. The white stitches can be removed from the finished embroidery later if you like; I just work over them to hide them.

Steps in sweatshirt embroidery
Steps in sweatshirt embroidery, as described above

Today, however, I have something even better to work with! These are patterns I drew with transfer pencil on non-woven interfacing. They have already been used to transfer the flower designs onto a pair of pillow tops. I then filed the patterns for future reference. Now I can pin them to the insides of shirts and stitch along the lines with white thread, floss, or yarn. I simply leave the interfacing in place to further strengthen the embroidery.

used iron-on transfers
Recycled iron-on transfers of lily and pansy

All of the items I have shown here have been for adults, but the same techniques work well on sweatshirts for children. Animals, cartoons, sports logos, superheroes, and many other topics are appropriate. If there are no children in your life, clothing like this is always in demand at women's shelters and emergency services. You and your friends could take on a project like that and have a lot of fun getting together to make the shirts.

I regret that I have written fewer posts lately. J.D. and I have been as busy as long-tailed cats in a room full of rocking chairs, dealing with craft shows and sales. We have another three weeks or so of that and then I will be able to get back to my regular writing schedule. Until then...

Stitch away!


Finished embroidered sweatshirt with detail


 Creative Commons LicenseThis post by Annake's Garden is licensed under a Creative Commons Attribution-NonCommercial-ShareAlike 3.0 Unported License.

Sunday, July 31, 2016

For the Wee Folk

some of Annake's puppets
Some of Annake's many puppet designs
If you have followed this blog for some time, you have read about my puppets occasionally. I started making them for my own children, made more for the children of family and friends, and used many as teaching aids throughout the years.

Earlier this year (February 29, 2016), I showed a puppet made into a simple stuffed toy. I call these toys ‘loveys’ because they remind me of simple, even crude, toys called that which I saw as a child when living in the southern United States. Here are some other examples:

loveys
'Loveys", made from Annake's puppets

Lately I have begun combining the ‘loveys’ with another of my favorite pastimes, making afghans — in this case, baby afghans. I've never cared much for the “Pink is for girls, blue is for boys” idea. Babies don't see pastels very well. The first color that babies really focus on is usually bright red. Toy manufacturers know this and make good use of the fact. I used bright colors for my children and incorporate them in most of my afghans.

big red barn afghan and lovey
"Big Red Barn" afghan/lovey set

I mean for the afghans to be used long after they are needed to wrap a tiny baby. I envision toddlers using them as nap blankets and play mats, cuddling in them while being read to or told stories, even using them as “security blankets”. Therefore, I try to incorporate features that inspire “teachable moments” for parents and care-givers. “Cottontail's Garden”' for example, could help children learn colors, associate the colors with favorite vegetables and fruits, and learn the names of those edibles. That should make trips to the grocery store more fun. (J. D. says it makes him hungry just to look at that afghan.) The association of the garden pattern with the rabbit ‘lovey’ leads naturally to reading storybooks like Beatrix Potter’s Peter Rabbit series.

cottontails garden afghan and lovey
"Cottontail's Garden" afghan and lovey set

Later this spring (May 12, 2016), I used a puppet to show how simple designs like those in coloring books could be adapted to create various kinds of needlework items for children and decorations for their rooms. The first thing I did was to convert my lion puppet pattern into a down-loadable outline drawing, similar to a coloring book picture, suitable for several kinds of needlework projects.

Puppet and new design outline

I used a copy of the outline pattern to cut out pieces of felt. Then I stitched the felt pieces together and appliqued them to a background. At this point, the picture would be suitable to be framed or to be made into a small wall hanging. There were, however, several other options. Eventually the picture was used to decorate a tote bag — a nice place for a coloring book and crayons perhaps?

lion applique tote bag
Lion applique on tote bag
Needlework pictures, wall hangings and other decorations are ideal for a child's room because they are not likely to cause any injuries to the children. I never put glass in a picture designed for a child's room, and I use narrow, light-weight frames. I learned this lesson the hard way. One day when my oldest child was about 14 months old — and already walking and climbing out of his crib — I found he had climbed onto the bench of my spinet piano. From there he had climbed onto the closed keyboard and then onto the top of the piano. He was trying to lift a framed painting that was bigger than he was off the wall. The painting had glass in it and a very heavy frame. There were dangers of several sorts of disasters. I think I got my first gray hair that day! We moved all the pictures closer to the ceiling and secured them to the walls with adhesive. Then I began making things for the nursery that weren't hazardous to young would-be mountain climbers, like this blackwork cat embroidery which, even framed, weighs just a few ounces.

cat nap framed blackwork
"Cat Nap",  framed blackwork embroidery
I'm still embroidering animals in blackwork, redwork, whitework, and Holbein embroidery (which is essentially blackwork stitches done in many colors). I decided to do the lion design in Holbein embroidery on checked gingham. Once again, I used the simple outline design, this time to make a hot-iron transfer that I ironed onto the gingham. You will notice that the pattern is reversed when you use the iron-on technique. You can see more animal designs — these destined to become a child's quilt — on the blog post for October 18, 2013. Go to our Archive or the search engine on this blog to find them, along with a pattern you can download.

lion Holbein embroidery
Lion pattern done in Holbein embroidery
The last little lion is done in latch-hook, a soft medium that children like to touch. I traced the outline directly onto the latch-hook canvas with a permanent marker. I had to adjust the position of the tail a little to make it look right. This little fellow became a small wall hanging. As you can see, the three projects are similar, but different.

lion latch hooked
Lion pattern as a latch hooked wall hanging
I hope you will try one or more of these projects, whether with the downloaded designs or ones of your own making. If you don't have children or grand-children of your own, please make something for a child in need of kindness. There are far too many of them out there.

Thank you,


we love you this much wall hanging
"We Love You THIS Much", latch hooked wall hanging from our Etsy shop


 Creative Commons LicenseThis post by Annake's Garden is licensed under a Creative Commons Attribution-NonCommercial-ShareAlike 3.0 Unported License.

Thursday, May 12, 2016

Designing from Coloring Books

A local (and loyal) reader asked me: “You said we could use a child's coloring book to make designs for needlework (April 10, 2016). Are you going to write a blog post about that?”

I'd be happy to do that. The picture I planned to use was from Landolls, Inc.'s Let's Color coloring and activity book, © 1993. (I never throw anything useful away!) But, to prevent any possible copyright infringement*, I'm substituting a sketch of one of my puppets in a similar pose. The advantage to such drawings is their simplicity, with large open areas. I've added back legs and feet, which wouldn't show on the puppet, and moved the front legs downward and the tail partially around from the back.

lion puppet
Lion puppet
Once I had a working sketch, I erased all the unnecessary pencil lines and traced the sketch on tracing paper with a wide-pointed permanent marker. I ran this through the copier to get an outline picture like those you might see in a child's coloring book. Click on the outline below to download it.

Now that I have the outline, how would I use it for needlework?

1) The use for applique seems obvious, especially in felt. Felt does not need to have its edges either turned under or overcast with stitches. It holds its shape well and comes in a wide range of colors. The first thing you have to know about felt applique is that you cannot just cut your picture up and use it as pattern pieces. You need to decide which pieces will overlap others and which pieces need to be cut out, even if they will never be seen. I used tracing paper again to make a set of the shapes I would need to pin to the felt to cut out the pieces for the applique. The picture is formed in layers with the shapes from the back layer sewn down first. You then work forward toward the front of the picture, overlapping pieces as you do so. To make this easier to visualize, J. D. took photographs at four stages in the development of the appliqued picture.

lion applique sequence
Lion applique sequence, steps 1 through 4
2) As for embroidery, the outlines could easily be done in plain chain (October 31, 2015) and the eyes, nose, teeth and tongue in satin stitch. If something more complicated is desired, the outlined sections could be filled in with solid chain stitch (Beauvais embroidery, January 31, 2016). Or do the picture in cross-stitch, or Spanish blackwork, perhaps on baby-checked gingham. Embroider each section in a different diaper pattern (October 6, 2013).

Transfer pencil on tracing paper
Do you want an easy way to transfer your outline to your fabric? Make a hot-iron transfer. Trace your outline on tracing paper with a hot-iron transfer pencil. These red pencils are made by several companies. I use Aunt Martha's®, 2 to a package for $2.99. Each pencil will make many transfers. Keep the pencil point sharp and go over the lines firmly until they look dark. Cut and press a piece of quarter-inch checked gingham about two inches larger on all sides than your outline design. Pin your transfer pattern (red-penciled side down) to the gingham, centering it with the checks. Press the transfer pattern on the back with a hot, dry iron (no steam). Press hard and go back and forth several times, but don't scorch the paper. It takes at least 5 seconds to get a good transfer. Unpin one corner and lift it carefully. Peek under it to see if your lines transferred. If not, re-pin it in the same place and iron over it until they do. Remember that your picture will appear reversed on the fabric, so avoid lettering or anything that looks “wrong” if reversed. The red lines will wash out of the fabric with warm water and a mild detergent once your project is finished.

Lion outline transferred to gingham
I plan to do this sample in Holbein embroidery, which is done in blackwork patterns, but in many colors of embroidery floss. The transfer was ironed onto light yellow-green baby-checked gingham with a dry iron set for “cotton”'. You can use a transfer pattern on many plain-colored fabrics, too, but be sure to try a small sample transfer on the fabric first. Not all fabrics will accept a transfer. If you go over a transfer pattern again with the transfer pencil, pressing firmly, you can often use the pattern again. I file and save mine.

Lion latch hook front
Lion latch hook,  front
3) Draw the pattern on rug canvas, to be filled in with latch-hook knots (June 16, 2013). Ordinarily, I would work the background of the latch-hook picture as I made the picture itself. This time I did the picture and will fill in the background later. (These are all works-in-progress; I will show the finished items at a later date.)


Lion latch hook back
Lion latch hook, back
If you look at the back of the latch-hook lion and disregard the vertical lines of canvas, you can get a good idea of how the picture would look if it were done in tent stitch on quickpoint canvas.

I'm sure you can think of many other possibilities. Of course it is not necessary to use a cartoon animal as a design. There are many coloring books with more detailed, realistic pictures of birds, flowers, houses, automobiles, and nearly anything else you desire. Dover Publications has enough of those to keep you busy for a lifetime! If you want something more elaborate, look at some of the beautiful and intricate adult coloring books which have become very popular during the past year.

*These simple coloring book designs are perfectly acceptable when you are making projects for yourself and your household or for gifts. If you plan to sell your work at craft shows or shops, however, do not use any copyrighted materials in your designs. The legal complications can be awful. I will continue to give you suggestions in these blogs for creating your own original designs.

Thank you all for allowing me to discuss one of my favorite subjects. Now, design something of your own!


 Creative Commons LicenseThis post by Annake's Garden is licensed under a Creative Commons Attribution-NonCommercial-ShareAlike 3.0 Unported License.

Contact Us

Name

Email *

Message *

Blog Archive