 |
| Traditional counted cross-stitch on plain white linen |
The cross-stitch is an ancient and venerable stitch. It can be traced back at least to the Byzantine Empire, founded about 300 AD (or CE, if you prefer). It probably spread northward from the Black Sea region along big rivers like the Dnieper, used both as a pattern stitch on its own and as a filling stitch with other forms of embroidery, such as white-work and pulled-thread work. It was used widely in western Russia, the countries that bordered Russia on the west, the Baltic republics, Germany, Holland and Scandinavia. It came early to colonial America, where it was used primarily for linens and in decorative samplers. Indeed, it is sometimes called “sampler stitch”. (For more on cross-stitch, see the post for Aug. 26, 2013.)
In the 20th Century, cross-stitch — which had always been done by counting threads in even-weave fabrics — became widespread when patterns that could be transferred by ironing them onto fabrics became readily available. There was no need to count threads; just stitch over the printed X's, which would disappear when the fabric was laundered. If you want to make this kind of pattern yourself, it's easy to do. Use a well-sharpened hot-iron transfer pencil to draw your design in red X's on graph paper. Go over each X a few times so it will transfer easily. Remember that the design will be reversed on the cloth once it is ironed on, so letters should be done in reverse on the graph paper. (For more on making iron-on transfers, see the post for Oct. 6, 2013.) This pattern would be a nice size for a pillowcase, table runner, or the back yoke of a blouse. Patterns can be used more than once; I file mine to use as charts for other projects.
In the second half of the 20th century, counted cross-stitch once again became popular. Books of patterns that enabled stitchers to make detailed, realistic pictures were printed. New even-weave fabrics became available in a broad range of colors and thread-counts. (The larger the number on the fabric, the finer the weave and the smaller the stitches; the smaller the number, the larger the scale of the embroidery and the fewer stitches per square inch.) Today, counted cross-stitch is as popular as ever. This rose is cross-stitched on monks' cloth using the pattern from the Aug. 1, 2013 post.
I believe those of you who are beginners, learning counted cross-stitch on gingham, as well as those of you who are experienced cross-stitchers who have never tried monk's cloth, are in for a treat. It is a sturdy cloth woven so that it appears as all-over small squares of woven thread, each with a tiny opening at its corners. Since you use these little holes to space your stitches, just as you did with the corners of the squares of gingham, it makes the transition to plain fabrics very easy. If you have given up on cross-stitch because Aida cloth or even-weave fabrics are too difficult to see easily, you should find that projects on monk's cloth are easier to see and quick and easy to stitch. If you have only used white, ecru, or natural monk's cloth, you will be pleased to know that it is now available in as wide a range of colors as Aida cloth. (For more about monk's cloth, see the blackwork blog post of Feb. 27, 2014.)
Cross-stitch designs may be worked on monk's cloth in either tapestry yarn or embroidery floss (rayon, linen, cotton or silk). Monk's cloth has approximately 7 stitches per inch (49 stitches per square inch), so you may need to separate the strands of yarn or floss. Experiment on a scrap of fabric to see how many strands give you the coverage and appearance that you desire. I find that one or two strands of tapestry yarn and three to six strands of most kinds of floss work well for me at this scale, but you must find what works best for you. The preparation of the fabric and the technique of the stitching are just the same as for any other cross-stitch project. Here is the pattern above, worked in four shades of blue on monks' cloth using a single strand of J&P Coats™ craft thread.
Once you have some experience with monk's cloth, you may want to move on to Aida cloth. The technique is the same, for there are still little openings at the corners of the squares. The big difference is one of scale. The most popular gauge of Aida is #14. This is readily available and comes in many colors, including black. The scale is comparable to #14 mono needlepoint canvas. The stitches will be much smaller than the ones you used on the monk's cloth (nearly 200 per square inch, as compared to about 50.) The finished motif, worked from identical charts, will be much smaller on the Aida as well. For this reason, you will be able to produce very fine details. From #14, the weave and the scale get finer and finer: #16, #18, # 20, etc. Eventually the fabric gets so fine that only a single strand of thread can be used.
 |
| Butterfly stitched on #11 flax Aida cloth |
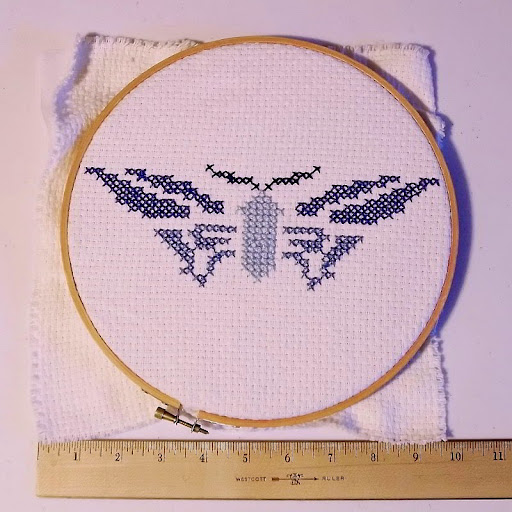
My local variety store also carries #11 Aida. This is my favorite because it works up much like #10 mono needlepoint canvas, which I use all the time. Therefore, I can easily visualize the finished project before I begin stitching. There is an Aida #11 flax in a lovely natural tan. It is firm and pleasant to work on. The edges fray very little and it does not require a backing fabric. The finished embroidery requires little or no blocking. It can be hand-washed gently in warm, soapy water, with no bleach, rinsed, and pressed on the reverse side with a warm iron. It works especially well as a background for embroidering plants or animals. Here's our little flier again, worked in a single color on # 11 Aida flax, using three strands of six-strand embroidery floss.
I worked the next sample on a cream-colored piece of #14 Aida. I worked in several colors, using two strands of six-strand embroidery floss and a single strand of craft thread for the light lines on the body. Once I had made the complete pattern used in the other two samples, I filled in the rest of the outline with a darker color of floss. Although the pattern was not designed to represent any living species, I think the little creature looks pretty realistic. At this scale, many people have reached the bottom limit of their vision, where they can discern individual cross-stitches as X's with their naked eyes. It is this use of tiny, closely packed stitches which makes realistic renderings possible. Aida cloth is not inexpensive. I recommend that beginners purchase a small packaged piece in white, antique white, ivory or a pastel. It is easier to see the open spaces in the fabric and your stitches show up well.
 |
| Today's butterfly embroidery samples shown together for comparison |
 |
| Butterfly on monk's cloth in Assisi technique: subject of a future blog! |


