Saturday, December 19, 2015

More Optical Illusion Needlepoint Patterns: Interlacings

This time we are going to begin with my version of an old bargello stitch pattern that produces the illusion that stitches pass over and under each other. The pattern, called Double Weave Stitch, is made with vertical and horizontal blocks of two contrasting colors. The original used 3-stitch blocks, but I thought 4-stitch blocks would be easier to see and understand. I have used #7 plastic canvas for easy visibility. I began in the first empty square in the upper left-hand corner with Color A (aquamarine here), but you could begin in the upper right-hand corner and work right-to-left instead of left-to-right. I brought my needle up through that space from the back and pulled the yarn through, making sure to hold the tail of the yarn against the back of the canvas and work over it to secure it. I skipped 5 threads (or bars of plastic canvas) downward and took the yarn to the back of the canvas. After making 4 parallel stitches this way, I had my first vertical block. I then made four more stitches in the top row, but each stitch covered only one thread. I repeated this pattern to the edge of my canvas. An empty horizontal block has been left bare in each of the top two rows in the illustration. The next row of vertical blocks are made below the four 1-thread stitches, with 3 horizontal threads left uncovered. Do at least two rows of the vertical blocks before you begin the horizontal blocks. The third row of vertical blocks repeats the first row, leaving out the 1-thread stitches.

double weave stitch sample
Double Weave Stitch sample, on #7 plastic canvas

To make the horizontal blocks, thread Color B (brown here) and secure it under stitches on the back of the canvas. Hold the last stitch of the first vertical block back with your thumbnail. Bring the Color B yarn up under that row and stitch forward horizontally across the bottoms of the 1-thread stitches, skipping over 5 threads and ending just underneath the first stitch of the next vertical block. Work 4 parallel stitches in this way and you have made the first horizontal block. The bottom stitch of each of these blocks covers the top of the stitches in the vertical block below it. This gives the illusion of weaving. You can work the color blocks alternately, or you can fill in all the vertical blocks your canvas will hold and then put in the horizontal ones. Do what is easiest for you. Wherever there is not enough room for a complete stitch or block, do as much of the stitch as you possibly can. When you do the same pattern on #10 canvas (see below), no canvas shows through and the illusion is complete. I recommend smoothing each block with the pad of your thumb as you complete it.

Double Weave Stitch sample 2
Double Weave Stitch sample, on #10 plastic canvas

In our next project, we are doing a pattern of loosely interlaced “ribbons“, done here in 4 shades of red and 4 of blue. Because they are loosely spaced, some background shows through between the “ribbons”. I've indicated this background with white. Each stitch is doubled. Each stitch covers 4 threads. The stitches rise and fall diagonally by starting and ending 2 threads higher or lower each time.

"Ribbons" sampler in 4 reds and 4 blues
Use the enlarged picture at the bottom of this article as your guide. I began with the darkest red below the 16th thread at the left edge and worked 8 pairs of stitches upward and to the right. I then put in the 4 blocks of white stitches near the bottom and the top of the red diagonal. The spaces between the white blocks gave me the places to start the four shades of blue, which slant downward to the right. It also showed me the placement for the next sections of red “ribbon”. This is probably the most complicated pattern we have done yet, so take your time, study the picture, and be prepared to take out stitches if you make a mistake.


"Ribbons" sampler in 2 reds and 2 blues
Is it possible to do the pattern with fewer colors? Certainly. This time I did the same pattern on #10 canvas with only 2 shades of red and 2 of blue. The pattern is tighter on the finer canvas and no canvas shows through. (You can do the ribbons in a single shade of each color, but it is not as interesting.) The red and blue yarns are twisted nylon novelty yarns. The white yarn is tapestry yarn, which is thinner and flatter than the novelty yarn, increasing the illusion that the white background is further below or behind the “ribbons”.


Needlepoint medallions
Needlepoint 'medallions', done two ways
For those of you who like to include some tent stitches in your design, the background spaces give you an opportunity to do that. The top of the sample shows a background space done in the paired stitches over 5 threads. The bottom sample shows the background space done in continental stitch. You will need to make 3 stitches in each of the 2 top rows, 7 stitches in each of the 4 middle rows, and 3 stitches in each of the 2 bottom rows.

Patterns like these have many uses. They may be framed as examples of geometric or “op art” design. They make excellent pillow tops. In both cases, I suggest you key the color schemes to the décor of the room where they will be used whether in your own home or as gifts for someone else. Other uses include desk sets, purses, tote bags, place-mats, and table runners. It is relatively easy to “translate” such designs to graph paper (using one square of graph paper for each square of canvas mesh), for larger projects, such as needlepoint or latch-hook rugs.

Remember that practice makes for perfect projects.


 Creative Commons LicenseThis post by Annake's Garden is licensed under a Creative Commons Attribution-NonCommercial-ShareAlike 3.0 Unported License.

Monday, November 30, 2015

Autumn 2015 Questions and Answers

strawflowers
Strawflowers in the porch planter
Your strawflowers are so pretty. Is it just the camera angle, or do these have unusually long stems?

You're very observant. It isn't the camera angle. Many of these flowers had stems 18 inches (46 cm) or longer. Instead of planting them in annual flower borders as we usually do, this year we planted them in our porch planters, which are halves of wooden kegs. If you look closely at the bottom of the picture, you can see the barrel staves. We seeded the planters heavily so that the plants would be crowded, watered them generously, and fed them with liquid plant food once a month. They rewarded us with tall, healthy stalks and multiple flowers on single stalks.

What do you DO with the strawflowers?

We found several unusual two-toned ones this year in our collection, plus one that appears to be a true black. We put little transparent zip-lock bags over those flower heads to catch the seeds for next year's planting. We cut the other flowers before they could be pollinated, gathered them into bunches tied with string, and hung them in the garden shed to dry. I used them in autumn bouquets along with silk flowers and leaves. This little arrangement was our Thanksgiving table centerpiece.

pilgrim centerpiece


yellow irises
Yellow Irises in the spring
If I may, I would like to share another autumn flower story with you. We have several re-blooming irises, but — at our high altitude — the flowering season is seldom long enough for a second blooming. This autumn was late. Our yellow re-bloomer put out buds in mid-October. We covered the plants through the first two frosts. The first flower bloomed on the day we received a freeze warning. I was doubtful that we would be successful, but I cut the flower stalks and brought them inside. I put the stems in a pitcher of warm water and hoped for the best. The buds continued to open and new buds formed for a full two weeks! This is one of our most fragrant irises. It filled the house with sweet scent while leaves and even snow fell outside. Here's a picture of our beauty in her spring dress. It was lovely to have this reminder of spring while the world was shutting down for the winter.

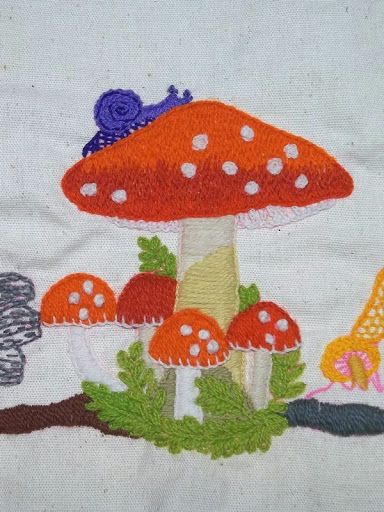
I love the mushrooms! Are they all part of the same project? If so, how big is it and what will it be when it is finished?

I'm so glad you like them! Yes, they are all part of the same piece of embroidery. It is a panel that is approximately 34 inches (87 cm) long and 11 1/2 (29 cm) deep. When work slows down at the end of the year, I will finish it. I haven't decided yet whether it will be framed or become a wall hanging. Either way, you will see pieces of it again on our crewel embroidery posts and a picture of the whole thing when it is finished.

mushroom embroidery collage
Views of the mushroom embroidery, in progress


Am I right that there are some rows of chain-stitch examples on the brown sampler (October 31, 2015 post) that you didn't show in the enlarged samples on blue cloth? Are you going to show us those?

You are correct. The brown sampler was a practice sampler that I did as I was experimenting with new ways to embellish plain chain-stitches. Due to time and space constraints, I left those off of the close-up samples. However, you can see them close-up on the samples below, along with stitching directions.

sampler stitches #1 & #2
Sampler stitches #1 & #2

1) This is just an extension of the #8 stitch pattern on the October 31, 2015, post (laced chain). Starting at one end of the chain (either one will do), lace the chain with a second color of yarn. When the loops are completed, couch each one with a single strand of the same color. Starting at the opposite end of the chain, lace the chain in the reverse direction with a third color. Couch the loops with a single thread in the same color. This makes a very attractive border.

2) Make two parallel chains in the same color. I have made these some distance apart so it is easy to see how the stitches work. You will probably want to place your lines of stitches a little closer together. This is basically a Pekinese stitch (see the January 16, 2015 post) done on two parallel chains. I started at the right-hand end of the bottom chain, but you can start at either end. I drew my contrasting color of yarn through from the back and, working from left to right, made a Pekinese-stitch loop through two adjacent links of the top chain. Keeping my yarn on the surface and working from right to left I pushed my needle down and then up through the next two adjacent links in the bottom chain. No loop this time. I made another loop through the next two links on the top chain. I continued to the ends of the chains. No couching was required. If you begin from the left end of the chain, reverse the left-to-right and right-to-left directions. You may also want to do a sample of an interlaced double chain made the same way as the interlaced double-running stitch shown on the same January post.

sampler stitch #3
Sampler stitch #3

3) Make a rather loose chain with one color of yarn and secure it at both ends. With a thinner yarn of a contrasting color, make a French knot inside each link of the chain. To make a French knot, bring your yarn up through the link, wrap the yarn once around the needle, and push the needle to the back of the fabric, gently pulling it until the knot is formed. Bring your needle up in the next link and continue until all links have knots in them. You may also want to try knots made with floss or metallic thread for more contrast.

I enjoy being able to clarify directions, give additional examples, and expand on topics....so keep those questions coming!


 Creative Commons LicenseThis post by Annake's Garden is licensed under a Creative Commons Attribution-NonCommercial-ShareAlike 3.0 Unported License.

Monday, November 16, 2015

Optical Illusion Needlepoint and Bargello - An Introduction

optical illusion needlepoint
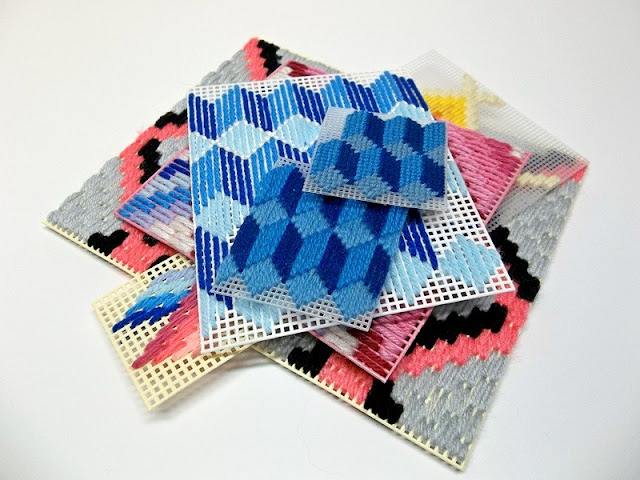
Optical illusion needlepoint samples
We're going to explores some patterns that fool the eye into seeing things that are not really there. These include 3-dimensional objects that appear to extend out from the canvas, “hollow” spaces in the canvas showing depth, textured surfaces, and interwoven areas where sections appear to pass over and under each other. Some optical illusions can be traced back to Early American quilt blocks. One of these, called “Tumbling Blocks”, was the inspiration for our first project. You will need either plastic or fiber canvas, at least one tapestry needle, 3 shades of one color of yarn, and scissors. I did the sample on #7 plastic canvas with knitting yarn to make the stitches easily visible.

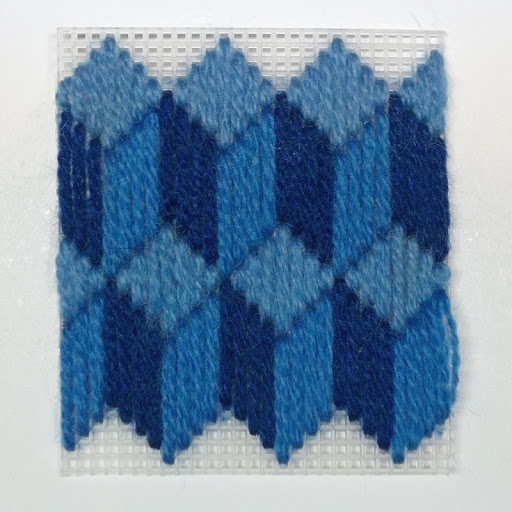
reversible block illusion
Reversible block illusion, the basis for "Tumbling Blocks"

Begin in the upper left-hand corner of your canvas (or the upper right-hand corner if you are left-handed) with the lightest shade of yarn. Count down to he 4th square of mesh. Bring your needle up through this square from the back. Pull the yan through, holding some against the back of the canvas so you can secure it by stitching over it. Stitch down over 2 threads of mesh (or 2 bars of plastic canvas). Bring your needle up through the next higher square of mesh in the next row and stitch down over 4 threads. Repeat, stitching over 6 threads in the next row and 8 threads in the 4th row. Then repeat the stitches over 6, 4, and 2 threads. You have made a little diamond like those in the top row of the sample below. Skip one row of squares of mesh and begin the next diamond in the following row. Make a row of at least 4 complete diamonds. Secure your yarn on the back of the canvas.

Thread your needle with the darkest shade of yarn. Beginning in the empty square between the diamonds, stitch down over 9 threads. Make 3 more such stitches, starting in the same square of mesh where a diamond stitch ended, each over 9 threads. Move over to the next diamond and repeat. Continue until you have made one side of the block below each diamond as in the sample. Work another row of light-colored diamonds. Put in the dark sides of the blocks. Now thread your needle with the medium shade of yarn. Fill in the remaining side of each block with four stitches down over 9 threads each. I worked an additional row of blocks on the sample, showing the top diamonds back- stitched in white. This is optional.

The other “tumbling block” samples were done on #10 canvas with tapestry yarn. The blocks are much more distinct on the smaller mesh. The separations are so clear that back-stitching is not needed, but you may do it if you like the effect. (I recommend that — once you have mastered one of these patterns — you repeat it on #14 canvas for maximum effect.) You can now see that your eye moves back and forth from blocks that appear to be pointing upward and acting like stepping stones to blocks that appear to be pointing downward and coming out of the canvas. The illusion is complete.

Tumbling Blocks in longstitch

We haven't forgotten those of you who prefer tent stitching. This pattern adapts easily to being worked in continental stitch, as you can see in this sample. You will have to make two small adjustments in the directions, however, to make it work. Your top diamond is now made with this pattern of stitches:

1
123
12345
1234567
12345
123
1

The dark side of the block is unchanged, with 4 rows of 9 stitches vertically. But the first vertical row of the medium color has only 8 stitches, followed by 3 rows of 9 stitches each. That's it.

Tumbling Blocks in tent stitch

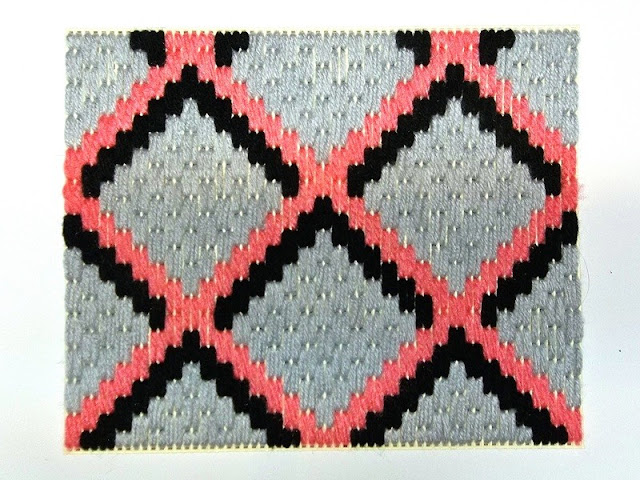
The second project uses the illusion of depth. It appears that you are looking down at a surface that is farther away than the surface of the canvas. This is quite a large sample, so we have shown it at a distance to illustrate the effect. You will need a bright yarn, a dark yarn, and a light yarn. (By now you have probably realized how nice it is to have several tapestry needles for your work.) If you are working on the same piece of canvas, turn it so that you start in the same corner as for the first project. Count down to the 19th square of mesh. Bring your needle up in that square with the bright yarn and stitch up over 4 threads. Make a second stitch just like this in the next row. We have done ascending and descending stitches before (See the post for March 21, 2014). Each stitch will cover 4 threads and each will be doubled. The step, either up or down, will be 2 threads. You are going to do a diagonal stepped line of 8 pairs of stitches. This should bring you to the top of your canvas. Then you are going to step down diagonally for 7 pairs of stitches, bringing you to the level where you started. Turn your canvas 180 degrees and complete the diamond in the same way. Using the picture as a guide, make several diamonds, both horizontally and vertically. Notice that each pair of diamonds shares a pair of stitches.

diamond-shaped boxes
Diamond-shaped boxes

With your dark yarn, put in a row of stitches under the top of each of the bright diamonds. The stitches are the same size, as are the steps. This time you step up 7 pairs and down 6. The rest of the diamond will be filled with the light yarn with the following rows: up 6, down5: up 5, down 4; up 4, down 3; up 3, down 2; up 2, down 1, finishing with a single pair of stitches. Complete several filled diamonds until the pattern emerges. Practice the pattern on a finer mesh if you can.

diamond-shaped box with shaded rows
Diamond-shaped box with shaded rows
The more shaded rows you have inside the diamond, the deeper the “box” or “room” appears to be. I'm going to leave you with the start of one such pattern to see what you can do with it. This makes a striking allover pattern on a smaller-scale canvas. For a nice masculine look, use white for the lattice pattern, black for the small diamond shape, and deepening shades of gray for the “walls”. One of these days, I am going to use this technique on a honeycomb pattern; I'm working on it, but it isn't ready yet!

Remember that practice makes for perfection,


twisted ribbons needlepoint
Twisted Ribbons - a sample from the next set of projects

 Creative Commons LicenseThis post by Annake's Garden is licensed under a Creative Commons Attribution-NonCommercial-ShareAlike 3.0 Unported License.

Saturday, October 31, 2015

The Chain-Stitch Family, Part I: Plain Chain With Variations

(Continuing the topic of crewel embroidery, introduced in the previous post.)

chain stich sampler 1
 A chain-stich sample, yarn on burlap
I like to think of related stitches as “families”. We've looked at cross-stitches, running stitches and back-stitches previously in this way. The chain-stitch “family” is surely in the top three of important stitch families ― and is my personal favorite. The stitch is very old and very widespread, indicating that it may have been “invented” several times. It can be found in the oldest surviving embroideries of such diverse places as Afghanistan, Egypt, Nigeria, Greece, Russia, Scandinavia, France, Bolivia and Peru. A glance at the maps makes me suspect some of it spread from contact and trade with ancient Egypt, where some authorities believe it was derived from a sail-makers' stitch used to make the sails of small boats that traveled the Nile stiffer and more durable. But the pieces from Bolivia and Peru predate contact with Europeans by more than a thousand years.

A line of chain-stitch
A line of simple chain-stitch
Before we explore the many varieties of chain stitches, let's take a simple chain and see how it can be embellished. To make the chain, place your fabric in an an embroidery hoop and make it tight. Thread your yarn into a crewel needle (a thin needle with a large eye like a tapestry needle, but with a sharp point). Start with a waste knot (see the blog post for Sept. 24, 2013) on the surface of your fabric. Push your needle through the fabric and bring it back to the surface several inches from the waste knot. Holding the yarn aside with the thumb of your non-stitching hand, insert the point of your needle through the same hole where it came up. Bring the needle up a few threads ahead of where it went down. Loop the thread under the needle from left to right (or right to left if you are left-handed). As you pull gently on the yarn, it will begin to form a teardrop-shaped loop. Draw the yarn through until the loop is the size you want and the yarn lies flat on the surface of the fabric. (Don't leave the loop loose and floppy, but don't pull it too tight or the fabric will pucker.) Insert the needle in the same hole you just made and repeat the process. You have made the first two “links” of your chain. Continue until the chain is the desired length. Stitch the top of the last loop down with a tiny forward stitch, pointing the tip of the needle back under the completed stitches. Overcast (wrap) the yarn around several completed stitches to anchor it and cut it close to the stitches. Cut off the waste knot, pull the yarn to the back, thread it into your needle and overcast several stitches at that end. The back of your chain should be a straight line of back-stitches. Practice several lines of the plain chain-stitch.

Closeup of simple chain-stitch


Another section of the crewel embroidery mushrooms
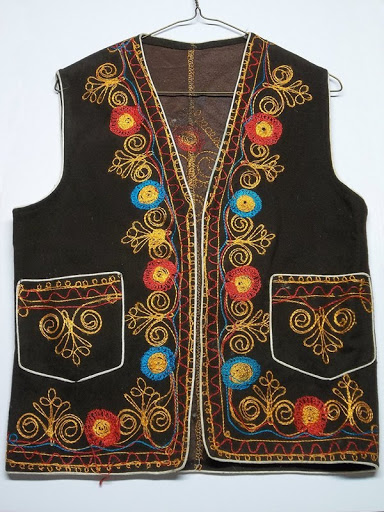
Chain stitch is used both as an outline stitch and as a closely packed filling stitch. In this section of embroidery, it outlines the cap and gills of the mushroom and the edges, stem, and veins of the large leaf. It is used as a filling stitch on the mushroom stem. These stitches are done with a single strand of tapestry wool, so they can be quite small, and it is difficult to distinguish individual stitches. If you begin practicing with large, visible stitches, you can then gradually decrease the size of your yarn or thread until your stitches  are tiny like the ones done in silk on the vest at the end of this post.

Removing a thread to create a straight void
Two things about chain-stitch usually require practice: keeping the line of stitches straight and making the “links” in your chain as alike as possible. To make this easier, I suggest that you start with a piece of fabric loosely-woven enough that you can easily withdraw individual threads. I've used wool, coarse linen, hop-sacking, and even burlap for this. You need to be able to gently remove a single thread completely without breaking it. Then draw out a thread every inch (2.5 cm.) or so before you put the fabric in the embroidery hoop. Stitching in the space where the thread once was will help you stitch a nice, straight line. You will be able to see and count the threads that cross the space. If you pass your needle under the same number of threads each time and use the same amount of “pull” (tension), your stitches should be fairly uniform. The tension on the fabric is important, too. Keep it stretched tight in the hoop. Adjust the hoop with the turn-screw as needed.

Not too many years before my time, girls and women made and framed “samplers” to show off their best stitchery. Now it is your turn to make a sampler. (Before you begin, you may want to review the stitches and terms shown on the Jan. 16, 2015 blog post.) Start by making a line of plain chain along each of the pulled thread lines that you made. Then try each of the seven variations I'm going to show you in the sampler below. I used 4-ply yarn, which is not ideal for embroidery, but I wanted to make big stitches that were easy for you to see and copy. The rows are as follows:
Chain-stitch with variations
Chain-stitch with variations listed at left
  1. plain chain stitch in medium blue;
  2. chain back-stitched with a smaller white yarn from link to link;
  3. chain with double-running stitch, alternating white and navy yarns link to link;
  4. entire chain whipped (overcast) with the white yarn;
  5. each side of the chain whipped with thin navy yarn, stitched one side at a time from center out;
  6. Pekinese stitch done in white through the entire chain;
  7. entire chain laced (threaded) with white yarn, with the loops then stitched down at the tops with white sewing thread;
  8. entire chain laced with white yarn, first from one end, then from the other (double-laced) and then couched (stitched down) with a contrasting yarn.
Lazy Daisy stitch
 Demonstrating the Lazy Daisy stitch
If you look carefully at the bottom of the first practice sampler (photo at the top of the post), you will see some stitches that look like flower petals. This is Detached Chain or Lazy Daisy stitch, one of the first stitches I learned as a child. Look at the demonstration and try it for yourself. The next time we touch on this topic, I will have a design for you that you can download and do these stitches on in your choice of colors.

Practice, practice, practice,


Embroidered vest
Embroidered vest, silk floss on wool


 Creative Commons LicenseThis post by Annake's Garden is licensed under a Creative Commons Attribution-NonCommercial-ShareAlike 3.0 Unported License.

Monday, October 12, 2015

The World of Crewel Embroidery

mushroom embroidery section 1
Part of the crewel embroidery mushrooms in progress
First, let me apologize for writing fewer posts this summer. The farmers' market season, which occupied so much of our time, is finished here in the high country. Although we are still very busy, harvesting, transplanting, getting gardens ready for winter and “weather-proofing” the house, greenhouse, and out-buildings, my thoughts are turning to completing unfinished projects and planning new ones. My fingers are eager to work with yarn — whether for rug-making, crocheting, knitting or embroidery. One of my first projects to finish is a rectangular crewel embroidery piece featuring fanciful mushrooms done in wool yarn on rather coarse linen. One of these motifs was featured at the end of the August 31, 2015 post.

800px-Odo_bayeux_tapestry
Detail of Bayeux Tapestry from Wikimedia Commons
One of the oldest (and largest!) pieces of crewel embroidery still in existence is the Bayeux Tapestry (not a real tapestry because it was embroidered rather than woven), probably embroidered by needlewomen of Normandy to celebrate William the Conqueror's victory over England in 1066 A.D. The piece is believed to have been completed about 1100 A.D. Besides land and sea battles, it shows many details about costumes, artifacts, techniques and customs of the time.

crewel embroidered handbag
Crewel embroidered handbag (modern)
Crewel embroidery became popular in England during the reign of Queen Elizabeth I. The queen loved roses and native wildflowers, so these motifs were widely used, along with leaves and vines like those on the 20th-century European handbag shown here. One of the major functions of this type of embroidery was to provide warmth. The embroidery added weight and thickness to bed curtains and canopies, draperies, and wall coverings made of linen or wool. The work was usually done by groups of needleworkers, supervised by an experienced embroiderer, who may also have designed the motifs. Lovely examples of this work are exhibited at the Victoria and Albert Museum in London.

crewel embroidered pillow cover
Crewel embroidered pillow cover (modern)
Crewel embroidery reached the peak of its popularity during the reign of Queen Elizabeth I's successor, King James I. Work from this period is also called Jacobean embroidery. The designs were heavily influenced by the Chinese and other Oriental fabrics, porcelains, and lacquer-work which were beginning to be imported into England at that time. This Jacobean influence can still be discerned in much more modern crewel embroidery like that on the 20th-century European pillow cover shown here. Dragons, gryphons, and other mythical creatures were also popular in the 17th century.

mushroom embroidery section 2
Another section of the mushroom embroidery
The word “crewel” refers to the type of yarn they used, a loosely twisted 2-ply (2-strand) wool yarn. I prefer Paternayan® crewel yarn and a 3-ply Persian yarn (used for the mushrooms) that I separate as needed. Unfortunately, these have become more expensive and harder to find in recent years. We have talked previously about dividing 3-ply and 4-ply yarns (May 29, 2015 post). You will find some of these synthetic yarns easier to embroider with than others. Practice with them to make your choices. You can also use novelty yarns and silk, linen, cotton and rayon flosses. You just can't call your work crewel embroidery unless it is done with wool yarn. (I recommend calling it “crewel-style” embroidery.)

mushroom embroidery section 3
More crewel mushrooms
Early colonists brought crewel patterns and techniques to the New World, where they became quite popular. We have already discussed several of the stitches widely used in crewel embroidery, such as cross-stitch, back-stitch, running stitch and double-running stitch. (If you are new to this blog, check our search feature.) We've also shown techniques such as whipping, lacing, interlacing, etc., which embellish these simple stitches. You may want to review some of these on the January 16, 2015 post before we begin a crewel project. (Use our Archive to find it.) You can see some of these techniques used on the completed mushroom motifs.


mushroom transfer
Hot-iron transfer for mushroom embroidery
I made separate hot-iron transfers for each section of the mushroom design. (See the post for October 6, 2013.) You can see what the transfer looks like on this unfinished motif. Some red lines from the transfers will show around the finished embroidery. To remove them, I will gently hand-wash the embroidery in cool water and Woolite®, rubbing until the red lines disappear. A quick rinse and the entire piece will be ready to be pressed or blocked. I'm looking forward to our first crewel project together. I hope you are too.

See you again soon,


 Creative Commons LicenseThis post by Annake's Garden is licensed under a Creative Commons Attribution-NonCommercial-ShareAlike 3.0 Unported License.

Thursday, September 17, 2015

Saving the Summer: Collecting Seeds and Drying Herbs

Strawflowers
Strawflowers
This is my favorite time of year. I was born at the autumnal equinox, so each September brings me to the successful completion of another of my many years and the beginning of a new one. It is a time of hard work and satisfaction, harvesting what we have grown and planning for an even better harvest next year. It is a time of great color: the red of ripe tomatoes and chili peppers, the yellow of squash and aspen leaves, the orange of pumpkins and chrysanthemums, the purple of asters and eggplants. It's no wonder we want to preserve that color as long as we can, even by drying these colorful strawflowers.

Orange Poppies
Orange Poppies
Another way to preserve that color is to save the seeds of this year's brightest flowers to plant in new places for next spring. Many annuals self-seed; that is, they drop ripe seeds around themselves before they die. These seedlings come up in the same place ― and often in unexpected places — the following year. To gather such seeds, you need to place bags over the flower heads before the seeds fully mature. I'm not a great admirer of plastic, but I must admit that the self-sealing snack and sandwich bags are a great help for this, saving the time and effort it takes to tie on paper bags and being waterproof besides. We start saving the seeds of our poppies this way in late spring. This year we were able to offer seeds of orange, red, pink, peach and white poppies at the farmers' markets. We hope to have an even greater variety next year.

Black-eyed Susans
Black-eyed Susans, going to seed
Be aware that flowers grown from commercial seeds or bought as greenhouse plants may be hybrids. Their seeds may not produce flowers that are identical to the ones that produced them! This is not always a bad thing. You can get some interesting new varieties this way. Sometimes such flowers will revert to their wild ancestors, which are probably better for the environment. We are using more and more native wildflower seeds for ground cover and filling bare areas in the gardens.

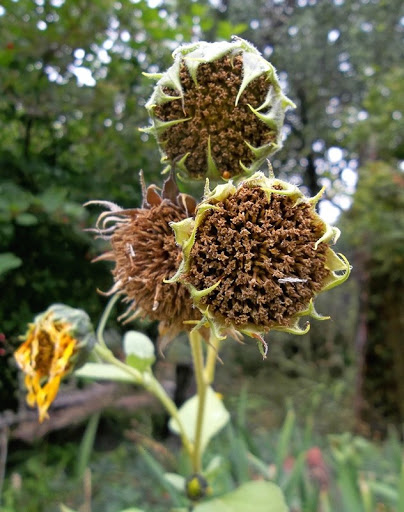
Sunflower Seed-Heads
Several herbs have seeds that may be used in cooking. While our poppies are not the ones commercially grown for the seeds you buy at the supermarket, we can use some from the prolific orange poppies in this way. Dill seed is wonderful for pickling; harvest he ripe seeds for drying. If we let our cilantro mature completely and produce seeds, they are the same ones you buy as coriander seeds. Bag them and remove the entire seed heads. Nasturtiums, which we grow for their red, orange, and yellow edible flowers and the peppery leaves we add to salads (the pickled flower buds are also an inexpensive substitute for capers), often produce a nice crop of seeds that can even be grown attractively in hanging baskets over the winter. Sunflower seeds can be salted for snacks or used as birdseed.

Spearmint, strung to air dry
We have not had a dehydrator very long and are still exploring its capacities for drying herbs. We started by air-drying our herbs, an easy process which you can do if you have a light, airy space where you can hang bunches of plants, tied together with string, upside-down for a few days. Herbs with strong odors and flavors, like peppermint and spearmint (Mentha species), are probably best dried this way. DO NOT dry herbs in a garage: the fumes and particulates from gasoline and motor oil will ruin them. Air-drying is appropriate for anise hyssop (Agastache foeniculum), sweet marjoram (Origanum majorana), dill (Anethum graveolens), oregano (Origanum vulgare), sage (Salvia officinalis) and thyme (Thymus species). Thyme, however, is best dried hung inside paper bags. I've used the scientific names here because there are so many different common names in many languages for these plants. “Officinalis” indicates herbs used for healing properties. “Vulgare” just means “common”, not anything naughty. And I almost forgot catnip (Nepeta cataria) for your cat. Our cat, Katana, would never forgive me for that!

Annake's dehydrator
Annake's dehydrator
Herbs best dried in a dehydrator include: sweet basil (Ocimum basilicum), bergamot ― also called bee balm and Oswego tea (Monarda didyma), cilantro/coriander (Coriandrum sativum), lemon balm (Melissa officinalis), rosemary (Rosmarinus officinalis), parsley (Petroselinum crispum), and sage (Salvia officinalis). Lemon balm, oregano, and thyme should be dried with the fruit leather insert in the dehydrator. I have just included herbs we grow in the garden or greenhouse. As we acquire new ones and learn more about the dehydrator, I will update you with new information from time to time.

Herbs ready for oven curing
Although they may appear completely dry, herbs (air-dried ones especially) may not be. To avoid problems like mildew, it may be best to do a final “cure”. Preheat your oven to 200 degrees Fahrenheit. Spread the sprigs of herbs on aluminum foil. Heat for no more than 10 minutes (13 for sage). Store in an airtight container — a jar with a screw-on cap or a sealed plastic bag. You can store as sprigs or separate leaves. Or you can crumble the leaves by rubbing them between your hands over an open bowl before sealing them in a container. When cooking with dried herbs, use only ¼ to ½ of the amount you would use of the fresh herbs. The dried ones are much stronger. It is a good idea to start with a small amount, taste the result, and add more if needed. Otherwise your “culinary delight” might turn out to be a “culinary disaster”. This is true about the commercial dried herbs bought at the supermarket, as well.

Chives in bloom
Chives in bloom
Unfortunately, some of my favorite herbs don't dry well. These herbs should be frozen in ice cubes or mixed with butter and frozen (thaw and use as an herb butter). Chives (Allium schoenoprasum), which I would grow for its lovely flowers even if I didn't eat it, is one of these herbs. Others include: sweet basil (Ocimum basilicum), borage (Borago officinalis) and tarragon (Artemesia dranunculus). Sprigs of rosemary and thyme may be frozen on baking sheets and stored in air-tight jars.


Savor the summer,


Annake's spice rack
Annake's spice rack, first of a planned two...


 Creative Commons LicenseThis post by Annake's Garden is licensed under a Creative Commons Attribution-NonCommercial-ShareAlike 3.0 Unported License.

Contact Us

Name

Email *

Message *

Blog Archive