Sunday, November 30, 2014

Shapes and Patterns: More Simple Needle-weaving

Photograph "Honalee" by jljardine
"Honalee" by jljardine
I have always been fascinated by shapes and patterns. When I was a child, I would lie on my back in the grass and look for “pictures” in the clouds. I loved to see them change shape. On summer nights, after my parents were asleep, I would leave the house to look for patterns in the stars. I liked to invent and name my own constellations. I'm still looking for patterns in clouds and trees and frost on the windowpanes.

I've recently been studying a photograph of an old piece of Norwegian embroidery, looking for new needle-weaving motifs. The picture is in black and white and the motifs are rather small, so I don't know how accurate my reconstructions are. I have, however, derived a couple of patterns that I like. I wanted them to be large enough to use on a belt, so they are much larger than the original embroidery. I also wanted them to be colorful, so I did each motif half in red and half in blue. The spaces between the motifs were left empty, but they could easily be filled in with a third color, leaving no empty squares in the design. I worked the two examples in acrylic yarn on plastic canvas so that I would have good reference samples to keep on file. The directions for each of the two patterns is below its picture.

needleweaving pattern 1
Needleweaving Border Pattern I

Pattern I: Starting on the far left of the canvas and leaving enough yarn loose to weave into stitches on the back of the work, bring your needle down through the first square of canvas mesh.
  • Rows#1 & #2: under 1, over 2, *under 2, over 2, under 6, over 6, under 6, over 2, repeat from * across.
  • Rows #3 & #4: under 1, over 2, *under 2, over 2, under 4, over 10, under 4, over 2, repeat from * across.
  • Row #5: under 3, over 2, *under 4, over 6, under 2, over 6, under 4, over 2, repeat from * across.
  • Row #6: Repeat Row #5 (with a second color, if you choose).
  • Rows #7 & #8: Repeat rows #3 and #4.
  • Rows #9 & #10: Repeat Rows #1 and #2.
needleweaving pattern 2
Needleweaving Border Pattern II

Pattern II: Starting on the far left of the canvas and leaving enough yarn loose to weave into stitches on the back of the work, bring your needle down through the first square of canvas mesh.
  • Rows#1 & #2: under 1, *over 2, under 2, over 4, under 4, over 2, under 4, over 4, under 2, repeat from *across.
  • Rows #3 & #4: under 1, *over 2, under 2, over 6, under 2, over 2, under 2, over 6, under 2, repeat from *across.
  • Row #5: under 1, *over 2, under 4, over 6, under 2, over 6, under 4, repeat from * across.
  • Rows #7 & #8: Repeat rows #3 and #4.
  • Rows #9 & #10: Repeat rows #1 and #2.
When I looked at the second pattern, I was reminded of butterflies. At that time, I was looking for a way to decorate a hat for a dear friend of mine who is a member of the Red Hat Society. (Their motto is: “When I'm an old lady, I shall wear purple with a red hat.”) I had a wide-brimmed red straw hat. It was pretty, but rather plain. Why not, I asked myself, make a wide hatband with a row of purple and lavender butterflies? I chose dark purple for the bodies, a lighter purple for the lower wings, a dark lavender for the upper wings and white for the background. But first I needed to make some minor changes in the pattern of the butterfly. I decided that I didn't need the rectangles between the butterflies. I liked the straight edges and squared corners, so I didn't try to make any of those into curves. I filled in the hole in the center of the body and shortened the “head” end by one row. Then I added “antennae” like little stair-steps on either side of the head. After carefully measuring the crown of the hat, I determined how many butterflies I could place on the band and how they needed to be spaced so that there would not be any butterflies that were not whole. (See the practice piece.)

needleweaving butterfly motif
Sample of the needleweaving butterfly motif
The motifs for the hatband were worked in acrylic yarn on #7 plastic canvas. This made a very firm band that is removable and washable. Because #7 plastic canvas has a large mesh, I doubled each strand of yarn for the butterflies to give a them a smooth, solid appearance. I finally decided to work the background in tent stitch in a single strand of white yarn and to back-stitch the antennae on top of the tent stitch after the butterflies and background were completed. I also modified the antennae slightly. (A word of caution about working on any kind of canvas: do not pull your stitches too tight; your canvas may start to curl and may never lie completely flat.) Once I had the work completed, I had a band that was 22.5 inches (about 57 centimeters) long and 2.5 inches (about 6.5 centimeters) wide.

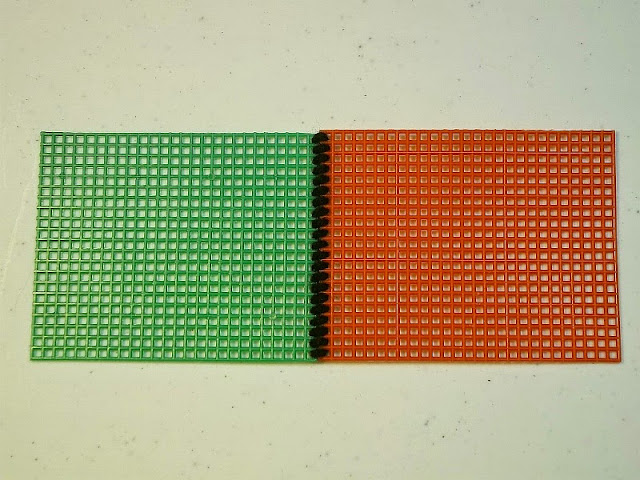
I formed this into a circle and lined up the two ends so they matched exactly. Using a piece of the background yarn, I overcast the two edges to make a flat seam, leaving extra yarn at both the beginning and the end. The loose ends were both secured and hidden inside the tube of stitches formed by the seam. (see picture showing the joining of two pieces of plastic canvas). The finished hatband was then placed over the crown of the hat and pushed down to sit directly on the brim of the hat. (see below) I hope my friend enjoys wearing her hat to Red Hat Society meetings and festivities.

joining pieces of plastic canvas illustrated
Joining pieces of plastic canvas, illustrated in contrasting colors

Here are some things you may want to do:
  1. Practice both of the patterns on sample canvas for your pattern file. You may think practice pieces are a waste of time, but they are not. Not only do they give you a good idea of how a project will look, but they also allow you to encounter and solve a lot of minor problems that you can then avoid when you do a larger project.
  2. Look at the empty spaces between the motifs on the patterns. Design one or more borders using these “negative” spaces. (Turn your pattern samples over to get ideas.)
  3. Make something useful or decorative (headbands, hatbands, belts, eyeglass or cell phone cases, etc.) from one of the border designs or from the butterfly motif.

Have fun!


red hat with purple butterfly motif headband
The red hat with purple butterfly motif headband


 Creative Commons LicenseThis post by Annake's Garden is licensed under a Creative Commons Attribution-NonCommercial-ShareAlike 3.0 Unported License.

Sunday, November 16, 2014

Craft Show Queries Answered

October 31 in the Springs photo by jlj
Autumn is craft fair season!
I apologize to those of you who have been checking this site for a new blog post. From mid-September to mid-December, Annake’s Garden is involved in quite a number of art and craft shows. We are often away from home; and we spend a lot of our time when at home loading and unloading, packing and unpacking, changing out displays, doing minor repairs and replacing the items we have sold. Therefore, I sometimes get behind in my writing, sample-making, and designing.

We meet such nice people at these shows, and it is especially gratifying to meet readers of this blog. I'm going to use this post to try to give some fairly prompt responses to recent questions and comments from such readers.


Are there going to be any more blackwork designs that we can download?

Yes, there will be more from time to time as I get a chance to work on them. I see they are appearing on Pinterest® frequently. I'm glad to see people are using them. At the bottom of this post is a page of quick and easy border designs in cross-stitch and back-stitch for you. (Just click on the picture to download them.) When we get into folk embroidery more deeply, you will find them useful. You will probably be doing them in bright colors rather than in black, however. These were done freehand, but should be easy enough to follow. If you are going to do a hot-iron transfer, however, you will want to re-draw them using a straight-edge or ruler. I'm also working on more of the small colored designs to be posted later

Why does your framed four-way bargello in the September 29th post look so different from the sample pattern? They're not the same shape or anything!

I keep telling you that even small changes in pattern lead to great differences in appearance. Believe me, the two are worked in exactly the same way, with two minor exceptions: I changed the way I did the very center and I did a satin stitch border around the finished design to blend with the picture mat. So what made the differences? First of all, the framed picture is done on #10 needlepoint canvas, which has 100 squares per square inch. The sample was done on plastic canvas which is approximately #7, with 49 squares per square inch. The plastic canvas sample is much easier for you to see in a photograph, while the stitches on the needlepoint canvas are smaller and closer together. Second, the framed picture is much larger, so there are many more rows than can be seen in the sample. The farther from the center those rows are, the more the outline is smoothed out, giving a scalloped edge. Third, the baseline, while in a dark color, is not the darkest color in the picture, making it less evident. Finally, I used more than twice as many colors in the picture than in the sample (13 as opposed to 6), so the colors don't repeat as often and the baseline color appears in different places in the pattern. Perhaps this close-up of the comparable are of the framed bargello next to the sample pattern will make the process easier to visualize.


That's the beauty of these four-way patterns. You can use the same one over and over with different color combinations, number of pattern repeats, and small changes in the centers and along the diagonals and no two will be alike!

4-way bargello picture -  pillow comparison
Here is another example of two projects using the same pattern, with variations - these were done more than 30 years apart!

I'm reading your posts on my iPhone and I can't count the squares on the pattern you say you did as a child. The picture's too small. Can you give me a counted-out pattern?

Simple needleweaving on plastic canvas
Another sample of the simple needleweaving stitch
Certainly. Start with Color A. Bring your yarn up from the back of the canvas, letting a couple of inches hang down to be woven into the stitches on the back later. Row 1: over 8 threads, under 2, over 8, under 2 across. Row 2: under 1, over 6, under 4, over 6 under 4 across. Row 3: under 2, over 4, under 6, over 4, under 6, across. Row 4: under 3, over 2, under 8, over 2, under 8 across. (See sample.)

With Color B, secure your yarn under Color A stitches on the back, bring your needle up through the same square of mesh as the end of the first over 8 stitch of color A. Skip 2 threads, push your needle down in the same square of mesh as the beginning of the next over 8 stitch of Color A. Continue with Color B to fill in all the skipped spaces in Rows 1 through 4, leaving no canvas threads showing. (See sample.) Repeat Rows1 through 4 until you have filled your canvas. At the end of each row, do as much of the pattern stitch as the canvas allows, bringing your yarn to the back of the canvas to secure it. The sample shows the same pattern (shown on trug canvas in large scale on the original post) done on plastic canvas in approximately the same colors.

I must confess that this is such a simple pattern that I often work a column of Color A from bottom to top rather than from side to side, then reverse my canvas and work back with a column of Color B. The advantage to doing it this way is that you can add columns of as many colors as you like, instead of just alternating two colors. This is a follow-the-weft pattern. Unlike the follow-the-warp patterns we have been doing, this kind of pattern can cover the canvas completely. These are patterns that work nicely for conventional needlepoint, as well. They can be used as all-over designs, fillings, or backgrounds.

How do I get my little girls interested in needlework? (From a discussion at a recent craft show.)

Do they make art in school that you put up on the refrigerator or on a bulletin board? If so, copy a favorite one onto cloth or canvas and help them learn a technique to make it into something permanent like a framed picture or a pillow. Or do the same thing with a picture from a favorite movie like Frozen”. Help them do a simple cross-stitch/back-stitch pattern (like one of the ones on the chart below [See the post for August 26, 2013 for directions for easy cross-stitch on checked gingham.]) and then applique it onto a T-shirt or sweatshirt. Encourage them to make handmade gifts for family members (especially grandparents) or their friends. Work together on costumes for school plays or holiday parties. Older children should be encouraged to make useful things for premature babies, elderly people, anyone in need. Often groups of girls can get together to work on such projects, socializing and developing social consciences at the same time.

Good luck on all your projects,


Downloadable blackwork stitch patterns
Click to download these blackwork stitch patterns


 Creative Commons LicenseThis post by Annake's Garden is licensed under a Creative Commons Attribution-NonCommercial-ShareAlike 3.0 Unported License.

Contact Us

Name

Email *

Message *

Blog Archive