Monday, November 30, 2015

Autumn 2015 Questions and Answers

strawflowers
Strawflowers in the porch planter
Your strawflowers are so pretty. Is it just the camera angle, or do these have unusually long stems?

You're very observant. It isn't the camera angle. Many of these flowers had stems 18 inches (46 cm) or longer. Instead of planting them in annual flower borders as we usually do, this year we planted them in our porch planters, which are halves of wooden kegs. If you look closely at the bottom of the picture, you can see the barrel staves. We seeded the planters heavily so that the plants would be crowded, watered them generously, and fed them with liquid plant food once a month. They rewarded us with tall, healthy stalks and multiple flowers on single stalks.

What do you DO with the strawflowers?

We found several unusual two-toned ones this year in our collection, plus one that appears to be a true black. We put little transparent zip-lock bags over those flower heads to catch the seeds for next year's planting. We cut the other flowers before they could be pollinated, gathered them into bunches tied with string, and hung them in the garden shed to dry. I used them in autumn bouquets along with silk flowers and leaves. This little arrangement was our Thanksgiving table centerpiece.

pilgrim centerpiece


yellow irises
Yellow Irises in the spring
If I may, I would like to share another autumn flower story with you. We have several re-blooming irises, but — at our high altitude — the flowering season is seldom long enough for a second blooming. This autumn was late. Our yellow re-bloomer put out buds in mid-October. We covered the plants through the first two frosts. The first flower bloomed on the day we received a freeze warning. I was doubtful that we would be successful, but I cut the flower stalks and brought them inside. I put the stems in a pitcher of warm water and hoped for the best. The buds continued to open and new buds formed for a full two weeks! This is one of our most fragrant irises. It filled the house with sweet scent while leaves and even snow fell outside. Here's a picture of our beauty in her spring dress. It was lovely to have this reminder of spring while the world was shutting down for the winter.

I love the mushrooms! Are they all part of the same project? If so, how big is it and what will it be when it is finished?

I'm so glad you like them! Yes, they are all part of the same piece of embroidery. It is a panel that is approximately 34 inches (87 cm) long and 11 1/2 (29 cm) deep. When work slows down at the end of the year, I will finish it. I haven't decided yet whether it will be framed or become a wall hanging. Either way, you will see pieces of it again on our crewel embroidery posts and a picture of the whole thing when it is finished.

mushroom embroidery collage
Views of the mushroom embroidery, in progress


Am I right that there are some rows of chain-stitch examples on the brown sampler (October 31, 2015 post) that you didn't show in the enlarged samples on blue cloth? Are you going to show us those?

You are correct. The brown sampler was a practice sampler that I did as I was experimenting with new ways to embellish plain chain-stitches. Due to time and space constraints, I left those off of the close-up samples. However, you can see them close-up on the samples below, along with stitching directions.

sampler stitches #1 & #2
Sampler stitches #1 & #2

1) This is just an extension of the #8 stitch pattern on the October 31, 2015, post (laced chain). Starting at one end of the chain (either one will do), lace the chain with a second color of yarn. When the loops are completed, couch each one with a single strand of the same color. Starting at the opposite end of the chain, lace the chain in the reverse direction with a third color. Couch the loops with a single thread in the same color. This makes a very attractive border.

2) Make two parallel chains in the same color. I have made these some distance apart so it is easy to see how the stitches work. You will probably want to place your lines of stitches a little closer together. This is basically a Pekinese stitch (see the January 16, 2015 post) done on two parallel chains. I started at the right-hand end of the bottom chain, but you can start at either end. I drew my contrasting color of yarn through from the back and, working from left to right, made a Pekinese-stitch loop through two adjacent links of the top chain. Keeping my yarn on the surface and working from right to left I pushed my needle down and then up through the next two adjacent links in the bottom chain. No loop this time. I made another loop through the next two links on the top chain. I continued to the ends of the chains. No couching was required. If you begin from the left end of the chain, reverse the left-to-right and right-to-left directions. You may also want to do a sample of an interlaced double chain made the same way as the interlaced double-running stitch shown on the same January post.

sampler stitch #3
Sampler stitch #3

3) Make a rather loose chain with one color of yarn and secure it at both ends. With a thinner yarn of a contrasting color, make a French knot inside each link of the chain. To make a French knot, bring your yarn up through the link, wrap the yarn once around the needle, and push the needle to the back of the fabric, gently pulling it until the knot is formed. Bring your needle up in the next link and continue until all links have knots in them. You may also want to try knots made with floss or metallic thread for more contrast.

I enjoy being able to clarify directions, give additional examples, and expand on topics....so keep those questions coming!


 Creative Commons LicenseThis post by Annake's Garden is licensed under a Creative Commons Attribution-NonCommercial-ShareAlike 3.0 Unported License.

Monday, November 16, 2015

Optical Illusion Needlepoint and Bargello - An Introduction

optical illusion needlepoint
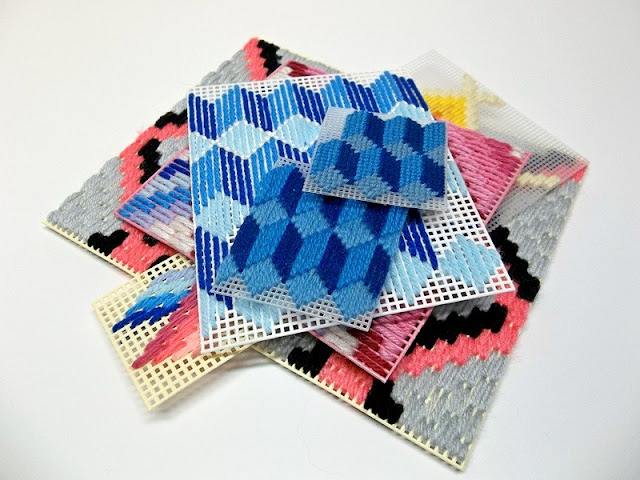
Optical illusion needlepoint samples
We're going to explores some patterns that fool the eye into seeing things that are not really there. These include 3-dimensional objects that appear to extend out from the canvas, “hollow” spaces in the canvas showing depth, textured surfaces, and interwoven areas where sections appear to pass over and under each other. Some optical illusions can be traced back to Early American quilt blocks. One of these, called “Tumbling Blocks”, was the inspiration for our first project. You will need either plastic or fiber canvas, at least one tapestry needle, 3 shades of one color of yarn, and scissors. I did the sample on #7 plastic canvas with knitting yarn to make the stitches easily visible.

reversible block illusion
Reversible block illusion, the basis for "Tumbling Blocks"

Begin in the upper left-hand corner of your canvas (or the upper right-hand corner if you are left-handed) with the lightest shade of yarn. Count down to he 4th square of mesh. Bring your needle up through this square from the back. Pull the yan through, holding some against the back of the canvas so you can secure it by stitching over it. Stitch down over 2 threads of mesh (or 2 bars of plastic canvas). Bring your needle up through the next higher square of mesh in the next row and stitch down over 4 threads. Repeat, stitching over 6 threads in the next row and 8 threads in the 4th row. Then repeat the stitches over 6, 4, and 2 threads. You have made a little diamond like those in the top row of the sample below. Skip one row of squares of mesh and begin the next diamond in the following row. Make a row of at least 4 complete diamonds. Secure your yarn on the back of the canvas.

Thread your needle with the darkest shade of yarn. Beginning in the empty square between the diamonds, stitch down over 9 threads. Make 3 more such stitches, starting in the same square of mesh where a diamond stitch ended, each over 9 threads. Move over to the next diamond and repeat. Continue until you have made one side of the block below each diamond as in the sample. Work another row of light-colored diamonds. Put in the dark sides of the blocks. Now thread your needle with the medium shade of yarn. Fill in the remaining side of each block with four stitches down over 9 threads each. I worked an additional row of blocks on the sample, showing the top diamonds back- stitched in white. This is optional.

The other “tumbling block” samples were done on #10 canvas with tapestry yarn. The blocks are much more distinct on the smaller mesh. The separations are so clear that back-stitching is not needed, but you may do it if you like the effect. (I recommend that — once you have mastered one of these patterns — you repeat it on #14 canvas for maximum effect.) You can now see that your eye moves back and forth from blocks that appear to be pointing upward and acting like stepping stones to blocks that appear to be pointing downward and coming out of the canvas. The illusion is complete.

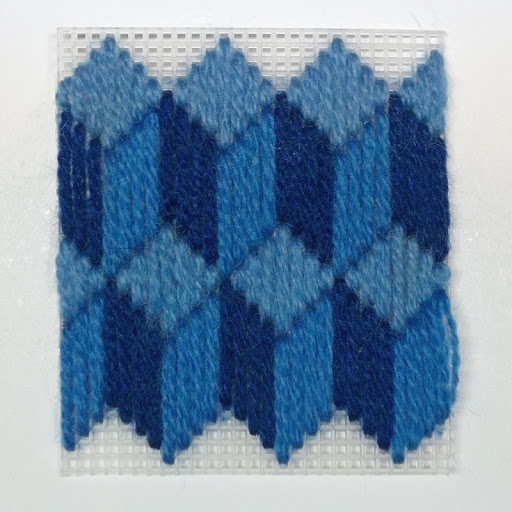
Tumbling Blocks in longstitch

We haven't forgotten those of you who prefer tent stitching. This pattern adapts easily to being worked in continental stitch, as you can see in this sample. You will have to make two small adjustments in the directions, however, to make it work. Your top diamond is now made with this pattern of stitches:

1
123
12345
1234567
12345
123
1

The dark side of the block is unchanged, with 4 rows of 9 stitches vertically. But the first vertical row of the medium color has only 8 stitches, followed by 3 rows of 9 stitches each. That's it.

Tumbling Blocks in tent stitch

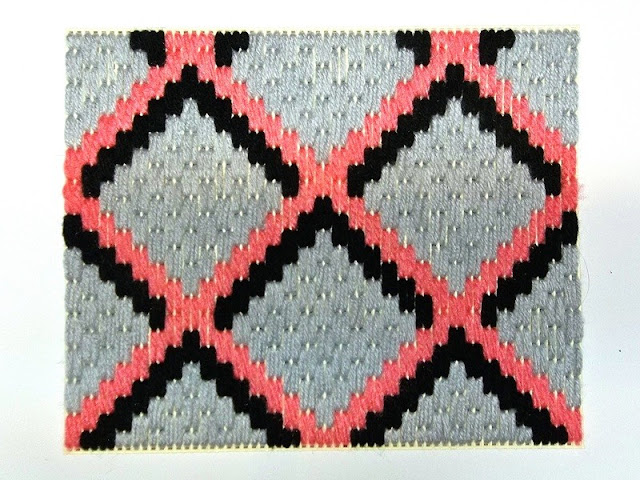
The second project uses the illusion of depth. It appears that you are looking down at a surface that is farther away than the surface of the canvas. This is quite a large sample, so we have shown it at a distance to illustrate the effect. You will need a bright yarn, a dark yarn, and a light yarn. (By now you have probably realized how nice it is to have several tapestry needles for your work.) If you are working on the same piece of canvas, turn it so that you start in the same corner as for the first project. Count down to the 19th square of mesh. Bring your needle up in that square with the bright yarn and stitch up over 4 threads. Make a second stitch just like this in the next row. We have done ascending and descending stitches before (See the post for March 21, 2014). Each stitch will cover 4 threads and each will be doubled. The step, either up or down, will be 2 threads. You are going to do a diagonal stepped line of 8 pairs of stitches. This should bring you to the top of your canvas. Then you are going to step down diagonally for 7 pairs of stitches, bringing you to the level where you started. Turn your canvas 180 degrees and complete the diamond in the same way. Using the picture as a guide, make several diamonds, both horizontally and vertically. Notice that each pair of diamonds shares a pair of stitches.

diamond-shaped boxes
Diamond-shaped boxes

With your dark yarn, put in a row of stitches under the top of each of the bright diamonds. The stitches are the same size, as are the steps. This time you step up 7 pairs and down 6. The rest of the diamond will be filled with the light yarn with the following rows: up 6, down5: up 5, down 4; up 4, down 3; up 3, down 2; up 2, down 1, finishing with a single pair of stitches. Complete several filled diamonds until the pattern emerges. Practice the pattern on a finer mesh if you can.

diamond-shaped box with shaded rows
Diamond-shaped box with shaded rows
The more shaded rows you have inside the diamond, the deeper the “box” or “room” appears to be. I'm going to leave you with the start of one such pattern to see what you can do with it. This makes a striking allover pattern on a smaller-scale canvas. For a nice masculine look, use white for the lattice pattern, black for the small diamond shape, and deepening shades of gray for the “walls”. One of these days, I am going to use this technique on a honeycomb pattern; I'm working on it, but it isn't ready yet!

Remember that practice makes for perfection,


twisted ribbons needlepoint
Twisted Ribbons - a sample from the next set of projects

 Creative Commons LicenseThis post by Annake's Garden is licensed under a Creative Commons Attribution-NonCommercial-ShareAlike 3.0 Unported License.

Contact Us

Name

Email *

Message *

Blog Archive