Wednesday, May 21, 2014

Assisi Embroidery: A Different Way to Look at Design

arrow points to Assisi on map of Italy Assisi work is a very old form of counted-thread embroidery. Its first known use was in the late 13th or early 14th Century. The name comes from Assisi, Italy, the little town in Umbria made famous by its association with Saint Francis of Assisi. Many of the best examples, made by nuns in convents for use as altar cloths in cathedrals, have managed to survive. They were worked on white linen with single colors of silk thread. The colors used were red, blue, yellow, green and brown. Only the silhouettes of the subjects were outlined; the backgrounds were worked solidly. The subjects were primarily Biblical scenes, with some mythological subjects and stylized animals and plants. The technique remained popular in church circles throughout the 17th Century.

Marked area shows flowers implied by background stitching
Red square shows flowers implied by background stitching
By the 18th century, however, the embroidery work had passed from the nuns to the women of the town of Assisi, where it became a cottage industry for them. The subjects became more secular and they were then used on household linens. The motifs were outlined in one color (usually black), while the backgrounds were worked in a second color (often red or green). Some women began experimenting with less traditional color combinations, such as rose and blue or blue-gray and gold. Elements of the technique became incorporated with more widespread folk embroidery. If you look carefully at the enlargement of this counted-stitch embroidery on evenweave linen, you will see tiny flowers that are not embroidered, but simply suggested by the stitches around them.
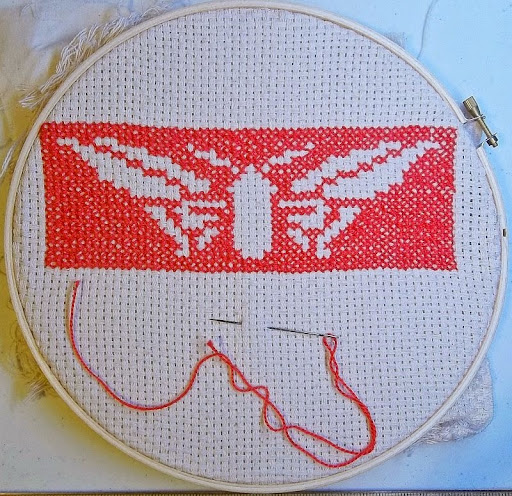
Assisi-style butterfly in red on white monk's cloth
Assisi butterfly in red on white monk's cloth
Today you need not be limited by any of the traditional restrictions. Indeed, the simplest subjects need not be outlined at all; Their inner structure is shown by extending the background stitches inside their silhouettes. An example is this piece, first shown on the post for April 30, 2014. The colors used here are the traditional red-on-white, but it is perfectly possible to use any color (or colors) of thread on any other color of background –- even black. There are many ways in which you can use this simple and versatile style of embroidery to express your indiviual taste and personality.

Sampler for some Assisi background stitches
The most common background stitches are conventional (left-over-right, stitched in two different passes) cross-stitches, but other alternatives include two-sided cross-stitch (right-over-left, each stitch completed before the next is begun), zigzag stitch (cross-stitches with upright stitches between them), long-armed cross-stitch, four-sided stitch, and detached filling stitches like wheatear and French knot. Three of these stitches are shown on this sample, first in a single color and then with two colors used to make the stitch pattern clearer. (Top to bottom, long-armed cross-stitch, zigzag stitch, four-sided stitch.) There are several versions of long-armed cross-stitch; I've chosen a simple one. The four-sided stitch can be used as a detached filling stitch. Outlining is usually done in back-stitch or double-running stitch (sometimes called Holbein stitch). That doesn't mean you can't use outline stitch, stem stitch, chain stitch or even couching.

Assisi embroidered rose on monk's cloth
Nor do you need to use a linen background and silk thread. Cotton fabrics and cotton or rayon floss, craft threads, and crochet cotton are inexpensive, readily available, easy to use and come in a multitude of colors. Hardanger cloth and Aida are strong contenders for this type of work. I have a special fondness for linen thread and tapestry wool on coarser fabrics like hopsacking, wool, wool blends and decorator burlap. (Whatever you use, use something that will not cause discomfort to your eyes or hands.) The project shown here is a multiflora rose outlined in a single strand of J&P Coats™ craft thread. The background is worked in six-strand DMC™ floss on monks' cloth. Several closely-related shades of red were used.

Outline of "JOY" embroidery, ready for Assisi background
I like single words displayed in ways that make me stop and think about the meaning of the word. I decided to do an Assisi embroidery featuring the word JOY against a background of “joyous” rainbow colors. I had a frame I wanted to use for it, so that dictated the size of the project. After working out my design on graph paper, I prepared my fabric and backing with easy-to-remove basting and centering stitches. This time I decided to use the conventional black outline. I back-stitched around the three letters. Here is a picture of the project at that stage.

The yellow and green center stripes were measured so that each would fill exactly half of the space allotted for the letter “O”. The other stripes are slightly wider. I wanted the blue and orange stripes to encompass the majority of their letter spaces and the red and purple ones to cover the small parts left over. I decided to leave a margin of the unstitched background fabric at either end of the embroidery to set it off. This picture shows the project completed, hemmed, and ready to frame.

Finished Assisi embroidery project, "JOY"
 
Assisi embroidery of iris on needlepoint canvas
I had never seen Assisi work done on needlepoint canvas, but I could see no reason not to try it. I drew a simple outline of an iris bloom and a bit of stem and traced it with pencil onto #10 mono canvas. I worked the outlines of the design in continental stitch and the background in basketweave stitch. I decided it needed a bit of a second color, so I did the “stamens” in doubled six-strand floss. I like the result and am now planning a long horizontal panel with several flowers, done so the white canvas becomes the flower, each with a different color background. There may be a place for that little butterfly somewhere in the panel, too.

I believe my interest in Assisi work stems from my fascination with positive and negative shapes in design. If you want to see the work of a master of positive/negative design (and one of my two favorite artists of all time), look for pictures by Dutch artist M. C. Escher (Maurits Cornelis Escher, 1898–1972). They will exercise your mind and your imagination.

As for Assisi work --- try it. You'll like it!


 Creative Commons LicenseThis post by Annake's Garden is licensed under a Creative Commons Attribution-NonCommercial-ShareAlike 3.0 Unported License.

Sunday, May 11, 2014

An Introduction to Four-way Bargello --- Part I

The picture below shows a vintage four-way bargello pillow that I made in the 1970's, when I was just learning the technique. Some four-way patterns appear to continue past the edges of the canvas, but I chose to emphasize this one by using a solid color, closely related to the color of the pillow's backing, around it. The four corners are done in brick stitch, mitered at the center of each corner. The small areas along the sides are done in continental (tent) stitch. The pillow is holding up pretty well, considering that it has shared rocking chairs with me and several generations of cats.

Vintage 4-Way Bargello Pillow


Remember when I demonstrated a series of concentric diamonds done in Hungarian stitch (April 10, 2014 blog post)? This is not a true four-way because the stitches point in only two ways --- not four. Nevertheless, the pattern shares many four-way characteristics. The canvas is prepared in the same way. It is cut into a square and the edges are covered with masking tape to prevent it raveling and snagging floss or yarn. The center of the canvas is located by the intersection of central horizontal and vertical lines. The preparation is finished by drawing diagonal lines from the corners through the center. You can see these lines around the diamond in the picture. This marking is vitally important in making four-way designs. The stitching of the diamonds starts at the center point and is worked outward. Although there are exceptions, many four-ways are worked in this way.

Diamond 4-way bargello in progress


As you may remember, the Hungarian stitch is based on two short stitches, over two threads of canvas, with a longer stitch, over four threads of canvas, between them. I've shown a sample of the stitch as it is used to make such a diamond, emphasizing descending and ascending lines and how corners are made (upper right). I used contrasting colors so that it is easy to see how the pattern develops. I prefer to begin at the center and work outward (lower left), but it is also possible to start with a small diamond (like this one with five Hungarian stitches on a side) and work both toward the center and outward (upper right).


4-way bargello stitch sampler showing Hungarian stitch


I worked the diamond design all the way to the centers of the four sides of the canvas. The diamonds were worked in six-strand embroidery floss, doubled, and single-strand craft thread, also doubled. This makes plush, padded stitches which rise above their background. The floss gives a shine to the design. There is one drawback to working with doubled strands, however; if you make a mistake, it may be difficult or even impossible to correct it. You may be left with two alternatives: cut and remove an area of stitches and replace them, or live with the mistake.

Diamond 4-way bargello in floss with tent stitched background


The four corners were worked in a Persian-style tapestry yarn to give a textural contrast. They are done in basketweave (tent) stitch, beginning with the corner stitch. Some of you may not be familiar with tent stitches. The sample below shows an example of basketweave with the odd rows in one color and the even ones in another to make the sequence easier to understand. It begins with a single stitch in the upper right-hand corner. There are two stitches in the second row, three in the third, and so on. The rows are worked alternately left-to-right and right-to-left. (As you can see, using two related shades in this way creates a kind of iridescent effect ) The diagonal strip shows how the stitch looks in a single color. The swatch at lower left gives a glimpse of the back side of the stitches, showing how well they cover both sides of the canvas. As I completed each corner of the diamonds, I turned the canvas 90 degrees before beginning the following corner. Compensation stitches were made on the inner edges, running in under the last row of stitches in the outer diamond.

4-way bargello stitch sampler #2, basketweave stitch


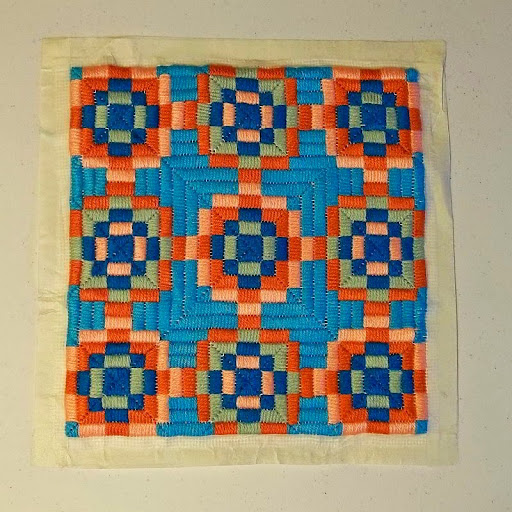
Our next pattern is a true four-way, done in blocks of gobelin stitch with the direction of the stitches oriented to the edges of the canvas. I adapted this pattern from a design by Lisbeth Perrone (The New World of Needlepoint, Random House, New York 1972). The design was not originally intended to be a four-way project, but I could see that it had a strong potential to become one. This is one of those patterns that extend past the limits of the central motifs and can be repeated over and over. The colors shown are roughly those in the original design.

chart for 4-way bargello worked in color on graph paper


I worked my version out on graph paper because the rows of stitches in the original differed in width. I wanted mine to be uniform --- each stitch over four threads --- except where they are mitered along the diagonal lines. The next sample will show you how to miter stitches along diagonal lines and make all four sides of the pattern meet at the center of the canvas. Let's start with the center square. I've done one in four colors so that you can see the four triangles that make up the square, and the way they fit together. Below that is a square done in a single color. Each triangle starts with a stitch over a single thread, then stitches over two, three, four, three, two, and one thread. Remember that we count threads, not spaces. You will notice that there are empty squares of mesh at the four corners of the square. You may wish to leave these as part of the design. Or you may choose to cover them with a short, straight stitch or a tent stitch or a cross-stitch. It doesn't matter which as long as you are consistent throughout the work. To the right are three examples of corner joins of strips of different widths. The two small rectangles on the far right show two different ways to join areas of stitches along a diagonal line. Finally, you might decide to back-stitch over some of the lines created by the stitches --- as in this aqua square back-stitched in turquoise.

4-way bargello stitch sampler #3, mitered stitches


I substituted turquoise, coral, sage green, and peach for the colors used in the original design and decided to use a fifth color, aqua, for the stitches between the motifs.. These colors are often associated with Southwestern Indian designs, like textiles and sand paintings. I suspect Ms. Perrone referred to Native American designs for her inspiration, so this seemed culturally appropriate. You could work the design in your choice of colors; however, I recommend using one dark color, at least two medium colors (one brighter than the other --- or others), and one light color to get the desired effect. The fact that I changed colors and values changed the emphasis in the different sections of the pattern, making it differ quite a bit from the original. Finally, I chose to work the large, plain areas in aqua, a lighter color than the turquoise, changing the all-over effect even more. This gives a quite modern effect, while still using traditional colors.

4-way bargello with all areas filled in


To begin, find the center of your canvas. Since this design may be continued in all directions, you are not restricted to a square canvas. If you are planning to frame your work, you may want to cut the canvas to fit the frame you intend to use. (Add an extra half-inch or so on all sides, to accommodate the masking tape, which can be turned under when the tape is removed or used as a seam allowance if you are making a pillow top.) In most cases, I use frames that have apertures which are as nearly square as possible. In order for the design to progress properly, however, it is wise to draw a square lightly in pencil or permanent marker on the canvas, no matter what the canvas's shape is. I would do this, for example, if I were using a round or octagonal frame. Make sure that the center square of your canvas is the exact center of the square you draw. Then draw the diagonal lines through the center point to the corners of the square. These lines can be extended outward to the edges of the canvas. I draw my lines in pencil because I find that, after working a few rows of stitches, the diagonals may be off by a row or two of canvas squares and need to be erased and redrawn. Use a good quality masking tape to cover the raw edges of the canvas. Now you are ready to begin stitching.

Prepared canvas, ready for stitching


Make something beautiful!


4-way bargello, finished with topstitching
4-way bargello pattern, finished with topstitching

 Creative Commons LicenseThis post by Annake's Garden is licensed under a Creative Commons Attribution-NonCommercial-ShareAlike 3.0 Unported License.

Contact Us

Name

Email *

Message *

Blog Archive