Monday, December 30, 2013

An Interview With Our Glass Artisan

For this last blog post of 2013, Annake presents an interview with our very talented glass artisan...

How and when did you get started working with glass?
 I've been working with glass for about ten years. When I retired from the health care profession, I wanted to do something different -- something that was really fun to do. I'd always been fascinated with glass. As you can see, I have collected quite a bit of it over the years. I love the way the light moves through it.


You work with both stained glass and fused glass, don't you? 
 “Stained” glass is a misnomer. What I work with is art glass. It comes in sheets of various colors and textures. It can be cut to pattern shapes, which are then framed with metal strips that are soldered together.

Artisan cutting glass
Artisan cutting glass in her studio
How do you cut the glass?
I score it along the pattern lines. I try to make a deep, even cut in the surface of the glass. Putting pressure on both sides of the of the scored line causes a break to form and spread along the scoring. If I'm lucky, the glass breaks cleanly and I can proceed to the next step.

And if you're not lucky?
Then I have to try again. I have a whole drawer full of “bad breaks”, as well as of bad ideas that seemed fine in theory but didn't work out in practice. That drawer keeps me humble!


What is the hardest thing about working with art glass?
For me, probably the soldering. Soldering is not my greatest skill. Also, art glass is very hard to cut. I don't work as much with it lately because I have had some trouble with my hand strength. (She indicates a soft brace on her right hand.)
 
Artisan with art glass
 What kinds of things do you make from art glass?
Pictures, suncatchers, lampshades, wind chimes. Right now I'm working on an abstract sculpture in red, white, and blue.


How does working with fused glass differ from working with art glass?
Fusing glass is much softer than art glass; therefore, it is much easier to cut. It is much less restrictive, too. I put the pieces of glass together the way I want them and let the kiln do the work. You can fire the glass over and over to add or change elements to get the effect you want. It is much more “forgiving” than art glass. I like working with crushed glass and ground glass, called fritt.  Fritt comes in many colors and in sizes all the way from powder to coarse chunks.

Designing a fused glass piece
What kinds of things do you make from fusing glass?
Jewelry, all kinds of bowls and dishes, trays, coasters, Christmas ornaments.

Do you use moulds for some of the work?
Yes. You can use moulds made from any kind of ceramic (bisque-fired) clay. Commercial kitchen equipment suppliers are a good source of metal moulds. These moulds have to be sprayed with a releasing compound so that the glass separates cleanly from the mould. First you heat the glass to a very high temperature. Then you soften it just enough so that it sags (called “slumping”) into the mould. Even if you have fired a piece of glass before, however, you can't be sure how it will come out in the next firing. If I'm not satisfied with the piece, I would rather break it up, melt it, and use it in something new rather than trying to “fix” it.


Blue fused glass dish
Blue fused glass dish, available in our Etsy shop
Where do you get your materials?
I order a lot of it online. I also visit shops that sell glasswork and browse thrift stores and yard sales. I sometimes find pieces of beautiful antique glass that way. I may be called upon to repair a piece of heirloom glass, so I like to have a supply of antique glass on hand. That is not to say that some of those pieces don't become part of my collection. Interestingly, people often just give me glass items.

Is there a modern material that you particularly like?
Yes, dichroic glass. It was developed by the space program. It has both reflective and refractive properties at the same time.

Adjusting the fused glass design
How do you get the ideas and inspirations for your projects?
I have a lot of books and magazine articles on the subject. More and more, however, I prefer to create my own designs and get my ideas from my own observations and environment. If I don't have an idea in mind, I lay out pieces of glass on my workbench, including ones from my “humble” drawer. Working from the outside inward, I arrange and rearrange the pieces, until they begin to “speak” to me. The design evolves from the materials themselves.

That's very interesting. If you read the interviews with our natural-stone jeweler and our quilt-maker (July 1, 2013 and August 16, 2013) , you will find comments along those same lines.
Sometimes it seems that the glass has a mind of its own and simply decides what it wants to be.
I've learned the hard way that fighting it doesn't work.

What is the most satisfying thing about your work?
Teaching. I teach classes in both kinds of glass. A few months ago I taught a class of grandmothers and their grandchildren who were here visiting for the summer. It was fun to watch the two generations interacting with and inspiring each other. It was a delight to see their faces when they came to pick up their pieces that had come out of the kiln. They were so enthusiastic and happy about their work.

Orange fused glass dish
Orange swirl fused glass dish, from our Etsy shop
Is there anything you don't like about the work?
I don't like mass production. I want to make one-of-a-kind pieces or limited sets. Sometimes I have to do production work, but I'll tell you there is a lot of grumbling involved.


You can see some of our artisan's Christmas ornaments in our after-Christmas sale and her other pieces elsewhere in our Etsy shop.

Have a great New Year!
 Annake

fused glass Christmas ornaments
Fused glass gingerbread Christmas ornaments


  Creative Commons LicenseThis post by Annake's Garden is licensed under a Creative Commons Attribution-NonCommercial-ShareAlike 3.0 Unported License.

Sunday, December 15, 2013

A Perky 'Possum Puppet

Little Pink Pig Puppet
Annake with the Little Pink Pig Puppet
'Tis the season ... for craft shows and Christmas bazaars. We have been doing our share of them. The hand puppets are always a popular item. I've been pleased with the number of people who have come up to me to say they enjoyed the story behind the little pink pig. If you have read that blog, (April 17, 2013), you know how I got into making puppets in the first place. I'd always done realistic art work, so making the caricatures that were necessary for a child's puppets was hard for me at first. I wanted to put in too much detail. My class members, who were making most of the puppets, soon convinced me that this was both unnecessary and undesirable!

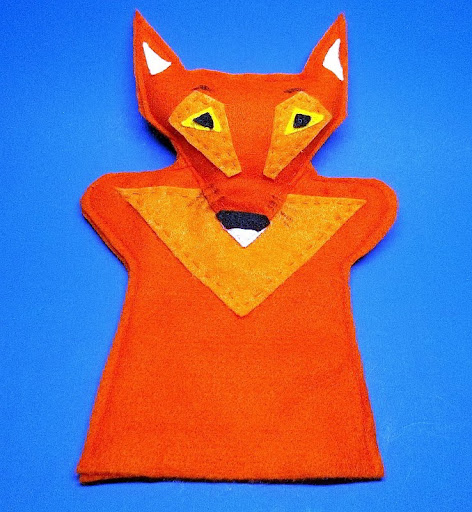
Fox Puppet, Front View
Red Fox Puppet, Front View
The more I worked with the designs, however, the more I enjoyed the cartooning process. Now I design and make puppets for my own enjoyment as much as for that of the children who will eventually receive them. I especially enjoy making animal puppets and giving them “personalities” of their own. They're one of the few items I make more than once. Even then, no two versions of an animal turn out to be exactly alike. For some time I've wanted to make a perky 'possum puppet. (Say that out loud five times quickly!) Let me share the process with you.

Fox Puppet, Back View
Fox Puppet, Back View, showing tail
The most important part of a hand puppet's design is the face. The bodies are pretty standard for animals with paws or hooves, but need to be modified for ones with wings or flippers. I try to make the backs of the puppets interesting, paying particular attention to their tails. The first thing I do is cut out two stock bodies, a front and a back., from the appropriate color of felt --- gray, in this case. The back of the 'possum's body is medium gray and the front is light gray. These pieces have a “wrong” and a “right” side since I adjust the patterns for the fact that a hand's thumb and little finger are joined to the hand at slightly different levels. I have small hands, so a puppet that fits me will work for most children, although it is sometimes necessary to pad the tips of the puppet's “arms” with cotton or fiberfill for very small hands.

Possum Face Sketch
Possum Face Sketch
I make a cartoon sketch of the animal's head, using colored pencils that approximate the colors of felt that I plan to use. Once I have the basic features and have captured the expression that I want, I trace the outline of the head, cut it out, and place it over the front of the body. Sometimes the sketch is too large or too small and has to be adjusted for size. Or I may have to make some small changes so that the left and right sides match. When I'm satisfied with the head shape, I make a new pattern out of a heavier, more durable paper and cut one out of felt. I place one on the front of the body to decide how far it should overlap the “neck” of the puppet, pinning the head in place. I make a second paper pattern for the back of the head, leaving off the “chin” or “muzzle” and rounding off the back of the head where it will overlap the neck in a gentle curve. I cut out the felt for the back of the head and turn it and the back of the body over.

Possum Body and Head Pieces
I match the front and back, wrong sides together, adjusting until they fit exactly. The back is now ready to be sewn together. I mark the position of the head on the front of the body with a couple of small pins. Then I remove the head so that I can put on all the facial features. Some of these are sewn on in layers, while others are drawn with permanent markers.

I wanted my puppet to be a mother opossum with some babies. When I was in college, someone brought our biology class a female opossum that had been hit by a car. There was nothing we could do to save her life, but six of the babies in her pouch were alive and apparently unharmed. Working in shifts around the clock, we fed them with doll's bottles and carried them in our pockets to keep them warm. They gripped our fingers with their tough little tails and dangled underneath our hands. Eventually they were weaned onto solid food and we were able to release them into the wild.

Possum Puppet Pouch Detail
A mother opossum's pouch is a slit that runs along her belly from front to back, with babies tucked in on both sides. If I were making a stuffed animal, I would make it that way, put in a zipper, and stuff it with babies. This wouldn't work for my 'possum puppet, however. So I made a side-to-side pouch like that of a mother kangaroo (another marsupial). When making puppets, I sometimes have to take liberties with Nature.

Possum Puppet Tail Detail
I try to avoid having loose parts on my puppets that a small child might pull off and swallow. That's why I don't use buttons, beads, ball fringe, sequins, etc. Therefore, I chose to applique the “babies” to the mother's body rather than having them loose in her pocket. On the back, I added a long tail for the mother and appliqued a single baby hanging from it. Up to this point, all sewing was done by hand. The two halves of the puppet were sewn together by machine and the head was stuffed lightly with fiberfill.

Opossums are not particularly intelligent, or even attractive, but they are survivors. They have been around much longer than we have, spreading from their original home in South America throughout the United States and well into Canada by now. As scavengers, they are a part of Nature's clean-up crew. I hope this new puppet will help children learn to respect them as much as they do the more “cuddly” creatures. They all have their parts to play in the great scheme of things.

Season's Greetings,

Annake

Finished Possum Puppet
Finished Possum Puppet, Front and Back Views


 Creative Commons LicenseThis post by Annake's Garden is licensed under a Creative Commons Attribution-NonCommercial-ShareAlike 3.0 Unported License.

Thursday, November 21, 2013

Crocheted Trees -- They Aren't Just for Christmas

Colorado Avalanche fan with her tree
There are some craft items I never tire of making, even after several decades of making them. One of these is the tabletop tree. It all began many years ago with two patterns in a McCall's magazine. One pattern was for a little Christmas tree to be made with cotton crochet thread. It was to be crocheted in the round, then partially flattened to be made into a lapel ornament. The second pattern was for a Christmas wreath lapel pin. Considering my preference for yarn over thread, I couldn't help wondering what would happen if I substituted knitting worsted for the thread and the larger aluminum hooks for the smaller steel ones. I couldn't wait to find out, so I collected green yarn and crochet hooks in sizes G through K. I began to experiment and soon had a neat little layered tree shape about 10 inches tall and a wreath between 10 and 12 inches in diameter.

Crocheted Feliz Navidad tree
Crocheted tree for a "Feliz Navidad"
The original tree and wreath were supposed to be starched to make them hold their shape and then be laced onto pin backs from a craft store. That obviously would not work for my yarn creations.
 
My husband volunteered to make a “tree trunk” from a block of wood and a dowel and to bend a wire coat hanger into a circle as a frame for the wreath. He made these items and painted the tree trunk brown. I laced the wreath onto the wire circle and decorated it with small ornaments and a bow. I glued felt to the bottom of the tree base so it couldn't scratch furniture and arranged the crocheted layers an the trunk, decorating them with miniature ornaments. We were both pleased with the results and immediately set to work to produce a tree and a wreath to add to each of his sisters' Christmas boxes.

Crocheted Valentine's Day tree
"Heartwood", a Valentine's Day-themed tree
My best friend was teaching second grade in another state. When she received her Christmas tree, she called me to ask if I could make trees for other holidays that she could display in her classroom. I began collecting tiny items with holiday themes. Eventually I made her trees for Valentine's Day, St. Patrick's Day, Memorial Day, Back-to-School Night, Halloween, and Thanks-giving. I began to make themed trees for relatives, friends, and co-workers. Our children, niece, and nephews graduated from high school and went off to college, military service, marriage and jobs away from home. Each of them needed a “starter” tree for their new beginnings. I made more than a hundred trees in this way and am proud to say no two were ever alike. Trees for the men were always fun. I trimmed them with everything from fishing lures to tiny model cars to dice and poker chips.

Broncos tree
One of several trees made for Broncos fans
Along the way I acquired a son-in-law who is a devoted Denver Broncos' fan and a grand-daughter who is equally loyal to the Colorado Avalanche. Of course they had to have trees in their team colors to decorate with memorabilia. I'm a die-hard Bronco fan myself, so it is a little bit embarrassing to admit that my favorite among the team trees I have made was one that I made recently as a special order for an Oakland Raiders' fan. I did it in black, white, shades of gray and metallic silver and it looked elegant. I'd like to do a Seattle Seahawks' tree because I love their colors.


Undecorated tree with an alternative shape
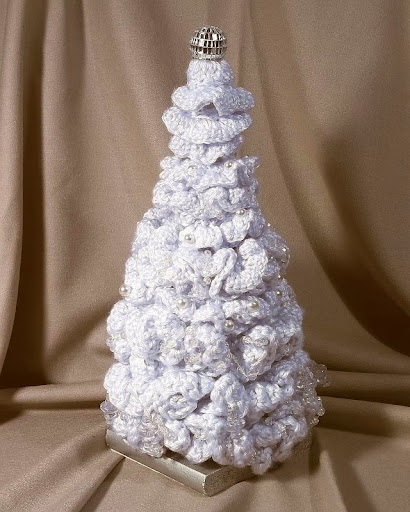
Over time the trees grew larger and more complex. I came up with ways to alter the technique to give me several different tree shapes. I began to get requests for special trees: a baby's first Christmas tree, trees for limited spaces like dorm rooms and suites for assisted living, even a tree to fasten to the dashboard of an RV! A teenager wanted a special tree for her parents' silver anniversary. I made a pair of extra-large, extra-tall trees for a friend who makes fused-glass jewelry. She wanted them to display her handmade earrings at shows. She requested a white tree for displaying predominantly “cool” colors like blues, greens, and purples, and a deep blue tree for “hot” colors like red, orange, and gold. They are easy and safe to transport and it only takes a moment to remove or replace a pair of earrings. She uses them for shows year around, not just during fall and winter holidays.
 
Wedding shower tree
Moonlight on Snow, appropriate for a bridal shower
Small trees like these make nice centerpieces for wedding and baby showers and can then be given to the guest of honor. They are nice for hospital visits, especially for men, who may not care for bouquets of flowers, and for visits to shut-ins. They make thoughtful house-warming and hostess gifts and “bon voyage” gifts for friends or neighbors who are moving away. Other “tree” occasions include: birthday, confirmation, quinceanera, engagement party, silver anniversary, golden anniversary, Mother's Day, Father's Day, graduation, Cinco de Mayo, Fourth of July, and any time a person receives a special honor.

Patriotic crocheted tree
The Patriot, available in our Etsy shop
Speaking of honor, do you know a returning serviceman or servicewoman whom you might thank with a patriotic tree in red, white, and blue? The little trees make nice door prizes. I've even made one to raffle off for a Sons of Norway fundraiser.


I hope you've enjoyed this little stroll through my “forest”. Best wishes,

Annake


Creative Commons License


   This post by Annake's Garden is licensed under a Creative Commons Attribution-NonCommercial-ShareAlike 3.0 Unported License.

Sunday, November 3, 2013

Gobelin Droit and French Longstitch Needlepoint

fir and feathers needlepoint detail
Gobelin stitch (trees), Hungarian stitch (sky), tent stitch (eagle)
Needlepoint (canvas work, Florentine embroidery, tapestry work) became an important industry in the 1500's. A rising middle class was growing rapidly and demanding amenities formerly reserved for royalty and the rich. They wanted wall hangings, bed draperies, and upholstery that looked like hand-woven tapestry, but at a fraction of the cost of those tapestries. The manufacture of needlepoint canvas and the development of a few straight filling stitches made simulated tapestries possible.

Gobelin Droit --- also called upright Gobelin, straight Gobelin, flat Gobelin and a host of other names --- is one of the oldest of those stitches. It belongs to a “family” of stitches that includes brick stitch, Hungarian stitch, Hungarian ground, Parisian stitch, Florentine stitch and Byzantine stitch. It is a straight stitch that may be used vertically or horizontally over a number of canvas threads, but which does not cross canvas intersections in the way that tent stitch does. It is a basic stitch in bargello (see “Bravo Bargello!”) and is extremely important in the development of curving and compound patterns. This is a topic we will return to in a future blog.

bighorn framed needlepoint
Framed needlepoint of a bighorn in French longstitch
Although Gobelin Droit is customarily used in repeating, shaded, geometric patterns, it works just as well in naturalistic designs. It is especially effective when used “freehand” over a varying number of canvas threads. This is how I have used it in my French longstitch compositions. The straight stitches lie parallel to each other, fitting closely side-by-side, very much like satin stitches in traditional embroidery. No canvas should show between the parallel stitches. If it does, you need to use more strands of floss or yarn or use a thicker variety altogether. It is a good idea to work a small swatch of your design on a waste piece of canvas to make sure that your materials cover the canvas entirely. No canvas should show between the rows of stitches, either. If it does, this can be disguised by back-stitching with a strand or two of the same color of floss or yarn. On the other hand, if you want to emphasize the textural effect of the rows of stitches, you can do so by back-stitching with a contrasting color or with metallic thread (see the close-up of “Cascades” on the needlepoint challenge blog post). Stitches may vary in length, but -- unless you are using a very fine canvas with many threads to the inch -- probably should not cross more than eight threads at one time. If the stitches are too long, it is very easy to snag them. This is less crucial if you are making a framed picture, which will not be subjected to a lot of wear and tear, than if you are making a pillow or covering a footstool.

bighorn needlepoint pattern
Downloadable pattern for bighorn needlepoint
To make a French longstitch project, start with a simple design which has some large areas to be filled in. If you are taking our needlepoint challenge, you may already have such a design. Or you may want to download my bighorn design. Trace your design on the canvas with a permanent marker and blot or rub off any extra ink. Tape the edges of the canvas with masking tape to keep the threads from raveling. This also keeps your yarns and flosses from being roughened by contact with the edges of the canvas. Since canvas is harder on threads than other fabrics, it is a good idea to shorten the 18-inch strands we have been using to 16 or even 15 inches in length. Use waste knots to get started and secure the ends of strands under existing stitches on the back of the canvas. It isn't necessary to invest in needlepoint canvas and tapestry yarn to try out this technique. I suggest that beginners start with the most economical materials available to them. If you find out you love the technique and want to keep on doing it, then you can start collecting more expensive materials and tools. Gobelin works well even on plastic canvas with whatever yarn you have. If you knit or crochet -- or know someone who does -- you have access to a wealth of leftover yarns. And you can use them to make a project worth framing, even with such inexpensive materials. You need not tape the edges of plastic canvas so long as the edges are smooth.

Framed needlepoint of a pronghorn in French longstitch
Always begin any stitchery with clean, dry hands. Remove any traces of hand cream or lotion and keep food and drink away from your work area. Assemble all your materials, threading several needles if you have them. I start my stitches at the bottom, pulling the strand all the way through to the front of the canvas, then ending the stitch by pushing the point of the needle down at a canvas space directly above where the stitch began. I then begin the following stitch right next to the first one. This makes stitches which cover both sides of the canvas. Yes, this does use more yarn, but it makes a nicely padded fabric which will last for a long time. Each stitch should just fill the space between the entry and exit points. Stitches should be plump. Do not pull your stitches too tight; this will distort your canvas. If you feel resistance to your stitch, you are trying to pull it too tight. The stitches on each subsequent row should end in the same squares of canvas where the previous stitches began.

Lion needlepoint
Unframed needlepoint of a lion, available in our Etsy shop
Most books will tell you to work your stitches from right to left if you are right-handed and from left to right if you are left-handed., turning your canvas 180 degrees at the end of each row. This is necessary for some stitches, but not ordinarily for these straight ones. I usually work boustrophedon (Greek for “as the ox plows”), meaning I work right to left on one row and left to right on the return row. Try all three ways and use the one that is most comfortable and looks best to you. If you are using Gobelin Droit both vertically and horizontally in the same piece (see the legs on the pronghorn antelope and the bighorn sheep), you may need to insert some tiny stitches where the two meet to keep the canvas from showing through. It can also be very effective to use a tent stitch background for a longstitch picture, as I have done on the lion's head, running the closest tent stitches slightly underneath the edges of the Gobelin stitches. When you are not working on your canvas, roll it up --- don't fold it --- and place it in a plastic bag or zippered case to keep it clean and lint-free.

When you have a pattern you like, file it and keep it. You never know when you might use it again in a totally different way. Happy creating,

Annake

 Creative Commons LicenseThis post by Annake's Garden is licensed under a Creative Commons Attribution-NonCommercial-ShareAlike 3.0 Unported License.

Friday, October 18, 2013

Basic Blackwork, Part 2

Blackwork snail quilt block
Blackwork Snail, ready for use as a quilt block or ??
You may wonder why I'm encouraging you to learn a technique like blackwork. There are a number of reasons, but the first is simple economics. Once you learn a skill like this, you can make beautiful and unique items for your home and family and gifts for friends for a fraction of what it takes to buy mass-produced, machine-made things which don't bear the stamp of your personality at all. A second reason is the satisfaction you can feel after making something that would not even exist were it not for you. For example, I have the satisfaction of knowing that my black cat, surrounded by ruffles, will become a pillow for a little girl who loves cats. The snail and his companions will become blocks in a child's quilt. I will probably never meet the child, but I have the satisfaction of imagining him or her pointing to the blocks and saying “snail,” or “fish'” or “turtle” or “owl”. That satisfaction warms my heart. I'd love for it to warm yours, too.

Simple fish outline
Simple outline of a fish
Ready to start on your blackwork project? Let's go over a checklist to make sure you didn't skip a step. Did you:
  • choose a simple outline pattern and divide it into at least 6 sections?
  • trace the outline on quarter-inch graph paper and mark the center lines?
  • download the chart of diaper patterns?
  • choose a pattern for each section and fill it in on your chart?
  • make a hot iron transfer of your outline (optional)?
  • cut and press 1/4-inch checked gingham and a backing fabric?
  • transfer the outline to the gingham with a hot iron, remembering that it will be reversed (optional)?
  • baste the gingham and backing together and stitch in centering lines?
  • assemble your materials, plus scissors, needle(s), and black floss?
All right. Here we go!

Snail outline via transfer pencil to gingham
Snail outline via transfer pencil to gingham; note reversal
Cut several pieces of the black floss, each no more than 18 inches long. Thread as many needles as you have available. Make a knot in the end of the first strand. This is the only knot you will need. It is called a waste knot. Push your needle down from the top of your fabric several inches outside the outline of your design, so that the knot is on top of the fabric. Work your first stitches. When there are about two inches of floss left in your needle, take the needle through to the back of your fabric and run the remaining floss under completed stitches to secure it. Do this every time. Start the next strand of floss on the back of your fabric by running a couple of inches of it under finished stitches. Bring your needle through to the front of the fabric and start stitching where you left off. Eventually you can cut off the waste knot, draw the floss to the back of the fabric, thread it into a needle and secure it under finished stitches. If it makes you feel more comfortable, use another waste knot when you begin each section of your pattern.

Simple outline of owl
Simple outline of an owl
I start working on my designs at or near the place where the centering lines cross because it makes it easier to follow the chart. You do not have to do this. Choose any of your pattern sections and begin stitching, following the chart of your chosen diaper pattern. Put in all the lines for a square (check) before you move on to the next one. While it is true that the short lines often line up to make longer lines, just do one square of check at a time. Don't extend your stitch into the next square. Make the stitches in each square meet the stitches in the surrounding squares with no background showing between the ends of the stitches. Try not to split the strands of floss on the completed stitch when you join it with a new stitch. Work all the way to the borders of each section. Where you cannot do a complete pattern, do as much of the pattern as you can. Where you cannot put in a complete stitch, do as much of the stitch as you can. When I'm working on a square which contains several stitches, I do them in this order: horizontal (if any), vertical (if any), left-to-right diagonal, right to left diagonal. If a stitch doesn't look right to you, take it out immediately and do it over. This is much easier than trying to “fix”it later.

Stitch pattern chart for fish outline
Be sure you are working through both layers of fabric at all times. Don't let your needle slip in between the two layers. Don't pull your stitches too tight. If you are meeting resistance, you are probably trying to pull the stitches too tight. This will cause the fabric to pucker and make it harder to block the finished project. Check the back of your work occasionally to make sure you aren't leaving loose loops of floss on that side. If you do find a long loop, cut it in half and thread each end under finished stitches. Short loops can be fastened to existing stitches with a tiny crossing stitch so that you don't pull them through to the right side.

Close-up of Black Cat Blackwork, face detail
As your blackwork project nears completion, you have choices in the stitch(es) you use to outline the design and add details or embellishments. I outlined the cat and snail with chain stitch, but could have used back stitch, stem stitch, whipped running stitch, couching or many other stitches. The cat's nose is satin stitch. Its eyelashes are lazy daisy stitch. Its whisker spots and the snail's eyes are French knots. There is a whole encyclopedia of embroidery stitches out there for you to use. If you enjoyed this project, as I hope you did, you may want to try one on smaller “baby check” gingham. Sooner or later, though, we must “take off the training wheels” and move on to more challenging monk's cloth, Aida, and evenweave fabrics. Watch for future blogs about those.

We'd love to see your finished pieces. See “Contact Us” ….................. Have fun!
           Annake

Stitch pattern for Owl outline


 Creative Commons LicenseThis post by Annake's Garden is licensed under a Creative Commons Attribution-NonCommercial-ShareAlike 3.0 Unported License.

Sunday, October 6, 2013

Basic Blackwork, Part 1

(...and now, we return you to our regularly scheduled tutorial series...)


Mouse and tulip blackwork
Student blackwork of a mouse and tulip
Blackwork embroidery may be best known from Hans (the Younger) Holbein's 16th century paintings of English nobles from the reigns of Henry VIII and Elizabeth I. (Don't look at the paintings, yet; they might discourage you from trying a technique that is really fun!) What we are going to do this time is strictly 21st Century, leaning toward making pictures, pillows, quilt blocks, place mats, etc. The original 16th century blackwork was done in black silk and gold thread on white linen. We are going to start with black embroidery floss on quarter-inch checked gingham in your choice of color:  you will need a half-yard of gingham and an equal amount of plain backing fabric -- muslin, interfacing, or something similar. Later, we'll progress to other fabrics and a variety of threads, flosses, and yarns.

Those of you who have become familiar with my work through these blogs know that I like naturalistic depictions. But I also have a whimsical streak, fostered by a lifetime of teaching children and teenagers. Blackwork is a medium which allows and encourages me to be playful.

Black Cat Blackwork
Black Cat Blackwork, modeled on a friend of ours
We are going to work with designs that can easily be divided into sections. The sections are then filled in with a wide range of patterns made (like counted cross-stitch) with short, straight stitches. These repeating patterns are sometimes called diaper patterns. I make my own designs and hope you will try to do so -- eventually, if not now. A good source of simple outline designs is a child's coloring book. A group of panels like the cat and the snail will make an endearing quilt for a child. These simple coloring book designs are perfectly acceptable when you are making projects for yourself and your household or for gifts. If you plan to sell your work at craft shows or in shops, however, do not use any copyrighted materials in your designs. The legal complications can be awful. I will continue to give you suggestions in these blogs for creating your own original designs.

Black Cat Blackwork detail
Black Cat Blackwork closeup, showing pattern detail
Shading in blackwork is done by increasing the density of the stitches. The simpler the pattern, the fewer the stitches and the more background that shows through. These patterns are the lightest in value. As more stitches are added, the pattern becomes more complex and the value becomes darker. Look at the cat done on pink “baby check” gingham. See how the front leg on the far side of the body appears to be darker than the front leg on the near side?

Now you are going to design a project of your own so that you will be all ready to start when this instruction is continued in the next tutorial blog. Choose a simple outline pattern like the black cat or my silly snail and trace it onto quarter-inch graph paper. Or, make up your own design (or use something one of your children drew) and draw it on the graph paper. You should be able to divide your design into at least 6 sections (see the 7 sections on the black cat). Decide where these sections will be. Draw heavy lines in between them on your graph.

Downloadable Diaper Pattern Chart
Now download the diaper pattern chart and print it out. I inked the patterns freehand without a ruler, so they are a little irregular, but you should be able to follow them without any difficulty. Each separate line in a pattern represents a single short, straight stitch and each square on the graph paper represents a square or check on the gingham. Each diaper pattern can be used horizontally, vertically, or diagonally.

Notice how some patterns appear very light, while some are medium in value and others are much darker. Choose a different pattern for each section of your outline. At least one should be very light (see the cat's stomach) and at least one should be very dark (see the cat's front leg on the far side of its body). Copy your chosen designs in the sections of your outline. (You don't need to copy my choices; make your own.) Work all the way to each bordering line, even if it means you can only show part of a stitch. Once your chart is filled in to your satisfaction, you may want to go over it in ink to make it easier to read --- but this is not required. Be sure to draw in the horizontal and vertical centering lines, preferably in another color.

Silly Snail outline and transfer copy
Silly Snail outline and copy in transfer pencil
Want an easy way to transfer your outline to your fabric? Make a hot-iron transfer. Trace your outline on tracing paper with a hot-iron transfer pencil. These red pencils are made by several companies. I use Aunt Martha's, 2 to a package for $2.99. Each pencil will make many transfers. Keep the pencil point sharp and go over the lines firmly until they look dark. Cut and press a piece of quarter-inch checked gingham at least two inches larger on all sides than your outline design. Pin your transfer pattern (red-penciled side down) to the gingham, centering it with the checks. Press the transfer pattern on the back with a hot, dry iron (no steam). Press hard and go back and forth several times, but don't scorch the paper. It takes at least 5 seconds to get a good transfer. Unpin one corner and lift it carefully. Peek under it to see if your lines transferred. If not, re-pin it in the same place and iron over it until they do. Remember that your picture will appear reversed on the fabric, so avoid lettering or anything that looks “wrong” if reversed. The red lines will wash out of the fabric with warm water and a mild detergent once your project is finished.

Snail outline with stitch patterns added
Silly Snail outline with diaper (stitch) patterns added
Whether or not you make a transfer pattern, press your gingham and the material you plan to use to back it. Baste them together around the edges. Run a colored basting stitch through the horizontal and vertical centers of the gingham. I use embroidery floss to do this, so that it will show up on J. D.'s photos, but you can use sewing thread. (See Easy Cross-stitch on Gingham, August 26). Assemble scissors, one or more large-eyed needles, and a few skeins of black embroidery floss (at least 4) and you'll be ready to begin. For those of you who want further instructions and more patterns, we will have those for you in a few days. You will need to refer to your design chart or the diaper pattern chart as you work.

To download the simple diaper pattern chart, or the Silly Snail outline, simply click on the links in this sentence or on the appropriate picture above. Happy designing!

Annake


Model for Black Cat Blackwork
Our model for the Black Cat Blackwork takes a break


 Creative Commons LicenseThis post by Annake's Garden is licensed under a Creative Commons Attribution-NonCommercial-ShareAlike 3.0 Unported License.

Contact Us

Name

Email *

Message *

Blog Archive